
Related Manuals for SCHUNK ROTA THW vario


Summary of Contents for SCHUNK ROTA THW vario
- Page 1 Translation of Original Operating Manual Jaw quick-change with arbor or collet chuck adapter ROTA THW vario Assembly and Operating Manual Superior Clamping and Gripping...
- Page 2 Imprint Imprint Copyright: This manual is protected by copyright. The author is SCHUNK GmbH & Co. KG. All rights reserved. Technical changes: We reserve the right to make technical improvements. Document number: 889033 Version: 01.00 |12/10/2020|en-US Dear Customer Dear Customer, Thank you for putting your trust in our products and our family-owned company, the leading technology supplier of robots and production machines.
-
Page 3: Table Of Contents
6.4 Accuracy classes ..................... 26 6.5 Permitted imbalance ....................26 7 Product description ....................27 7.1 Segmented mandrel ROTA THW vario D ..............27 7.2 Collet chuck ROTA THW vario F ................28 8 Assembly ......................... 30 8.1 Mounting the lathe chuck onto the machine spindle ..........30 8.2 Segmented mandrel ROTA THW vario D .............. - Page 4 12 Spare parts ......................56 12.1 ROTA THW vario 215-62 ..................56 12.1.1 Versions and spare parts, segmented mandrel ROTA THW vario D ... 58 12.1.2 Design and spare parts, collet chucks ROTA THW vario F ......59 13 Assembly drawing ....................60 13.1 ROTA THW vario 215-62 ..................
- Page 5 14.2 Collet chuck ROTA THW vario F ................70 14.2.1 HSW clamping heads for self-turning ............70 14.2.2 Changing device ..................73 14.2.3 Jaw turning rings ..................75 15 Declaration of Incorporation ................... 77 01.00|ROTA THW vario |en-US...
-
Page 6: General Information
Ignoring a safety note such as this will certainly lead to irreversible injury and even death. WARNING Danger to individuals! Ignoring a safety note such as this can lead to irreversible injury and even death. CAUTION Danger to individuals! Non-observance can cause minor injuries. 01.00|ROTA THW vario |en-US... -
Page 7: Applicable Documents
• Catalog data sheet for purchased product * • Calculation of the jaw centrifugal forces, in the chapter "Technology" of the lathe chuck catalog * The documents indicated with an asterisk (*) can be downloaded from schunk.com. 01.00|ROTA THW vario |en-US... -
Page 8: Basic Safety Notes
Only use original SCHUNK spare parts when replacing damaged parts. • Keep this manual accessible to all users at all times. • If transferring the product to a third party, be sure to include this manual. -
Page 9: Inappropriate Use
• The lathe chuck may only be used on machines and facilities that fulfill the minimum requirements of the EC Machinery Directive; specifically, they must have effective technical measures to protect against possible mechanical hazards. 01.00|ROTA THW vario |en-US... - Page 10 • Ensure that the working environment is clean before starting assembly and installation work. • Wear suitable safety boots. • Follow the safety and accident prevention regulations when operating the chuck, especially when working with machine tools and other technical equipment. 01.00|ROTA THW vario |en-US...
- Page 11 Exception: The supporting jaw variant 3 protrudes beyond the chuck base jaw due to its design. In this case, the T-nuts always need to be completely inserted into the groove of the chuck base jaw. 01.00|ROTA THW vario |en-US...
-
Page 12: Notes On Safe Operation
(Golden pin on the chuck's shell). • Jaw lock! The spindle can only be turned when all the chuck jaws have been fitted into the T-slot. This prevents the wedge bars from being brought into the working position without chuck jaws. 01.00|ROTA THW vario |en-US... - Page 13 • It is useful to travel the clamping piston through to its end position several times after 500 clamping strokes, at the latest. (Removed lubricant will be pushed back to the pressure surfaces again so that the clamping force is retained for longer). 01.00|ROTA THW vario |en-US...
- Page 14 • If the clamping device is involved in a collision, it must be subjected to a crack test before using it again. Replace damaged parts with original SCHUNK spare parts. • Renew the chuck jaw mounting screws if there are signs of wear or damage.
-
Page 15: Substantial Modifications
During training and instruction, personnel must only be permitted to work with the clamping device if continuously supervised by a specialist. 01.00|ROTA THW vario |en-US... -
Page 16: Organizational Measures
Only allow specialists to remedy malfunctions. Spare parts Only use original SCHUNK spare parts. Environmental regulations The applicable environmental regulations must be observed for all maintenance and repair work. -
Page 17: Warranty
• Observance of the specified maintenance and lubrication ( 10, Page 49) intervals Parts touching the workpiece and wearing parts are not part of the warranty. Scope of delivery ROTA THW vario 215-62 Flange Bayonet adapter Set of protective jaws Screws ROTA THW vario D... -
Page 18: Screw Torques
M6 M8 M10 M12 M14 M16 M18 M20 M22 M24 M27 M30 Tightening torques 120 160 200 290 400 500 1050 1500 (Nm) Tightening torques for mounting top jaws onto the lathe chuck (screw quality 12.9) Screw size Maximum admissible torque (Nm) 01.00|ROTA THW vario |en-US... -
Page 19: Technical Data
If manual loading is used, set up the jaw position so that there is no risk of injury when inserting the parts. The maximum opening gap must be less than 8 mm when the workpiece is in contact with one of the jaws. 01.00|ROTA THW vario |en-US... -
Page 20: Clamping Force Rpm Diagrams
The chuck is in perfect condition and lubricated with SCHUNK LINOMAX special grease. If one or more of these prerequisites is modified, the graphs will no longer be valid. -
Page 21: Calculating The Clamping Force And Rpm
The sum of the initial clamping force F and the total centrifugal force F is the effective clamping force F (–) for gripping from the outside inwards (+) for gripping from the inside outwards 01.00|ROTA THW vario |en-US... - Page 22 According to VDI 3106: S ≥ 1.5. From this we can derive the calculation of the initial clamping force during shutdown: (+) for gripping from the outside inwards (–) for gripping from the inside outwards 01.00|ROTA THW vario |en-US...
-
Page 23: Calculation Example: Required Initial Clamping Force For A Given Rpm
Calculation example: required initial clamping force for a given Required initial clamping force F for a given RPM n The following data is known for the machining job: • Gripping from the outside in (application-specific) • Machining force F = 3000 N (application-specific) 01.00|ROTA THW vario |en-US... - Page 24 For the centrifugal torque of the top jaw, the following applies: Centrifugal torque for one jaw: The chuck has 3 jaws, the total centrifugal torque is: The total centrifugal force can now be calculated: Initial clamping force during shutdown that was sought: 01.00|ROTA THW vario |en-US...
-
Page 25: Calculation Of The Permissible Rpm In Case Of A Given Initial Clamping Force
The calculated RPM n = 1495 RPM is smaller than the perm maximum permissible RPM of the lathe chuck n = 3200 RPM (see "Lathe chuck data" table Link Futterdaten). This calculated RPM may be used. 01.00|ROTA THW vario |en-US... -
Page 26: Accuracy Classes
6.3, as well as uneven lubricant application. In order to prevent damage resulting from these residual risks, the entire rotor is to be dynamically balanced in accordance with DIN ISO 21940-11. 01.00|ROTA THW vario |en-US... -
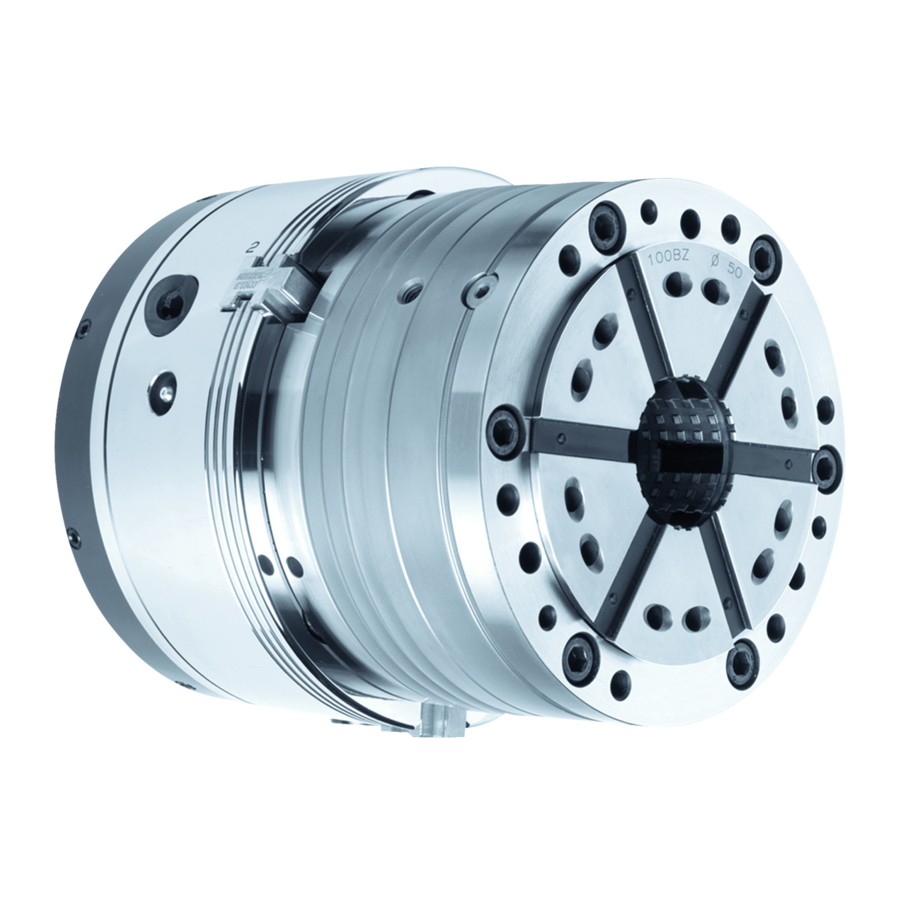
Page 27: Product Description
Product description Product description Segmented mandrel ROTA THW vario D The segmented mandrels are especially suitable for I.D. clamping, where high run-out accuracy is required. The segmented clamping sleeves consist of hardened steel segments vulcanized together. As the functional surfaces are completely ground in a single operation during production, a high degree of run-out accuracy can be guaranteed. -
Page 28: Collet Chuck Rota Thw Vario F
Ø 50 to Ø 80 ±0.35 1 mm increments Collet chuck ROTA THW vario F The collet chucks are especially suitable for clamping, where high run-out accuracy is required. The vario F lathe chuck can be used as a stop chuck for chuck work. - Page 29 Clamping range of the segmented clamping sleeve from Ø 4 to Ø 65 ±0.5 1 mm increments from Ø 5 to Ø 80 ±0.5 1 mm increments from Ø 16 to Ø 100 ±1 1 mm increments 01.00|ROTA THW vario |en-US...
-
Page 30: Assembly
(see Image 6.1). NOTE It is important to make sure that the piston can be moved to the foremost (jaw change) position. To do this, ensure compliance with the dimensions for the attachment (Image 6.1). Image 6.1 01.00|ROTA THW vario |en-US... - Page 31 Ø 74 mm. 8 Screw the lathe chuck tightly to the flange. 9 Check concentricity according to the taper. Alternatively, also possible on the bore diameter Ø 74 mm. 10 Fit the center sleeve. 01.00|ROTA THW vario |en-US...
- Page 32 1, 2 and 3. Check that the base jaw and jaw stroke can easily move. The parts are disassembled in the same way but in the reverse order. 01.00|ROTA THW vario |en-US...
-
Page 33: Segmented Mandrel Rota Thw Vario D
The segmented mandrel vario D is only prepared for use on a ROTA THW vario 215-62 Any other application must be discussed with SCHUNK. The attachment between power chuck and lathe must be prepared for the use by the vario D. - Page 34 (screws: DIN EN ISO 4762 - M10-10.9 tightened to a torque of 53 Nm). The vario component is fixed free from play in the lathe chuck. 6 Change the clamping pressure on the hydraulics to the actuating force of the vario. 01.00|ROTA THW vario |en-US...
- Page 35 120° in each case. Furthermore, concentricity can only be achieved by improved alignment of the power chuck. If necessary, the mounting position of the vario must be marked to a specific position to achieve optimum repeat clamping accuracy. 01.00|ROTA THW vario |en-US...
-
Page 36: Changing The Segmented Clamping Sleeve
M25 x 1 55 Nm 8.2.3 Changing the stops The stops are changed by loosening the 3 mounting screws. Depending on the design, the clamping bolts (item 3) and the segmented clamping sleeve (1) must be removed first. 01.00|ROTA THW vario |en-US... -
Page 37: Disassembling And Assembling The Segmented Mandrel
(item 1). Clean the individual components and check all parts for damage and wear. Only use original SCHUNK spare parts when replacing damaged parts. The segmented mandrel is assembled in the same way, but in reverse order. -
Page 38: Collet Chuck Rota Thw Vario F
Assembly Collet chuck ROTA THW vario F 8.3.1 Mounting the segmented mandrel on the power chuck The collet chuck is delivered ready for assembly. Only accessories, such as the clamping heads, stop, etc. still need to be fitted. The collet chuck vario F is only prepared for use on a ROTA THW vario 215-62. - Page 39 The bayonets can be slid into each other in this position. 5 Turn the vario approx. 60° until the screw threads are positioned coaxially one above the other. 01.00|ROTA THW vario |en-US...
- Page 40 If there is no dirt on the fitting surface, an attempt can be made to obtain an optimum concentricity value by twisting the vario on the lathe chuck by 120° in each case. 01.00|ROTA THW vario |en-US...
-
Page 41: Replacing Vario F Clamping Head
By actuating the changing device, the clamping head (item 1) is compressed in the coupling area. Remove the changing device with the clamping head from the lathe chuck, loosen the changing device and remove the clamping head. 01.00|ROTA THW vario |en-US... -
Page 42: Back Stops
When reworking, care must be taken to ensure that the interior is not penetrated. The openings can cause the collet chuck to become dirty and thus impair its function. If no axial stop is required, the bore should be closed with a locking screw. 01.00|ROTA THW vario |en-US... -
Page 43: Disassembling And Assembling The Collet Chuck
After cleaning and oiling, we recommend storage in a closed box. Clean the individual components and check all parts for damage and wear. Only use original SCHUNK spare parts when replacing damaged parts. The collet chuck is assembled in the same way, but in reverse order. -
Page 44: Function
The chuck piston (item 3) must not be moved as long as the chuck key (item 90) is located in one of the jaw-change bolts (item 8) for the chuck. 01.00|ROTA THW vario |en-US... -
Page 45: Base Jaw Position
(item 3) to its front end position. • Remove the screws (item 43) and use the threaded extraction hole to push off the center sleeve (item 4) away from the chuck body (item 1), and then pull it out completely. 01.00|ROTA THW vario |en-US... - Page 46 For a top jaw width up to For a top jaw width over 22 mm 22 mm Standard (with through- 8703734 88020753 hole) With adjustable stop 8703640 88021182 With ejector 8703637 88021184 With spray nozzle 8703638 88021168 Closed 8703639 88021185 01.00|ROTA THW vario |en-US...
-
Page 47: Disassembling And Assembling The Chuck
(item 4) and the sealing ring (item 32) for the draw tube for damage and wear, and replace it if necessary. A wedge bar (item 9) consists of nine parts in total. Spring tension pre-loads the pressure bolt (item 12) and the pressure pieces (item 01.00|ROTA THW vario |en-US... - Page 48 The pin (item 11) is securely glued into the eccentric bolt (item 10). Clean the individual components and check all parts for damage and wear. WARNING Only use original SCHUNK spare parts when replacing damaged parts! The lathe chuck is assembled in the same way, but in reverse order.
-
Page 49: Troubleshooting
Troubleshooting Troubleshooting 10.1 Segmented mandrel ROTA THW vario D Problem Possible causes Remedy Eccentric dimensional Concentricity error of the Check concentricity at the deviation on the workpiece segmented mandrel outer taper of the mandrel and correct if necessary Not enough clamping force Oversized workpiece... -
Page 50: Collet Chuck Rota Thw Vario F
Troubleshooting 10.2 Collet chuck ROTA THW vario F Problem Possible cause Remedy Chuck head cannot be Insufficient changeover gap changed between clamping head Workpiece-specific stop coupling and workpiece must be reworked stop Eccentric dimensional Check concentricity of the Concentricity error of the... -
Page 51: Maintenance
• The screws secured with sealing wax must not be opened. • When loosening the corresponding screws, they must be engaged alternately to reduce the tension to a minimum! • A particularly cautious approach is required! • Always wear personal protective equipment. 01.00|ROTA THW vario |en-US... -
Page 52: Cleaning
• Move the lathe chuck into the open position. Lubricate the chuck at the three lubrication nipples (Fig. 9.1 Arrow) using a high-pressure grease gun with six strokes of SCHUNK LINOMAX special grease at each nipple. • For optimum grease distribution, the clamping piston must travel the entire clamping stroke several times after lubrication. -
Page 53: Maintenance Plan
If increased wear and tear can be detected during regular checks, shorten the required maintenance intervals according to the actual signs of wear and tear. Contact SCHUNK if you have any questions about maintenance work and intervals. Cleaning interval Maintenance work... - Page 54 • The seals in the segmented clamping sleeve must be checked for damage during the maintenance and cleaning intervals and replaced if necessary. Only use original SCHUNK spare parts. • Depending on the amount of dirt, a complete cleaning of all moving parts should be carried out.
-
Page 55: Technical Condition
• If the clamping force has dropped too far or if the base jaws and clamping piston no longer move properly, the chuck has to be disassembled, cleaned, and relubricated. NOTE Only use original SCHUNK spare parts when replacing damaged parts. 11.6 Changing the stepped jaws When changing the base or stepped jaws, the serration has to be cleaned and greased with SCHUNK LINOMAX special grease. -
Page 56: Spare Parts
Seals, sealing elements, screw connections, springs, bearings, screws, wiper bars and parts that come into contact with the workpiece are not covered by the warranty. 12.1 ROTA THW vario 215-62 Item Designation Quantity Chuck body... - Page 57 Spare parts Item Designation Quantity Pan-head screw Screws, DIN EN ISO 4762-10.9 Vario protective jaw Adapter for bayonet Standard center sleeve Flange Cover Jaw change key 01.00|ROTA THW vario |en-US...
-
Page 58: Versions And Spare Parts, Segmented Mandrel Rota Thw Vario D
Spare parts 12.1.1 Versions and spare parts, segmented mandrel ROTA THW vario D SCHUNK TYPE Chuck mount Vario D 0 with idle stroke 800 701 without idle stroke 800 700 Vario D 1 with idle stroke 800 703 without idle stroke... -
Page 59: Design And Spare Parts, Collet Chucks Rota Thw Vario F
Spare parts 12.1.2 Design and spare parts, collet chucks ROTA THW vario F SCHUNK type Chuck mount Vario F 65 with idle stroke 800 711 without idle stroke 800 710 Vario F 65-51 with idle stroke 800 716 Vario F 80... -
Page 60: Assembly Drawing
Assembly drawing Assembly drawing 13.1 ROTA THW vario 215-62 01.00|ROTA THW vario |en-US... - Page 61 Assembly drawing 01.00|ROTA THW vario |en-US...
-
Page 62: Segmented Mandrel Rota Thw Vario D
Assembly drawing 13.1.1 Segmented mandrel ROTA THW vario D 01.00|ROTA THW vario |en-US... -
Page 63: Collet Chuck Rota Thw Vario F
Assembly drawing 13.1.2 Collet chuck ROTA THW vario F 01.00|ROTA THW vario |en-US... -
Page 64: Accessories
Accessories (with separate order, see catalog) • Proximity switch 14.1 Segmented clamping sleeve ROTA THW vario D 14.1.1 SAD segmented clamping sleeve The SAD segmented clamping sleeves are made of hardened steel and have a Rockwell hardness of approximately 55 HRC. These segmented clamping sleeves can, if necessary, be turned to the desired clamping diameter. - Page 65 200-52 200-62 15 Nm 15 Nm 15 Nm 15 Nm 30 Nm 30 Nm –– 45 Nm The data on max. speed of rotation refer exclusively to the use of segmented clamping sleeves in standard design. 01.00|ROTA THW vario |en-US...
- Page 66 6x slotted Size 3 SB 130RØD SAD 130RØD ABR Ø Clamping area: Ø 50 mm – Ø 80 mm max. speed of rotation: 4200 RPM max. axial tensile force: 25 kN Taper angle: 6° 6x slotted 01.00|ROTA THW vario |en-US...
-
Page 67: Back Stops
It must also be ensured that the inner Ø of the stop is always at least 0.6 mm larger in Ø than the largest Ø of the segmented clamping sleeve. 01.00|ROTA THW vario |en-US... -
Page 68: Mandrex
• The bore tolerance should not exceed 0.3 mm. • The ideal situation is for the workpiece bore to fully cover the MANDREX clamping face. If the workpiece bore is shorter (minimum 1/3 of the clamping face) please inquire. 01.00|ROTA THW vario |en-US... - Page 69 • Disassemble the clamping bolt as previously described. MANDREX cartridge • Screw the supplied extractor into the MANDREX cartridge using an Allen key until the cartridge can be removed from the mandrel body. • Turn the extractor back out of the MANDREX cartridge. 01.00|ROTA THW vario |en-US...
-
Page 70: Collet Chuck Rota Thw Vario F
Accessories 14.2 Collet chuck ROTA THW vario F 14.2.1 HSW clamping heads for self-turning Vario F clamping heads of type HSW are used for superfinishing. Only the taper of these clamping heads is hardened. However, the heads are soft at the front and in the bore and can be turned individually. - Page 71 • For safety reasons, the HSW head may only be turned on a machine with closed protective cover. • HSW heads may only be turned by skilled workers with the appropriate training. 01.00|ROTA THW vario |en-US...
- Page 72 RPM max. tensile force=65,000 max. radial force=150,000 N 6x slotted E = Minimum workpiece clamping length The data on max. speed of rotation refer exclusively to the use of clamping heads in standard design. 01.00|ROTA THW vario |en-US...
-
Page 73: Changing Device
You have 3 different options for this: 1 Manual changing The manual changing device EasyGrip type MQ is the simplest conversion method. The manual changing device EasyGrip type MQQ for narrow machining areas. 01.00|ROTA THW vario |en-US... - Page 74 2 Pneumatic changing The pneumatic changing device type PP is the ultimate choice in terms of handling, with a comfortable handle and integrated valve head. The pneumatic changing device type PPG [size 100-160] has 2 additional handles. 01.00|ROTA THW vario |en-US...
-
Page 75: Jaw Turning Rings
The clamping length should be at least 6 mm. Clamping head HSW 100 BZ Standard bores: Ø 30 mm, 45 mm, 65 mm, 90 mm - for self-turning - front side and soft bore The clamping length should be at least 2 mm. 01.00|ROTA THW vario |en-US... - Page 76 Accessories 01.00|ROTA THW vario |en-US...
-
Page 77: Declaration Of Incorporation
. The declaration is rendered invalid if modifications are made to the product. Product designation: Jaw quick-change chuck with arbor or collet chuck adapter Type designation ROTA THW plus, ROTA THW, ROTA THW-B, ROTA THW vario, ROTA NCW, ROTA NCWF ID no. 0800000, 0800699, 0800100, 0800199, 0800400, 0800500,...
Need help?
Do you have a question about the ROTA THW vario and is the answer not in the manual?
Questions and answers