Advertisement
HELIOTERM INVERTER
CBD 25 - PAINEL DE COMANDO A BORDO
(BASE)
Avisos preliminares
Estas instruções são parte integrante do manual do aparelho
no qual o KIT é instalado. Consulte este manual para as
ADVERTÊNCIAS GERAIS e REGRAS FUNDAMENTAIS DE SEGURANÇA.
Em algumas partes do manual são utilizados os símbolos:
ATENÇÃO = para ações que exigem cautela especial
e preparação adequada.
PROIBIDO
=
para
absolutamente ser executadas.
Versões
Códigos
20116409
CBD 25 - Painel de comando a bordo (BASE)
Montagem e ligações do painel de comando
a bordo da máquina
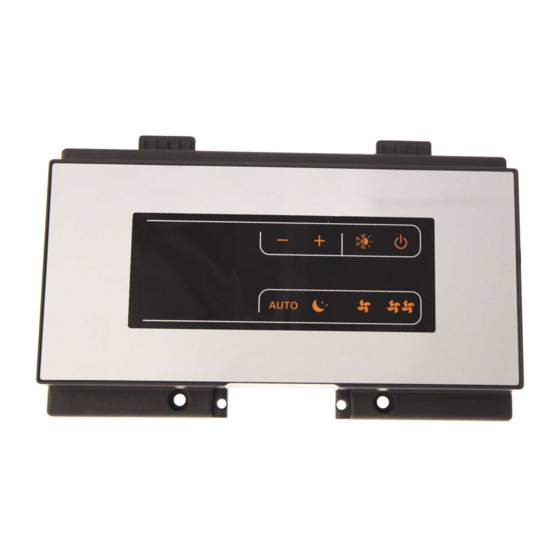
O comando a bordo da máquina é um painel com 8 teclas
capacitivas e ecrã âmbar com a função AUTO (regulação
da velocidade passo a passo). O comando é regulável de
5 a 40 °C, possui um seletor de verão/inverno e através
da sonda de temperatura da água (10 kΩ) posicionada na
cavidade presente na bateria do aparelho, pode gerir a
função de temperatura mínima da água no aquecimento
(30 °C) e máxima no arrefecimento (20 ° C). É adequado
para instalação a bordo da máquina e possui uma saída
de 230 V para o controlo da eletroválvula. Além disso, é
capaz de gerir o atuador para grelhas móveis. A placa
também prevê o funcionamento sem sonda H2, neste
caso, os limites de paragem do ventilador são ignorados.
Montagem
Insira o painel de controlo na respetiva sede, na parte
superior do aparelho e fixe-o com os dois parafusos
fornecidos (ref.A).
Para instalar a caixa das ligações:
abra a caixa (ref.B);
insira o dente inferior na respetiva ranhura (ref.C), na parte
lateral do aparelho;
encaixe a parte superior da caixa na parte lateral (D);
fixe-a com os dois parafusos fornecidos (ref.E);
fixe o cabo de terra (ref.M) à estrutura do aparelho,
utilizando o parafuso fornecido (deve ser aplicada uma
força mínima de aberto de cerca de 2N);
ligue o engate rápido do motor (MOTOR) ao presente na
placa (ref.I) *;
no par de terminais GRID (ref.L) está presente uma ponte
que assegura o funcionamento das versões Design Inverter
e Design Inverter Plus sem microinterruptor. Para as
PT
ações
que
não
devem
CBD 25 - CONTROL PANEL BOARD
(BASE)
Preliminary instructions
This instruction booklet is an integral part of the manual
of the device on which you install the kit. In that manual,
please refer to the WARNINGS and the BASIC SAFETY RULES.
The following symbols are used in this publication:
WARNING = actions requiring special care and
appropriate training.
DO NOT = actions that MUST ON NO ACCOUNT be
carried out.
Versions
Codes
20116409
CBD 25 - Control panel board (BASE)
Machine onboard control assembly and
connecting
The on-board machine control is a panel with 8 capacitive
keys and amber display and AUTO function (ventilation
adjustment) in steps. The control switch can be adjusted
from 5 to 40°C, is equipped with a winter summer selector
and the water temperature probe
well on the battery manages the minimum in heating
(30°C) and maximum in cooling (20°C) functions. Suitable
for on-board installation an provided with a 230V output
for solenoid valve control. Thanks to the additional relay
mounted on the board the actuator for mobile grills. The
board can also operate without a H2 probe, case in which
the fan stop thresholds will be ignored.
Mounting
Place the control panel into its housing in the upper part
of the cooler-convector/cooler-radiator and fix it with the
two supplied screws (ref. A).
To install the connection box:
open the box (ref. B);
insert the lower lug into the special slot (ref. C) on the
side of the appliance;
hook the upper part of the box to the side (ref. D);
fix it with the two supplied screws (ref. E);
fix the earth wire to the cooler-convector/cooler-radiator
structure using the supplied screws (the minimum force
of about 2N must be used when screwing-up);
connect the rapid connector on the motor (MOTOR) to
that on the board (ref. I) *;
the 2 terminals of the GRID clamp (ref. L) feature a jumper
that ensures the operation of the Design Inverter and
Design Inverter Plus versions without microswitch.
1
EN
(10
kΩ) located in the
Doc-0091334 Rev. 0
For
Advertisement
Table of Contents

Related Manuals for Riello CBD 25


Summary of Contents for Riello CBD 25
- Page 1 Versões Versions Códigos Codes 20116409 CBD 25 - Painel de comando a bordo (BASE) 20116409 CBD 25 - Control panel board (BASE) Montagem e ligações do painel de comando Machine onboard control assembly and a bordo da máquina connecting O comando a bordo da máquina é...
- Page 2 HELIOTERM INVERTER outras versões, remova a ponte e ligue os dois terminais The other versions remove the jumper and connect the provenientes do microinterruptor de segurança da grelha*. two terminals from the grid safety microswitch*. ligue o conector da sonda de água (H2) presente no connect the water probe connector (H2) on the Cooler- aparelho.
- Page 3 HELIOTERM INVERTER Configuração das funções auxiliares dip- Setting auxiliary functions dip-switches B switch B e C and C Na placa eletrónica do comando, estão posicionados dois There are two dip-switches on the electronic control panel dip-switches para a configuração do funcionamento do for setting the functions of the appliance as required.
- Page 4 HELIOTERM INVERTER Ligações Connections H2 Sonda de temperatura da água 10kΩ H2 Water temperature probe 10 10kΩ AIR Sonda de temperatura do ar 10kΩ AIR Air temperature probe 10kΩ M1 Motor do ventilador DC inverter M1 Fan motor DC inverter Microinterruptor de segurança da grelha Grill safety micro-switch Eletroválvula de água (tensão de saída de 230 V/ 50 Hz 1 A)
- Page 5 HELIOTERM INVERTER Descrição Description O comando torna a regulação da temperatura ambiente The control makes the room temperature adjustment completamente autónoma (com offset regulável no completely autonomous (with adjustable offset via teclado) graças a 4 velocidades de ventilação e através keyboard) through four speeds by means of aprobe located de uma sonda posicionada na parte inferior do aparelho.
-
Page 6: Key Function
HELIOTERM INVERTER Ícone Icons Supervisão ativa (indicador luminoso intermitente) Supervision on (flashing light) Indicação de alarme (indicador luminoso fixo) Allarm indication (light on) Indicação de painel desligado Panel off indication Indicação de resistência elétrica Resistance enabled indication Função das teclas Key function As várias funções são definidas através das 8 teclas You can set the various functions through the 8 backlit... -
Page 7: Seleção Da Temperatura
HELIOTERM INVERTER Configuração do modo de funcionamento Heating / cooling operation mode setting aquecimento/arrefecimento Tecla Operação Ecrã Operation Display Mantenha a tecla de Aquecimento/ Keep Heating / Cooling pressed Arrefecimento premida durante down for about 2 seconds to switch cerca de 2 segundos para comutar operation mode between... - Page 8 HELIOTERM INVERTER Regulação da velocidade de ventilação Fan speed adjustment Operation Display Tecla Operação Ecrã Attraverso tasti Através teclas, é selezionano modi possível selecionar funzionamento corrispondenti modos funcionamento alle velocità del ventilatore correspondentes às velocidades (automatico, notturno, minimo ventilador (automático, massimo).
-
Page 9: Shutting Down For Long Periods
HELIOTERM INVERTER Desativação Deactivation Tecla Operação Ecrã Operation Display Mantenha tecla “ON stand- Press the ON stand-by for about by” premida durante cerca de 2 2 seconds. When the device is in segundos. A ausência de qualquer De ligado para From “stand-by“... -
Page 10: Error Indications
HELIOTERM INVERTER Sinalizações de erro Error indications Ecrã Display Erro Error Avaria sonda Room temperature probe temperatura ambiente (AIR). fault (AIR). Problemas motor Fan motor fault (for example ventilador (por exemplo, jamming foreign bloqueio devido a corpos bodies or fault in the rotation estranhos, avaria no sensor sensor). - Page 11 Doc-0091334 Rev. 0...
- Page 12 HELIOTERM INVERTER RIELLO S.p.A. - 37045 Legnago (VR) tel. +39 0442 630111 - fax +39 0442 22378 www.riello.it Sendo a nossa empresa orientada por uma política de melhoria contínua de toda a produção, as características estéticas e dimensionais, dados técnicos, equipamentos e acessórios são suscetíveis de variação.
Need help?
Do you have a question about the CBD 25 and is the answer not in the manual?
Questions and answers