
Subscribe to Our Youtube Channel
Related Manuals for Nautilus Hyosung MX7600I


Summary of Contents for Nautilus Hyosung MX7600I
- Page 1 Operator Manual MONiMAX7600I System V01.00.00 (2017.05.16) © Nautilus Hyosung, Inc. All Rights Reserved.
- Page 2 Operator Manual - MX7600I System Version Date Description of Change Chapter V01.00.00 2017/05/16 New Publication © Nautilus Hyosung All Rights Reserved. The content of this specification is protected by copyright laws. 2017.05. 16. 1st Release © Nautilus Hyosung, Inc. All Rights Reserved.
-
Page 3: Table Of Contents
Remove jam from the B2 Upper Transport Path of BM2 ························································· 4-14 Remove jam from B2 Reject Transport Section ···································································· 4-15 Remove jam from B3 Transport Section ·············································································· 4-16 Remove jam from Reject Section ······················································································ 4-17 © Nautilus Hyosung, Inc. All Rights Reserved. - Page 4 Cassette Cover Guide Setting for the Vertical Size of Each Denomination ·································· 5-27 Change Note Index ········································································································· 5-29 Chapter6. Receipt Printer....................... 6-1 Receipt Paper ............................... 6-1 How to load the receipt paper ........................6-2 How to clear jamming in receipt printer ......................6-4 Memo ............................Memo-1 © Nautilus Hyosung, Inc. All Rights Reserved.
-
Page 5: Chapter1. Preface
This manual details how the customers replenish the notes and paper and how they remove the jam at the MX7600I. Audience ▶ Customers and staffs of Nautilus Hyosung who use and operate the MX7600I in each branches of bank. Support Information ▶... -
Page 6: Terminologies
Camera Unit CASSETTE Cash & Check Cassette CCIM Cash & Check In Module Contactless Card Reader Cash Dispenser Unit Control Electronics Earphone Jack Voice Converter for Visually Disabled Persons (ADA) Europay, Mastercard, Visa © Nautilus Hyosung, Inc. All Rights Reserved. - Page 7 Recognition Module REJECT Reject Module RT/A6 Retract & A6 Cassette Switch Separator Control Module Sensor and Indications Unit Service Provider Slip Printer (Receipt Printer) Text Terminal Unit (OPL or SPL) Vacuum Fluorescent Display © Nautilus Hyosung, Inc. All Rights Reserved.
-
Page 8: Safety Precautions (English)
▪ Do not touch the equipment when it is running. ▪ The equipment can get extremely hot and may cause a burn. ▪ Make sure to close the cover before running the equipment. © Nautilus Hyosung, Inc. All Rights Reserved. - Page 9 TYPE. DISPOSED OF USED BATTERIES ACCORDING TO THE INSTRUCTIONS 3. FOR PLUGGABLE EQUIPMENT, THE SOCKET-OUTLET SHALL BE INSTALLED NEAR THE EQUIPMENT AN SHALL BE EASILY ACCESSIBLE 4. THE EQUIPMENT IS TO BE SECURED TO THE BUILDING STRUCTURE BEFORE OPERATION © Nautilus Hyosung, Inc. All Rights Reserved.
-
Page 10: Précautions Pour La Sécurité (French)
• Ne pas retirer le couvercle. Seul le technicien d'entretien est autorisé à ouvrir le couvercle. • Ne pas toucher. Vous pouvez avoir un choc électrique. • Assurez-vous d'éteindre l'appareil lors de l'entretien de l'équipement. © Nautilus Hyosung, Inc. All Rights Reserved. - Page 11 2. RISQUE D'EXPLOSION SI LA BATTERIE EST REMPLACEE PAR UN TYPE INCORRECT. DISPOSER POUR UTILISATION DES BATTRIES SELON LES INSTRUCTIONS 3. POUR LES APPAREILS RACCORDES, LA PRISE DOIT ETRE INSTALLEE PRES D’EQUIPEMENT POUR ÊTRE FACILEMENT ACCESSIBLE © Nautilus Hyosung, Inc. All Rights Reserved.
-
Page 12: Related Document
▪ Installation Manual ▪ Service Manual ▪ VDM Manual (Diagnostic) ▪ Error Code Manual For the contact of maintenance staffs of Nautilus Hyosung, see the E-mail addresses and telephone numbers provided separately. © Nautilus Hyosung, Inc. All Rights Reserved. -
Page 13: Chapter2. Introduction
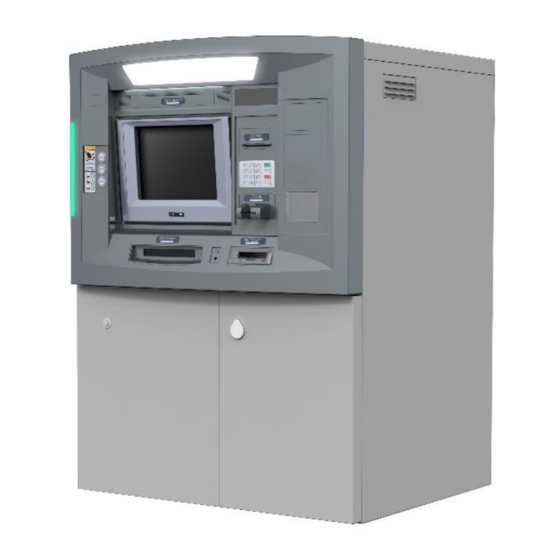
Chapter2. Introduction Chapter2. Introduction About the MX7600I ► The MX7600I is a full service ATM. Consumers deposit the cash/check, make the withdrawal and receive the transaction records through openings in the fascia with MX7600I ATM. The MX7600I is a versatile, easily maintained delivery system that can be modified to keep pace with the bank's changing needs. -
Page 14: The Exterior Overview
Chapter2. Introduction Operator Manual The Exterior Overview ► The following picture shows the front of MX7600I and key units. The fascia provides the interface between the customer and MX7600I. The customer selects transactions and requests information at the fascia. Statement Printer Slot (Optional) -
Page 15: Basic Features
▶ Important features of the MX7600I is highlighted in the following list: <Note!> 1. Your MX7600I may not contain all the devices described in this section. Some devices are optional and some devices cannot be used in combination with other devices (mutually exclusive combinations). - Page 16 1 Check : - Seconds Deposit 5 Notes & 2 Checks Time : Less than 30 Seconds 25 Notes & 25 Checks : : Less than 30 Seconds Storage 1 Sheet : - Seconds © Nautilus Hyosung, Inc. All Rights Reserved.
- Page 17 Dimension (H X W X D) About 1,591 X 1,048 X 950 (mm) Install Method Anchor Weight About 1220Kg Dimension Battery System Battery Alarm Battery Option & Heater 3 Heater Environment (Upper/Bottom Left/Bottom Right) © Nautilus Hyosung, Inc. All Rights Reserved.
-
Page 18: Devices Of Mx7600I
USB HUB used to communicate with several devices such as a cash dispenser, card reader, receipt printer and EPP. Basic Specification & Sample Picture © Nautilus Hyosung, Inc. All Rights Reserved. -
Page 19: Customer Display & Keypad
The customer selects from the choices shown on the consumer display and presses the corresponding function key. A touch screen display eliminates the need for function keypads. Basic Specification & Sample Picture Encryption Teller Display Customer Display PIN Pad with Touch Screen © Nautilus Hyosung, Inc. All Rights Reserved. -
Page 20: Cash Dispenser Unit
ATM, where the customer can receive it. If the media is too mutilated or wrinkled to dispense, or if a multiple pick occurs, the dispenser sends the notes to the reject/retract cassette. Basic Specification & Sample Picture © Nautilus Hyosung, Inc. All Rights Reserved. -
Page 21: Card Reader
ATM card in the card entry slot and then removes the card to begin the transaction. The dip card reader can read magnetic stripe cards and memory chip cards. The dip card reader cannot retract, capture, or retain cards. Basic Specification & Sample Picture © Nautilus Hyosung, Inc. All Rights Reserved. -
Page 22: Receipt Printer
ATM number and location, and other desired information. After the consumer uses the ATM, a printed record of the transaction information is presented through the appropriate printer slot. Basic Specification & Sample Picture 2-10 © Nautilus Hyosung, Inc. All Rights Reserved. -
Page 23: Cash & Check Inert Module (Ccim)
It enables cash deposit and automated check handling. Banknotes and checks deposited by the customer are stored in cassettes. The type of document for each cassette is defined on the basis of the bank's application. © Nautilus Hyosung, Inc. All Rights Reserved. 2-11... -
Page 24: Power Supply
► The power supply unit converts AC power to DC power and provides that voltage to various modules within the system. The power supply unit allows the user to turn on/off the system, enter power-failure mode, and perform other sequences. 2-12 © Nautilus Hyosung, Inc. All Rights Reserved. -
Page 25: Heater
On the contrary, if the detected temperature is higher than the setting temperature, heater drive will be blocked. There are no operator maintenance requirements for the heater. © Nautilus Hyosung, Inc. All Rights Reserved. 2-13... -
Page 26: Safety & Security
Safety & Security Item Specification Sample Picture Safety UL 291 Level-1 Body Cover Steel Locking device Cencon Lock Dual Combo Lock, Single Combo Lock Option Key Lock Common Key (Side & Rear Door) 2-14 © Nautilus Hyosung, Inc. All Rights Reserved. - Page 27 Chapter2. Introduction Alarm Dual Seismic + Heat Sensor Security Terminal Block (External I/F) Camera CCD Camera Camera I/F Video Port /w Pig Tail for internal Video Power /w Pig Tail for Cam © Nautilus Hyosung, Inc. All Rights Reserved. 2-15...
-
Page 28: Chapter3. For The Beginning Operator
1. Open the lower front door with key. 2. Insert the key into the lock on the upper front hatch and turn the key clockwise Then open the upper front hatch pulling it upward. © Nautilus Hyosung, Inc. All Rights Reserved. -
Page 29: Closing Upper & Lower Front Body
3. Do not hold the following position when closing the front hatch. Check the label on the front. CAUTION Be careful not to hurt your head when opening and closing the front hatch or during maintenance. Be careful not to knock your head against a tilt!! © Nautilus Hyosung, Inc. All Rights Reserved. -
Page 30: Opening The Security Enclosure
1. Unlock the security door, refer to the relevant instructions detailed under “Opening/ Closing The Security Enclosure (Security Door)” for the configuration of MX7800I 2. Turn and pull the Handle. Cencon Lock Handle (Dual Combo/Single Combo lock option) © Nautilus Hyosung, Inc. All Rights Reserved. -
Page 31: Switching Power On/Off
<System Off> procedure starts and only [AC IN] LED is turned on. ▪ In case power failure occurs during normal system operation, the system will enter <Power Failure Mode> and only [DC OUT] will be turned off. © Nautilus Hyosung, Inc. All Rights Reserved. -
Page 32: Locking Devices
CW = Clockwise; CCW = Counter Clockwise 2. Enter the factory combination of 50-25-50 by sequentially pressing those six buttons. The LCD will display the entered number. © Nautilus Hyosung, Inc. All Rights Reserved. - Page 33 3. When the combination has been correctly entered, the LCD will read “OPr” meaning “Open right.” 4. Turn the dial right (CW) until it stops. The lock’s bolt is now retracted and the lock is open. 5. Turn the handle and open the security door. © Nautilus Hyosung, Inc. All Rights Reserved.
- Page 34 The best thing to do in analyzing the lock level is to write down the entire string and then pick out the portions of it that are significant to you, or if you are experiencing a problem with the lock, report the entire string to the Tech Support group. © Nautilus Hyosung, Inc. All Rights Reserved.
- Page 35 Turn the Dial to the left (CCW) to extend the bolt. 7. Power Lock Turn the dial to the left (CCW) until (the Change Key symbol along with Enter Combination) is displayed. © Nautilus Hyosung, Inc. All Rights Reserved.
- Page 36 15. OPr Retract Bolt Turn the Dial to the right (CW) to retract the bolt. 16. Close Door 17. Extend Bolt Turn the Dial to the left (CCW) to extend the bolt. © Nautilus Hyosung, Inc. All Rights Reserved.
-
Page 37: Electronic Lock
▪ Use one (1) 9-Volt alkaline battery in the Small Battery Box or six (6) “C” cell alkaline batteries in the Large Battery Box. It is recommended that batteries be replaced at least once a year. If the battery is depleted and will not allow the lock to open: 3-10 © Nautilus Hyosung, Inc. All Rights Reserved. - Page 38 3. Remove the six old “C” cell alkaline batteries. 4. Insert six new “C” cell alkaline batteries 5. Replace the cover and test the lock several times before closing the door. © Nautilus Hyosung, Inc. All Rights Reserved. 3-11...
-
Page 39: Environment
2. Use the following tips to minimize device exposure. Close (but do not lock) the upper chassis when using the operator's interface to perform routine maintenance sessions (use the keyboard outside of the terminal). 3-12 © Nautilus Hyosung, Inc. All Rights Reserved. -
Page 40: Chapter4. Cash & Check Insert Module (Ccim)
In case of the transaction cancellation, cash and check in reject section is ejected to the customer in a lump by the command of higher rank. BC (Bill Checker) This section verifies the image data on both sides of cash for identification © Nautilus Hyosung, Inc. All Rights Reserved. - Page 41 Cash and check received are stored in the cassette by sheets. The cassettes can be mounted or demounted from the unit with the key. And also cassette’s door can be opened using the key. © Nautilus Hyosung, Inc. All Rights Reserved.
-
Page 42: Basic Specification Of Cash & Check In Module
USB1.1 (Full-Speed) USB2.0 HUB Interface Control TM Use External Storage, Program Loading on flash Memory by SP Remote Download It is the reference value when the thickness of bill used is 0.1mm. © Nautilus Hyosung, Inc. All Rights Reserved. -
Page 43: Specification Of External Appearance
Length: 162 ± 2 (mm) (Cash&Check) Height: 310 ± 2 (mm) Weight 4.5Kg(except Cash&Check weight) RT/A6 Dimensions Width: 274 ± 2 (mm) Cassette Length: 169 ± 2 (mm) Height: 62 ± 2 (mm) Weight 1.1Kg(except Cash&Check weight) © Nautilus Hyosung, Inc. All Rights Reserved. -
Page 44: Cash & Check Conditions
Operator Manual Chapter4. Cash & Check Insert Module (CCIM) Cash & Check Conditions ▶ Please refer to “Bill Conditions” in the section of the Cash Dispenser. © Nautilus Hyosung, Inc. All Rights Reserved. -
Page 45: How To Remove Jam From Each Section
BOTTOM Module includes CASH CASSETTE Module and CHECK CASSETTE Module. Zone Abbreviation Description ① BUNDLE Bulk Note Separation Module ② Separator Control Module ③ Bill Checker ④ Alignment Module ⑤ RECOG Recognition Module © Nautilus Hyosung, Inc. All Rights Reserved. - Page 46 ⑪ B4 GUIDE B4 Guide of Body Module1 ⑫ ESCROW Escrow Module ⑬ RT/A6 Retract & A6 Cassette ⑭ CASSETTE1 Cash Cassette ⑮ CASSETTE2 Check Cassette ► Open Status of Unit Transport Path © Nautilus Hyosung, Inc. All Rights Reserved.
-
Page 47: Remove Jam From Bundle Module
1. After opening the Bundle Module and SCM, remove a jammed note. If necessary, turn the green Knob 1 to move the note to easily remove the jammed note. Removing jam from Bundle Module. Removing jam from Bundle Module. © Nautilus Hyosung, Inc. All Rights Reserved. -
Page 48: Remove Jam From The First Transport Path
3. After checking if the jammed bill is removed, completely close the First Transport Path pushing the lock lever in the yellow arrow direction as shown in the picture. Opening SCM to remove jam. Closing SCM after removing jam. © Nautilus Hyosung, Inc. All Rights Reserved. -
Page 49: Remove Jam From Bc
3. After checking if the jammed Note is removed, completely close the BC section by pushing the lock lever in the yellow arrow direction as shown in the picture. Opening BC (Zone ③) to remove jam. Closing BC after removing jam. 4-10 © Nautilus Hyosung, Inc. All Rights Reserved. -
Page 50: Remove Jam From Alg
Note as shown in the picture below. 3. After checking if the jammed Note is removed, completely close the ALG section. Opening Zone ④ to remove jam. Turning the green knob to remove jam. © Nautilus Hyosung, Inc. All Rights Reserved. 4-11... -
Page 51: Remove Jam From Recog Transport Section
Note as shown in the picture below. 3. After checking if the jammed Note is removed, completely close the Recog Transport Section. Pushing the lock lever to open Zone ⑤. Opening or Closing Zone ⑤. 4-12 © Nautilus Hyosung, Inc. All Rights Reserved. -
Page 52: Remove Jam From The B2 Upper Transport Path Of Bm2
3. After checking if the jammed Note is removed, completely close Zone ⑥ as shown in the picture. Pushing the lock lever to open Zone ⑥. Opening or Closing Zone ⑥. © Nautilus Hyosung, Inc. All Rights Reserved. 4-13... - Page 53 3. After checking if the jammed Note is removed, completely close Zone ⑥ as shown in the picture. Pushing the lock lever to open Zone ⑥. Opening or Closing Zone ⑥. 4-14 © Nautilus Hyosung, Inc. All Rights Reserved.
-
Page 54: Remove Jam From B2 Reject Transport Section
Section as shown in the picture. 4. If it is necessary to remove the inside jam of ALG, open the ALG guide as shown in the picture. Pushing the lock lever. Opening Zone ⑦-1, ⑦-2. © Nautilus Hyosung, Inc. All Rights Reserved. 4-15... -
Page 55: Remove Jam From B3 Transport Section
Note as shown in the picture below. 3. After checking if the jammed Note is removed, completely close Zone ⑧ as shown in the picture. Opening Zone ⑧ Closing Zone ⑧ 4-16 © Nautilus Hyosung, Inc. All Rights Reserved. -
Page 56: Remove Jam From Reject Section
Note as shown in the picture below. 3. After checking if the jammed Note is removed, completely close the door. Removing jam from Reject Section. © Nautilus Hyosung, Inc. All Rights Reserved. 4-17... -
Page 57: Remove Jam From B3 Escrow Transport Section
Note as shown in the picture below. 3. After checking if the jammed Note is removed, push the green button and completely close Zone ⑩ as shown in the picture. Opening Zone ⑩ Closing Zone ⑩ 4-18 © Nautilus Hyosung, Inc. All Rights Reserved. -
Page 58: Remove Jam From B4 Transport Section
3. After checking if the jammed Note is removed, push the green button and completely close Zone ⑪ as shown in the picture. Opening Zone ⑪ Closing Zone ⑪ © Nautilus Hyosung, Inc. All Rights Reserved. 4-19... -
Page 59: Remove Jam From Escrow
5. And then come out one note from the escrow module. And remove the note as shown in lower figure. If necessary, repeat it to end. Finally turn the Lock Lever8 to “CLOSED” position. Removing jam from Escrow Removing note from Escrow 4-20 © Nautilus Hyosung, Inc. All Rights Reserved. -
Page 60: Remove Jam From Rt/A6 Cassette
4. After removing jam, close the door and turn the key to the left. And then it is locked. 5. To mount RT/A6 Cassette, turn the key to the left and remove it. Then mount the RT/A6 Cassette. (Auto-locking mounting) Moving BM3 Separating Retract BOX Removing jam from Retract © Nautilus Hyosung, Inc. All Rights Reserved. 4-21... - Page 61 Chapter4. Cash & Check Insert Module (CCIM) Operator Manual Opening or closing the door of Retract BOX Removing jam from Retract Section 4-22 © Nautilus Hyosung, Inc. All Rights Reserved.
-
Page 62: Remove Jam From Cassette
3. After removing jam, close the door and turn the key to the left. And then it is locked. 4. To mount the Cassette, turn the key to the left and remove it. Then it is mounted automatically. Front View of Cassette Section. Separating the Cassette. © Nautilus Hyosung, Inc. All Rights Reserved. 4-23... - Page 63 Removing jam from cassette section. Turning the key to the right to open the door and turning the key to the left to close the door. Pressing the green lever to drop down the Push Plate. 4-24 © Nautilus Hyosung, Inc. All Rights Reserved.
-
Page 64: How To Change Prt Maintenance Module
※ After replacing Ink Cartridge, you have to reset "PRT Cartridge Count". And you may need to replace Ink Head Cleaner Felt if necessary Installing Ink Cartridge © Nautilus Hyosung, Inc. All Rights Reserved. 4-25... -
Page 65: How To Reset Prt Cartridge Count
3. Press the green button on PRT capping module installed BM3 for 3 seconds as shows the picture (Pressing the green button). 4. Push down DIP Switch 1 DIP Switch 1 Pressing the green button 4-26 © Nautilus Hyosung, Inc. All Rights Reserved. - Page 66 4.5 million, it will be displayed in red. And you have to replace the Ink Cartridge. < Note! > Ink Count Clear is Available since V01.00.54 of VDM and V02.00.35 of firmware. © Nautilus Hyosung, Inc. All Rights Reserved. 4-27...
-
Page 67: How To Replace Ink Head Cleaner Felt
3. After replacing the new one by removing the tape, assemble the felt unit in the reverse process Dissembling the Felt Unit Replacing Ink Head Cleaner Felt 4-28 © Nautilus Hyosung, Inc. All Rights Reserved. -
Page 68: Chapter5. Cash Dispenser
2. Bill has sufficient life or sizing to be handled easily 3. Bill which can be manually held straightly when one end is held by a hand and the bill is slightly curved vertically. © Nautilus Hyosung, Inc. All Rights Reserved. -
Page 69: Unacceptable Condition
Operator Manual Unacceptable condition ▶ 1. Bill with serious wrinkles, torn or broken section wherein paper fiber is broken and separation begins. ▪ Wrinkle Wrinkle ▪ Torn Torn ▪ Broken section Broken Section © Nautilus Hyosung, Inc. All Rights Reserved. - Page 70 4. Bill ragged and cannot be held straightly when one end is supported by a hand 20mm (0.79inch) 35mm (1.38inch) When the bill is held by 20mm (0.79inch) and the straightness of the bill is 35mm (1.38inch) or less, it cannot be used © Nautilus Hyosung, Inc. All Rights Reserved.
- Page 71 Chapter5. Cash Dispenser Operator Manual 5. Bill with cellophane tape, scotch tape, etc Tape 6. Bill with folds Fold 7. Gradually curved bill (bills tied by hand seal, etc) Band seal © Nautilus Hyosung, Inc. All Rights Reserved.
- Page 72 Operator Manual Chapter5. Cash Dispenser 8. Bill with folded lines Case 1 Case 2 Case 3 <Note!> Bill distortion should not exceed 10 mm (0.39inch). © Nautilus Hyosung, Inc. All Rights Reserved.
-
Page 73: How To Replenish The Cash Cassette
2. Place the cash cassette on a flat level platform and turn the green lever clockwise to unlock a cassette cover. Then lift up the cassette cover. <Note!> 1) Completely open the cassette cover as picture below when replenishing a cash cassette. © Nautilus Hyosung, Inc. All Rights Reserved. - Page 74 3. Pull black push-plate back completely until it is locked against the cash plate latch. 4. Pull the Push-Plate after pressing the Green Color Button ( 5. Set the bills and push the Push-Plate to the location where the bills are set. © Nautilus Hyosung, Inc. All Rights Reserved.
- Page 75 4) Place the bills correctly. 6. Turn the green lever clockwise and completely close the cassette cover. <Note!> 1) If you have the key type cassette, close the cassette cover using the key like the picture below. © Nautilus Hyosung, Inc. All Rights Reserved.
- Page 76 7. Holding a cassette handle with one hand and supporting the cassette from the bottom with the other hand, place the cassette carefully on the set guide of the CDU and push it completely until it is locked in place. © Nautilus Hyosung, Inc. All Rights Reserved.
-
Page 77: How To Empty The Reject/Retract Box
1. Push the lever (A) and holding a Reject/Retract Box handle (B) with the other hand pull out slightly, and support the Reject/Retract Box from bottom with the hand pushed the lever (A), and pull out to the end of the cassette. 5-10 © Nautilus Hyosung, Inc. All Rights Reserved. - Page 78 3. Remove both rejected and retracted bills from the box. Push the edge of transparent component when remove retracted bills. PRE CAUTION: Don’t recycle rejected bills any more. Doing so will cause not only the same reject © Nautilus Hyosung, Inc. All Rights Reserved. 5-11...
- Page 79 4. Use the reverse order of 1)~3) to put Reject/Retract Box together into cash dispenser again. The Reject/Retract Box must be fully inserted. Otherwise, it will happen problems and the error code will display at monitor promptly. 5-12 © Nautilus Hyosung, Inc. All Rights Reserved.
-
Page 80: How To Clear Jamming In Cash Dispenser
Any branch personnel should not attempt to remove any jams without first powering down the ATM. 2. Undock the CDU and slide out completely. Then perform the following steps for each case to clear the obstruction. © Nautilus Hyosung, Inc. All Rights Reserved. 5-13... -
Page 81: Remove Jam From The Upper Horizontal Transport Path
1. Pull the lever with both hands while pressing it inward and then remove the bill. 2. Pull the lever with both hands while pressing it inward (see the picture of 1)) and lift up E part as the below picture. Then remove the jammed bill. 5-14 © Nautilus Hyosung, Inc. All Rights Reserved. - Page 82 3. Put down the E part and press the D part in the direction of arrow until it fixes. CAUTION: DO NOT put down the E part after first closing the D part. © Nautilus Hyosung, Inc. All Rights Reserved. 5-15...
-
Page 83: Remove Jam From The Vertical Transport Path
1. Pull the green lever of the bottom with lifting it up and open the part. Then remove the bill. 2. Press the lever with hand as the below picture until the F part fixes. 5-16 © Nautilus Hyosung, Inc. All Rights Reserved. -
Page 84: Remove Jam From The Carriage
1. Rotate the carriage by turning the knob (G) and remove the jammed bill. 2. After removing the jammed bill, turn the knob ( ) and return the carriage to the original position. © Nautilus Hyosung, Inc. All Rights Reserved. 5-17... -
Page 85: Remove Jam From The Transport Path Of The Main Body
2. Lift up the carriage with hand and move it to the throat. 3. Turn the knob (G) and move the jammed bill to the location to clear it easily. Then remove the jammed bill. 5-18 © Nautilus Hyosung, Inc. All Rights Reserved. -
Page 86: Remove Jam From The Transport Path Of Rj/Rt Box
Remove jam from the transport path of RJ/RT box ▶ Remove jam from the transport path of RJ/RT box 1. Demount the Reject/Retract Box. (Refer to “How to empty the Reject/Retract Box.”) 2. Remove the jammed bills. © Nautilus Hyosung, Inc. All Rights Reserved. 5-19... -
Page 87: Remove Jam From The Separation Part
Remove jam from the separation part ▶ Remove jam from the separation part 1. Demount the cassette. (Refer to “How to replenish the Cash Cassette.”) 2. Remove the jammed bill as shown in below picture 5-20 © Nautilus Hyosung, Inc. All Rights Reserved. -
Page 88: Remove Jam From The Transport Path Of Reject
2. If turning the Knob (H) counterclockwise, the jammed bill will move in the direction of the Transport Path. 3. If turning the Knob (H) clockwise, the jammed bill will move in the direction of the RJ/RT Box. © Nautilus Hyosung, Inc. All Rights Reserved. 5-21... -
Page 89: How To Reset Main Board
Chapter5. Cash Dispenser Operator Manual How to Reset Main Board ▶ How to Reset Main Board 1. Press the hole in the red circle with a stick and reset. 5-22 © Nautilus Hyosung, Inc. All Rights Reserved. -
Page 90: How To Set The Cassette For Each Denomination
Push Plate and take it out with the other hand. Also take out the Push Plate on the other side in the same way. 3. Completely take out the Push Plate and gently place it inside the box. © Nautilus Hyosung, Inc. All Rights Reserved. 5-23... - Page 91 5. After taking out the Hook Part, push the Guide in the direction of yellow arrow and take it out. 6. Remove current 6 LOWER NOTE SPACER as shown in below. Press HOOK in the green arrow and pull up the Spacer. 5-24 © Nautilus Hyosung, Inc. All Rights Reserved.
- Page 92 Recommended spacer for note size 8. For the desired denomination size, mount the Guide matching it with the white line. Press it until clicking sounds. (Mount the remaining guide in the same way.) © Nautilus Hyosung, Inc. All Rights Reserved. 5-25...
- Page 93 Operator Manual 9. Vertically insert two kinds of Shaft and turn the hand holding the Push Plate. 10. Then chck whether A Shaft matches the white arrow. (The other side is same.) 5-26 © Nautilus Hyosung, Inc. All Rights Reserved.
-
Page 94: Cassette Cover Guide Setting For The Vertical Size Of Each Denomination
2. Also unfasten the Hook on the other side in the arrow direction and completely take out the Guide pulling it in the C direction. 3. Remove 6 Upper note SPACER. Then lift up HOOK and pull out Spacer from guide © Nautilus Hyosung, Inc. All Rights Reserved. 5-27... - Page 95 However, be sure to push it after matching the height of the other side of the Guide. 6. After also matching the other side of the Guide with the height of the desired bill size, push it with both hands until the Hook is caught. 5-28 © Nautilus Hyosung, Inc. All Rights Reserved.
-
Page 96: Change Note Index
1. After change, Change the denomination label 2. After adjust cassette have to change assigned denomination value in Supervisor mode. <Note!> To assign new denomination in supervisor mode, please contact software develops part or Technical Support Center. © Nautilus Hyosung, Inc. All Rights Reserved. 5-29... -
Page 97: Chapter6. Receipt Printer
8. Make sure the paper is rolled evenly. 9. Miscellaneous: If the paper comes in contact with carbon copy paper or if the paper surface is scratched with a metallic object, de-coloring may occur. © Nautilus Hyosung, Inc. All Rights Reserved. -
Page 98: How To Load The Receipt Paper
2. Retract printer assembly from the rail assembly. This can be accomplished by pressing the green button and then pull out the printer towards you. 3. Insert the paper axis into the center of receipt roll and mount it onto the charger. © Nautilus Hyosung, Inc. All Rights Reserved. - Page 99 <Note!> Refer to diagram stickers placed on either side of the center section of the thermal printer. © Nautilus Hyosung, Inc. All Rights Reserved.
-
Page 100: How To Clear Jamming In Receipt Printer
Thermal Print Head (TPH) is closed. When finished loading paper, close the Front Panel and remove the key. <Note!> After all paper jams have been cleared, reinstall the paper and test the printer using Diagnostics. © Nautilus Hyosung, Inc. All Rights Reserved. -
Page 101: Memo
Operator Manual Memo Memo © Nautilus Hyosung, Inc. All Rights Reserved. Memo-1...
Need help?
Do you have a question about the MX7600I and is the answer not in the manual?
Questions and answers