Table of Contents
Advertisement
Quick Links
What's in box
Without "Quick Start", The package includes the following items:
1
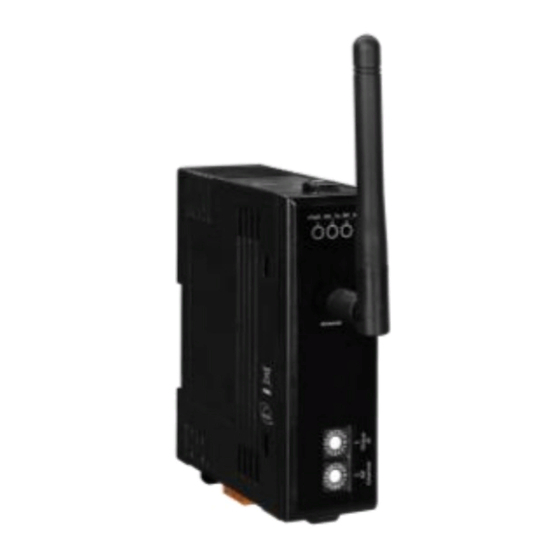
Appearance
Technology support:service@icpdas.com
iWSN-2200-E Quick Start
iWSN-2200-E
(includes antenna)
○
1
○
2
○
3
○
4
○
5
Screw Driver
(1C016)
Number
Instructions
1
Antenna connector
2
(type RP-SMA)
Rotary switch of
3
Communication
parameter setting
Terminal and
4
Ethernet port
(RJ-45 interface)
DIP switch of
5
operation mode
v1.00, Mar. 2019
P1
Advertisement
Table of Contents

Subscribe to Our Youtube Channel
Related Manuals for ICP DAS USA iWSN-2200-E


Summary of Contents for ICP DAS USA iWSN-2200-E
- Page 1 Quick Start v1.00, Mar. 2019 What’s in box Without “Quick Start”, The package includes the following items: iWSN-2200-E Screw Driver (includes antenna) (1C016) Appearance ○ Number Instructions ○ LED indicators Antenna connector ○ (type RP-SMA) Rotary switch of Communication ○...
- Page 2 Pin assignments Number Name Instructions +10V~+30VDC Ground F.G. Shield ground Switch Instructions Init Initial mode Run mode Communication Parameter Rotary Instructions switch 0 ~ F = ch 0 ~ ch F Channel Group 0 ~ 7 = GID 0 ~ GID 7 8 ~ F = Reserved, fix GID 0 Technology support:service@icpdas.com...
- Page 3 Confirm both firewalls of Windows and Anti-virus has closed or correct setting in your computer to avoid “Search Servers” function in chapter 6 can’t search to iWSN-2200-E. (Please conform to your administrator) B. Connecting iWSN-2200-E and computer to same Hub/Switch or same sub network.
- Page 4 ICP DAS website as below link: http://ftp.icpdas.com/pub/cd/tinymodules/napdos/software/esearch/ B. Double click the eSearch Utility shortcut icon in desktop. C. Click “eSearch Servers” button to search your iWSN-2200-E. D. Double click your iWSN-2200-E to open “Configure Server (UDP)” configuration dialog. Technology support:service@icpdas.com...
- Page 5 The factory default values of iWSN-2200-E as below table: IP Address 192.168.255.1 Sub-net Mask 255.255.0.0 Gateway 192.168.0.1 E. Contacting your network administrator, and get correct network configuration (ex: IP/Mask/Gateway). Key in the network configuration (IP/Mask/Gateway), and then click “OK” button.
- Page 6 二、 Using browser Note: If your using browser is Internet Explorer, in order to ensure the web server of iWSN-2200-E can display properly, please be sure to close the IE cache first, the step as below: (If your using browser isn’t Internet Explorer, please skip these steps.)
- Page 7 A. After key in password in Login password field, click “Submit” button. Default password: admin B. After click “Network” item, the web will display IP Address Selection page. Key in network configurations (IP/Mask/Gateway), and click “Update Setting” button. C. After click “Port1” item, the web will display Setting page. Key in Port number, and click “Submit”...
- Page 8 “Tools” ”Modbus TCP Master” to open Modbus TCP Master Utility. B. Key in the IP address of iWSN-2200-E in Modbus TCP Master, and then click ”Connect” button to connect iWSN-2200-E. C. Key in Modbus command such as: 1 2 0 0 0 6 1 3 0 1 0 1 in command field, and then click “Send command”...
Need help?
Do you have a question about the iWSN-2200-E and is the answer not in the manual?
Questions and answers