Table of Contents
Advertisement
Quick Links
Advertisement
Table of Contents

Subscribe to Our Youtube Channel
Related Manuals for STA-RITE Signature 2000


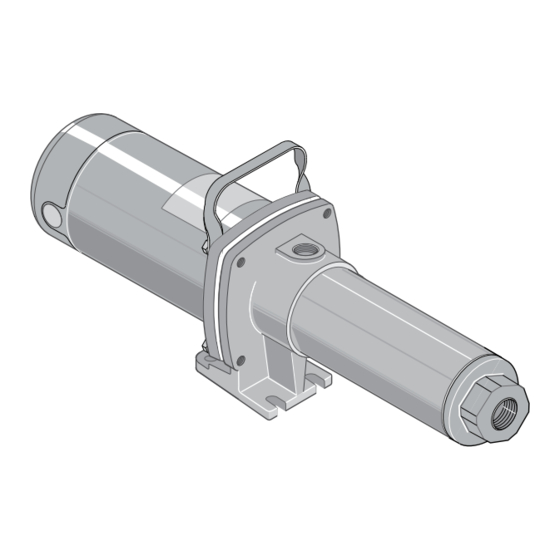
Summary of Contents for STA-RITE Signature 2000
- Page 1 OWNER’S MANUAL INSTALLATION AND OPERATING INSTRUCTIONS REPAIR PARTS LIST Signature 2000 High Pressure Booster Pump 60 Hz. 1/2 through 3 HP 1218 0894 NC STA-RITE INDUSTRIES, DELAVAN, WISCONSIN 53115 S327 (Rev. 12/4/03) Printed in U.S.A. © 2003, Sta-Rite Industries...
-
Page 2: Electrical Safety
READ AND FOLLOW SAFETY INSTRUCTIONS! This is the safety alert symbol. When you see this symbol on your pump or in this manual, look for one of the following signal words and be alert to the potential for personal injury: DANGER warns about hazards that will cause serious personal injury, death or major property damage if ignored. -
Page 3: Inspect The Shipment
INSPECT THE SHIPMENT INSTALLATION The high pressure booster pump has been carefully The pump is designed to boost city water pressure or inspected and packaged to assure safe delivery. water pressure from a private water system. Use this Inspect the pump and fittings and report to the carrier high pressure stream to wash down milk parlors, barns, any items which are damaged or missing. -
Page 4: Operation
Size the inlet according to the chart below: Priming Plug 90 Elbow Recommended Recommended Ave. Threaded Inlet Discharge Male Pipe to Male Hose Adapter Inlet Size Line Size Line Size 3/4” NPT 1” 1” 3/4” NPT 1” 1” Female Hose Connection 1”... -
Page 5: Wiring Connections
Disconnect power before working on pump, motor, pressure switch, or wiring. Single Phase, ODP Motor Single Phase, ODP Motor 230 Volt to 115 Volt Conversion. Move plug to change voltage. 230 Volt to 115 Volt Conversion. Move plug to change voltage. Ground Pull plug Plug in again... - Page 6 To Convert 230 Volts to 115 Volts, Plug-in type 4. Pull the plug straight out from the terminal board, (see Figures 5 and 6). from 230 Volt socket. 5. Plug in again with arrow on plug pointing to 115 1. Unplug the motor. Volts.
-
Page 7: Maintenance
To Check For Proper Rotation – 3 Phase Motors Models without cord and plug: Risk of electrical shock. 1. Connect ground wire first. Connect the ground first, then to green grounding terminal provided under 1. Be sure power is disconnected to motor when motor canopy (see Figures 5 and 6) identified as working on electrical connections. - Page 8 Impeller Stack Changeout (See Figure 7) shown. Place on motor shaft flats to hold shaft stationary. Remove pump from service and mount vertically in vise (if available) motor side down. Hold at center of 4. With one 7/16” wrench in place on motor shaft, motor.
- Page 9 Mechanical Seal Changeout polished face of seat and press into seal cavity (refer to Figures 7 and 8) using a 3/4” socket or a piece of 3/4” standard pipe. This procedure is best completed with the pump held in a vertical position, motor down. D.
-
Page 10: Repair Parts List
THE FOLLOWING ACCESSORIES MAY BE ORDERED FOR HIGH PRESSURE BOOSTER PUMPS Hose 6’-3/4” w/Female Ends (150 PSI Rating) Pkg. 83 Hose 25’-3/4” w/Male & Female Ends (150 PSI Rating) Pkg. 84 Adapter 3/4” NPT x 3/4” Hose Pkg. 85 Sprayer Gun Pkg. - Page 11 THE FOLLOWING ACCESSORIES MAY BE ORDERED FOR HIGH PRESSURE BOOSTER PUMPS Hose 6’-3/4” w/Female Ends (150 PSI Rating) Pkg. 83 Hose 25’-3/4” w/Male & Female Ends (150 PSI Rating) Pkg. 84 Adapter 3/4” NPT x 3/4” Hose Pkg. 85 Sprayer Gun Pkg.
- Page 12 THE FOLLOWING ACCESSORIES MAY BE ORDERED FOR HIGH PRESSURE BOOSTER PUMPS Hose 6’-3/4” w/Female Ends (150 PSI Rating) Pkg. 83 Hose 25’-3/4” w/Male & Female Ends (150 PSI Rating) Pkg. 84 Adapter 3/4” NPT x 3/4” Hose Pkg. 85 Sprayer Gun Pkg.
- Page 13 THE FOLLOWING ACCESSORIES MAY BE ORDERED FOR HIGH PRESSURE BOOSTER PUMPS Hose 6’-3/4” w/Female Ends (150 PSI Rating) Pkg. 83 Hose 25’-3/4” w/Male & Female Ends (150 PSI Rating) Pkg. 84 Adapter 3/4” NPT x 3/4” Hose Pkg. 85 Sprayer Gun Pkg.
- Page 14 THE FOLLOWING ACCESSORIES MAY BE ORDERED FOR HIGH PRESSURE BOOSTER PUMPS Hose 6’-3/4” w/Female Ends (150 PSI Rating) Pkg. 83 Hose 25’-3/4” w/Male & Female Ends (150 PSI Rating) Pkg. 84 Adapter 3/4” NPT x 3/4” Hose Pkg. 85 Sprayer Gun Pkg.
- Page 15 THE FOLLOWING ACCESSORIES MAY BE ORDERED FOR HIGH PRESSURE BOOSTER PUMPS Hose 6’-3/4” w/Female Ends (150 PSI Rating) Pkg. 83 Hose 25’-3/4” w/Male & Female Ends (150 PSI Rating) Pkg. 84 Adapter 3/4” NPT x 3/4” Hose Pkg. 85 Sprayer Gun Pkg.
-
Page 16: Limited Warranty
LIMITED WARRANTY Sta-Rite warrants to the original consumer of the products listed below, that they will be free from defects in material and workmanship for the Warranty Period from the date of original installation or manufacture as noted. Product Warranty Period Water Systems Products –...
Need help?
Do you have a question about the Signature 2000 and is the answer not in the manual?
Questions and answers