Arjo Maxi Sky 2 PLUS Instructions For Use Manual
Hide thumbs
Also See for Maxi Sky 2 PLUS:
- Quick reference manual (4 pages) ,
- Quick reference manual (4 pages)
Table of Contents
Advertisement
Advertisement
Table of Contents

Related Manuals for Arjo Maxi Sky 2 PLUS


Summary of Contents for Arjo Maxi Sky 2 PLUS
- Page 1 INSTRUCTIONS FOR USE Maxi Sky 2 PLUS 001-31249-EN Rev 3 • 08/2019...
- Page 2 LATEX XXXXXX Design Policy and Copyright ® and ™ are trademarks belonging to the Arjo group of companies. © Arjo 2019. As our policy is one of continuous improvement, we reserve the right to modify designs without prior notice. The content of this publication may not be copied either whole or in part without the consent of...
-
Page 3: Table Of Contents
Battery Information ..........................Charging the Batteries ........................Regular Charging System ..........................14 ECS Charging System ............................14 Operating the Maxi Sky 2 Plus in Dual Mode ..............15 Movement Controls ..........................Vertical Movement ............................15 Horizontal Movement and Rotation .........................15 Maxi Sky 2 Plus Patient Tilt Function ......................15... - Page 4 Removing the Spreader Bar from the Ceiling Lift ................Switching From Dual Mode to Single Mode..................Switching from Single Mode to Dual Mode ..................Operating the Maxi Sky 2 Plus in Single Mode ..............35 Vertical Movement ............................35 Horizontal Movement and Rotation .........................35 Patient Positioning ............................35...
-
Page 5: Foreword
The information in this manual is crucial to the 001-31249-XX. proper operation and maintenance of the Maxi Sky 2 Plus. It will help protect your product as Manufacturer Information well as ensure that the equipment performs to your satisfaction. Lifting and transferring a person This product was manufactured by: always presents a potential risk. -
Page 6: Safety Instructions
Preventive Maintenance Schedule. between 159 kg and to 454 kg, with a Body Mass Index (BMI) of above 40. The Maxi Sky 2 Plus is Important Safety Instructions designed to assist caregivers in hospitals, nursing homes, long-term care and home care environments, including private homes. -
Page 7: General Instructions
• Do not attempt to service or repair the ceiling lift, battery or charger. If the unit is malfunctioning, contact your local Arjo The "Safe Working Load" of the Maxi Sky 2 Plus agent. refers to the maximum lifting capacity of the ceiling lifts. -
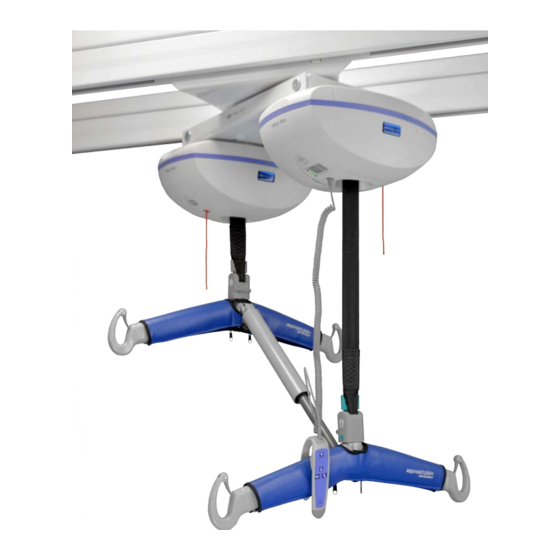
Page 8: Product Description
Product Description Maxi Sky 2 Plus Fig. 2 Legend Leading ceiling lift (with hand KWIKtrak rail Red emergency stop Latch control) cord Driven ceiling lift Charging station* Control panel Universal charger Trolley Enhanced Charging System Quick connect (ECS) strips* Emergency lowering hex key... -
Page 9: Hand Control
Hand Control Icon Button Description Up Button Sit Button Recline Button Down Button Programming / Information Button Fig. 3 See "Controls and Features" on page 11 for additional details. WARNING: Never let go of the hand control while the cord is extended as this could cause injuries to others. -
Page 10: Labels And Symbols
Labels and Symbols General This symbol is accompanied by These symbols refer to the date of manufacture and the Instructions for Use address of the manufacturer. CE marking indicating conformity This symbol locates the with European Community manual emergency lowering harmonised legislation. -
Page 11: Control Panel
Control Panel The control panel regroups several elements intended to provide important information to the user. Display Status LEDs SWL Rating The USB access port Auxiliary Up-Down buttons 1. Display • This is the message centre that informs the user of the different statuses of the ceiling lift by means of intuitive icons (see "LCD Display Symbols"... -
Page 12: Lcd Display Symbols
• This symbol displays for 7 seconds (accompanied with 2 beeps) when the ceiling lift is waking up from sleep mode and flashes every 5 seconds to draw user's attention. • Contact your Arjo service centre for maintenance. Overweight While ascending: •... -
Page 13: Preparation
Always ensure that: attachments are properly secured, and • The Maxi Sky 2 Plus display shows that the that all the quick connect’s components battery charge level is within the normal (cover and latch) are present. -
Page 14: Customizing
Customizing With the Maxi Sky 2 Plus, a trained user can Once the parameter is set to the desired option, customize certain parameters to optimize its press the button to accept the selection. You interaction with the environment in which it is will hear a short beep and the ceiling lift will return installed using the hand control. -
Page 15: How To Use The Maxi Sky 2 Plus
Controls and Features Dual and Single Modes The Maxi Sky 2 Plus is a configurable ceiling lift that can be set by the user to operate either in Dual or Single Mode. Dual Mode is intended for the bariatric population, whereas Single Mode is intended for non-bariatric patients. -
Page 16: Sleep Mode General Instructions
Displaying Usage Data Emergency Stop with Red Cord The ceiling lifts in the Maxi Sky 2 Plus also record The Maxi Sky 2 Plus has an easy and rapidly the number of times they have been used to assist accessible feature that disables the ceiling lifts the technician servicing the ceiling lifts. -
Page 17: To Reactivate The Ceiling Lift
At this time, the ceiling lift will allow only the down function. Make sure to recharge the batteries as soon as possible. Let the batteries recharge for a complete charging cycle. Fig. 10 How to Use the Maxi Sky 2 Plus... -
Page 18: Charging The Batteries
Fig. 12 icon when batteries are charging. Charging the Batteries The LED will flash The Maxi Sky 2 Plus is equipped with two universal green for a fixed AC voltage chargers; one per ceiling lift. period of 8 hours. After that time Regular Charging System <... -
Page 19: Operating The Maxi Sky 2 Plus In Dual Mode
NOTE: If the button is continuously pressed, the ceiling lifts in the Maxi Sky 2 Plus will each reach their highest raising limits, but at different times. This will produce a tilting motion that will Green cause the patient's position to shift. -
Page 20: Using The Auxiliary Buttons
Fig. 18 To raise or lower a patient in the Maxi Sky 2 Plus, press both matching buttons (up or down) on both ceiling lifts simultaneously. Note: When using the auxillary button, the software no longer limits the travel of the "foot-... -
Page 21: Loop Sling Applications
Loop Sling Applications The following is a list of all Arjo loop slings that are compatible with the Maxi Sky 2 Plus when operating in Dual Mode. WARNING: Failing to conform to the following directives by using other Arjo sling models—such as MAA8030—to perform seated transfers with the Maxi Sky 2 Plus set in Dual Mode may lead to... -
Page 22: Sling Loop Selection
Open the spring-loaded latch and remove the loop from the hook. Repeat the same procedure for all loops. Fig. 24 WARNING: Always hold the spreader bar when near a patient to prevent it from striking the patient. Operating the Maxi Sky 2 Plus in Dual Mode... -
Page 23: Spreader Bar Description
Spreader Bar Description WARNING: Only the spreader bar shown below must be used to perform seated transfers when the Maxi Sky 2 Plus is in Dual Mode. Doing otherwise may lead to injuries. The "head-end" spreader bar is reserved for the patient's upper body. -
Page 24: Attachment Methods
WARNING: Method 2 might not be suitable for patients with limited upper body control as they can slide down and almost out of the sling or pitch forward when the most seated position is reached. Operating the Maxi Sky 2 Plus in Dual Mode... -
Page 25: Transferring From A Seated To A Lying Position
(see "Attachment Methods" on page 20). Fig. 33 Raise the foot-end of the spreader bar first using the " " ( ) button to create tension on the Recline sling's leg loops. Operating the Maxi Sky 2 Plus in Dual Mode... - Page 26 8) When the patient's body weight is fully supported, detach the leg loops, then the shoulder loops. Carefully move the ceiling lift away from the patient. Remove the sling from underneath the patient. Fig. 36 Operating the Maxi Sky 2 Plus in Dual Mode...
-
Page 27: Transferring From A Lying To A Seated Position
WARNING: Always confirm that the sling loop straps are correctly attached and remain in tension as the weight of the patient is gradually Fig. 39 taken up. This will prevent a patient fall. Operating the Maxi Sky 2 Plus in Dual Mode... - Page 28 9) When the patient's body weight is fully supported, detach the leg loops, then the shoulder loops. Carefully move the ceiling lift away from the patient. Remove the sling from behind the patient. Fig. 42 Operating the Maxi Sky 2 Plus in Dual Mode...
-
Page 29: Bed Repositioning
Select loop lengths in order to lift the patient as horizontally as possible. Fig. 43 3) Raise the patient using the Maxi Sky 2 Plus until the patient's hips and upper body are supported and until it is possible to move the patient up in the bed. -
Page 30: Bed Turning
3) Raise the spreader bar until the patient is rolled into the appropriate position. NOTE: Place some pillows to prevent the patient from rolling backwards and to maximize the patient's comfort. Fig. 48 Operating the Maxi Sky 2 Plus in Dual Mode... -
Page 31: Limb Support
Carefully move the ceiling lift away from the patient. Fig. 49 Limb Support The Maxi Sky 2 Plus can be used to assist with procedures where limbs need to be supported in elevated positions. 1) Place the limb sling around the patient's limb. - Page 32 Connect the loops to the spreader bar. 2) Raise the patient using the Maxi Sky 2 Plus until the patient is fully supported. NOTE: It may be necessary to support the head for some patients, depending on the patient's medical condition.
-
Page 33: How To Use The X-Y Track System
Both the Maxi Sky 2 Plus and the linked mobile tracks can be moved simultaneously by pulling on the spreader bar. Fig. 57 Operating the Maxi Sky 2 Plus in Dual Mode... -
Page 34: How To Use The Gate
The Gate is a KWIKtrak accessory that allows an X-Y system to connect to another fixed track section. Exiting the X-Y System 1) Move the Maxi Sky 2 Plus along the mobile tracks toward the end on which the KWIKtrak Gate is installed. -
Page 35: Entering The X-Y System
3) Move the Maxi Sky 2 Plus through the gate and onto the adjacent fixed tracks. Note: The mobile tracks will remain in the locked position. In order to release the mobile tracks, refer to the "Entering the X-Y System" section below. -
Page 36: Switching Between Dual And Single Modes
Switching Between Dual and Single Modes Attaching the Spreader Bar to the Removing the Spreader Bar from the Ceiling Lift Using Quick Connect Ceiling Lift The spreader bar features an attachment which 1) If using a allows the caregiver to change the spreader bar in a PDPS, detach ... -
Page 37: Switching From Dual Mode To Single Mode
Switching From Dual Mode to Single Mode 1) Detach both the Maxi Sky 2 Plus head and foot- end spreader bars (see page 32). 2) It is recommended to store the Maxi Sky 2 Plus spreader bar on the wall support or cart designed for 3) Install a compatible Maxi Sky 2 ceiling lift spreader bar onto the... -
Page 38: Switching From Single Mode To Dual Mode
Switching from Single Mode to Dual Mode 1) Press the button and bring the spreader bar to its highest limit. Fig. 75 2) Follow the steps shown in Fig. 76 to set the Maxi Sky 2 Plus in Dual Mode. 3) Lower the spreader bar while simultaneously pulling down on the empty strap (either with your free hand or back monitoring... -
Page 39: Operating The Maxi Sky 2 Plus In Single Mode
Fig. 80 Use of Slings and Spreader Bars in Single Mode Once in Single Mode, the Maxi Sky 2 Plus acts as a stand-alone Maxi Sky 2 ceiling lift. All slings and spreader bars compatible with the Maxi Sky 2 are equally compatible with the Maxi Sky 2 Plus in Single Mode. -
Page 40: Care And Maintenance
Care and Maintenance Cleaning the Ceiling Lifts Rub the equipment vigorously when using the wipes, to promote an effective cleaning of the ceiling lifts' surfaces. NOTE: It is recommended to clean the lifts and their accessories between each patient use. CAUTION: Do not drench the product, as this could damage electrical components and cause internal corrosion. - Page 41 Disinfection Wipe Maxi Sky 2 PLUS & accessories using a solution containing one of the compatible disinfectants below. Disinfection methods should comply with local or national guidelines (Decontamination of Medical Devices), depending on Healthcare Facility or country of use. If uncertain, consult local Infection Control specialist.
-
Page 42: Handling, Transport And Storage
NOTE: Even if the lift is not used, Arjo recommends charging the batteries at least every 2 weeks. This will prevent premature aging of batteries. If you store or ship the Maxi Sky 2 Plus, ensure that the power is turned off (no green light) beforehand. Battery Replacement... - Page 43 NOTE: For information regarding the maintenance schedule for the ceiling lifts that are part of the Maxi Sky 2 Plus, please refer to the Maxi Sky 2 Instructions for Use (001-15698- WARNING: The points on this checklist are the minimum the manufacturer recommends. In some cases more frequent inspections should be carried out.
-
Page 44: Troubleshooting
Troubleshooting freQuency Every two years or 5,000 cycles Every year or 2,500 cycles Inspections for Accessories Every four months or 1,000 cycles Before every Initially user inspections Inspect all sling parts (attachments, fabric, stitch areas and strap) for signs of wear, ... - Page 45 NOTE: If the product does not work as intended, immediately contact your local Arjo distributor for support. WARNING: Before each use, make sure all end stoppers are in place to prevent the risk of a patient falling PROBLEM TO CHECK After pushing up on one ceiling lift's •...
- Page 46 The ceiling lift needs a minimum tension on the strap to operate. • Verify if the Maxi Sky 2 Plus is in Dual Mode (refer to page 34). • If unit display indicates a malfunction code, contact your local Arjo agent.
- Page 47 PROBLEM TO CHECK Tilt function buttons on hand control • Verify if the Maxi Sky 2 Plus is in Dual Mode (refer to page ) do not work, 34). SIT/RECLINE meaning that the tilt function cannot • Maximum allowed height difference between spreader...
- Page 48 ECS symbol is displayed again and that a new charging cycle is initiated. 4) If possible, check that the chargers are plugged into a standard outlet and that the outlet has power. 5) If problem persists, contact your Arjo agent for maintenance. Care and Maintenance...
-
Page 49: Overall Dimensions
Technical Specifications Overall Dimensions 722 mm (28 1/2") 450 mm (17 3/4") 735 mm (28 7/8") * When using a scale, add 156 mm to this dimension. MAX. 765 mm (30 1/8”) Fig. 82 MIN. 450 mm (17 3/4”) Technical Specifications... -
Page 50: Technical Data
WARNING: Portable RF communications equipment (including peripherals such as antenna cables and external antennas) should be used no closer than 30 cm to any part of the Maxi Sky 2 Plus, including cables specified by the manufacturer. Otherwise, performance degradation of this equipment could result. See the "Electromagnetic Compliance" section for more details. -
Page 51: Approvals And List Of Standards
Electromagnetic Compliance The Maxi Sky 2 Plus has been tested for compliance with current regulatory standards regarding its capacity to block EMI (electromagnetic interference) from external sources. Nonetheless, some procedures can help reduce electromagnetic interferences: •... -
Page 52: Electromagnetic Emissions
Quipment and ystems The Maxi Sky 2 Plus is intended for use in the electromagnetic environment indicated below. The customer or the user of the Maxi Sky 2 Plus should ensure that it is used in such an environment. Electromagnetic environment -... - Page 53 Quipment and ystems The Maxi Sky 2 Plus is intended for use in electromagnetic environment specified below. The customer or the user of the Maxi Sky 2 Plus should ensure that it is used in such an environment. Electromagnetic...
- Page 54 Page intentionally left blank. Technical Specifications...
- Page 55 AUSTRALIA FRANCE POLSKA Arjo Australia Pty Ltd Arjo SAS Arjo Polska Sp. z o.o. 78, Forsyth Street 2 Avenue Alcide de Gasperi ul. Ks Piotra Wawrzyniaka 2 O’Connor CS 70133 PL-62-052 KOMORNIKI (Poznań) AU-6163 Western Australia FR-59436 RONCQ CEDEX Tel: +48 61 662 15 50 Tel: +61 89337 4111 Tél: +33 (0) 3 20 28 13 13...
- Page 56 At Arjo, we are committed to improving the everyday lives of people affected by reduced mobility and age-related health challenges. With products and solutions that ensure ergonomic patient handling, personal hygiene, disinfection, diagnostics, and the effective prevention of pressure ulcers and venous thromboembolism, we help professionals across care environments to continually raise the standard of safe and dignified care.
Need help?
Do you have a question about the Maxi Sky 2 PLUS and is the answer not in the manual?
Questions and answers