Table of Contents
Advertisement
Advertisement
Table of Contents

Subscribe to Our Youtube Channel
Related Manuals for Arjo Maxi Sky 2


Summary of Contents for Arjo Maxi Sky 2
- Page 1 INSTRUCTIONS FOR USE Maxi Sky 2 001.15698-EN rev 12 • 09/2019...
- Page 2 © Arjo 2019. As our policy is one of continuous improvement, we reserve the right to modify designs without prior notice. The content of this publication may not be copied either whole or in part without the consent of Arjo.
-
Page 3: Table Of Contents
Actions Before Every Use ......................... 15 Customizing ....................16 Entering Customizing Mode ......................16 Programmable Parameters ....................... 16 Using the Maxi Sky 2 series of Ceiling Lifts ..........17 Controls and Features ........................17 Sleep Mode ..............................17 Movement Controls ............................ 17 Return to Charge / Return to Home ...................... - Page 4 Inspections for Rails ...........................58 Troubleshooting ..................59 Technical Specifications ................62 Overall Dimensions..........................62 Maxi Sky 2 ..............................62 Loop Sling Spreader Bars (Basic Ceiling Lifter model only) ...............62 Scale ................................63 Loop Sling Spreader Bars (not for Basic Ceiling Lifter model) ..............63 Dynamic Positioning Spreader Bars ......................64 Morgue Stretcher ............................64...
-
Page 5: Foreword
The information in this manual is crucial to the 001-15698. proper operation and maintenance Maxi Sky 2. It will help protect your product as Manufacturer Information well as ensure that the equipment performs to your satisfaction. This product was manufactured by:... -
Page 6: Safety Instructions
WARNING: The manufacturer cannot ensure full safety for a lift or an accessory of which the The Maxi Sky 2 series of ceiling lifts are designed to assist caregivers in hospitals, nursing homes, operational life has been exceeded. Wear may... -
Page 7: General Instructions
If the unit is Safe Working Load (SWL) malfunctioning, contact your local Arjo agent. The Maxi Sky 2 series of ceiling lifts have been Fire and Explosion Prevention designed with a maximum lifting capacity of 600 lbs/272 kg. -
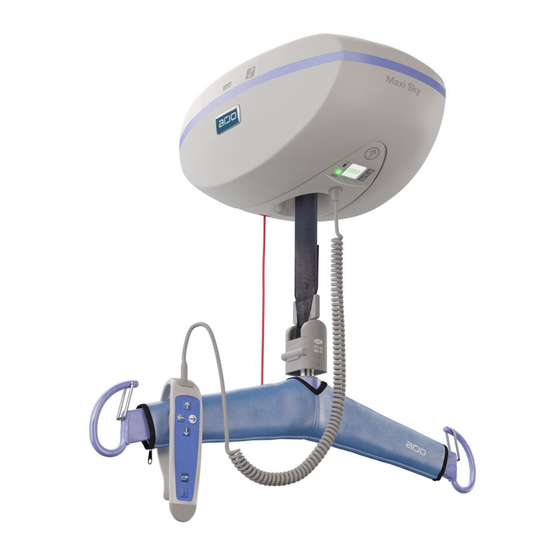
Page 8: Product Description
Product Description Maxi Sky 2 Detail A Detail A Figure 2 1) Lift 9) Spreader Bar attachment 10) Hand control 2) Access door for manual • Quick connect (Ceiling Lifter 11) Spreader bar and Infection Control Ceiling emergency lowering 12) Latches... -
Page 9: Labels & Symbols
Labels & Symbols General This symbol is accompanied Degree of protection by the date provided by enclosure. of manufacture and the address of N1: Ingress of particles, the manufacturer. N2: Ingress of water. CE marking indicating conformity These symbols refer to with European Community the Instructions for Use. -
Page 10: Hand Control
Hand Control 2-function Infra-Red Hand Control Wired Hand Controls 2-function Powered 4-function Four Function Function With Powered DPS Icon Button Description 2-Function 4-Function Infra-Red Up Button Down Button Right Button Left button ... -
Page 11: Control Panel
Icons (see "Display Symbols" for details). SWL Rating • This label indicates the maximum lifting capacity of the lift. • The Maxi Sky 2 is built to operate in three different maximum weight settings. • 120 kg / 265 lb •... -
Page 12: Display Symbols
This symbol is shown for 7 seconds (accompanied with 2 beeps) when the lift is waking up from sleep mode and flashes each 5 seconds to draw user's attention. • Contact your Arjo service centre for maintenance. Overweight • This symbol flashes when a transfer is attempted with a load exceeding the lift's capacity. -
Page 13: Charging System
The RTC (Return to Charge) is disabled by default. See "Customizing" on page 16 for instructions on how to enable this feature. The Maxi Sky 2 comes in two different types of charging systems. KWIKtrak ECS Rail System Whenever the lift is being used, it automatically... -
Page 14: Preparation
NOTE: Batteries need to be charged for a minimum of 8 hours prior to the initial lift use. Initial Start-up Push the Power On Switch button in. NOTE: If the Maxi Sky 2 is used in its transportable version, please refer... -
Page 15: Actions Before The First Use
Actions Before the First Use Always ensure that: • The rail system and the lift are installed by an authorized Arjo agent in accordance with local codes. • A weight load test has been performed on the rail, as per Arjo's instructions. -
Page 16: Customizing
Customizing Programmable Parameters With the Maxi Sky 2 series of ceiling lifts, a trained user can customize certain parameters to optimize its interaction with the environment in The following table lists parameters that can be which it is installed. set to fit your needs. -
Page 17: Using The Maxi Sky 2 Series Of Ceiling Lifts
Movement Controls When the RTC / RTH function is enabled, the Moving the Maxi Sky 2 is achieved with the aid of button is intended to automatically send the lift the hand control which includes all the command back to a charging station or to a predetermined buttons to operate the lift. -
Page 18: Usage Monitoring
The Maxi Sky 2 series of ceiling lifts are equipped with a load sensor that will stop any motion if a load variation is detected when lifting. Make sure Accessing Usage Data when PPP is there are no obstacles in the path. -
Page 19: Emergency Lowering Mechanism
In this situation, the emergency lowering mechanism will not be functional. WARNING: If the emergency brake activates, turn the unit off, apply a warning sign on the lift to prevent any further usage and call your local Arjo agent for an inspection. -
Page 20: Battery Information
Battery Information The batteries for this device are rechargeable lead- Battery acid batteries. For safe handling and to extend the Display Remarks Charge battery lifetime, please follow and remember these instructions. Not following these instructions can cause 100% short battery life and may, in extreme cases, put user at risk. - Page 21 ECS Charging System ECS Charging System Systems equipped with ECS will display the Systems equipped with ECS will display the icon when batteries are icon when batteries are charging. charging. • • The LED will flash green for a fixed period of 8 hours. After that period, The LED will flash green for a fixed period of 8 hours.
- Page 22 Spreader Bar and Scale Attachment/Removal (see page 25 for Basic Ceiling Lifter model’s Spreader Bar and Scale attachment) Quick Connect Overview (Maxi Sky 2 Ceiling Lifter and Infection Control models) The spreader bar and scale features an attachment which allows the caregiver to change it in a few steps without using any tools.
-
Page 23: Spreader Bar And Scale Attachment/Removal
Attach to Quick Connect Align the spreader bar/scale Quick-Connect latch to the hook. Insert the hook into the Quick- Connect. Move the spreader bar/scale to engage the hook into the pivot. Rotate the spreader bar into position. Make sure that the Quick Connect latch is closed. - Page 24 Remove from Quick Connect If using a PDPS, detach the cable from the back of the Quick Connect housing and then disconnect the cable. Open the latch that locks the hook in place by pressing it. Rotate the spreader bar/scale up towards the latch, depending on which one you want to remove.
- Page 25 Spreader Bar and Scale Attachment/Removal (Basic Ceiling Lifter model only) (see page 22 for Maxi Sky 2 Ceiling Lifter and Maxi Sky 2 Infection Control Ceiling Lifter model Spreader Bar & Scale attachment) The spreader bar features an attachment which allows the caregiver to change it in a few steps without using any tools.
-
Page 26: Spreader Bar (Basic Ceiling Lifter Model)
Clip Sling Applications Clip Sling Compatibility Following is a list of typical Arjo clip slings that are compatible with the Maxi Sky 2 series of ceiling lifts. Application for Sling Sling Layout General Transfer Hygienic Sling Selection The spreader bar that is attached to the lift determines what slings can be used to transfer a patient. -
Page 27: Spreader Bar Compatibility
Spreader Bar Compatibility Following is a list of all Arjo spreader bars to use with clip slings recommended with the Maxi Sky 2 series of ceiling lifts. Other combinations could be suitable based on facility assessment. Clinical judgement must be applied when choosing a size and a combination. -
Page 28: Attaching The Sling To The Dps
Attaching the Sling to the DPS Insert the clip attachment over the lug on the PDPS/DPS. Secure the clip in place by pulling the sling down so that the lug is in the top portion of the clip hole. (The graphic on the left represents the label located on the spreader bar that recalls this procedure.) Method 1 - Straight Attachment For most patients, the straight attachment of the leg clips is... -
Page 29: Operating The Dps And Pdps
Operating the DPS and PDPS WARNING: To ensure maximum patient comfort and safety, do not allow the patient to hold onto the spreader bar. Arm or finger pinching could occur when operating the DPS/PDPS. The DPS spreader bar is adjusted by raising or lowering the tilt handle until the patient is in the desired position. - Page 30 Approach the patient with the lift, ensure that: • The spreader bar is in reclined position. • The wide part of the spreader bar is at or just below shoulder level. • The spreader bar is close enough to be able to connect the shoulder strap clips of the sling to the frame.
-
Page 31: Transferring Patient From A Supine Position
Move the lift away from the patient. Remove the sling from behind the patient. Transferring Patient from a Supine Position The technique described here can be used for transferring patients regardless of where they may be laying (on the bed or on the floor of the exercise area). Before you start, make sure the bed is in correct working height. - Page 32 Using the hand control, lower the spreader bar taking care not to lower the frame onto the patient. Connect the sling shoulder and leg strap clips to the spreader bar. WARNING: Always confirm that the sling attachment clips are correctly attached and remain in tension as the weight of the patient is gradually taken up.
-
Page 33: Loop Sling Applications
Loop Sling Applications Loop Sling Compatibility Following is a list of all Arjo loop slings compatible with the Maxi Sky 2 series of ceiling lifts. Application for Sling Sling Layout General Transfer Hygienic Gait Training Bed Repositioning Limb Supine Position... -
Page 34: Sling Selection
Please contact your local Arjo agent for more information. Flites slings (single patient multi-use slings) are also available for most sling models. If Arjo Flites slings are to be used with the Maxi Sky 2 series of ceiling lifts, refer to the separate Arjo Flites sling Instructions for Use. -
Page 35: Spreader Bar Compatibility
Spreader Bar Compatibility Following is a list of all Arjo spreader bars to use with loop slings that are compatible with the Maxi Sky 2 series of ceiling lifts. Other combinations could be suitable based on facility assessment. Clinical judgement must be applied when choosing a size and a combination. -
Page 36: Attaching The Sling To The Spreader Bar
Attaching the Sling to the Spreader Bar Place the attachment loop onto the hook. Make sure loop is positioned correctly and that the safety latch is closing the hook. Repeat same procedure for all loops. Removing the Sling from the Spreader Bar Open the latch and remove the loop from the hook. -
Page 37: Transferring Patients Using Loop Slings
Transferring Patients Using Loop Slings Loop slings are available in many sizes. The correct size sling will be able to support the patient's shoulders during the transferring procedure. WARNING: Always hold the spreader bar when near patients to avoid hitting them with it. This could cause an injury. -
Page 38: Attachment Points
Attachment Points NOTE: On the 4-hook spreader bar, sling straps must be mounted as follows. Shoulder & Shoulder & Hip straps Hip straps straps straps Method 1 - Cross-through This method is recommended for most general transfers. B, D A, E Legs closed with crossing straps Method 2 - Hammock This method can provide a comfortable cradle for amputee... -
Page 39: Transferring Patient From A Seated Position
Transferring Patient from a Seated Position The techniques described here can be used for transferring patients regardless of where they may be seated (e.g. in a bed, in a chair, wheelchair or similar). Place the sling around the patient so that the base of the ®... - Page 40 Proceed with the transfer keeping a hand on the spreader bar to stop excessive swinging and to give a feeling of added security. CAUTION: Do not attempt to pull the lift along the rail using the hand control cable. This will damage the cable and eventually ruin the function of the hand control.
-
Page 41: Transferring Patient From A Supine Position
If possible, slightly raise the head of the bed. Position the Maxi Sky 2 directly over the patient. WARNING: Using the hand control, lower the spreader bar taking care not to lower it onto the patient. - Page 42 Proceed with the transfer keeping a hand on the spreader bar to stop excessive swinging and to give a feeling of added security. CAUTION: Do not attempt to pull the lift along the rail using the hand control cable. This will damage the cable and eventually ruin the function of the hand control.
-
Page 43: Repositioning
Make sure to distribute loops on both hooks. Select loop length in order to lift the patient as straight as possible. Raise the patient using the Maxi Sky 2 until patient's hips are supported and until it is possible to move the patient up ®... - Page 44 Bed Turning Position the Maxi Sky 2 directly over the patient. WARNING: Using the hand control, lower the spreader bar perpendicular or parallel to the patient taking care not to lower the spreader bar onto the patient, as this could cause injury.
-
Page 45: Gait Training
Gait Training The Maxi Sky 2 series of ceiling lifts can be used to assist patients in rehabilitation training as they remain suspended in the sling preventing them from falling. Place the rehabilitation sling around the patient. Approach the Maxi Sky 2 so that the spreader bar is close enough to be able to connect the loops. -
Page 46: Transferring Patient In Supine Position
Transferring Patient in Supine Position WARNING: Only use Arjo soft stretcher slings. Do not use any other type of soft stretcher sling with the Maxi Sky 2. CAUTION: Before the soft stretcher can be used with the Maxi Sky 2, ensure the stretcher frame has been correctly attached to the strap. - Page 47 Proceed with the transfer keeping a hand on the spreader bar to stop excessive swinging and to give a feeling of added security. CAUTION: Do not attempt to pull the lift along the rail using the hand control cable. This will damage the cable and eventually ruin the function of the hand control.
-
Page 48: Limb Support
Limb Support The Maxi Sky 2 series of ceiling lifts can be used to assist with procedures when limb needs to be supported in elevated position. WARNING: To prevent a fall risk, do not activate RTC or RTH function while performing the limb support task. -
Page 49: Morgue Stretcher Applications
Morgue Stretcher Applications Spreader Bar Compatibility Following is a list of all Arjo morgue stretchers that are compatible with the Maxi Sky 2 series of ceiling lifts. Other combinations could be suitable, based on facility assessment. Clinical judgement must be applied when choosing a size and a combination. -
Page 50: Use Of Accessories
Use of Accessories Room Assessment Following is an assessment example that shows the different accessories to give a general idea of where they can be encountered in a desired environment. Figure 1 KWIKtrak Accessories The X-Y Rail System The X-Y rail system allows the lift to be moved in any direction over a predetermined area to cover its entire surface. -
Page 51: How To Use The X-Y Rail System
How to Use the X-Y Rail System Moving the Lift in the Lateral Direction 2-function models: Moving the lift in the lateral direction (X axis) is achieved by pushing or pulling on the spreader bar. 4-function models: Moving the lift in the lateral direction (X axis) is achieved by using the button on the hand control. -
Page 52: How To Use The Exchanger
How to Use the Exchanger If the exchanger is not already aligned in the If the exchanger is already positioned in the appropriate path proceed as described below. appropriate path, keep moving the lift through the exchanger without stopping at the activation station. -
Page 53: How To Use The Turntable Accessory
How to Use the Turntable Accessory Move the lift to the activation station in the Turntable accessory. Once the Turntable accessory detects the lift, it acknowledges with a beep and starts turning to align with the other rail path. Wait until the Turntable accessory has stopped completely then the lift can be moved out of the Turntable accessory. -
Page 54: Care And Maintenance
Care and Maintenance Cleaning NOTE: It is recommended to clean the lift and its accessories between each patient use. Cleaning of Lift and Accessories 1) Use a cloth soaked with water to remove 4) Use a clean damp cloth with clear water to excessive residues from the lift and its wipe off all spots of cleaning fluids. -
Page 55: Disinfection
Disinfection Wipe the Maxi Sky 2 and accessories using a solution containing one of the compatible disinfectants below. Disinfection methods should comply with the local or national guidelines (Decontamination of Medical Devices), depending on the Healthcare Facility or country of use. -
Page 56: Handling, Transport And Storage
The lift should not remain stored for long periods Edge wear (fraying) of time without recharging the batteries. If you store or ship the Maxi Sky 2, ensure that Noticeable the power is turned off (no green light) discolouration (strap beforehand. -
Page 57: Inspections For The Lift
FREQUENCY Every two years or 5000 cycles Every year or 2500 cycles Inspections for the Lift Every four months or 1000 cycles Before every use Initially USER INSPECTION Inspect for evidence of external damage, missing parts or broken panels. √... -
Page 58: Inspections For Rails
√ Load test with the SWL (safe working load). NOTE: If the product does not work as intended, immediately contact your local Arjo distributor for support. WARNING: Before each use, make sure all end stoppers are in place to prevent a fall risk. -
Page 59: Troubleshooting
TO CHECK • Bring the unit to the charging station. After power ON, the LED does • If the unit is not charging, contact your Arjo agent for not light and nothing appears on maintenance. display. • The lift may be in “Sleep mode”. Press a button on the hand The LED is RED and nothing control and see if something appears on the display. - Page 60 If so, the problem may be coming from the hand control. • Contact your local Arjo agent to have the hand control replaced. • Check if the strap is completely rolled inside the lift. Only the UP button on the hand •...
- Page 61 Batteries might not charge or charging station might be The LED is still flashing GREEN defective. after 24 hours of continuous • Contact your local Arjo agent to have the batteries replaced or charging with lift under charging charging system maintenance. station. •...
-
Page 62: Technical Specifications
Technical Specifications Overall Dimensions Maxi Sky 2 2,5° 2,5° max. max. 15° 15° max. max. Loop Sling Spreader Bars (Basic Ceiling Lifter model only) 700-05461 700-05443 8 1/8 9 5/8 24 3/4 27 7/48 1 3/4 27 1/4 1.5 kg / 3.3 lb... -
Page 63: Scale
Scale Basic Ceiling Lifter model Maxi Sky 2 Ceiling Lifter & Infection Control models Model Model 700-00511 700-00531 700-19485 700-19490 Type Type Standard Class III Standard Class III Weight 0.7 kg/1.5 lb Weight 0.7 kg/1.5 lb Loop Sling Spreader Bars (... -
Page 64: Dynamic Positioning Spreader Bars
Dynamic Positioning Spreader Bars 700-19475 700-19350 (not for Basic Ceiling Lifter model) (not for Basic Ceiling Lifter model) 7 5/8 21 11/16 24 3/8 25 3/16 21 1/2 3.4 kg / 7.5 lb 7.9 kg / 17.4 lb 700-19480 700-19355 (not for Basic Ceiling Lifter model) (not for Basic Ceiling Lifter model) 23 3/4... -
Page 65: Maxi Sky 2 Transportable
Maxi Sky 2 Transportable Charging Station version shown Charging Station version show 418mm 272mm 10 3/4" 16 1/2" 60mm 2 3/8" 236mm 9 1/4" 2.5° 2300mm [90 1/2"] 15° 15° Receiving modules 700-31400 (Charging Station) 700-31401 (ECS) 9 5/8 9 5/8... -
Page 66: Technical Data
WARNING: Portable RF communications equipment (including peripherals such as antenna cables and external antennas) should be used no closer than 30 cm to any part of the Maxi Sky 2, including cables specified by the manufacturer. Otherwise, performance degradation of this equipment could result. See "Electromagnetic Compatibility"... -
Page 67: Approvals And List Of Standards
Electromagnetic Compliance Maxi Sky 2 has been tested for compliance with current regulatory standards regarding its capacity to block EMI (electromagnetic interference) from external sources. Nonetheless, some procedures can help reduce electromagnetic interferences: •... -
Page 68: Electromagnetic Emissions
Electromagnetic Emissions - For all Equipment and Systems Maxi Sky 2 is intended for use in the electromagnetic environment indicated below. The customer or the user of the Maxi Sky 2 should assure that it is used in such an environment. Emissions test... -
Page 69: Electromagnetic Immunity
Electromagnetic Immunity - For all Equipment and Systems Maxi Sky 2 is intended for use in electromagnetic environment specified below. The customer or the user of the Maxi Sky 2 should assure that it is used in such an environment. Electromagnetic... - Page 70 Electromagnetic Immunity - For all Equipment and Systems Maxi Sky 2 is intended for use in electromagnetic environment specified below. The customer or the user of the Maxi Sky 2 should assure that it is used in such an environment. Immunity test...
- Page 71 AUSTRALIA FRANCE POLSKA Arjo Australia Pty Ltd Arjo SAS Arjo Polska Sp. z o.o. 78, Forsyth Street 2 Avenue Alcide de Gasperi ul. Ks Piotra Wawrzyniaka 2 O’Connor CS 70133 PL-62-052 KOMORNIKI (Pozna ) AU-6163 Western Australia FR-59436 RONCQ CEDEX...
- Page 72 At Arjo, we are committed to improving the everyday lives of people affected by reduced mobility and age-related health challenges. With products and solutions that ensure ergonomic patient handling, personal hygiene, disinfection, diagnostics, and the effective prevention of pressure ulcers and venous thromboembolism, we help professionals across care environments to continually raise...
Need help?
Do you have a question about the Maxi Sky 2 and is the answer not in the manual?
Questions and answers