Dormakaba Saffire LX Installation Instructions Manual
Exit device operators
Hide thumbs
Also See for Saffire LX:
- Installation manual (28 pages) ,
- Installation instructions manual (27 pages) ,
- User instructions (4 pages)
Table of Contents
Advertisement
Quick Links
Advertisement
Table of Contents

Related Manuals for Dormakaba Saffire LX


Summary of Contents for Dormakaba Saffire LX
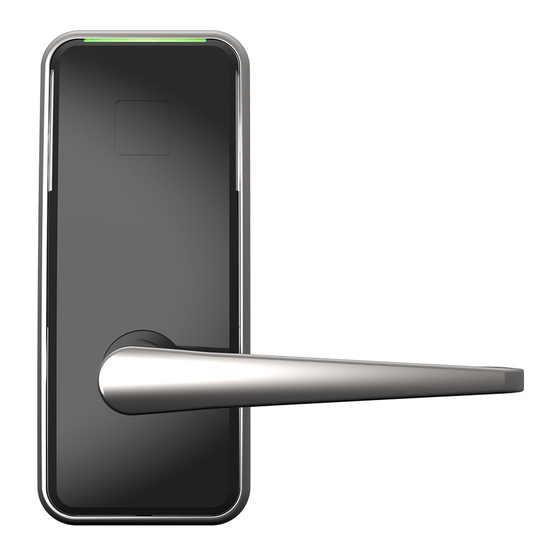
- Page 1 Exit Device Operators Saffire LX Installation instructions PK3713-T - 2019 - 07 ...
- Page 2 SAFFIRE LX MATCH‐UP CHART ...
-
Page 4: Table Of Contents
: (1) l'appareil ne doit pas produire de brouillage, et (2) l'utilisateur de l'appareil doit accepter tout brouillage radioélectrique subi, même si le brouillage est susceptible d'en compromettre le fonctionnement. Made in Canada ©2018 dormakaba Canada Inc.All trademarks and registered trademarks are the property of their respective owners. Saffire LX PK3713_T 2019-03 ... -
Page 5: Introduction And Disclaimers
Introduction and disclaimers Caution: Please read and follow all directions carefully. Wear safety glasses when making the holes. Target Audience: These instructions are designed for use by maintenance professionals or lock installers who are familiar with common safety practices and competent to perform the steps described. dormakaba is not responsible for damage or malfunction due to incorrect installation however arising. Important: Carefully inspect windows, doorframe, door, etc. to ensure that the recommended procedures will not cause damage. dormakaba standard warranty does not cover damages caused by installation. Respect applicable building codes regarding handle height. Technical Assistance For technical assistance, call: ... -
Page 6: Components
3 Components Standard mounting Secondary back plate mounting Saffire LX PK3713_T 2019-03 ... - Page 7 SCREW 12‐24 x ½ FLAT HEAD PHILLIPS NO.2 12 118‐515979 1 KEY & CYLINDER SAFFIRE LX 13 810‐516437 1 SCREW 10‐32 x 7/16 ROUND HEAD PHILLIPS NO.2 14 041‐515465 1 KEY CYLINDER ACCESS PLATE 15 810‐509093 2 SCREW 6‐32 x 5/16 FLAT HEAD PHILLIPS NO.2 16 118‐515937‐V 1 BATTERY & ANTENNA ENCLOSURE 17 041‐515972 1 SECONDARY BACKPLATE 18 033‐515996‐2 1 LOCK GASKET 19 810‐515193 2 SCREW 8‐32 x ½ PAN HEAD PHILLIPS Saffire LX PK3713_T 2019-03 ...
-
Page 8: 06 4. Installation Steps
4 Installation Steps 4.1. Install key cylinder (for MKO only) • Insert the cylinder core in the key override housing. • Secure the cylinder core (item 13) using screw item 13. • Secure the access plate key cylinder item 14 over the key override housing. • Secure the access plate using two screws item 15. 1 2 3 4 Saffire LX PK3713_T 2019-03 ... -
Page 9: Install Mounting Option
4.2. Install mounting option (for secondary backplate mounting only) • If supplied with secondary backplate item 17, install gasket item 18 & secure secondary backplate item 17 into place using 3 screw items 9 & 1 screw item 11. Saffire LX PK3713_T 2019-03 ... -
Page 10: Install The Lock Spindle
4 Installation Steps 4.3. Install the lock spindle The spindle must be installed and properly secured in the front lock housing assembly. The spindle is used to connect the handle to operate the opening and closing door mechanism. • Insert the spindle item 3/4/5 (depending exit device supplied) smoothly until it clips. Saffire LX PK3713_T 2019-03 ... -
Page 11: Install The Lock Housing On The Door
4.4. Install the lock housing on the door Before starting the installation of the lock on the door, please make sure the door has been prepared properly with proper holes for the lock. Refer to corresponding drilling template for your lock model. Drilling templates are available in the centerfold included in this installation manual and on the dormakaba support site (dormakabalodgingsupport.com) Install the housing on the door and align with the lock mechanism. • Install the front lock housing with gasket item 19, routing the wire cable(s) by the center hole at the top & in the groove. • Install the supplied adaptor plate and secure with 3 screw items 7. OR • If supplied with secondary backplate item 18, secure the housing into place using 4 binding barrels item 2 with 4 screw items 8. Saffire LX PK3713_T 2019-03 ... -
Page 12: Install Exit Device
For rim and concealed mount exit devices, start with step 4.6 For surface mount exit devices, start with step 4.7 4.6. Connect the cables & install enclosure • Connect each cable with its matching connector and route the excess of cable back into the hole of the door. • Secure battery enclosure with 2 screw items 19. • Insert the batteries in the battery holder respecting the polarity indicated in the battery holder . • Reinstall cover with setscrew Saffire LX PK3713_T 2019-03 ... -
Page 13: Connect Cables & Install Enclosure (Svr Only)
Saffire LX PK3713_T 2019-03 ... -
Page 14: Install Outside Lever Handle
IMPORTANT Use only Alkaline batteries 4.9. Step 9: Test lock functionality Make sure the room door is open prior testing A ‐ Present test keycard B ‐ Check green & red lights flash C ‐ Rotate outside lever to check bolt or rod(s) retraction D ‐ Release outside lever, should move freely E – Push panic bar to check bolt or rod(s) retraction 4.13. Step 13: Program the lock Refer to dormakaba access management system user manual for lock programming. Saffire LX PK3713_T 2019-03 ... - Page 15 Online Consumable Orders: www.saflokstore.com To access all of our easy steps, please visit our Support Website: www.kabalodgingsupport.com www.dormakaba.com Saffire LX PK3713_T 2019-03 ...
Need help?
Do you have a question about the Saffire LX and is the answer not in the manual?
Questions and answers