Advertisement
Available languages
Available languages
Quick Links
SINGLE MAST NET CLIMBER
INSTALLATION MANUAL
Safety Checklist after first assembly
● Test intervals of Safety: 6 months
● Test Component and contents:
1. Removing the reticulated system:
- Check of removing condition each rope
- Screwing the turn buckle and conversion the turnbuckle
in anchors plate(see for this workstep turnbuckle assembly)
2. Abrasion condition of rope:
- Checking of all rope surface
- Strengthned of rope: Coating on the surface
3. Attachment condition of the anchors plate and turnbuckle
4. Screwing condition of all bolt
5. Galvanizing condition of the steel component:
- Protection of steel component from corrosion.
● Measure
In case of the appearance the defect detail is
repaired usually within 3 days after checking.
GSWEB PLAYGROUND EQUIPMENT
1046-3, Najeon-ri, Saengnim-myeon, Gimhae-si
Gyeongsangnam-do, 621-821, Republic Of Korea
Tel) +82. 55. 326. 9096~7
Fax) +82. 55. 326. 9022
E-mail) gswebinfo@chol.com
Web site) www.gsweb21.com
GSWeb Playground Equipment
By Lappset Group Oy
MODEL NO.
200203, 220203
GS-W1002
Ver. 070101
1
Advertisement

Related Manuals for GSWeb Playground Equipment GS-W1002


Summary of Contents for GSWeb Playground Equipment GS-W1002
- Page 1 - Protection of steel component from corrosion. ● Measure In case of the appearance the defect detail is repaired usually within 3 days after checking. GSWEB PLAYGROUND EQUIPMENT 1046-3, Najeon-ri, Saengnim-myeon, Gimhae-si Gyeongsangnam-do, 621-821, Republic Of Korea Tel) +82. 55. 326. 9096~7 Fax) +82.
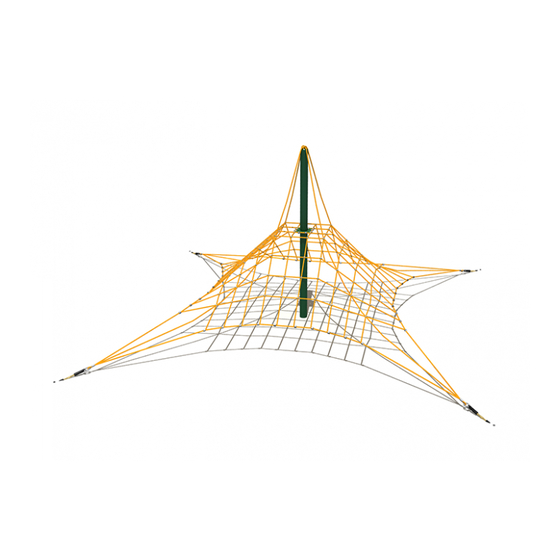
- Page 2 Ages: 6 to 12 years Capacity: 46 children Size: L: 32' 6" / 9.9m W: 32' 6" / 9.9m H: 18' 8" / 5.7m Use zone: L: 42' 7" / 12.97m W: 42' 7" / 12.97m Figure-1: Completed Net GSWeb Playground Equipment...
- Page 3 This height is based on the centre of gravity height of the maximum user. Figure-2: Safety area Imperial/Metric conversion 6' = 1830mm 22' 11-1/2" = 7000mm 57' 11" = 17660mm GSWeb Playground Equipment...
- Page 4 By Lappset Group Oy MODEL NO. SINGLE MAST NET CLIMBER 200203, 220203 Foundation Information GS-W1002 Foundation Please refer to GS-W1002 drawing for installation dimension Pole Figure-4: Foundation section view Level Line Finished ground Finished Grade surface layer Figure-3 : Excavate enough...
-
Page 5: Foundation Layout
Position anchor plate on concrete footing " " 22' 11-1/2" = 7000mm [CF] 'L" anchor hole 32' 5-3/4" = 9900mm Front edge of anchor plate must be installed 4" (100mm) from the edge of concrete footing. Anchor Plate position GSWeb Playground Equipment... - Page 6 1 frame (27-½" / 700mm L x 27-½" / 700mm W x 31-½" / 800mm H) 7-⅞" ⅞" *Use ½" (min) plywood; not included in package 5-⅞" NOTE: Use anchor plate as guide for exact measurements. (a) wood jig for Anchor plate (b) wood support frame for concrete Figure-6: Wood support frame GSWeb Playground Equipment...
- Page 7 Allow 3-5 days for concrete to cure before proceeding to next step. [concrete footing work] *Concrete is to be wet concrete with minimum 25 MPA / 3500PSI. Pour wet concrete in the wooden support frame Figure-7: Concrete footing work GSWeb Playground Equipment...
- Page 8 SINGLE MAST NET CLIMBER 200203, 220203 Remove Wood Support Frame GS-W1002 Remove wood support frame from dry concrete blocks After concrete has cured enough, remove frames and replace soil around the footings to subgrade level Figure-8: remove wood support frame GSWeb Playground Equipment...
- Page 9 Anchor Plate Assembly GS-W1002 (a) Anchor Plate Figure-9: Concreted blocks - Clean threads of "L"-Anchors (b) Post plate (b) Post plate (a) Anchor Plate Figure-10: Attach Anchor plate to footing with flat washer, locking washer and nut. GSWeb Playground Equipment...
-
Page 10: Post Assembly
SINGLE MAST NET CLIMBER 200203, 220203 Post Assembly GS-W1002 Post Assembly Insert Post following nylon string STEP-2 STEP-1 Nylon string Figure-12: Insert Post Figure-11: Find Nylon String following Nylon string NOTE: Remove string prior to placing cap on post. GSWeb Playground Equipment... - Page 11 (already attached to the top of the net) into the mast’s top end. STEP-3 Figure-14: U-bolt assembly. STEP-4 Note: Rubber mallet may be required to insert cap into post. Figure-13: Insert Post Figure-15: Post cap assembly into the Center of Net. GSWeb Playground Equipment...
- Page 12 Safety cable Assembly After successfully preparing the net and mast assembly, attach safety cable with M22 X L110 H/T Bolt to Anchor plate as shown below M22 X L110 H/T Bolt Figure-16: Attach cable to (A) (B) (C) GSWeb Playground Equipment...
- Page 13 SINGLE MAST NET CLIMBER 200203, 220203 Standing the net GS-W1002 It is strongly recommended that 5-7 workers or a machine be used to lift the net into place. [Working Process] Figure-18: Centre Post Figure-19: Safety cables attached GSWeb Playground Equipment...
- Page 14 SINGLE MAST NET CLIMBER 200203, 220203 Stand Net up GS-W1002 After standing up the Net, Attach remaining safety rope and Turnbuckles Figure-21: Loosen Turnbuckle: all the way (about 100mm), leaving only 4 or 5 threads attached Figure-20: Stand Net up GSWeb Playground Equipment...
- Page 15 Tightening Turnbuckles NOTE: Make sure post is level before tightening and remains level during process. (a) + (a) Tighten Cable with Turnbuclke at the Same time (b) + (b) Tighten Cable with Turnbuclke at the Same time GSWeb Playground Equipment...
- Page 16 After Net structure tension is completed, the net will stretch slightly over the first four weeks of use. Following this initial period, the net needs to be fully re-tensioned by Turnbuclke after 1 year. Figure-24: completed Net GSWeb Playground Equipment...
- Page 17 GS-W1002 1: main post 7: H/T bolt,nut washer 2: multi compound rope 8: U-bolt,nut,washer 3: post cap 9: main post plate 4: turn buckle 10: L-anchor bolt,nut,washer 5: anchor shackle 11: Anchor plate 6: shock proof ring GSWeb Playground Equipment...
-
Page 18: Maintenance
SINGLE MAST NET CLIMBER 200203, 220203 Maintenance GS-W1002 A weekly check of the activity net is recommended to ensure that no acts of vandalism have damaged the rope. Periodic checks on tension will assist in the durability of the product. GSWeb Playground Equipment... - Page 19 GSWeb Playground Equipment...
- Page 20 Repairs during operation that could put the safety of maintenance personnel of the public at risk, should be avoided. F. Equipment alterations Alterations to parts of a piece of equipment or structure that could affect the essential safety of the equipment should only be carried out after consultation with the manufacturer or a compete person. GSWeb Playground Equipment...
- Page 21 - Teräskomponenttien korroosiosuoja. Toimenpide ● ● ● ● Mikäli vikoja esiintyy on ne yleensä korjattava 3 vuorkauden sisällä tarkistuksesta. GSWEB PLAYGROUND EQUIPMENT 1046-3, Najeon-ri, Saengnim-myeon, Gimhae-si Gyeongsangnam-do, 621-821, Republic Of Korea Puh: +82. 55. 326. 9096~7 Fax: +82. 55. 326. 9022 S-posti: gswebinfo@chol.com...
- Page 22 Kapasiteetti: 46 lasta Kapasiteetti: 46 lasta Koko: P: 32' 6" / 9,9m L: 32' 6" / 9,9m H: 18' 8" / 5,7m Käyttöalue: P: 42' 7" / 12,97m L: 42' 7" / 12.97m Kuva 1. Valmis verkko GSWeb Playground Equipment...
- Page 23 Tämä korkeus perustuu painopistekorkeuteen maksimikäyttäjältä. Kuva 2: Turva-alue Metrinen/imperiaalinen vaihdos 6' = 1830mm 22' 11-1/2" = 7000mm 22' 11-1/2" = 7000mm 57' 11" = 17660mm GSWeb Playground Equipment...
- Page 24 Perustuksen tiedot Perustuksen tiedot Perustuksen tiedot Perustuksen tiedot 200203 / 220203 200203 / 220203 200203 / 220203 200203 / 220203 Perustus Katso GS-W1002 piirustus saadaksesi asennuskoot Pole Kuva 4: Perustuksen läpileikkaus Level Line Finished ground Viimeistelty taso surface layer Kuva 3: Kaiva tarpeeksi jotta saavutetaan riittävä...
- Page 25 Etäisyys kappaleen etupuolelta seuraavan kappaleen etupuoleen on 45' 11" (14000mm) Metrinen/imperiaalinen vaihdos Ankkurilevyn asemointi betonijalustaan " " 22' 11-1/2" = 7000mm [CF] 'L" ankkurin aukko 32' 5-3/4" = 9900mm Ankkurilevyn etureuna täytyy asentaa 4" (100mm) betonijalustuksen reunasta. Ankkurilevyn asemointi GSWeb Playground Equipment...
- Page 26 1 kehys (27-½" / 700mm L x 27-½" / 700mm W x 31-½" / 800mm H) " ⅞ ⅞" *Käytä ½" (min) vaneria; ei sisälly pakkaukseen 5-⅞" HUOMAUTUS: Käytä ankkurilevyä apuna tarkoille mitoituksille. (a) Ankkurilevyn puinen asennusteline asennusteline (b) Puinen tukikehys betonille Kuva 6: Puinen tukikehys GSWeb Playground Equipment...
- Page 27 Valuta betonia* puisen tukikehyksen yläreunaan asti. Anna betonin kovettua 3-5 vuorokautta ennen seuraavaan vaiheeseen siirtymistä. [betonijalustan työstö] *Betonin on oltava märkää betonia jossa on minimissään 25 MPA / 3500 PSI. Valuta märkää betonia puiseen tukikehykseen. Kuva 7: Betonijalustan työstö GSWeb Playground Equipment...
- Page 28 200203 / 220203 200203 / 220203 200203 / 220203 200203 / 220203 Poista puiset tukikehykset kuivista betonikappaleista Kun betoni on kovettunut tarpeeksi, poista kehykset ja täytä alue maa- aineksella jaluksen ympäriltä maapohjan tasolle. Kuva 8: Poista puinen tukikehys GSWeb Playground Equipment...
- Page 29 200203 / 220203 200203 / 220203 (a) Ankkurilevy Kuva 9: Betonikappaleet - "L" ankkureiden vapaat "L" ankkureiden vapaat kierteytykset (b) Kiinnityslevy (b) Kiinnityslevy (a) Ankkurilevy Kuva 10. Kiinnitä ankkurilevy jalustaan käyttäen tasaista pultin aluslevyä, varmistusaluslaattaa ja mutteria. GSWeb Playground Equipment...
- Page 30 200203 / 220203 200203 / 220203 200203 / 220203 Paalun asennus Asenna paalu nailonköyttä seuraten. VAIHE 2 VAIHE 1 Nailonköysi Kuva 12: Asenna paalu Kuva 11. Etsi nailonköysi nailonköyttä seuraten HUOMAUTUS: Poista köysi ennen paalun kannen paikalleen asentamista. GSWeb Playground Equipment...
- Page 31 Paina kantta (valmiiksi asennettu verkon yläosaan) paalun yläosaan. VAIHE 3 Kuva 14. U-pultin asennus. VAIHE 4 Huom: Kumivasaraa voi tarvita paalun kannen paikalleen asettamisessa paalun kärkeen. Kuva 13. Aseta paalu verkon keskustaan. Kuva 15. Paalunkannen asennus GSWeb Playground Equipment...
- Page 32 Kiinnitä turvaköysi ankkurilevyihin (A) (B) (C) kuten kuvassa 16. Kuva 17: Turvaköyden asennus Verkon onnistuneen asennuksen sekä paalun asennuksen jälkeen, kiinnitä M22 X L110 H/T pultti ankkurilevyyn kuten kuvassa alla. M22 X L110 H/T PULTTI Kuva 16: Liitä kaapeli (A) (B) (C) GSWeb Playground Equipment...
- Page 33 Verkon ylösnosto Verkon ylösnosto Verkon ylösnosto Verkon ylösnosto 200203 / 220203 200203 / 220203 200203 / 220203 200203 / 220203 On erittäin suositeltavaa että 5-7 apulaista auttaa verkon paikalleen nostamisessa. [Työprosessi] Kuva 18: Keskipaalu Kuva 19: Turvaköydet kiinnitettyinä GSWeb Playground Equipment...
- Page 34 200203 / 220203 Verkon noston jälkeen kiinnitä loput turvaköydet ja kiristyslukot. Kuva 21: Löysää kiristyslukko: täysin (noin 100mm), jättäen ainoastaan 4 tai 5 kierrettä liitettyinä. Kuva 20: Verkon ylösnosto 1 4 1 4 1 4 1 4 GSWeb Playground Equipment...
- Page 35 Kiristyslukon kiristäminen HUOMAUTUS: Varmista että paalu ei kallistu ja pysyy kallistumatta prosessin ajan. Kiristä köyttä ja kiristyslukkoa samanaikaisesti (a) + (a) (b) + (b) Kiristä köyttä ja kiristyslukkoa samanaikaisesti 1 5 1 5 1 5 1 5 GSWeb Playground Equipment...
- Page 36 Katso IPEMA ja TUV ylläpitojärjestelmät. Verkon huolellisen kiristämisen jälkeen tulee se venymään jonkin verran ensimmäisen 4 käyttöviikon aikana. Tämän ensimmäisen käyttökauden jälkeen Tämän ensimmäisen käyttökauden jälkeen tulee verkko täydellisesti uudelleen kiristää 1 vuoden jälkeen. Kuva 24: Valmis verkko GSWeb Playground Equipment...
- Page 37 7. H/T pultti, mutteri, aluslaatta 2. Moniyhdistelmäköysi 8. U-pultti, mutteri, aluslaatta 3. Paalun kansi 9. Pääkiinnityslevy 4. Kiristyslukko 10. L-ankkuripultti, mutteri, 5. Ankkurin ketjulukko aluslaatta 6. Iskunkestävä vanne 11. Asennusteline 1 7 1 7 1 7 1 7 GSWeb Playground Equipment...
- Page 38 200203 / 220203 200203 / 220203 200203 / 220203 200203 / 220203 Viikoittainen verkon tarkistus on suositeltavaa varmistamaan, että köyteen ei ole kohdistunut vahingollista ilkivaltaa. Ajoittaiset tarkistukset jännitykseen parantavat tuotteen kestävyyttä. 1 8 1 8 1 8 1 8 GSWeb Playground Equipment...
- Page 39 1 9 1 9 1 9 1 9 GSWeb Playground Equipment...
- Page 40 Laitteen käyttöönoton aikana suoritetut korjaukset jotka voivat aiheuttaa riskin kunnossapitohenkilöstölle tai yleisölle on vältettävä. F. Muutokset laitteisiin Laitteisin tai rakenteisiin tehdyt muutokset jotka voivat olennaisesti vaikuttaa välineiden turvallisuuteen ei saa suorittaa ilman että siitä etukäteen konsultoidaan valmistajan tai pätevän henkilön kanssa. 2 0 2 0 2 0 2 0 GSWeb Playground Equipment...
- Page 41 - Teräskomponenttien korroosiosuoja. Toimenpide ● ● ● ● Mikäli vikoja esiintyy on ne yleensä korjattava 3 vuorkauden sisällä tarkistuksesta. GSWEB PLAYGROUND EQUIPMENT 1046-3, Najeon-ri, Saengnim-myeon, Gimhae-si Gyeongsangnam-do, 621-821, Republic Of Korea Puh: +82. 55. 326. 9096~7 Fax: +82. 55. 326. 9022 S-posti: gswebinfo@chol.com...
- Page 42 Kapasiteetti: 46 lasta Kapasiteetti: 46 lasta Koko: P: 32' 6" / 9,9m L: 32' 6" / 9,9m H: 18' 8" / 5,7m Käyttöalue: P: 42' 7" / 12,97m L: 42' 7" / 12.97m Kuva 1. Valmis verkko GSWeb Playground Equipment...
- Page 43 Tämä korkeus perustuu painopistekorkeuteen maksimikäyttäjältä. Kuva 2: Turva-alue Metrinen/imperiaalinen vaihdos 6' = 1830mm 22' 11-1/2" = 7000mm 22' 11-1/2" = 7000mm 57' 11" = 17660mm GSWeb Playground Equipment...
- Page 44 Perustuksen tiedot Perustuksen tiedot Perustuksen tiedot Perustuksen tiedot 200203 / 220203 200203 / 220203 200203 / 220203 200203 / 220203 Perustus Katso GS-W1002 piirustus saadaksesi asennuskoot Pole Kuva 4: Perustuksen läpileikkaus Level Line Finished ground Viimeistelty taso surface layer Kuva 3: Kaiva tarpeeksi jotta saavutetaan riittävä...
- Page 45 Etäisyys kappaleen etupuolelta seuraavan kappaleen etupuoleen on 45' 11" (14000mm) Metrinen/imperiaalinen vaihdos Ankkurilevyn asemointi betonijalustaan " " 22' 11-1/2" = 7000mm [CF] 'L" ankkurin aukko 32' 5-3/4" = 9900mm Ankkurilevyn etureuna täytyy asentaa 4" (100mm) betonijalustuksen reunasta. Ankkurilevyn asemointi GSWeb Playground Equipment...
- Page 46 1 kehys (27-½" / 700mm L x 27-½" / 700mm W x 31-½" / 800mm H) " ⅞ ⅞" *Käytä ½" (min) vaneria; ei sisälly pakkaukseen 5-⅞" HUOMAUTUS: Käytä ankkurilevyä apuna tarkoille mitoituksille. (a) Ankkurilevyn puinen asennusteline asennusteline (b) Puinen tukikehys betonille Kuva 6: Puinen tukikehys GSWeb Playground Equipment...
- Page 47 Valuta betonia* puisen tukikehyksen yläreunaan asti. Anna betonin kovettua 3-5 vuorokautta ennen seuraavaan vaiheeseen siirtymistä. [betonijalustan työstö] *Betonin on oltava märkää betonia jossa on minimissään 25 MPA / 3500 PSI. Valuta märkää betonia puiseen tukikehykseen. Kuva 7: Betonijalustan työstö GSWeb Playground Equipment...
- Page 48 200203 / 220203 200203 / 220203 200203 / 220203 200203 / 220203 Poista puiset tukikehykset kuivista betonikappaleista Kun betoni on kovettunut tarpeeksi, poista kehykset ja täytä alue maa- aineksella jaluksen ympäriltä maapohjan tasolle. Kuva 8: Poista puinen tukikehys GSWeb Playground Equipment...
- Page 49 200203 / 220203 200203 / 220203 (a) Ankkurilevy Kuva 9: Betonikappaleet - "L" ankkureiden vapaat "L" ankkureiden vapaat kierteytykset (b) Kiinnityslevy (b) Kiinnityslevy (a) Ankkurilevy Kuva 10. Kiinnitä ankkurilevy jalustaan käyttäen tasaista pultin aluslevyä, varmistusaluslaattaa ja mutteria. GSWeb Playground Equipment...
- Page 50 200203 / 220203 200203 / 220203 200203 / 220203 Paalun asennus Asenna paalu nailonköyttä seuraten. VAIHE 2 VAIHE 1 Nailonköysi Kuva 12: Asenna paalu Kuva 11. Etsi nailonköysi nailonköyttä seuraten HUOMAUTUS: Poista köysi ennen paalun kannen paikalleen asentamista. GSWeb Playground Equipment...
- Page 51 Paina kantta (valmiiksi asennettu verkon yläosaan) paalun yläosaan. VAIHE 3 Kuva 14. U-pultin asennus. VAIHE 4 Huom: Kumivasaraa voi tarvita paalun kannen paikalleen asettamisessa paalun kärkeen. Kuva 13. Aseta paalu verkon keskustaan. Kuva 15. Paalunkannen asennus GSWeb Playground Equipment...
- Page 52 Kiinnitä turvaköysi ankkurilevyihin (A) (B) (C) kuten kuvassa 16. Kuva 17: Turvaköyden asennus Verkon onnistuneen asennuksen sekä paalun asennuksen jälkeen, kiinnitä M22 X L110 H/T pultti ankkurilevyyn kuten kuvassa alla. M22 X L110 H/T PULTTI Kuva 16: Liitä kaapeli (A) (B) (C) GSWeb Playground Equipment...
- Page 53 Verkon ylösnosto Verkon ylösnosto Verkon ylösnosto Verkon ylösnosto 200203 / 220203 200203 / 220203 200203 / 220203 200203 / 220203 On erittäin suositeltavaa että 5-7 apulaista auttaa verkon paikalleen nostamisessa. [Työprosessi] Kuva 18: Keskipaalu Kuva 19: Turvaköydet kiinnitettyinä GSWeb Playground Equipment...
- Page 54 200203 / 220203 Verkon noston jälkeen kiinnitä loput turvaköydet ja kiristyslukot. Kuva 21: Löysää kiristyslukko: täysin (noin 100mm), jättäen ainoastaan 4 tai 5 kierrettä liitettyinä. Kuva 20: Verkon ylösnosto 1 4 1 4 1 4 1 4 GSWeb Playground Equipment...
- Page 55 Kiristyslukon kiristäminen HUOMAUTUS: Varmista että paalu ei kallistu ja pysyy kallistumatta prosessin ajan. Kiristä köyttä ja kiristyslukkoa samanaikaisesti (a) + (a) (b) + (b) Kiristä köyttä ja kiristyslukkoa samanaikaisesti 1 5 1 5 1 5 1 5 GSWeb Playground Equipment...
- Page 56 Katso IPEMA ja TUV ylläpitojärjestelmät. Verkon huolellisen kiristämisen jälkeen tulee se venymään jonkin verran ensimmäisen 4 käyttöviikon aikana. Tämän ensimmäisen käyttökauden jälkeen Tämän ensimmäisen käyttökauden jälkeen tulee verkko täydellisesti uudelleen kiristää 1 vuoden jälkeen. Kuva 24: Valmis verkko GSWeb Playground Equipment...
- Page 57 7. H/T pultti, mutteri, aluslaatta 2. Moniyhdistelmäköysi 8. U-pultti, mutteri, aluslaatta 3. Paalun kansi 9. Pääkiinnityslevy 4. Kiristyslukko 10. L-ankkuripultti, mutteri, 5. Ankkurin ketjulukko aluslaatta 6. Iskunkestävä vanne 11. Asennusteline 1 7 1 7 1 7 1 7 GSWeb Playground Equipment...
- Page 58 200203 / 220203 200203 / 220203 200203 / 220203 200203 / 220203 Viikoittainen verkon tarkistus on suositeltavaa varmistamaan, että köyteen ei ole kohdistunut vahingollista ilkivaltaa. Ajoittaiset tarkistukset jännitykseen parantavat tuotteen kestävyyttä. 1 8 1 8 1 8 1 8 GSWeb Playground Equipment...
- Page 59 1 9 1 9 1 9 1 9 GSWeb Playground Equipment...
- Page 60 Laitteen käyttöönoton aikana suoritetut korjaukset jotka voivat aiheuttaa riskin kunnossapitohenkilöstölle tai yleisölle on vältettävä. F. Muutokset laitteisiin Laitteisin tai rakenteisiin tehdyt muutokset jotka voivat olennaisesti vaikuttaa välineiden turvallisuuteen ei saa suorittaa ilman että siitä etukäteen konsultoidaan valmistajan tai pätevän henkilön kanssa. 2 0 2 0 2 0 2 0 GSWeb Playground Equipment...
- Page 61 No silty or clay particles. Grain size can be identified by use of a sieve test, such as EN 933-1 ( See NOTE 1 in 4.2.8.5.2 ) E-mail : gswebinfo@chol.com Website : www.gsweb21.com GSWeb Playground Equipment Tel : +82 55 326 9096 Fax : +82 55 326 9022...
- Page 62 No silty or clay particles. Grain size can be identified by use of a sieve test, such as EN 933-1 ( See NOTE 1 in 4.2.8.5.2 ) E-mail : gswebinfo@chol.com Website : www.gsweb21.com GSWeb Playground Equipment Tel : +82 55 326 9096 Fax : +82 55 326 9022...
- Page 63 No silty or clay particles. Grain size can be identified by use of a sieve test, such as EN 933-1 ( See NOTE 1 in 4.2.8.5.2 ) E-mail : gswebinfo@chol.com Website : www.gsweb21.com GSWeb Playground Equipment Tel : +82 55 326 9096 Fax : +82 55 326 9022...
- Page 64 - Protection of steel component from corrosion. ● Measure In case of the appearance the defect detail is repaired usually within 3 days after checking. GSWEB PLAYGROUND EQUIPMENT 1046-3, Najeon-ri, Saengnim-myeon, Gimhae-si Gyeongsangnam-do, 621-821, Republic Of Korea Tel) +82. 55. 326. 9096~7 Fax) +82.
- Page 65 Ages: 6 to 12 years Capacity: 46 children Size: L: 32' 6" / 9.9m W: 32' 6" / 9.9m H: 18' 8" / 5.7m Use zone: L: 42' 7" / 12.97m W: 42' 7" / 12.97m Figure-1: Completed Net GSWeb Playground Equipment...
- Page 66 This height is based on the centre of gravity height of the maximum user. Figure-2: Safety area Imperial/Metric conversion 6' = 1830mm 22' 11-1/2" = 7000mm 57' 11" = 17660mm GSWeb Playground Equipment...
- Page 67 By Lappset Group Oy MODEL NO. SINGLE MAST NET CLIMBER 200203, 220203 Foundation Information GS-W1002 Foundation Please refer to GS-W1002 drawing for installation dimension Pole Figure-4: Foundation section view Level Line Finished ground Finished Grade surface layer Figure-3 : Excavate enough...
- Page 68 Position anchor plate on concrete footing " " 22' 11-1/2" = 7000mm [CF] 'L" anchor hole 32' 5-3/4" = 9900mm Front edge of anchor plate must be installed 4" (100mm) from the edge of concrete footing. Anchor Plate position GSWeb Playground Equipment...
- Page 69 1 frame (27-½" / 700mm L x 27-½" / 700mm W x 31-½" / 800mm H) 7-⅞" ⅞" *Use ½" (min) plywood; not included in package 5-⅞" NOTE: Use anchor plate as guide for exact measurements. (a) wood jig for Anchor plate (b) wood support frame for concrete Figure-6: Wood support frame GSWeb Playground Equipment...
- Page 70 Allow 3-5 days for concrete to cure before proceeding to next step. [concrete footing work] *Concrete is to be wet concrete with minimum 25 MPA / 3500PSI. Pour wet concrete in the wooden support frame Figure-7: Concrete footing work GSWeb Playground Equipment...
- Page 71 SINGLE MAST NET CLIMBER 200203, 220203 Remove Wood Support Frame GS-W1002 Remove wood support frame from dry concrete blocks After concrete has cured enough, remove frames and replace soil around the footings to subgrade level Figure-8: remove wood support frame GSWeb Playground Equipment...
- Page 72 Anchor Plate Assembly GS-W1002 (a) Anchor Plate Figure-9: Concreted blocks - Clean threads of "L"-Anchors (b) Post plate (b) Post plate (a) Anchor Plate Figure-10: Attach Anchor plate to footing with flat washer, locking washer and nut. GSWeb Playground Equipment...
- Page 73 SINGLE MAST NET CLIMBER 200203, 220203 Post Assembly GS-W1002 Post Assembly Insert Post following nylon string STEP-2 STEP-1 Nylon string Figure-12: Insert Post Figure-11: Find Nylon String following Nylon string NOTE: Remove string prior to placing cap on post. GSWeb Playground Equipment...
- Page 74 (already attached to the top of the net) into the mast’s top end. STEP-3 Figure-14: U-bolt assembly. STEP-4 Note: Rubber mallet may be required to insert cap into post. Figure-13: Insert Post Figure-15: Post cap assembly into the Center of Net. GSWeb Playground Equipment...
- Page 75 Safety cable Assembly After successfully preparing the net and mast assembly, attach safety cable with M22 X L110 H/T Bolt to Anchor plate as shown below M22 X L110 H/T Bolt Figure-16: Attach cable to (A) (B) (C) GSWeb Playground Equipment...
- Page 76 SINGLE MAST NET CLIMBER 200203, 220203 Standing the net GS-W1002 It is strongly recommended that 5-7 workers or a machine be used to lift the net into place. [Working Process] Figure-18: Centre Post Figure-19: Safety cables attached GSWeb Playground Equipment...
- Page 77 SINGLE MAST NET CLIMBER 200203, 220203 Stand Net up GS-W1002 After standing up the Net, Attach remaining safety rope and Turnbuckles Figure-21: Loosen Turnbuckle: all the way (about 100mm), leaving only 4 or 5 threads attached Figure-20: Stand Net up GSWeb Playground Equipment...
- Page 78 Tightening Turnbuckles NOTE: Make sure post is level before tightening and remains level during process. (a) + (a) Tighten Cable with Turnbuclke at the Same time (b) + (b) Tighten Cable with Turnbuclke at the Same time GSWeb Playground Equipment...
- Page 79 After Net structure tension is completed, the net will stretch slightly over the first four weeks of use. Following this initial period, the net needs to be fully re-tensioned by Turnbuclke after 1 year. Figure-24: completed Net GSWeb Playground Equipment...
- Page 80 GS-W1002 1: main post 7: H/T bolt,nut washer 2: multi compound rope 8: U-bolt,nut,washer 3: post cap 9: main post plate 4: turn buckle 10: L-anchor bolt,nut,washer 5: anchor shackle 11: Anchor plate 6: shock proof ring GSWeb Playground Equipment...
-
Page 81: Maintenance
SINGLE MAST NET CLIMBER 200203, 220203 Maintenance GS-W1002 A weekly check of the activity net is recommended to ensure that no acts of vandalism have damaged the rope. Periodic checks on tension will assist in the durability of the product. GSWeb Playground Equipment... - Page 82 GSWeb Playground Equipment...
- Page 83 Repairs during operation that could put the safety of maintenance personnel of the public at risk, should be avoided. F. Equipment alterations Alterations to parts of a piece of equipment or structure that could affect the essential safety of the equipment should only be carried out after consultation with the manufacturer or a compete person. GSWeb Playground Equipment...
Need help?
Do you have a question about the GS-W1002 and is the answer not in the manual?
Questions and answers