Siegenia KFV Assembly Instructions Manual
Electro-mechanical systems
Hide thumbs
Also See for KFV:
- Assembly instructions manual (16 pages) ,
- Assembly instructions manual (16 pages) ,
- Operating instructions manual (16 pages)

Related Manuals for Siegenia KFV


Summary of Contents for Siegenia KFV
- Page 1 ASSEMBLY INSTRUCTIONS Electro-mechanical systems A-opener 2.1 Window systems Door systems Comfort systems...
- Page 2 Assembly instructions Electromechanical systems A-opener 2.1 2/18 02.2019 H39.ELEKS005EN-01...
-
Page 3: Table Of Contents
Assembly instructions Electromechanical systems A-opener 2.1 Content INTRODUCTION .........4 Electromechanical test ........ 13 Troubleshooting .......... 14 Manufacturer and Service ......4 5.4.1 Functional disorder of the lever handle ..14 Target group of this documentation ..... 4 5.4.2 Functional disorder of the profile cylinder .. 14 Intended use .......... -
Page 4: Introduction
Follow the instructions in • Use the AS3500/3600 multi-point lock with A-opener Chapter 2 "Safety", in order to prevent personal injury 2.1 only with genuine KFV accessories in order to or disturbance. guarantee correct functioning. These instructions describe the assembly of the Incorrect use AS3500/3600 multi-point lock with A-opener 2.1 and... -
Page 5: Installation Conditions And Requirements
• Repair of the AS3500/3600 multi-point lock with • Surface treatment of the door and door frame must A-opener 2.1, which is not carried out by KFV or by take place before the multi-point lock is installed. a service agent authorised by KFV, will lead to the Subsequent surface treatment can reduce the functi- expiry of the warranty. -
Page 6: Symbols Used
Assembly instructions Electromechanical systems A-opener 2.1 1.11 Symbols used 1.12 Other types of indicators The following icons are used in this document: Below is a list of symbols used in these instructions and their meanings: General warning symbol • Items of text following this marker are found in lists. –... -
Page 7: Causes Of Damage
Assembly instructions Electromechanical systems A-opener 2.1 1.16 Causes of damage Do not drill through the door leaf in the area of the gear box when the multi-point lock is installed. Force must be exerted on the lever handle only in the normal direction of rotation. -
Page 8: Safety
(ISDN, DSL, etc.), this could lead to interference This symbol indicates special features and designates e.g. in the speed of the data transmission. We recom- mend that you use the shielded KFV cable. See: Product facts that require increased attention. catalogue KFV GENIUS and A-opener. -
Page 9: Assembly Of Sash Side
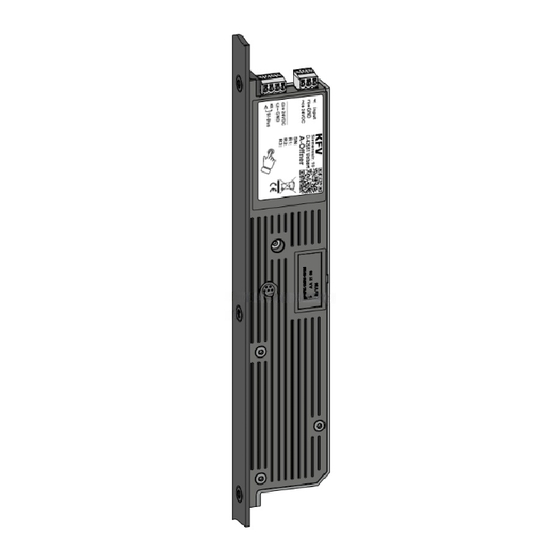
Assembly instructions Electromechanical systems A-opener 2.1 Assembly of sash side Delivery options A-opener 2.1 Functions A-opener 2.1 Opening via an E-button (optional) Opening via an access control system SI-BUS * recommended route depth = 55 mm H39.ELEKS005EN-01 02.2019 9/18 9/18... -
Page 10: Electrical Installation
Assembly instructions Electromechanical systems A-opener 2.1 Electrical installation Connector pin assignment [1] Connections and function Connec- Function tions Terminal A/B = Data interface SI-BUS Terminal C = A, B, C, D Output supply voltage – GND Terminal D = Output supply voltage + 24 V DC Operating voltage 2, 3 Terminal 2 = + 24 V DC... -
Page 11: Wiring Diagram
Assembly instructions Electromechanical systems A-opener 2.1 Wiring diagram DC LO DC OK Spindle square reference point ** recommended route depth = 55 mm *Information on the complete routing template for the multi-point lock can be obtained from the relevant assembly instructions. Item Designation Unlocking via the optional access control system... -
Page 12: Wiring Allocation
Only use shielded cables in order to prevent interferences, which have an effect on the AS3500/3600 multi-point lock with A-ope- ner 2.1, or originate from the AS3500/3600 multi-point lock with A-opener 2.1. We recommend that you use the original shielded KFV cable. See: Product catalogue KFV GENIUS and A-opener. Deburr all holes for the cable routing. -
Page 13: Functional Test
Assembly instructions Electromechanical systems A-opener 2.1 Functional test 5.1.3 Mechanical test of the AS3500/3600 multi-point lock with A-opener 2.1 In order to check the functionality, the door and the door Check the functioning of the locking elements with frame must be positioned vertically. the lever handle In case of stiffness or too much play, the frame parts and f Turn the key in the locking direction until the main... -
Page 14: Troubleshooting
Check that the door hardware is correctly seated. If the lever handle does not return to its original posi- tion by itself, the multi-point lock must be checked by KFV. 5.4.2 Functional disorder of the profile cylinder f If you cannot remove the key, dismount the profile cylinder and check it for functional disorders. -
Page 15: Appendix
Assembly instructions Electromechanical systems A-opener 2.1 Appendix Technical specifications Environmental conditions Ambient temperature range in the door (ac- - 25 °C to + 70 °C cording to DIN EN 14846 class K, M, L, N, P) Relative humidity 20% to 80% (non-condensing) Protection class IP 40 Electrical data... -
Page 16: Declaration Of Incorporation
Velbert, 2019-01-30 Site Manager The technical documents are provided by KFV Karl Fliether GmbH & Co. KG. This declaration certifies conformity with the directives cited but does not constitute a warrant of properties in a legal sense. The safety instructions provided in the product documentation supplied require compliance. -
Page 17: Test Report - Electromagnetic Compatibility
Assembly instructions Electromechanical systems A-opener 2.1 Test report - Electromagnetic compatibility H39.ELEKS005EN-01 02.2019 17/18 17/18... - Page 18 www.siegenia.com...
Need help?
Do you have a question about the KFV and is the answer not in the manual?
Questions and answers