Table of Contents
Advertisement
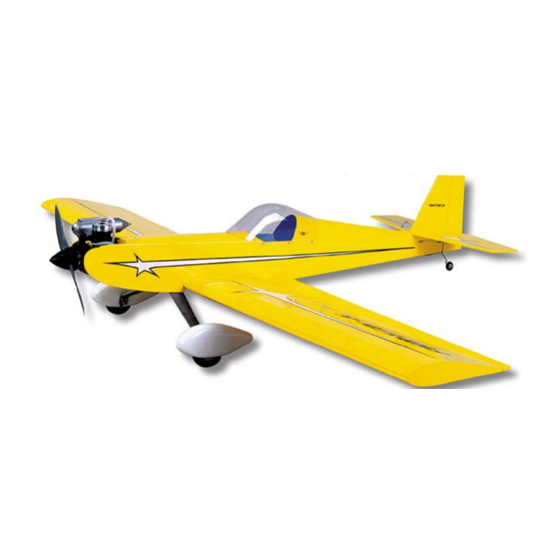
Introduction
SIG's FOUR-STAR 40 ARF combines the classic looks and performance of Sig's Four-Star series in an almost ready to fly
package. The FOUR-STAR 40 ARF is easy to fly and makes an ideal choice for your first low wing airplane. Intermediate and
advanced flyers will love the maneuverability and smooth handling of the FOUR-STAR 40 ARF, making it the sport model you'll
want to take to the flying field every time.
Set the control throws at the suggested rates for your first flights, throttle back and enjoy a truly honest, gentle airplane. As your
skill level advances, dial-up the control throws a little to enjoy a very aerobatic airplane. Inside and outside loops, rolls, inverted
flight, and snap maneuvers are all in the FOUR-STAR 40 flight envelope.
The FOUR-STAR 40 ARF kit has been engineered to get you into the air quickly as possible with an R/C model that will truly
last. The airframe has been expertly built and covered with AeroKote™. This material is both rugged and easy to repair. The
covering trim scheme is provided on two large peel & stick mylar decal sheets.
This assembly manual has been specifically sequenced to get your FOUR-STAR 40 ARF assembled and into the air very
quickly. We strongly suggest that you read through the manual first to get familiar with the various parts and their assembly
sequences. The proper assembly and flying of this aircraft is your responsibility. If you are new to the sport/hobby of radio
control, we urge you to seek the assistance of a qualified person to help you assemble this model airplane. If you do not
understand a particular assembly step or sequence, do not guess - find qualified help and use it.
Advertisement
Table of Contents

Subscribe to Our Youtube Channel
Related Manuals for SIG FOUR-STAR 40 ARF


Summary of Contents for SIG FOUR-STAR 40 ARF
- Page 1 FOUR-STAR 40 flight envelope. The FOUR-STAR 40 ARF kit has been engineered to get you into the air quickly as possible with an R/C model that will truly last. The airframe has been expertly built and covered with AeroKote™. This material is both rugged and easy to repair. The covering trim scheme is provided on two large peel &...
-
Page 2: Radio Equipment
A good running, reliable motor is a minimum requirement for the enjoyment of this or any R/C model aircraft. The FOUR-STAR 40 ARF can also use a variety of 4-stroke motors. Any 4-stroke motor in the .45 - .60 displacement range should provide plenty of power. -
Page 3: Assembling The Wing
ASSEMBLING THE WING The wing on the FOUR-STAR 40 ARF is designed as a strong, easy to assemble one piece unit. To avoid unnecessary dents, dings, or scuffing of the various covered parts, we suggest that you cover your workbench with a protective blanket... -
Page 4: Installing The Ailerons
10 minutes before flexing the aileron. Any spilled glue can be removed with Sig Debonder. After sufficient time has passed, flex the aileron up and down several times to create free and easy movement. You must also pull on the aileron at each hinge location to be sure that the hinges are firmly bonded in place. - Page 5 Use Sig Slow Cure epoxy to join the two wing panels together. Apply the glue generously to the end ribs, Work some glue into the joiner slots and coat the hardwood joiner. Carefully slide the wing halves into place and hold them in the proper alignment with tape until the epoxy cures.
-
Page 6: Assembling The Fuselage
NOTE: Depending on the type of servo that you use, you may have to bend the pushrod slightly in the middle to angle it up from the wing so that it is aligned with the control horn without putting any bending force on the servo arm. Remove the pushrod from the servo and remove the solder link from the torque rod. - Page 7 Also, at this time, you should drill a 1/16" dia. antenna exit hole in the aft fuselage bottom sheet. This hole should be about 1/4" behind the wing opening in the fuselage and centered left to right. Installing The Main Fuselage For the following steps you will need: The Fuselage 2 M4 Hex Nuts;...
-
Page 8: Fuel Tank Assembly
MOTOR AND FUEL TANK INSTALLATION Fuel Tank Assembly The 260cc (8.7oz.) fuel tank supplied with this kit is now assembled. We suggest using a simple two line fuel system in this airplane. One fuel line is connected to the "clunk" or fuel pick-up line and the motor's carburetor. -
Page 9: Tail Surface Installation
Place the four M3 Split Lock Washer onto the four M3 x 20mm Phillips Head Screws followed by the four M3 Flat Washers. Apply a little thread-locking compound to the screws and install the two motor mount arms to the firewall - do not tighten in place yet. - Page 10 Use a toothpick or small dowel to apply epoxy into the elevator joiner holes and channels in each elevator half. Press the wire elevator joiner into each elevator half and lay the assembly on a flat work surface, protected with waxed paper. Wipe off any excess glue with a paper towel and alcohol.
-
Page 11: Radio Installation
12. Carefully remove the covering from the stabilizer and fin in order to expose the wooden structure for gluing. The covering should be trimmed away 1/16" inside the drawn lines. It is extremely important that you cut the covering only and not the balsa underneath. - Page 12 Insert the unthreaded end of the 2mm x 100mm Pushrod into one of the 3.2mm x 686mm Nylon Pushrods, up to the threads on the rods. Thread the rod into the tube about 3/16" - 1/4". Repeat this procedure with the remaining tube and rod. Also, Insert the unthreaded end of the 2mm x 20mm threaded stud into the 3.2mm x 280mm Nylon Throttle Pushrod.
-
Page 13: Spinner Assembly
The following suggested control surface travel information is based on our experience with the FOUR-STAR 40 ARF. These suggested surface movements should be considered as starting points. As your experience and confidence builds, control movements can be adjusted to suit your particular style of flying and to explore the airplane's capabilities. -
Page 14: Decal Application
Use a small squeegee to now set the decal in place, removing all excess liquid and any trapped air bubbles from beneath the decal. The SIG 4" Epoxy Spreader - #SIGSH678 - is perfect for this job. Remove any excess fluid with a dry paper towel and allow the decals to set overnight. - Page 15 Hold a little up elevator and smoothly advance the throttle - do not slam the throttle full open all at once. As the FOUR-STAR 40 ARF begins moving forward, back off of the up elevator input and use the rudder as needed to correct any motor torque and/or wind induced deviations from a straight take-off run.
-
Page 16: Customer Service
Customer Service SIG MFG. CO., INC. is totally committed to your success in both assembling and flying the Four-Star 40 ARF kit. Should you encounter any problem building this kit or discover any missing or damaged parts, please feel free to contact us by mail or telephone.
Need help?
Do you have a question about the FOUR-STAR 40 ARF and is the answer not in the manual?
Questions and answers