Table of Contents
Advertisement
Quick Links
ASSEMBLY AND INSTALLATION
S.R. SMITH HELIX2 SLIDES ARE MANUFACTURED FOR INSTALLATION
AND USE ON RESIDENTIAL INGROUND SWIMMING POOLS ONLY. THE
HELIX2 IS NEVER TO BE INSTALLED AND USED ON ABOVEGROUND
POOLS, ONGROUND POOLS, HOUSEBOATS, BOAT DOCKS, FLOATING
DOCKS OR PLATFORMS OR OTHER BODIES OF WATER SUCH AS
LAKES, PONDS, RIVERS, ETC.
SRS AUSTRALIA, PTY LTD
12 Enterprise St
Richlands QLD 4077
Australia
Phone 07 3812 2283 • Fax 07 3812 1187
www.srsmith.com/au
06-755
INSTRUCTIONS
S.R. SMITH, LLC
CORPORATE HEADQUARTERS
P.O. Box 400 • 1017 S.W. Berg Parkway
Canby, Oregon 97013
USA
Phone (503) 266 2231 • Fax (503) 266 4334
www.srsmith.com
SEPT19
Advertisement
Table of Contents

Related Manuals for S.R.Smith heliX2


Summary of Contents for S.R.Smith heliX2
- Page 1 S.R. SMITH HELIX2 SLIDES ARE MANUFACTURED FOR INSTALLATION AND USE ON RESIDENTIAL INGROUND SWIMMING POOLS ONLY. THE HELIX2 IS NEVER TO BE INSTALLED AND USED ON ABOVEGROUND POOLS, ONGROUND POOLS, HOUSEBOATS, BOAT DOCKS, FLOATING DOCKS OR PLATFORMS OR OTHER BODIES OF WATER SUCH AS LAKES, PONDS, RIVERS, ETC.
-
Page 2: Table Of Contents
TABLE OF CONTENTS INTRODUCTION ............................3 INSTALLED HELIX2 STRUCTURAL & INSTALLATION CHECKLIST ............4 MAINTENANCE INSTRUCTIONS ........................ 4 ASSEMBLED HELIX2 LAYOUT ........................5 PARTS LIST ..............................6 ASSEMBLY INSTRUCTIONS ........................7 Tools Required ............................7 Gasket Installation ............................. 7 HELIX2 Assembly ............................. 8 ON-DECK MOUNTING INSTRUCTIONS .................... -
Page 3: Introduction
DANGER – FAILURE TO FOLLOW THESE WARNINGS, INSTRUCTIONS, AND THE OWNER’S MANUAL MAY RESULT IN SERIOUS INJURY OR DEATH. THE HELIX2 SLIDE IS DESIGNED AND MANUFACTURED FOR INSTALLATION AND USE ON INGROUND SWIMMING POOLS ONLY. DO NOT INSTALL THIS SLIDE ON ABOVE GROUND POOLS, HOUSEBOATS, BOAT DOCKS, FLOATING DOCKS OR PLATFORMS, OR OTHER BODIES OF WATER SUCH AS LAKES, PONDS, RIVERS, ETC. -
Page 4: Installed Helix2 Structural & Installation Checklist
Observe the position of the exit of the slide as shown in FIGURE N, FIGURE O, and FIGURE Q on pages 17 and 18. MAINTENANCE INSTRUCTIONS When hosing down the deck, hose your HELIX2 to wash away any dust, dirt or other debris, which may have accumulated. Be sure that all connections are secure. Tighten hardware if necessary. -
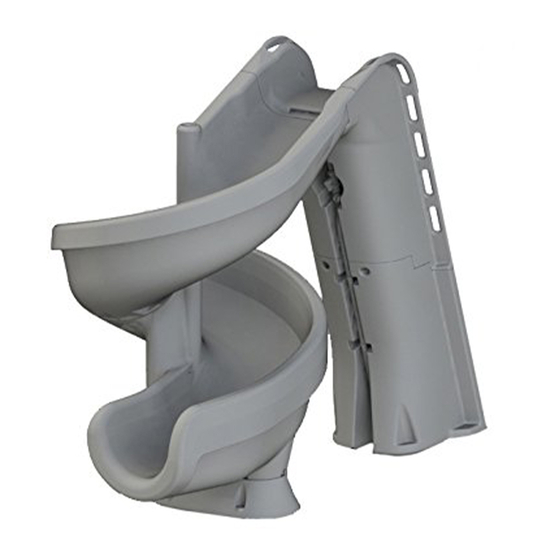
Page 5: Assembled Helix2 Layout
ASSEMBLED HELIX2 LAYOUT NOT A PROJECTED VIEW FIGURE A See Appendices A and B for additional slide layout details. -
Page 6: Parts List
PARTS LIST Item No. Part No. Description Qty. 3/8” Hex Nut 5-139 9 ea. 3/8” Lock Washer 5-151 11 ea. 05-14-115 1/2" Lock Washer 8 ea. 3/8” Flat Washer 5-145 25 ea. 3/8” x 2-3/4” Carriage Bolt 5-246 2 ea. 3/8”... -
Page 7: Assembly Instructions
ASSEMBLY INSTRUCTIONS Tools Required Ratchet handle Power drill 9/16” deep socket PVC pipe primer & glue 9/16” wrench Anti-seize 5/8” wrench Saw to cut PVC pipe 3/4" socket or wrench Knife 7/32” allen wrench Level Phillips head screwdriver Teflon tape (plumbers tape) 1/2"... -
Page 8: Helix2 Assembly
HELIX2 Assembly Before getting started: • To prevent damage to the parts during assembly, it is recommended that cardboard or some other protective barrier is laid down on the ground where the slide is to be assembled. • Verify that the gasket material is affixed to the slide parts as shown on page 7 •... - Page 9 FIGURE D Assemble the top ladder section and lower ladder section as shown in FIGURE E. Insert the two button head cap screws into the threaded inserts as shown in FIGURE E. Do not fully tighten the screws at this point; start the screws into the threaded inserts. Note: Be sure to apply anti- seize to all fasteners to prevent galling.
- Page 10 FIGURE F Before applying the gasket to the top of the ladder, be sure that the joint surfaces of the top runway and ladder sections are clean and dry. Unroll the gasket material and hold so that length of the gasket is centered on the center of the ladder joint.
- Page 11 Lay the ladder assembly on the ground with the steps facing down as shown in FIGURE G. Lift the upper runway section and align the threaded studs sticking out of the top ladder section with the holes in the upper runway section. Attach the runway to the ladder using the hardware shown in FIGURE G.
- Page 12 FIGURE I Stand the ladder upright and attach the runway entrance section to the runway exit section using the button head cap screw as shown in FIGURE I through the slides center column. Do not tighten the bolt at this point. Notes: It may take more than one person to perform this step. Be sure to apply anti-seize to all fasteners to prevent galling Finish assembling the two runway sections using the hardware shown in FIGURE J.
- Page 13 Attach the two 1” Pipe Clamps (15) with the #14 Pan Head Screws (11) as shown in FIGURE K, Detail B. in the recessed area under the slide ladder. Fully assemble the water system components as shown in FIGURE K Detail A without glue to ensure that all components have the correct fit and function before permanently gluing them together.
- Page 14 PUSH INTO SMALL FIGURE K GLUE TO FITTING BALL VALVE (Step 19) IN LADDER (Step 18) (23) (27) (16) (14) (11) (25) (22) (21) (20) (24) (27) (16) (22) (15) (20) (11) DETAIL C...
-
Page 15: On-Deck Mounting Instructions
ON-DECK MOUNTING INSTRUCTIONS Place the assembled slide on the deck relative to the pool wall. Ensure that the exit flume clears any coping. Slide may be angled slightly providing all dimensions are maintained as noted in the Manufacturer’s Placement Instructions noted in the following section. With the slide in its proper location, center punch or otherwise mark through the (8) mounting holes at the bottom of the ladder and pedestal so that a visible mark is apparent on the concrete. -
Page 16: Slide Plumbing Instructions
GHGJ (17) The HELIX2™ can handle up to 20 gallons per minute (75 L/min). Water flow to the main water supply is to be regulated using the ball valve (16) near the center of the ladder. The fountain feature can be regulated via the small ball valve just under the top of the ladder. FIGURE L shows the location of the small ball valve. -
Page 17: Manufacturer's Placement Instructions
OPERATION AND TO REDUCE THE RISK OF SERIOUS INJURY. 1. The critical dimensions for placement of the HELIX2 are as shown in FIGURE N and FIGURE O. A. The slide exit runway surface shall not exceed 20” (0.508 M) above the water surface as shown in FIGURE N. - Page 18 TABLE 1 Board Minimum Clearance Area “C” Dimension “W” Dimension Pool Type 14’ -6” (4.420 M) 5’ -0” (1.524 M) 14’ -6” (4.420 M) 6’ -0” (1.829 M) 16’ -6” (5.029 M) 6’ -0” (1.829 M) 18’ -6” (5.639 M) 7’...
- Page 19 APPENDIX A...
- Page 20 APPENDIX B...
Need help?
Do you have a question about the heliX2 and is the answer not in the manual?
Questions and answers