Table of Contents
Advertisement
Quick Links
Advertisement
Table of Contents

Related Manuals for Korg Pearl eMerge MDL1


Summary of Contents for Korg Pearl eMerge MDL1
- Page 1 Sound Module MDL1 Owner’s Manual E 1...
-
Page 2: Table Of Contents
Table of Contents Introduction -------------------------------------------------------------------------------------------- 4 Main features --------------------------------------------------------------------------------------------- 4 Main functions ----------------------------------------------------------------------------------------4 Other functions ----------------------------------------------------------------------------------------4 Part Names and Functions -------------------------------------------------------------------------- 5 Top panel -------------------------------------------------------------------------------------------------- 5 Rear and side panel ------------------------------------------------------------------------------------- 7 Preparations -------------------------------------------------------------------------------------------- 8 Settings ---------------------------------------------------------------------------------------------------- 8 Cautions during connection -----------------------------------------------------------------------8 Steps for connecting ----------------------------------------------------------------------------------8 Connecting the included AC adapter ---------------------------------------------------------- 10 Connecting audio devices ------------------------------------------------------------------------ 10... - Page 3 [UTILITY] Other functions and settings --------------------------------------------------------- 33 Selecting a function -------------------------------------------------------------------------------- 33 Utilities ----------------------------------------------------------------------------------------------- 33 TRAINING ---------------------------------------------------------------------------------------- 33 TRIGGER PAD ---------------------------------------------------------------------------------- 38 HI-HAT CALIBRATION ---------------------------------------------------------------------- 40 PAD FUNCTION -------------------------------------------------------------------------------- 42 DIRECT OUT ------------------------------------------------------------------------------------- 43 METRONOME ----------------------------------------------------------------------------------- 43 INPUT GAIN ------------------------------------------------------------------------------------- 44 MIDI ------------------------------------------------------------------------------------------------ 44 DATA MANAGEMENT ----------------------------------------------------------------------- 46 User Kit ------------------------------------------------------------------------------------------- 47...
-
Page 4: Introduction
Introduction Thank you for purchasing the Pearl e/MERGE Sound Module MDL1 Powered by Korg. To ensure trouble-free enjoyment of this module, please read this manual carefully and use the product as directed. Also, be sure to keep this manual in a safe place for reference. -
Page 5: Part Names And Functions
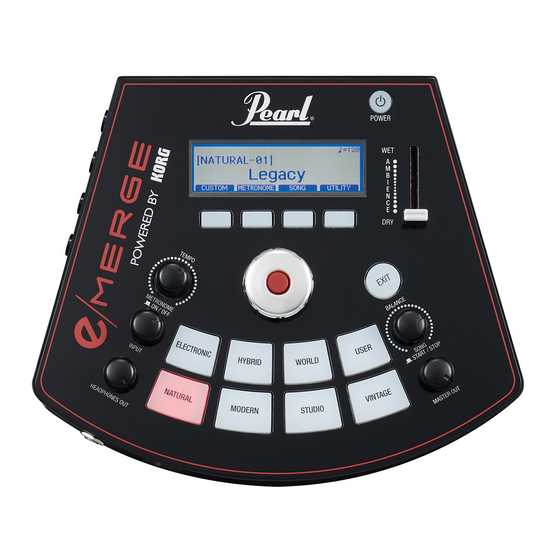
Part Names and Functions Top panel 1. Display Shows the drum kit name, tempo information, and each parameter. 2. Function buttons The functions of these buttons changes according to the status of the display. The func- tions are shown at the lower part of the display. 3. - Page 6 Part Names and Functions 7. HEADPHONES OUT knob This adjusts the output volume from the (Headphones) jack. (Headphones) jack Connect stereo headphones here. 9. Category buttons These buttons select the drum kit. Pressing a button within a category will select the next drum kit within that category, in sequential order.
-
Page 7: Rear And Side Panel
Part Names and Functions Rear and side panel 1. AUX IN jack Use these jacks to connect to an audio player or other external audio output device. 2. MIDI OUT connector Use this to connect to an external sound generator or other MIDI device (→ p.11 “Con- necting to a computer or MIDI device”). -
Page 8: Preparations
Preparations Settings Cautions during connection • Before connecting this module to the pads, place this module on a rack or stand. • Use the dedicated breakout cable that is included, in order to connect the module to the PureTouch Pad. •... - Page 9 Preparations The cable marked “KICK” that is connected to the KICK (kick drum) supplies the power used for lighting the LED. When connecting this cable to other products besides the specified pad, set Trigger Type to “OTHER” beforehand, and be sure to turn off the power before connecting.
-
Page 10: Connecting The Included Ac Adapter
Preparations Connecting the included AC adapter Fully insert the power cord for the AC adapter into the AC adapter, and then insert the DC plug into DC 12V jack on the rear panel. DC12V jack Cord hook When fastening the cord to the cord hook, be careful not to bend this area more than necessary. -
Page 11: Connecting To A Computer Or Midi Device
Preparations Connecting to a computer or MIDI device Connecting to a computer Connect the To PC port on this module to your computer using a USB 2.0 cable (sold sepa- rately) to exchange MIDI message data. This port can also receive audio data. Rear Panel USB 2.0 cable (sold separately) computer... -
Page 12: Turning The Power On And Off
Preparations Turning the power on and off Turning the power on 1. Turn the MASTER OUT and HEADPHONES OUT knobs all the way to the left, so that the volume is at a minimum. 2. Make sure that the volume on any external devices that are connected (such as powered monitor speakers or mixers) is turned down and that the power is turned off. -
Page 13: Changing The Drum Kits
Preparations Changing the drum kits There are 35 preset drum kits on the Pearl e/MERGE separated into seven categories, and 50 user drum kits can be saved. The preset drum kits cannot be overwritten. The user drum kits can be adjusted to match your tastes and then saved. -
Page 14: Configuration Guide
Configuration Guide CUSTOM: Drum Kit User Edit When you want to create your own drum kit, select an existing preset drum kit that is closest to the kit you have in mind, and then edit it. Use this function to select the pads for the drum kit you wish to create, after which you can select the instruments assigned, levels, and tun- ing. - Page 15 Configuration Guide Tip: The Inst properties icon will light up when you have selected an instrument (Inst) on which the respective functions are enabled. Icon Explanation The AMBIENCE can be controlled on this instrument. The instrument supports WAVE Trigger Technology. The instrument allows the hi-hat open/close sounds to be controlled with the hi-hat pedal.
-
Page 16: Storing A Drum Kit
Configuration Guide Storing a drum kit 1. Press the [STORE] function button on the “CUSTOM” menu. 2. Use the dial to select the store destination. • Kit Name ..........................The name of the currently selected drum kit will be displayed. Press the [RENAME] function button to change the drum kit name. -
Page 17: Editing The Detailed Parameters
Configuration Guide 5. Press the [STORE] function button. When you press the [STORE] function button, a message will be displayed asking if you are sure. Press the EXIT button at this time if you want to cancel storing. 6. Press the ENTER button to store. Editing the detailed parameters 1. - Page 18 Configuration Guide 5. Press the ENTER button to confirm your change. Repeat steps 2, 3 and 4 to continue editing other parameters. To cancel editing and revert the settings to their previous state, press the EXIT button. The values will be restored, and the cursor will move to the parameter selection. Tip: Press the [ENTRY] function button to confirm the changes you made to the Comp Edit, EQ Edit and MFX Edit parameters.
-
Page 19: Drum Kit Parameter Edit Menu
Configuration Guide Drum kit parameter edit menu The parameters that can be edited using the drum kit parameter edit menu are shown below. Note: Depending on the parameter, increasing this value may cause distortion or noise. Pad Select ....................... Sets the pad to edit. Selectable pads: Snare, Tom1, Tom1Rim, Tom2, Tom2Rim, Tom3, Tom3Rim, Kick, Hi-Hat, Crash, Ride, Tom4/Acc1, Acc2, Acc3... - Page 20 Configuration Guide • Level ........................000...100 Adjusts the output level of the COMP. EQ Edit Sets the EQ (equalizer) parameters for the currently selected pad. To access the parame- ters below, select “EQ Edit” using the dial and then press the ENTER button. +Gain Mid Q –Gain...
- Page 21 Configuration Guide Inst Amb Max Level ................000...100 Adjusts the ambience level when the AMBIENCE fader for the currently selected pad is set to maximum. Adjust this when you want to keep the maximum ambience levels down for a specific instrument. Note: The ambience effect has no effect on some instruments.
-
Page 22: [Metronome] Metronome Function
Configuration Guide [METRONOME] Metronome function You can save settings as a metronome project to meet specific needs, so that you can start playing right away. Fifty different settings can be saved and selected as necessary for use. Using metronome The metronome will start and stop with each press of the TEMPO knob (METRO- NOME ON/OFF). -
Page 23: Storing A Metronome Project
Configuration Guide • Sound ................... (all 10 sounds) Sets the metronome sound. (→ p.74 “Metronome sound list”). • Level ..................0...100(unity)...200 Sets the metronome volume level. • [TAP] function button Use these settings to set the tempo at the interval with which you push the [TAP] func- tion button, regardless of whether the metronome is on or off. -
Page 24: Selecting A Metronome Project
Configuration Guide Selecting a metronome project Select from the list of saved metronome projects. 1. Press the [LIST] function button. 2. Select a metronome project using the dial. The selected project will display in inverse color. 3. Press the ENTER button. The settings of the selected metronome project will be reflected. -
Page 25: Editing A Metronome Project
Configuration Guide Editing a metronome project You can select a metronome project from the list, change and then save the settings. By sav- ing the settings you use most often, you will be able to select them from the list and quickly change the metronome settings. - Page 26 Configuration Guide 3. Press the [EDIT] function button. 4. Use the dial to select the parameter you want to edit. Press the ENTER button to move to the value. Turn the dial to change the setting. Press the ENTER button to confirm your change. (→ p.27 “Metronome parameter edit menu”) 5.
-
Page 27: Metronome Parameter Edit Menu
Configuration Guide Metronome parameter edit menu • Name Sets the name of the metronome project that you are editing (up to 24 characters). (→ p.16 "Renaming") • Tempo ....................030...300 Sets the tempo for each metronome project. • Time Signature ....1/2...24/2, 1/4...24/4, 1/8...24/8, 1/8t...24/8t, 1/16...24/16 Sets the time signature for each metronome project. -
Page 28: [Song] Song Function
Configuration Guide [SONG] Song function Two WAV file tracks (a music track and a click track) can be played in sync on this module from a USB flash drive. The combination of output levels for music and click tracks is called a song project. Song projects are managed in the song project list. - Page 29 Configuration Guide 3. Press the [LIST] function button. Fifty song projects will be displayed in the list. You will need to edit one of these song projects made available in order to use them (→ p.31 “Song project list screen operations”). 4.
-
Page 30: Selecting And Playing Back A Song Project
Configuration Guide Selecting and playing back a song project 1. Press the [SONG] function button shown on the top page to display the SONG menu. After entering the SONG menu, use the [PREV] and [NEXT] function buttons to select a song project. - Page 31 Configuration Guide • [LIST] function button Displays the song project list. Song project list screen operations Press the [SONG] and then the [LIST] function button to display the song project list. There are 50 song projects. Four functions are assigned to the function buttons, [EDIT], [COPY], [MOVE] and [DELETE].
-
Page 32: Song Parameter Edit Menu
Configuration Guide Song parameter edit menu • Name Displays the song project name. Press the ENTER button to rename the song project. (→ p.16 “Renaming”) • File1 Select File1 using the dial and press the ENTER button. The WAV file list will be dis- played. -
Page 33: [Utility] Other Functions And Settings
Configuration Guide [UTILITY] Other functions and settings The UTILITY menu of the e/MERGE module contains many functions and settings. Selecting a function 1. Press the [UTILITY] function button shown on the top page to display the UTILITY menu. 2. Use the dial to select the function, and press the ENTER button to confirm. Select the utility to execute using the dial. - Page 34 Configuration Guide Tip: The specs for files that can be loaded into the e/MERGE are as follows: · WAV files (PCM format) · Sampling frequency: 44.1 kHz · Bit length: 16 bits · Maximum 4 hours (stereo/mono) 2. Press the [UTILITY] function button shown on the top page to show the “UTILITY” menu.
- Page 35 Configuration Guide Use the dial to select a file on the FILE SELECT page. Select “No Assign” if you do not want to specify a file. Use the [PLAY]/[STOP] function button to preview or stop playback of the cur- rently selected WAV file. When a file on the internal drive is selected, you can press the [EXPORT] and [DELETE] function buttons to store the currently selected file to a USB flash drive, or to delete it from the internal drive.
- Page 36 Configuration Guide 7. Play back the WAV file, and practice playing the drums. You can play back WAV files at different speeds, or loop the playback of certain parts to practice with them. Tip: The [PLAY] and [AB REP] function buttons shown below will only be shown if a WAV file is selected in “File”...
- Page 37 Configuration Guide 9. Press the [PLAY] function button to check what you have recorded. Checking a recorded file Press the EXIT button to cancel recording. The file will not be saved. The record- ed data will be discarded, and the display will return to the TRAINING page. •...
-
Page 38: Trigger Pad
Configuration Guide TRIGGER PAD This configures the settings for each trigger pad. • Trigger In ........Snare, Tom1, Tom1Rim, Tom2, Tom2Rim, Tom3, Tom3Rim, Kick, Hi-Hat, Crash, Ride, Tom4/Acc1, Acc2, Acc3 Select each trigger pad to configure. • Trigger Type ......................... Select the type for the selected trigger pad. The selection type differs for each Trigger In setting. - Page 39 Configuration Guide • Crosstalk Cancel ......................Off, On You can configure the e/MERGE to cancel out the resonance from other pads when a pad sounds. Turn this on to reduce resonance. Note: When this is set to “On,” striking two pads at the same time may be considered as resonance, and the sound from one of the pads may not be heard as a result.
-
Page 40: Hi-Hat Calibration
Configuration Guide HI-HAT CALIBRATION Used to adjust the open/close action of the hi-hat cymbal. [CALIB] function button If the action doesn’t feel right or when you are making the settings for the first time, you will need to perform calibration. •... - Page 41 Configuration Guide [FINE TUNE] function button • Hi-Hat Close Position .................... -50...+50% This parameter is used to fine-tune the adjustment of the hi-hat close position after calibration. Increment this value to move the closing position up, and decrement this value to move the closing position down. Press the [ENTRY] function button to confirm the fine-tuning value.
-
Page 42: Pad Function
Configuration Guide PAD FUNCTION Some of the button actions on this module, such as drum kit selection or tap tempo, can also be activated by hitting the pads instead. Note: Pads to which a function has been assigned cannot be used to make a sound. Pads to which pad functions can be assigned: No Assign, Snare, Tom1, Tom1Rim, Tom2, Tom2Rim, Tom3, Tom3Rim, Kick, Hi-Hat, Crash, Ride, Tom4/Acc1, Tom4/Acc1Rim*, Acc2, Acc2Rim*, Acc3, Acc3Rim*... -
Page 43: Direct Out
Configuration Guide DIRECT OUT This sets the pads that are routed from the DIRECT OUT 1–8 jacks. You can also set the output for the song project. Note: The sound of the pads set in DIRECT OUT and the metronome sound will not be outputted to the MASTER OUT jacks. -
Page 44: Input Gain
Configuration Guide INPUT GAIN This sets the input gain for the AUX In jack and USB audio. • Aux In ................-20.0 ... +00.0 ... +10.0 db (+/-0.5 db) This adjusts the input gain for the AUX IN jack. • USB Audio In ..............-20.0 ... +00.0 ... +10.0 db (+/-0.5 db) Adjusts the input gain for the USB audio. - Page 45 Configuration Guide The parameters below specify the note numbers to be outputted when each pad is struck. • Snare Head Note ..................... 000...127 • Snare Rim Note ..................... 000...127 • Snare Close Stick Note ................... 000...127 • Tom1 Head Note ..................... 000...127 •...
-
Page 46: Data Management
Configuration Guide DATA MANAGEMENT These are functions for saving, loading, deleting and otherwise handling the different types of data for this module (such as user kits, system data and so on). When using an external device, connect a USB flash drive. Basic data management operations 1. -
Page 47: User Kit
Configuration Guide User Kit Rename Internal User Kit Renames user drum kit data stored in internal memory. • Rename User Kit ................Rename (up to 24 characters) Use the dial to select a drum kit to rename. Press the [RENAME] function button to rename the drum kit (→ p.16 “Renaming”). Exchange Internal User Kit Exchanges the user drum kits stored in internal memory. - Page 48 Configuration Guide • External ....................USER : No.xx, ALL KIT Select the destination drum kit on the USB flash drive using the dial. Press the ENTER button to execute. Press the EXIT button to cancel. Import External User Kit This loads the user drum kit data stored in USB flash drive to internal memory. Either a single drum kit or all drum kits can be loaded.
-
Page 49: All Systems
Configuration Guide All Systems “All Systems” means all of the data stored, including each setting, the user drum kits and metronome projects. Note: This does not include WAV files recorded to internal memory using the training function (Internal Rec Files). Export All Systems Stores the All Systems data that is currently set to a USB flash drive. -
Page 50: Internal Rec File
Configuration Guide Delete External All Systems Deletes selected the All Systems data that is stored on a USB flash drive. Use the dial to select the All Systems data to delete. Press the [DELETE] function button to go to the execute screen. Press the ENTER button to execute. -
Page 51: All Metronome Projects
Configuration Guide Press the ENTER button to execute. Press the EXIT button to cancel. Delete Internal Rec File Deletes an internal rec file. Select an internal rec file using the dial. Press the [PLAY] function button to play back the file. Press the [DELETE] function button to go to the Delete execute screen. - Page 52 Configuration Guide Import All Metronome Projects Loads all metronome projects from a USB flash drive. Press the [IMPORT] function button to go to the Import execute screen. Press the ENTER button to execute. Press the EXIT button to cancel. - 52 -...
-
Page 53: Auto Power Off
Configuration Guide AUTO POWER OFF Sets whether the auto power off function is enabled or disabled. When this function is enabled, the power will automatically shut off if there is no input from the pads or no signal is received from any of the input jacks for a certain period of time. -
Page 54: Factory Reset
Configuration Guide FACTORY RESET You can restore all of the e/MERGE modules settings to their factory-set default state. 1. Press the [RESET] function button. A message will display on the page to confirm the reset procedure. Press the EXIT button to cancel and return to the previous page.] 2. -
Page 55: Usb Memory Format
Configuration Guide USB MEMORY FORMAT This formats (initializes) the USB flash drive. Before using a USB flash drive with the e/MERGE module, you must format (initialize) the flash drive. Formatting the USB flash drive will erase all data that has been saved. Back up any data on the flash drive that you wish to save by copying it to your computer or other device, before formatting the drive. -
Page 56: Appendix
Appendix Troubleshooting If you encounter any problems while using the e/MERGE, check the points shown below. If the instrument still does not operate correctly, please contact your local Pearl distributor. The e/MERGE won’t turn on. • Make sure that the AC adapter is correctly plugged into this instrument and into the AC outlet. - Page 57 Appendix Either the music track or the click track cannot be heard in Song mode. • Check the settings for each track. (→ p.28 “Registering a WAV file in a song project”) • The click track sound will not be routed to the MASTER OUT L/MONO, R jacks. •...
-
Page 58: Error Messages
Appendix Error messages Error messages Cause of error and how to solve An error has occurred when writing to or reading from a file in internal memory or on a USB Store Error flash drive. Import Error If errors occur frequently, use a different USB flash drive. Contact our service representative if Export Error you encounter errors after several unsuccessful tries of writing to or reading from internal Load Error... -
Page 59: Preset Drum Kit List
Appendix Preset Drum Kit List Category DrumKitName AMBIENCE Pad Assign Inst Name NATURAL 1 Legacy Snare SD15x5-SensiTone Mahogny Tom1 Tom12x8-Masters Maple Tom1Rim *Tom12x8-Masters Mpl RS Tom2 Tom13x9-Masters Maple Tom2Rim *Tom13x9-Masters Mpl RS Tom3 Tom16x16-Masters Maple Tom3Rim *Tom16x16-Masters Mpl RS Kick BD22x16-Masters Maple Hi-Hat... - Page 60 Appendix Category DrumKitName AMBIENCE Pad Assign Inst Name MODERN 1 Recipe Snare SD14x5-SensiTone Steel Tom1 Tom12x9-Reference Tom1Rim *Tom12x9-Reference RS Tom2 Tom13x10-Reference Tom2Rim *Tom13x10-Reference RS Tom3 Tom16x16-Reference Tom3Rim *Tom16x16-Reference RS Kick BD22x18-Reference Pure Hi-Hat HH14-Pst-2002 Crash Crash19-Pst-2002 Ride Ride22-Pst-2002 Tom4/Acc1 Tom18x16-Reference Acc2 Crash22-Pst-2002...
- Page 61 Appendix Category DrumKitName AMBIENCE Pad Assign Inst Name STUDIO 1 First Call Snare SD14x35-FreeFloat1 Brass Tom1 Tom12x8-Masters F-Call Tom1Rim Cowbell CMP Edge Tom2 Tom13x9-Masters F-Call Tom2Rim *Tom13x9-MasterF-Call RS Tom3 Tom14x14-Masters F-Call Tom3Rim *Tom14x14-MsterF-Call RS Kick BD22x16-Masters F-Call Hi-Hat HH14-Pst-2002 Crash Crash19-Pst-2002 Ride...
- Page 62 Appendix Category DrumKitName AMBIENCE Pad Assign Inst Name VINTAGE 1 Recking Kru Snare SD14x55-Masters Maple Tom1 Tom12x8-Wood Fiber Tom1Rim *Tom12x8-Wood Fiber RS Tom2 Tom13x9-Wood Fiber Tom2Rim *Tom13x9-Wood Fiber RS Tom3 Tom14x14-Wood Fiber Tom3Rim *Tom16x16-Wood Fiber RS Kick BD20x14-Wood Fiber Hi-Hat HH14-Pst-2002 Crash...
- Page 63 Appendix Category DrumKitName AMBIENCE Pad Assign Inst Name ELECTRONIC 1 Traproll Snare SD HipHop Tom1 HipHop Tom 2 Tom1Rim Scratch 4 Tom2 HipHop Tom 2 Tom2Rim Scratch 2 Tom3 HipHop Tom 1 Tom3Rim Bell Tree Kick BD HipHop Hi-Hat HH HipHop Crash Dance Crash 1 Ride...
- Page 64 Appendix Category DrumKitName AMBIENCE Pad Assign Inst Name HYBRID 1 Massonator Snare SD with Hihat Tom1 T101 Dance SD for TM Pad Tom1Rim 808 BD Bass Tom2 808 BD Bass Tom2Rim Wood Block H Tom3 Kick & Low SD Tom3Rim Bell Tree Kick BD22-MJP...
- Page 65 Appendix Category DrumKitName AMBIENCE Pad Assign Inst Name WORLD 1 Havana Snare Conga for SD Pad Tom1 Timbale H for TM Pad Tom1Rim Chacha Bell Tom2 Timbale L for TM Pad Tom2Rim Paila & Clave Tom3 Tumba for TM Pad Tom3Rim Tumba Slap Kick...
-
Page 66: Inst List
Appendix Inst Type Inst Name Inst List T09 Tom13x10-Reference T10 Tom16x16-Reference Inst Type Inst Name T11 Tom16x16-Reference L Snare S01 SD10x6-Popcorn Maple T12 Tom18x16-Reference S02 SD10x6-off-Popcorn Maple T13 Tom18x16-Reference L ... - Page 67 Appendix Inst Type Inst Type Inst Name Inst Name T64 Tom12x8-RF NOLA Funk K18 BD22x16-CRB Ramble T65 Tom14x14-RF NOLA Funk K19 BD22x18-RF Funkafize T66 Tom14x14-RF NOLA Funk L K20 BD Orchestral T67 Tom10x7-CRB Ramble K21 BD Toy Box ...
- Page 68 Appendix Inst Type Inst Type Inst Name Inst Name C16 FXCym7-Sbn-Chime 031 *SD14x55-Vintage Maple 1 C17 FXCym8-Sbn-Chime 032 *SD14x55-Vintage Maple 2 C18 FXCym10-Sbn-Chppr 033 *SD14x65-Kapur Fiber 1 C19 FXCym12-Sbn-MxStx 034 *SD14x65-Kapur Fiber 2 ...
- Page 69 Appendix Inst Type Inst Type Inst Name Inst Name 086 *Tom16x16-Masters Mpl RS 141 *Tom10x7-MasterF-Call RS 087 *Tom10x8-Reference 142 *Tom12x8-Masters F-Call 088 *Tom10x8-Reference RS 143 *Tom12x8-MasterF-Call RS 089 *Tom12x9-Reference 144 *Tom13x9-Masters F-Call 090 *Tom12x9-Reference RS 145 *Tom13x9-MasterF-Call RS ...
- Page 70 Appendix Inst Type Inst Type Inst Name Inst Name 196 *Tom14x14-FW Funkafiz 251 *Crash18-Sbn-AAX 1 197 *Tom14x14-FW Funkafiz RS 252 *Crash18-Sbn-AAX 2 198 *Tom16x16-FW Funkafiz 253 *Crash16-ZId-K 1 199 *Tom16x16-FW Funkafiz RS 254 *Crash16-ZId-K 2 ...
- Page 71 Appendix Inst Type Inst Type Inst Name Inst Name 306 Cowbell H M Center 361 Ceramic Jingle Short 307 Cowbell H M Edge 362 Chinese Gong 363 Vibraslap 308 Cowbell L M Center 309 Cowbell L M Edge 364 Flexatone ...
- Page 72 Appendix Inst Type Inst Name 416 Dub Hit 2 417 D&B Hit 418 D&B Industry 419 D&B Noise Up 420 D&B Noise Down 421 Dub SE 1 422 Dub SE 2 423 Bell SE 424 AirHorn 425 Reverse Cymbal 426 Coin 427 BD+Splash 428 Babbling Stream 429 Thunder...
-
Page 73: Mfx Type List
Appendix MFX Type List MFX Type Paramater BPM Sync MFX Type Paramater BPM Sync Sync Delay 2 Feedback Basic Comp Sens Wet Level Attack Sync Delay 3 Feedback Level Wet Level Attack Comp Sens Sync Delay LR 1 L Feedback Attack R Feedback ... -
Page 74: Metronome Sound List
Appendix Metronome sound list 1 Click 2 Claves 3 Bongo 4 Wood 5 Cowbell 6 Tambourine 7 Hi-Hat 8 Female 9 Male 10 Metronome - 74 -... -
Page 75: Mixer Block Diagram
Appendix Mixer block diagram Drum Kit AMBIENCE Fader Instrument AMBIENCE Instrument OSCILLATOR Instrument Instrument Mic Distance KitAmb Level Inst Amb Min Level KIT LEVEL MASTER OUT COMP OFF EQ OFF DIRECT OUT MASTER OUT L/MONO ,R LEVEL OSCILLATOR COMP KIT LEVEL HEADPHONES OUT COMP ON TRIGGER IN... -
Page 76: Files Stored To Usb Flash Drives
Appendix Files stored to USB flash drives User Drum Kit Data File This file contains data stored for 50 user drum kits. Drum kits can be imported and user_kit.dat exported one at a time. (→ p.47 “User Kit”) Metronome Project Data File Contains data stored for 50 metronome projects. -
Page 77: Pad Assignment Chart
Appendix Pad Assignment Chart Instrument Type Snare Kick Hihat Crash Ride Misc Trig EM-14S − − − − Snare Other *2 − *2 − − − *3 EM-10,12,14T − −... -
Page 78: Specifications
Appendix Specifications Number of drum kits 85 (including user kits) Sound generator PCM, physical modeling Playable data format WAV files (PCM: 44.1 kHz, 16-bit, max. 4 hours, stereo or mono) Display 240×64 dots (backlit LCD) Connection jacks MASTER OUT L/MONO, R jacks (6.3 mm phone jack, unbal- anced), DIRECT OUT 1–8 jacks (6.3 mm phone jack, unbalanced), (Headphones) jack (6.3 mm stereo phone jack), MIDI OUT connector, TO PC port, TO MEMORY DRIVE port (A USB flash... - Page 79 http://www.pearldrum.com Products and specifications are subject to change without notice. Published 4/2019 © 2019...
Need help?
Do you have a question about the Pearl eMerge MDL1 and is the answer not in the manual?
Questions and answers