Table of Contents
Advertisement
Advertisement
Table of Contents

Subscribe to Our Youtube Channel
Related Manuals for La Crosse WS6867


Summary of Contents for La Crosse WS6867
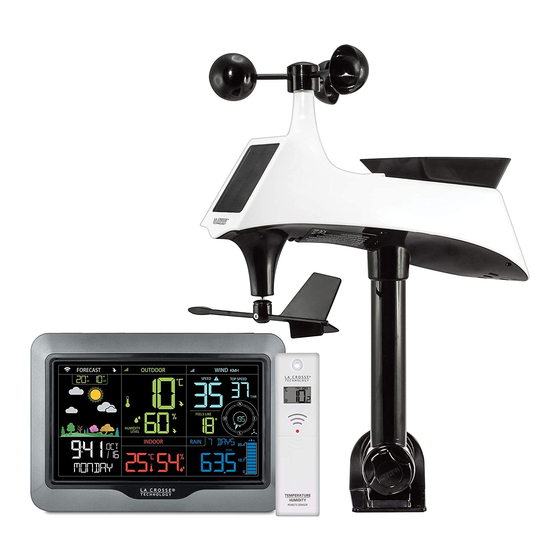
- Page 1 Model: WS6867...
-
Page 2: Table Of Contents
Temperature/ Humidity HI | LO..8 Weather Alerts......... Set Weather Alerts......... Weather Forecast Icons......Seasonal Trees......... Sensor Search.......... Mounting Instructions......Replace Wind Cups......... Replace Directional Vane..... Factory Restart........WIFI Icon........... Specifications..........Care and Maintenance......Liability Disclaims........Page | 1 WS6867... -
Page 3: Setup Preparation
Place sensors outdoors at least 2 meter above objects below them (ground, roof, etc.) • Thermo-hygro sensor-Place in a shaded location to protect from sun. • Multi-sensor- Place in an open area. No obstructions for 15 meter in all directions. Enjoy your backyard weather! WS6867 Page | 2... - Page 4 • • • • • • • • • • • • • • • Page | 3 WS6867...
- Page 5 WS6867...
-
Page 6: Display Icons
• Feels Like: Temperature | Humidity | Wind Speed • Wind Direction: In letters or degrees • History: Press and release the WIND button to view: 1 Hour (default) | 24 Hour | 7 Days | Month | Year Page | 5 WS6867... -
Page 7: Wind History
• Month: Defined by Calendar Month i.e. January 1 - January 31. • Year: Defined by Calendar Year i.e. January 1 - December 31. • Total: running total since station was powered up (no time stamp) WS6867 Page | 6... - Page 8 Reset Rainfall Readings (each resets individually): • Press the RAIN button to view individual rain readings. • Hold the MINUS button for five seconds to reset the individual value. • Rainfall reading will reset to 0.00 Page | 7 WS6867...
-
Page 9: Temperature/ Humidity Hi | Lo
• Feels like LOW • Outdoor dew point Note: Feels Like and Dew Point is not time/date stamped. Outdoor Temp LO Outdoor Temp HI Outdoor Humidity LO Outdoor Humidity HI Indoor Temp HI Indoor Temp LO WS6867 Page | 8... -
Page 10: Weather Alerts
• Outdoor LOW Humidity Value 10%RH-99%RH • Outdoor HIGH Humidity ON/OFF • Outdoor HIGH Humidity Value 10%RH-99%RH • Indoor LOW Temperature ON/OFF • Indoor LOW Temperature Value 0°C-50°C(32°F-122°F) • Indoor HIGH Temperature ON/OFF • Indoor HIGH Temperature Value 0°C-50°C (32°F-122°F) Page | 9 WS6867... -
Page 11: Set Weather Alerts
• The flashing alert icon will indicate if is a LOW or HI alert. • Press any button to stop the alert sound. • The alert icon will flash while value is in alert range. WS6867 Page | 10... -
Page 12: Weather Forecast Icons
• The trees and foliage color will change seasonally. The dates are programmed into the weather station for the scene to change automatically. Spring: March 20th – Jun 20th Summer: Jun 21st – Sep 20th Autumn: Sep 21st – Dec 20th Winter: Dec 21st – Mar 19th Page | 11 WS6867... -
Page 13: Sensor Search
1. Install batteries in sensor. 2. Press and release the SENSOR button to view sensor area (dashes). 3. Press the + button to search. 4. Press the TX button on sensor. 5. When sensor connects, and readings show. WS6867 Page | 12... -
Page 14: Mounting Instructions
See N, S, E W, embossed on the top of the sensor. Use the bubble level on the top of the • sensor to ensure it is level, for accurate rainfall readings. Page | 13 WS6867... -
Page 15: Replace Wind Cups
Insert your own mounting pole sensor. • Tighten screws • Mounting bracket would not be used. • Replace Wind Cups 1. Loosen the screw on side of cups 2. Remove cups 3. Install new cups 4. Tighten screw WS6867 Page | 14... -
Page 16: Replace Directional Vane
3. While searching for the outdoor sensors the Wind Speed, Outdoor Temperature/Humidity and Rainfall totals will show dashes. 4. Once connected to the outdoor sensors (allow 3 minutes) the Wind Speed, Outdoor Temperature/Humidity, and Rainfall will show current readings. Page | 15 WS6867... -
Page 17: Wifi Icon
Weather Underground. When connected: • Time and date will come from the Internet (set your own time zone) • View you backyard weather on your phone. • WI-FI icon will animate according to signal strength. WS6867 Page | 16... -
Page 18: Specifications
• Ensure the batteries are installed correctly with regard to polarity (+ and -). • Remove batteries from equipment which is not to be used for an extended period of time. • Promptly remove expired batteries promptly. Page | 17 WS6867... -
Page 19: Liability Disclaims
R&TTE Directive 2014/53/EU: Summary of the Declaration of Conformity : We hereby declare that this wireless transmission device does comply with the essential requirements of R&TTE Directive LA CROSSE TECHNOLOGY 6A Rue du commerce 67118 GEISPOLSHEIM - FRANCE WS6867 Page | 18...
Need help?
Do you have a question about the WS6867 and is the answer not in the manual?
Questions and answers