Table of Contents
Advertisement
Advertisement
Table of Contents

Subscribe to Our Youtube Channel
Related Manuals for La Crosse WS- 1913


Summary of Contents for La Crosse WS- 1913
- Page 1 WS- 1913 WEATHER CENTER Instruction Manual...
-
Page 2: Table Of Contents
Table of Contents Topic Page Inventory of contents Features Setting up Function keys LCD screen Manual settings Weather forecast and weather tendency Wind speed measurement Rainfall measurement Viewing history data Viewing the MIN/MAX weather data Outdoor transmission 915 MHz reception Positioning Care and maintenance Specifications... -
Page 3: Inventory Of Contents
WS-1913 WEATHER CENTER Instruction Manual INTRODUCTION: Congratulations on purchasing this state-of-the-art weather station as an example of excellent design and innovative measuring technique. Featuring time, date, calendar, weather forecast, wind gust and wind speed, indoor/outdoor temperature and outdoor humidity, air pressure and rainfall (optional), this weather station will provide you with various weather information and weather forecast. -
Page 4: Features
FEATURES: The Weather Station Battery compartment cover Stand Function keys • Time display (manual setting) • 12/24 hour time display • Calendar display (weekday, date, month, year) • Weather forecast icons and weather tendency indicator • Indoor temperature display in °C/ºF •... - Page 5 • Low battery indicator • Storage of 140 sets of history weather data recorded in 3-hour intervals • Wireless transmission at 915 MHz • Transmission range up to 330 feet/100 meters The Thermo-hygro Transmitter • Remote transmission of the outdoor temperature and humidity to the Weather Center at 915 MHz (open air) •...
- Page 6 SET UP: OPTIONAL Wireless transmission at 915 MHz – Rain sensor to weather station Weather center Wireless transmission at 915 MHz - thermo- hygro transmitter Rain sensor (optional) to weather station Wind sensor Thermo-hygro transmitter Cable connection between the wind sensor and the thermo-hygro transmitter NOTE: When first operating the Weather Station, it is important to...
- Page 7 Thermo-hygro sensor. Be sure the cord “clicks” into place. Next, insert the batteries into the Thermo-hygro sensor and Rain sensor (optional - purchased separately) See “How to install and replace the batteries into the Thermo-hygro sensor“ and “How to install and replace the batteries into the Rain sensor (optional)”...
- Page 8 Radio interferences created by cordless phones, PC screens; radios or TV sets can in some cases entirely cut off radio communication. Please consider this when choosing standing or mounting locations. NOTE: • After batteries are installed in the transmitter, install the batteries in the weather center to receive the signal from the transmitters as soon as possible.
-
Page 9: Setting Up
The outdoor Thermo-hygro transmitter works with 2 x AA IEC LR6, 1.5V batteries. To install and replace the batteries, please follow the steps below: Remove the airflow cover of the transmitter. Remove the battery compartment cover. Insert the batteries, observing the correct polarity (see the marking in the battery compartment). - Page 10 HOW TO INSTALL AND REPLACE BATTERIES INTO THE RAIN SENSOR (OPTIONAL; SOLD SEPERATELY) Figure 1 Figure 2 Figure 3 Unlock the main cover from the rain sensor base and remove the cover. Remove the battery cover at the top of the rain sensor. Insert 2 x AAA IEC LR3 1.5V batteries into the battery compartment, observing the correct polarity.
-
Page 11: Function Keys
FUNCTION KEYS: Weather Station: The Weather Station has 4 easy-to-use function keys. SET key key HISTORY key MIN/MAX key SET key • Press and hold to enter manual setting modes: LCD contrast, Manual time setting, 12/24 hour time display, Calendar setting, ºC/ ºF temperature unit, Wind speed unit, Rainfall unit, Pressure unit, Relative pressure reference setting, Weather tendency threshold, Storm threshold setting •... -
Page 12: Lcd Screen
LCD SCREEN The LCD screen is split into 3 sections displaying the following information: Time and date/ indoor temp/ second Wind data, outdoor temperature and humidity, dew point, weather forecast icon and tendency indicator Air pressure history, relative air pressure, rainfall data (optional) Calendar / indoor temperature / seconds Time display... - Page 13 Mode 1: Wind speed, outdoor temperature, relative air pressure are shown. Wind speed icon Outdoor temp icon Rel. Air Pressure icon In Mode 1, this reception icon is showing the condition of the reception of the signal from Thermo-hygro transmitter Mode 2: Wind gust, dew point, and rainfall (optional) reading are shown.
-
Page 14: Manual Settings
MANUAL SETTINGS: The following manual settings can be changed once the SET key is pressed and held for about 3 seconds: • LCD contrast setting • Manual time setting • 12/24 hour time display • Calendar setting • °C/ °F temperature unit setting •... - Page 15 The hour digit will start flashing. Use the + or MIN/MAX key to set the hour. Press the SET key to switch to the minutes. The minute digit will start flashing. Use the + or MIN/MAX key to set the minutes (holding of the key will forward the digit by 5).
- Page 16 Confirm all calendar settings with the SET key and enter the °C/°F TEMPERATURE UNIT SETTING. °C/°F TEMPERATURE UNIT SETTING Flashing The temperature display can be selected to show temperature data in °F or °C. (Default °F) The temperature unit is flashing Use the + or MIN/MAX key to toggle between “°F”...
- Page 17 RELATIVE AIR PRESSURE UNIT SETTING Flashing The relative air pressure can be set as hPa of inHg. The default unit is inHg. Use the + or MIN/MAX key to toggle between the unit “hPa" or “inHg” Confirm the unit with the SET key and enter the RELATIVE PRESSURE REFERENCE VALUE SETTING.
- Page 18 WEATHER TENDENCY THRESHOLD VALUE SETTING Flashing You may select a definite switching sensitivity value, .06, .09, or .12 inHg (2-4 hPa) for the change in the display of weather icons. This represents the "sensitivity" of the weather forecast (the smaller the value selected, the more sensitive the weather forecast). The default value is 0.09 inHg (3 hPa).
-
Page 19: Weather Forecast And Weather Tendency
The threshold value will start flashing. Use the + or MIN/MAX key to select the value. Confirm with the SET key and enter the STORM ALARM ON/ OFF SETTING. STORM ALARM ON/ OFF SETTING Note: the storm alarm ON/OFF setting is not available on this model. Skip and exit this setting by pressing the SET key. - Page 20 change of icon if the weather gets any better (with sunny icon) or worse (with rainy icon) since the icons are already at their extremes. The icons displayed forecasts the weather in terms of getting better or worse and not necessarily sunny or rainy as each icon indicates.
- Page 21 NOTE: Once the weather tendency indicator has registered a change in air pressure, it will remain permanently visualized on the LCD. AIR PRESSURE HISTORY (ELECTRONIC BAROMETER WITH BAROMETRIC PRESSURE TREND) The bottom section of the LCD also shows the relative air pressure value and the air pressure history.
-
Page 22: Wind Speed Measurement
the ground to the second floor of the house, the readings for the next 48-60 hours shall be discarded.. WIND SPEED MEASUREMENT In normal display mode, the second section of the LCD shows the following wind data. Wind chill in °F or °C •... - Page 23 VIEW THE HISTORY DATA The weather station can store up to 140 sets of weather data which are recorded automatically at 3-hour intervals after the weather station is powered up, at the nearest time of 0:00, 03:00, 06:00, 09:00, 12:00, 15:00, 18:00 and 21:00. For instance, if user has manually set the time as 14:52 after installing batteries, the first history record will be made at the coming 15:00 automatically.
- Page 24 HISTORY icon When viewing History records, press MIN/ MAX to view older records. (Press MIN/MAX and + key to view "Previous" and "Next" record respectively. The records are made at 3-hour intervals) NOTE: • The stored history records will not be retained after battery change or whenever battery is removed.
- Page 25 MAX outdoor temperature with the date and time of recording MIN dew point temperature Time and date or recording MIN Dew Point temp MIN icon MAX dew point temperature MIN outdoor humidity with the date and time of recording Time and date or recording MIN outdoor humidity value...
- Page 26 MIN Wind chill temperature with the date and time of recording Time and date or recording MIN wind chill value MIN icon MAX Wind chill temperature with the date and time of recording MIN Relative pressure with the date and time of recording MAX Relative pressure with the date and time of recording Time and date or recording...
- Page 27 MAX wind speed with the date and time of recording Time and date or recording MAX wind speed value MAX icon MAX Gust with the date and time of recording Time and date or recording MAX Gust value MAX icon...
- Page 28 MAX 24 hour rainfall (optional) with the date and time of recording The 24h rainfall value is counted from this time and date 24h rainfall 24 hour amount rainfall icon RESET MAXIMUM AND MINIMUM WEATHER DATA To reset the maximum or minimum weather data 1 to 13, you will need to reset each of the data independently.
- Page 29 The total rainfall value is counted from this time and date Total rainfall icon Total rainfall amount To reset the rainfall reading: Press the + key once when the Rainfall value and Reset icon are shown. Then the total rainfall amount will be reset to 0, and the time updated to current time.
- Page 30 OUTDOOR TRANSMITTER 915 MHz RECEPTION CHECK The outdoor temperature, humidity, wind data are transmitted from thermo-hygro transmitter every 4.5 seconds; the rainfall data are transmitted from the rain sensor (optional) every 6.25 seconds. The receiver will be synchronized to the thermo-hygro transmitter and rain sensor (optional) then.
-
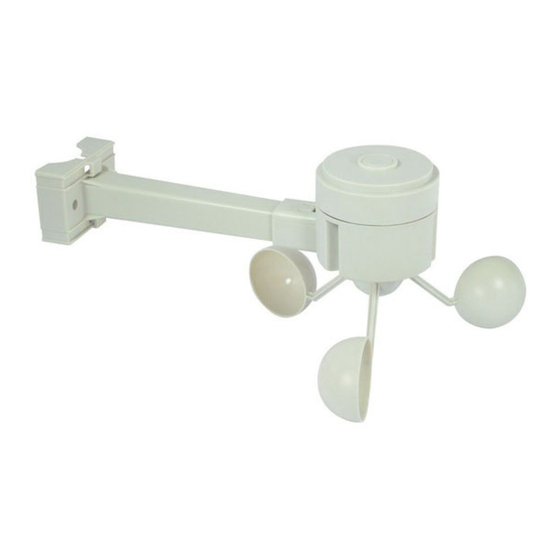
Page 31: Positioning
Signals from the sensors can be received by the base station at points of mounting La Crosse Technology Sensor Extension Cable You can purchase a La Crosse Technology Extension Cable if you require additional length to properly mount your sensor. The extension cable is 32 feet in length and comes with the appropriate connecter attached. - Page 32 An ideal mounting place for the thermo-hygro sensor would be the outer wall beneath the extension of a roof, as this will protect the sensor from direct sunlight and other extreme weather conditions. Be sure to mount vertically. To wall mount, use the 2 screws to affix the wall bracket to the desired wall, plug in the thermo-hygro sensor to the bracket and secure both parts by the use of the supplied screw and ensure that the cable from the wind sensor is correctly plugged in otherwise data transmission errors could occur.
-
Page 33: Care And Maintenance
The Rain Sensor (optional) Horizontal panel For best results, the rain sensor should be securely mounted onto a horizontal surface about 39.37” (1 meter) above the ground (or higher) and in an open area away from trees or other coverings where rainfall may be reduced causing inaccurate readings. When securing into place, check that rain excess will not collect and store at the base of the unit but can flow out between the base and the mounting surface (test by pouring clean water). -
Page 34: Specifications
• Do not make any repair attempts to the unit. Return them to their original point of purchase for repair by a qualified engineer. Opening and tampering with the unit may invalidate their guarantee. • Never touch the exposed electronic circuitry of the device, as there is danger of electric shock, should it become exposed. -
Page 35: Liability Disclaimer
the resolution is changed to 1mm) Outdoor data reception: Every 4.5 seconds (from thermo-hygro transmitter) Every 6.25 seconds (from rain sensor-optional) Air pressure checking interval: Every 15 seconds Transmission range: Up to 330 feet (100 meters) in open space Power consumption: Weather Center: 2 x C, IEC LR14, 1.5V Thermo-hygro transmitter:... -
Page 36: Warranty Information
Ltd or La Crosse Technology, Ltd’s authorized service center. La Crosse Technology, Ltd will repair or replace this product, at our option and at no charge as stipulated herein, with new or reconditioned parts or products if found to be defective during the limited warranty period specified above. - Page 37 La Crosse, WI 54601 Phone: 608.782.1610 Fax: 608.796.1020 e-mail: support@lacrossetechnology.com (warranty work) sales@lacrossetechnology.com (information on other products) www.lacrossetechnology.com For more information, please visit: www.lacrossetechnology.com/support All rights reserved. This handbook must not be reproduced in any form, even in excerpts, or duplicated or processed using electronic, mechanical or chemical procedures without written permission of the publisher.
Need help?
Do you have a question about the WS- 1913 and is the answer not in the manual?
Questions and answers