Table of Contents
Advertisement
................................................................................................ 1
.............................................................................................. 1
3-1 Unpacking and Checking................................................................................
3-2 Installing Components............................................................................... ....
3-3 Leveling the Scale........................................................................................
4-1 Specifications & General Features ...................................................................
4-2-1 Display ....................................................................................................
4-2-2 Keyboard..................................................................................................
4-3 Power Supply...............................................................................................
5-1-1 Weighing.................................................................................................
5-1-3 Unit Switch Operation .....................................................................................
5-2-1 Entering a Known Unit Weight ..........................................................................
5-2-2 Sample Counting & ACAI ...........................................................................
6-1 Single Point Calibration .................................................................................
6-2 Linear Calibration.........................................................................................
8-1 RS-232 Connector........................................................................................
8-2 Single Option..............................................................................................
8-3 RS-232 Output Format..................................................................................
Table of Contents
............................................................................................ 10
...................................................... 13
LGCN
1
1
2
3
3
4
5
6
6
7
7
7
8
9
11
12
12
0
Advertisement
Table of Contents

Related Manuals for Jadever LGCN-3075


Summary of Contents for Jadever LGCN-3075
-
Page 1: Table Of Contents
Table of Contents 1. Introduction ………………………………….……………………………………....1 2. Precautions ……………………………………….………………………………………… 1 3. Before Using the Product 3-1 Unpacking and Checking…………………………………………………………………….. 3-2 Installing Components.………………………………………..…………………………. …. 3-3 Leveling the Scale………………………………………………..………………………….. 4. Product Introduction 4-1 Specifications & General Features …………………………………………………………. 4-2 Front Panel 4-2-1 Display …….………………………………………………………………………………... -
Page 2: Introduction
3-1 Unpacking and Checking Open the package and check the instrument for transport damage. Immediately inform your dealer if you have complaints or if parts are missing. Model LGCN-3075 contains : ● Sc a le body ● User manual ● Weighing platform(plastic base with stainless steel pan) ●... -
Page 3: Leveling The Scale
M5 Allen screws[3] using an Allen wrench; 3. Put the stainless steel weighing pan [2] on the scale support [4]. B. Model LGCN-3075 Before using the scale, rotate counterclockwise to remove the delivery protection screws--- [1] . -
Page 4: Product Introduction
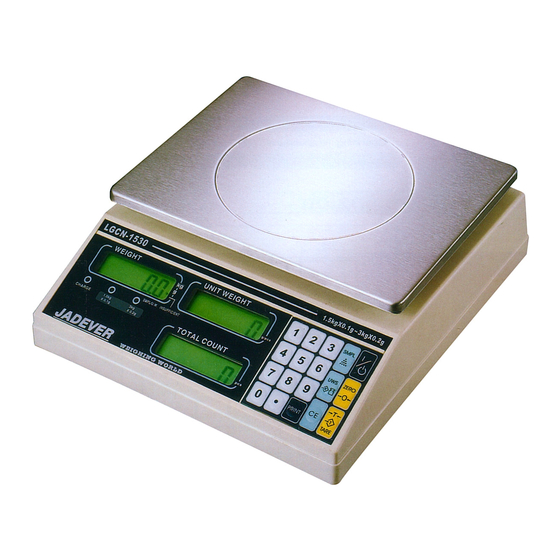
4.Product introduction 4-1 Specifications& General Features Specifications Model LGCN-3075 LGCN-1530 LGCN-7515 Capacity(g) 1500 3000 7500 15000 Division(g) 0.02 0.05 φ150 Pan Size (w×d)(in/mm) 235×178 Scale Dimensions(w×d×h)(mm) 280×250×96 Display 3 backlit LCD Displays (5/5/5) Weighing Units g, Lb Option RS-232 output interface printer Power supply AC 110V/220V (AC±10%) or rechargeable battery... -
Page 5: Keyboard
3. Total Count Display Display the current count of items on the scale . Low battery indication 5. NET Indication for displaying net values 6. TARE When “TARE” indicator appears , the weight of the container is tared . 7. ZERO : when “ZERO” indicator appears, the scale is in zero status. 8. -
Page 6: Power Supply
2) SMPL With samples on the weighing pan and inputs the indicated sample size to calculate piece weight. Press down to turn the scale ON/OFF. Inputs the indicated unit weight value entered via numeric keys. Zeros the display (within 2% of max.capacity) or cancels Tare action. Clears the indicated input values. -
Page 7: Operation
5. Operation 5-1 Basic Weighing 5-1-1 Weighing Begin with no load on the scale, the display reading zero . Place item(s) to be weighed on the scale. The display shown is 1000.0g, gross weight. 5-1-2 Tare & Preset Tare Tare When weighing a sample that must be held in a container, taring stores the container weight into memory. -
Page 8: Unit Switch Operation
5-1-3 Unit Switch Operation 1) Switch on the power, press and hold key SMPL while pressing key 2) Key in 1132 via numeric keys. 3) Press key SMPL again to enter unit selection mode. Press numeric key to toggle between kg and Lb units. 4) Press key SMPL to save, and then press key to return to the weighing mode. -
Page 9: Calibration
2) Remove the samples and put the load on, the scale begins to count. 3) Press key to return to the weighing mode. ACAI Automatic Counting Accuracy Improvement (ACAI) results in a more accurate count by increasing the reference weight without the need to count additional parts. A higher reference weight is important when there is a risk of inconsistent piece weights or if the reference weight is close to the minimum. -
Page 10: Linear Calibration
5) Put the corresponding weights on the weighing pan and SMPL. press key to confirm, and then press key 6) A few seconds later, the calibration procedure is completed with a “ ” appearing on the unit weight screen. Now, remove all the weights. SMPL 7) Press key to save, and then press key... -
Page 11: Setting Mode
6) The calibration Procedure is finished with a symbol of “ ” appear on the Total Count display , and then take away the weights. 7) Press key to save the settings and then press key to go back to the weighing mode. -
Page 12: Serial Interface
7) Press numeric key to shift print modes. Options are Prt.Pr and Prt.Co. If Prt.Co is chosen as the print mode,PC will be automatically selected as the external devices. = manual print = continuous print 8) Press key to select external devices. Options are PC、TP、EZ、SH and ZEBRA . -
Page 13: Single Option
8-2 Single Option 1. RS-232+ SH-24(TP)/ ZEBRA / EZ (printer) 2. RS232+ Computer 8-3 RS-232 Output Format Baud Rate : 2400, 4800, 9600 Data Bit : 8 Parity : N ( None ) Stop Bit Code : ASCII Bit Format : Start Stop Parity... -
Page 14: Troubleshooting And Error Message
3. lb : weight : Unit weight : Example: G.W. :+2.2352 lb U.W. :+0.5352 lb/pcs Total : 4 G = GROSS N = NET 9. Troubleshooting and Error Message Error Problems Solutions message Initial zero point exceeds 1. Confirm that there is nothing on the weighing platform. - Page 15 LGCN...
- Page 16 LGCN...
Need help?
Do you have a question about the LGCN-3075 and is the answer not in the manual?
Questions and answers