Advertisement
Quick Links
TOOLS REQUIRED:
#2
ESTIMATED ASSEMBLY TIME:
60-90 MIN
CARE AND MAINTENANCE:
Clean with a damp cloth and
wipe parts dry.
1
8
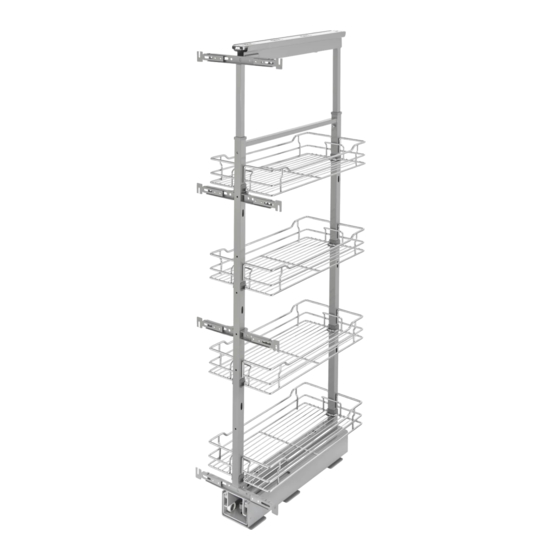
Parts List
No.
Description
1
Steel Frame
2
Wire Basket
3
Solid Bottom Basket
4
5
Bottom Slide
6
T-Type Door Bracket
7
4" T Type Door Bracket *
8
Door Bracket
9
4" Door Bracket *
10
4mm Allen Wrench
11
12
13
14
Plastic Basket Clip
15
#8 1/2" Wood Screw
16
#8 1" Wood Screw
17
18
Slide Foot
19
#3/16 1" Wood Screw
20
Solid Bottom Tray Cover Cap
INSTALLATION INSTRUCTIONS: 5700 SERIES PULLOUT PANTRY
VIDEO INSTRUCTIONS: WWW.REV-A-SHELF.COM/VIDEOS
Qty
1
4-6
4-6
Top Slide
1
1
2
2
1-2
1-2
1
M6 Screw
2
Washer
2
Logo Cap
1
8-12
20
24
M4 Screw
4
3
4
4
12400 Earl Jones Way
Louisville, KY 40299
rev-a-shelf.com
Customer Service: 800-626-1126
1
2
3
4
5
7
6
* 4" wide units only
8
9
#5
#4
#3
#2
#1
不可彎曲變形及刮痕 . 毛邊
模具名稱
模具編號
* 4" wide units only
10
15
16
11
17
12
13
18
14
檔案名稱及路徑
Y:\3D\Inventor\OEM\RAS\HA-RAS\HA-RAS-500 深系列 \T 霸 & 牛軛 ( 名稱以變動 )\H005.iam
頁次
46
/
46
版本
V23
出圖檔名及路徑
Y:\3D\Inventor\OEM\RAS\HA-RAS\RAS-HAHBHCHD 系列 - 共用件 .idw
單位 :mm
1
繪圖日期
2012/4/3
材
質
比
例
2
設
計
程 仁 勇
熱 處 理
零件編號
H005
第三角法
繪
圖
數
量
3
程 仁 勇
零件名稱
變 更 內 容
日 期 修 改 者
審
核
表面處理
產品編號
HA\HB\HC\HD
核
准
製造流程
重
量
產品名稱
高昇櫃
材料規格
佳飾美國際事業有限公司
委製廠商
19
20
I-5700-0617
Advertisement

Related Manuals for Rev-A-Shelf 5300 Series


Summary of Contents for Rev-A-Shelf 5300 Series
-
Page 1: Parts List
12400 Earl Jones Way Louisville, KY 40299 rev-a-shelf.com Customer Service: 800-626-1126 VIDEO INSTRUCTIONS: WWW.REV-A-SHELF.COM/VIDEOS TOOLS REQUIRED: ESTIMATED ASSEMBLY TIME: 60-90 MIN * 4” wide units only Parts List Description 檔案名稱及路徑 Y:\3D\Inventor\OEM\RAS\HA-RAS\HA-RAS-500 深系列 \T 霸 & 牛軛 ( 名稱以變動 )\H005.iam 頁次... - Page 2 Figure 3. CORRESPONDING SPACER Slide the top portion of the frame up so that the top slide is BOARD DIMENSIONS concealed but not touching the wood cabinet. Customer Service: 800-626-1126 | rev-a-shelf.com...
- Page 3 with the front of the face frame and center the slide Using 4, mark 3 hole locations and drill ⁄ ” pilot holes. Roughly align the front of the slide with th Roughly align the front of the slide with the front of the face frame using screws (#7).
- Page 4 4" [102 mm] 20-7/8"[53 5750 4-1/4" [108 mm] 4" [102 mm] 5773 4-1/4" [108 mm] 4" [102 mm] 20-7/8"[53 4”wide unit shown 5758 4-1/4" [108 mm] 4" [102 mm] Customer Service: 800-626-1126 | rev-a-shelf.com 5773 4-1/4" [108 mm] 4" [102 mm]...
- Page 5 To calculate overlay measure the door and then measure the To calculate overlay measure the door and then measure the To calculate overlay measure the door and then measure the made later. STEP 10 FIGURE 10 When determining the door mounting positioning, you To determine dimensions for “A”...
- Page 6 Snap the Basket Clips onto the frame (See Fig 15). Slide the basket down on the clips. Confirm the spacing you want between your baskets and repeat for all remaining brackets and baskets. Using four g. 16 Customer Service: 800-626-1126 | rev-a-shelf.com...
- Page 7 namiento. STEP 16 Attach the remaining Door FIGURE 16A Mount Bracket(s) (See Fig 16A). The pilot holes you drilled in step 10 should align. Refer to Figure 16B for T-type Bracket installation. Figure 16C is 4” wide units only. NOTE: This door mount bracket should fit closesly under a basket so it does not get in the way of storage.
- Page 8 12400 Earl Jones Way Louisville, KY 40299 rev-a-shelf.com Customer Service: 800-626-1126 Customer Service: 800-626-1126 | rev-a-shelf.com...
- Page 9 12400 Earl Jones Way Louisville, KY 40299 rev-a-shelf.com Customer Service: 800-626-1126 INSTRUCCIONES DE INSTALACIÓN INSTRUCCIONES EN VIDEO: WWW.REV-A-SHELF.COM/VIDEOS INSTRUCTIONS D’INSTALLATION VIDÉO DES INSTRUCTIONS: WWW.REV-A-SHELF.COM/VIDEOS 5300/5700 DESPENSA DESMONTABLE/5300/5700 GARDE-MANGER GIGOGNE HERRAMIENTAS NECESARIAS: OUTILS NÉCESSAIRES: ESTIMAR EL TIEMPO DE MANTAJE: TEMPS ESTIME DU MANTAGE:...
- Page 10 3. DIMENSIONES CORRESPONDIENTES DIMENSIONS CORRESPONDANTES Slide the top portion of the frame up so that the top slide is concealed but not touching the wood cabinet. Customer Service: 800-626-1126 | rev-a-shelf.com...
- Page 11 with the front of the face frame and center the slide Using 4, mark 3 hole locations and drill ⁄ ” pilot holes. Roughly align the front of the slide with th Roughly align the front of the slide with the front of the face frame using screws (#7).
- Page 12 4" [102 mm] 20-7/8"[530 mm] 20-7/8"[530 mm] g. 11 5773 4-1/4" [108 mm] 4" [102 mm] 20-7/8"[530 mm] 25 1/5" [640 mm] 5773 4-1/4" [108 mm] 4" [102 mm] 20-7/8"[530 mm] 25 1/5" [640 mm] Customer Service: 800-626-1126 | rev-a-shelf.com...
- Page 13 PASO 11/ÉTAPE 11 STEP 11 FIGURE 11A FIGURE 11B FIGURE 11C Ahora ya esta listo para colocar la g. 12 puerta. Inserte dos tornillos solamente en la parte superior de los dos orificios g. 11 piloto de la figura 11A. Coloque la puerta para que estos dos tornillos caigan dentro del soporte de montaje de la puerta tipo T (Figura 11B).
- Page 14 Terminez en serrant les deux Instale los soportes de montaje sobrantes g. 16 vis M6. Installer les autres supports de montage pour porte namiento. Using four Customer Service: 800-626-1126 | rev-a-shelf.com...
- Page 15 namiento. paniers restants. PASO 15/ÉTAPE 15 STEP 15 Primero instale la canasta superior. g. 16 Posicionela adentro del marco y sujetela FIGURE 15 hacia arriba. Cierre de golpe el plastico de los clips de la canasta dentro del marco como se muestra en la figura 15. Luego deslice la canasta hacia abajo en Instale los soportes de montaje sobrantes los clips.
- Page 16 12400 Earl Jones Way Louisville, KY 40299 rev-a-shelf.com Customer Service: 800-626-1126 Customer Service: 800-626-1126 | rev-a-shelf.com...
Need help?
Do you have a question about the 5300 Series and is the answer not in the manual?
Questions and answers