Advertisement
5330/5386 SERIES PULLOUT BASKET WITH SOFT-CLOSE
TOOLS REQUIRED:
3
#2
32
3
mm
ESTIMATED ASSEMBLY TIME:
30 MIN
CARE AND MAINTENANCE:
Clean with a damp cloth and
wipe parts dry.
WATCH TUTORIALS OF OUR
PRODUCTS BEING INSTALLED
WWW.REV-A-SHELF.COM/VIDEOS
INSTALLATION INSTRUCTIONS: 5330/5386 SERIES PULLOUT BASKET WITH SOFT-CLOSE
1A)
OR
1B)
2)
3)
4)
FOR BOTTOM
7)
MOUNTING ONLY
6)
5)
10)
8)
9)
FOR BOTTOM MOUNTING, PROCEED TO PAGE 2
FOR SIDE MOUNTING, PROCEED TO PAGE 3
No.
1A
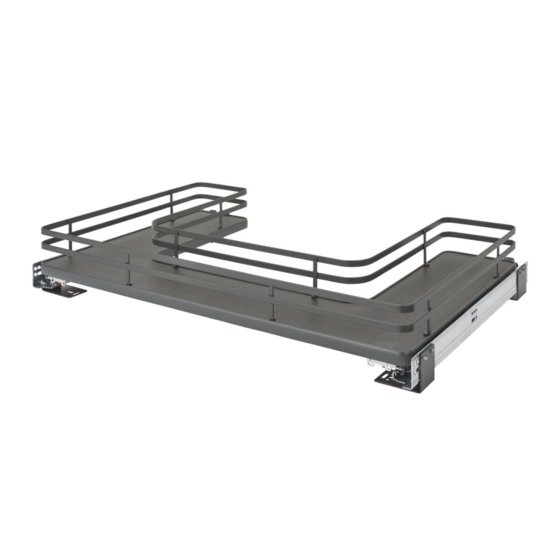
Solid Bottom Basket
1B
Solid Bottom U-Shaped Basket
2
Bottom Mount Brackets
3
4
5
6
7
Side Mount Brackets
FOR SIDE
MOUNTING
8
ONLY
9
Door Mounting Brackets
10
M4x6 Machine Screws
11
M4x10 Machine Screws
11)
15)
12
16)
12)
13
1/4-20x1/2" Screws
14
#6x1/2" Flathead Screws
13)
15
#6x3/4" Flathead Screws
14)
16
#8x5/8" Truss Head Screws
12400 Earl Jones Way
Louisville, KY 40299
rev-a-shelf.com
Customer Service: 800-626-1126
Parts List
Description
Qty
1
1
4
Slides
2
Release Levers
2
Rear Slide Brackets
2
Bracket Spacers
4
4
Mounting Brackets
2
2
8
12
Euro Screws
4
4
6
4
8
I-53XX-0417
Advertisement
Table of Contents

Related Manuals for Rev-A-Shelf 5330 Series


Summary of Contents for Rev-A-Shelf 5330 Series
-
Page 1: Parts List
12400 Earl Jones Way Louisville, KY 40299 rev-a-shelf.com Customer Service: 800-626-1126 5330/5386 SERIES PULLOUT BASKET WITH SOFT-CLOSE TOOLS REQUIRED: Parts List ESTIMATED ASSEMBLY TIME: Description Solid Bottom Basket 30 MIN Solid Bottom U-Shaped Basket Bottom Mount Brackets Slides Release Levers... - Page 2 Place the basket on top of the slides and push back until the basket locks under the tab at the rear and at the button on the side. You should hear the button click when fully engaged (See Fig 5). Customer Service: 800-626-1126 | rev-a-shelf.com...
- Page 3 SIDE MOUNTING INSTRUCTIONS FIGURE 1 FIGURE 2 STEP 1 Attach the side mount brackets to the front of the slides using (4) M4x10 flathead screws (See Fig 1). STEP 2 Place side mounting template FIGURE 3 to side of cabinet and pre-drill hole locations (See Fig 2) and install the cabinet side mounting brackets.
- Page 4 FIGURE 5 mounting brackets. Align to the surrounding drawer/door (See Fig 5). Slowly pull unit open and install (4) screws per bracket in the door. 12400 Earl Jones Way Louisville, KY 40299 rev-a-shelf.com Customer Service: 800-626-1126...
- Page 5 12400 Earl Jones Way Louisville, KY 40299 rev-a-shelf.com Customer Service: 800-626-1126 INSTRUCCIONES DE INSTALACIÓN / LES INSTRUCTIONS D’INSTALLATION CANASTA DESPLEGABLE CON CIERRE SUAVE DE LAS SERIES 5330/5386 ÉLÉMENT COULISSANT AVEC FERMETURE EN DOUCEUR DE LA SÉRIE 5330/5386 LISTA DE PARTES / LISTE DES PIÈCES...
- Page 6 Placez le panier sur les coulisses et poussez-le jusqu’à ce que le panier se verrouille sous l’onglet à l’arrière et au bouton sur le côté. Vous devriez entendre le clic du bouton lorsqu’il est complètement enclenché (voir l’Illustration 5). Customer Service: 800-626-1126 | rev-a-shelf.com...
- Page 7 INSTRUCCIONES DE MONTAJE LATERAL INSTRUCTION POUR LE MONTAGE PAR LE CÔTÉ Sujete los soportes de montaje lateral al frente de los deslizantes usando cuatro tornillos de cabeza plana M4x10 (ver la figura 1). Fixez les supports de montage par le côté à l’avant des coulisses avec 4 vis M4x10 à...
- Page 8 Vous pouvez également appliquer un ruban adhésif double face sur les supports de montage de porte. Alignez avec le tiroir/la porte environnants (voir l’Illustration 5). Retirez lentement l’unité et installez 4 vis par support dans la porte. Customer Service: 800-626-1126 | rev-a-shelf.com...
Need help?
Do you have a question about the 5330 Series and is the answer not in the manual?
Questions and answers