Sartorius Factory Series Operating Instructions Manual
Modular weighing terminal for hazardous areas/locations
Hide thumbs
Also See for Factory Series:
- Operating instructions manual (213 pages) ,
- Installation instructions and safety information (169 pages) ,
- Installation instructions and safety information (107 pages)

Related Manuals for Sartorius Factory Series


Summary of Contents for Sartorius Factory Series
- Page 1 This document courtesy of: Data Weighing Systems, Inc. Contact Us For immediate assistance call 1-800-750-6842...
- Page 2 98648-009-40 Sartorius Factory Serie i a l I n d u s t r h n o l o g i n g T e c W e i g h FCT01-X Modular Weighing Terminal for Hazardous Areas/Locations Operating Instructions...
-
Page 3: Table Of Contents
Codes ......104 been approved for verification. For Saving Values Manually more information, contact your local in M+ ......108 Sartorius office or dealer. Product Data Memory ..109 Combining Applications ..112 * including the Signatories of the Practical Combination of Several Agreement on the European Applications (Example) .. -
Page 4: Operating Design
Operating Design Operating Design You can connect any standard strain- gauge load cell or analog IWA, IU or IF-series weighing platform to the FCT01-X terminal. All cables are fitted with cable glands or threaded round connectors for network connections. In addition to the power jack, your scale also has an interface port for connecting additional devices such Meaning... - Page 5 Function Keys (Soft Keys) There are basically two different types Bar Graph: of displays: The bar graph indicates how much of The current function of soft keys is – display for weights and calculated the scale’s capacity is “used up” by indicated in the bottom line of the values the current load;...
- Page 6 Operating Design Tare Memory, Calculated Values: Display for Menu Parameter Settings To set a parameter: (Setup) The symbols displayed here indicate § Press the Q or q soft key repeatedly when there is a value in one of the until the desired setting is selected This display is divided into tare memories or when the value (displayed inversely)
- Page 7 Input Data Output Error Codes Foot Switch Input The FCT01-X is equipped with an If you press a key that has no interface port for connecting one of function, or which is blocked at a You can connect a foot switch to the the following devices: certain point in an application terminal and use it to perform a given...
-
Page 8: Configuring The Scale
Configuring the Scale Configuring the Scale Purpose Setting the Language You can configure your FCT01-X You can choose from 5 languages for the information display: terminal to meet individual – German requirements by entering user data and setting parameters in the Setup –... -
Page 9: Navigating In The Setup Menu
Navigating in the Setup Menu (Examples): Example: Adapting the scale to “Extreme vibration” Step Press key(s) (or follow instructions) Display/Output 1. Select Setup menu 2. Confirm “Scale functions” O soft key 3. Select menu item “Adapt filter” q, then and confirm O soft key 4. -
Page 10: Entering The Time And Date
Configuring the Scale Example: Entering the time and date Step Press key(s) (or follow instructions) Display/Output M , then 1. Select Setup menu; select “Device parameters“ q soft key and O soft key 2. Set clock press q repeatedly, then press O 3. -
Page 11: Setting The Scale Functions
Setting the Scale Functions Preparation Extra Functions (BAL.FUNC.) Show available balance/scale § Exit the Setup menu: press the oo functions: soft key Purpose § Select Setup menu: > Restart your application This menu item enables you to press the M key configure the scale functions, i.e., to >... - Page 12 Configuring the Scale ο External calibration/adjustment; with factory-defined calibration weight Setup - Calibration / Cal/isoTST key function Scale - adjustment External calibration/adjustment; user-defined weight functions Cal key blocked Selection mode for cal./adjustment) Calibration/ Calibrate, then auto adjust ο Calibrate, then manual adjust adjustment sequence isoCAL function Only adjustment prompt...
- Page 13 Setup – Weight unit 1* Grams /g Scale Kilograms /kg functions Carats /ct Pounds /lb Ounces /oz Troy ounces /ozt Hong Kong taels /tlh Singapore taels /tls Taiwanese taels /tlt Grains /GN Pennyweights /dwt Milligrams /mg Parts per pound //lb Chinese taels /tlc Momme /mom Austrian carats /K...
-
Page 14: Setting The Device Parameters
Configuring the Scale Setting the Device Parameters Preparation Entering or Changing a Password (DEVICE) Display available device parameters – Let’s assume that a password with 8 characters max. has already Purpose § Select the Setup menu: press M been assigned to access the Setup >... - Page 15 Extra Functions § New password: Enter the numbers and/or letters for the new § Exit the Setup menu: press the oo password (8 characters max.) soft key If "none" is displayed, this means > Restart the application no password has been assigned to delete the user password: Press .
- Page 16 Configuring the Scale Device Parameters (Overview) ο factory setting √ user-defined setting Setup – Device- parameters Password: None Enter 8 characters max. User ID: None Enter 20 characters max. Clock Time: Enter hh.mm.ss Date: Enter dd.mm.yy or mm.dd.yy (01.01.97) ο Interfaces Serial Baud rate...
- Page 17 Setup – Device- parameters Interfaces Function: Print key ο Tare key external switch Calibration key F1 function key (Right soft key) Clear function key c F2 function key (2nd soft key from the right) Function: Input ο Output control ports Display Contrast Select contrast (0 to 4):...
-
Page 18: Setting The Application Parameters
Configuring the Scale Setting the Application Factory Settings Extra Functions Parameters The factory settings are identified by § Exit the Setup menu: press the oo the symbol "ο" in the list starting on the soft key (Application) next page. > Restart your application Purpose Preparation This menu item enables you to... - Page 19 Application Parameters (Overview) ο factory settings √ user-defined setting ο Off (weighing only) Setup – Application 1 Application (Basic settings) Toggle wt. units Weight unit 1 Grams /g parameters Kilograms /kg Carats /ct Pounds /lb Ounces /oz Troy ounces /ozt Hong Kong taels /tlh Singapore taels /tls Taiwanese taels /tlt...
- Page 20 Configuring the Scale ο Setup – Application 1 Counting Accuracy – Average Display accuracy Application (Basic settings) piece weight calculation + 1 decimal place parameters (resolution) + 2 decimal places Average piece weight updating Manual ο Automatic ο Percent weighing Weight storage accuracy Display accuracy (resolution)
- Page 21 Setup – Application 1 Calculation Decimal places in None Application (Basic settings) calculated result 1 decimal place ο parameters 2 decimal places 3 decimal places 4 decimal places 5 decimal places 6 decimal places Differential weighing Weighing sequence* Individual weighing Consecutive individual weighing ο...
- Page 22 Configuring the Scale ο Off Setup – Application 2 Application (Control functions) ο parameters Checkweighing Activation of port lines Within checkweighing range Always on Stability and checkweighing range At stability Stability + checkweigh. range on (only once) ο Type of Target, min., max.
- Page 23 ο Off Setup – Application 3 Application (Data records) Totalizing Automatic storage parameters On, first value at stability On, last value at stability On, value bet. 70% – 130% at stability Minimum load for None ο automatic storage 10 digits 20 digits 50 digits 100 digits...
- Page 24 Configuring the Scale ο Setup – Application 3 Statistics Automatic storage Application (Data records) On, first value at stability parameters On, last value at stability On, value 70% – 130% at stability Minimum load for None ο automatic storage 10 digits 20 digits 50 digits 100 digits...
- Page 25 ο Off Setup – Extra Functions ο Application (F5 key) 2nd tare memory Container tare weight parameters Automatic printout Net value Tare/preset tare ο Identification Printout Automatic, if configured codes Once after pressing p, (IDs) if configured ο Each time the print key is pressed Once for M+ function (application 3 memory)
-
Page 26: Selecting The Printout Function
Configuring the Scale Selecting the Printout Function Preparation Extra Functions (PRINTOUT) Display available printout parameters § Exit the Setup menu: press the oo soft key Purpose § Select the Setup menu: press M > Restart your application This menu item enables you to >... - Page 27 Printout Parameters (Overview) ο factory setting √ user-defined setting Setup Application- Stability parameter Without stability ο With stability Print- defined ο Off output Print on request, then tare ο Off Auto print upon initialization All values (of the application) Only main values Configured printout See own chapter starting on the next page ο...
-
Page 28: Configured Printout
Configuring the Scale Configured Printout Features You can turn off automatic printout generation in the Setup menu – Maximum items in a data Purpose [Application parameters: record: 60 Application 1: Differential weighing: This menu item enables you to – Separate configuration of printout configure individual printout formats. - Page 29 Practical Example: Configure an Individual Printout for Counting Application to Include Dotted Line, Date/Time, Piece Count and Net Weight Settings (changes in the factory settings required for this example): Setup: Application parameters: Application 1: Counting Exit the Setup menu: press the oo soft key Then call Setup again and select: Printout: Application-defined output: Configured printout Step Press key(s)
- Page 30 Configuring the Scale Data Items for the Printout: Data Items for the Printout: Parameter Display text Indiv. Comp. Total Parameter Display text Indiv. Comp. Total With the “Check- Blank line** Blank line weighing” application: Dotted line** -------- Target value Target Form feed* Form feed Minimum value...
-
Page 31: Generate Flexprint
You can use a PC with the YAD02IS ------ CE [M] ------- application: print function carried "Nice Label Express" software from 124.45 kg Sartorius to load user-defined label- 100.00 kg printing formats in your FCT01 scale. – MR function carried out when p T1 + 24.00 kg... - Page 32 Configuring the Scale Printouts generated using the “Nice Label Express” software are divided into two groups: Print events with all applications except differential weighing: Event Explanation File name for event group: p key with individual values Print key PPRINT p key with text input Input and p key PDIRECT GLP/GMP header...
-
Page 33: Displaying Info
The weight block for legal metrology > Original settings are restored is not printed by this print file. > Display of version number: V.xx.xx.xx Created by Sartorius: V.S.xx.xx.xx § Return to SETUP overview: press the soft key § Exit Setup menu:... -
Page 34: Mp8 Interface Emulation
Configuring the Scale MP8 Interface Emulation Factory Settings Purpose Each parameter category has a factory setting. To restore the factory With the MP8 interface emulation settings, select this item in the Setup function, you can connect peripheral menu and select YES to confirm. devices of the MP8 generation that have separate AC power supplies The following parameters are not... - Page 35 MP8 Interface Emulation Parameters (Overview) ο factory setting √ user-defined setting Setup Balance/scale functions see page 11 Interface Device parameters Password, see page 13 User ID, Date/time Interfaces Function: external switch see page 15 Function: control port see page 15 Display, Keys, see page 16 Extra functions...
-
Page 36: Operating The Scale
Operating the Scale Operating the Scale Preparation Turn on the scale: press e Basic Weighing Function > The Sartorius logo is displayed $ To tare the scale, if desired, Purpose press t The basic weighing function is always > The... - Page 37 Assigning IDs to Weights (if desired): Calibration Select the parameters “Line format” Press the soft key isoTST and “For other apps /GLP” in the > See the section on “Calibration/ Setup menu: press M Adjustment” for further instructions Select “Printout”: press the q soft key three times, Setup then the O soft key once...
- Page 38 Operating the Scale Example W2 Enter “ABC123” as the sample ID Note: – The sample ID generally applies to one weighing operation only – The ID is deleted after data output Step Press key(s) Display/Output (or follow instructions) Initial state (scale unloaded) (ID can also be entered while scale is loaded) 1.
-
Page 39: Device Parameters
Device Parameters Universal Remote Switch Display You can connect an external universal You can configure the display for your Password remote switch (foot switch) to one of individual needs. the two serial ports. Then you can You can enter a password to block The contrast can be adjusted in 5 levels: assign one of the following functions access to the operating menu and to... - Page 40 Operating the Scale Keys Extra Functions You can assign different functions to Acoustic Signal the c key for deleting input and An acoustic signal is emitted when applications. you press a key. When the key pres- When you delete applications, you sed is allowed, the signal is a single can delete either the data stored for beep-tone;...
-
Page 41: Calibration, Adjustment
Calibration, Adjustment Features You can have the scale automatically display an adjustment prompt after a “isoTEST”* The isoTEST function lets you check certain time interval has elapsed since your inspection, measuring or test Purpose the last calibration/adjustment or equipment at any time by pressing a when the ambient temperature chan- key. - Page 42 Operating the Scale Preparation Select the scale function for “calibration/adjustment”: press M to open the Setup menu Select the : press the O soft key balance/scale functions Select : press the O soft key Calibration/adjustment Calibration/ CAL/isoTST key function Ext. cal./adj.; factory-def. wt. adjustment Ext.
- Page 43 Set the parameters for calibration and adjustment; e.g., with manual calibration/adjustment, isoCAL off Step Press key(s) Display/Output (or follow instructions) 1. Switch on the scale, Sartorius logo and self-test if not already on 2. Select the Setup menu 3. Select “Balance/scale functions” soft key 4. Select “Calibration/adjustment”...
- Page 44 Operating the Scale Step Press key(s) Display/Output (or follow instructions) 9. Confirm calibration and soft key adjustment sequence o = last setting selected 10. Select other settings, if desired soft keys and confirm (e.g., Calibration with manual adjustment) 11. Exit Cal./adjustment sequence soft key 12.
- Page 45 Calibration and Adjustment External Calibration/Adjustment with Sequence a User-Defined Calibration Weight In the Setup menu, you can configure In the Set up menu (Balance/scale the scale so that: functions: Calibration/adjustment: CAL/isoTST key function), you need – calibration is always followed to set Ext.
- Page 46 Operating the Scale Define the Calibration Weight Step Press key(s) Display/Output (or follow instructions) 1. Select Setup menu 2. Select “Balance/scale functions” O soft key 3. Select “Calibration/adjustment” O soft key 4. Select parameter for external q soft key 5 x weight O soft key 5.
- Page 47 Calibration/Adjustment Printout --------------------- GLP header Data Block Printout 13.05.2000 09:17 SARTORIUS You can have the results of a Model FCT01-X calibration/adjustment procedure Ser. no. 60419914 printed out. You can configure Vers. no. 01-41-02 whether the printout is generated as soon as the procedure is completed,...
-
Page 48: Application Programs
Operating the Scale Restoring the Factory Settings Application Programs Each parameter has a factory setting. Soft Key Functions To restore the factory settings, select the following item in the Setup menu Start application Start and select to confirm: Toggle to the basic Weighing –... -
Page 49: Toggle Between Two Weight Units
Toggle between Two Weight Preparation Units The available units depend on the A/D converter configuration. On scales used as legal measuring instruments in the EU*, grams, kilograms Purpose and tons are the only weight units available With this application program, you Standard scales: All weight units listed below: can switch the display of a weight value back and forth between two... - Page 50 Operating the Scale Additional Functions Toggling to the Next Application In addition to the functions for: Press D – alphanumeric input, > See the section on the corresponding application – taring (not during program for further instructions alphanumeric input), – printing (NUM print; S ID), Setup (Setting Parameters) you can also access the following fun- Press M...
-
Page 51: Counting
Features Factory Settings Counting – Optional scale configuration in Accuracy when calculating piece Setup for automatically initializing weight: Display accuracy Purpose this application and loading the Reference sample updating: With the Counting application, you most recent reference sample Automatic can determine the number of pieces quantity “nRef”... - Page 52 $ Turn on the scale: press e standby or off is displayed with backlighting > The Sartorius logo is displayed Select the “Counting” application in the Setup menu: press M Select the : press the q key 2 x, then...
- Page 53 Practical Example Determining an Unknown Piece Count; Weighing-In the Preset Reference Sample Quantity Settings (changes in the factory settings required for this example): Setup: Application parameters: Application 1: Counting: Average piece weight updating: Manual Setup: Application-defined output: Auto print upon initialization: All values Step Press key(s) Display/Output...
-
Page 54: Weighing In Percent
Operating the Scale Features Factory Settings Weighing in Percent – Reference percentage “pRef” Storage parameter: Purpose loaded from long-term memory Display accuracy when you turn on the scale Digits displayed with percentage: This application program allows you – Automatic initialization of this 2 digits to obtain weight readouts in percent application and loading the most... - Page 55 Wxx% for further instructions Turn on the scale: press e Toggling to the Next Application > The Sartorius logo is displayed Press D Select the “Percent weigh“ application in the Setup menu: press M > See the section on the...
- Page 56 Operating the Scale Practical Example P1: Weighing in Percent with Reference Weight Taken from Weight on Scale Settings (changes in the factory settings required for this example): Setup: Application parameters: Application 1: Weighing in percent Setup: Printout: Application-defined output: Auto print upon initialization: All values Step Press key(s) Display/Output...
- Page 57 Practical Example P2: Weighing in Percent with Reference Weight Entered Using the Numeric Keys Settings (changes in the factory settings required for this example): Setup: Application parameters: Application 1: Weighing in percent Setup: Printout: Application-defined output: Auto print upon initialization: All values Step Press key(s) Display/Output...
-
Page 58: Animal Weighing
Operating the Scale – Number of weighing operations Factory Settings Animal Weighing for calculation of an average Animal activity: ) can be entered before the mDef 5% of the animal/object Purpose beginning of each animal Start: Automatic weighing operation Use this program to determine the weights of unstable samples (e.g., Minimum load for automatic storage: –... - Page 59 Preparation Additional Functions Turn on the scale: press e In addition to the functions for: > The Sartorius logo is displayed – alphanumeric input, Select the “Animal weighing“ application in the Setup menu: press M – taring (not during alphanumeric input),...
- Page 60 Operating the Scale Practical Example Determining Animal Weight with Automatic Start of 20 Subweighing Operations for Averaging; Automatic Printout of the Number of Subweighing Operations and of the Animal Weight Settings (changes in the factory settings required for this example): Setup: Application parameters: Application 1: Animal weighing: Animal activity: Active Setup: Application parameters: Application 1: Animal weighing: Decimal places in calculated result display: 2 decimal places Setup: Application parameters: Application 1: Animal weighing: Printout: Average and calculated values...
- Page 61 Step Press key(s) Display/Output (or follow instructions) After 20 subweighing operations the arithmetic average (xNet) will be displayed : no. of subweighs mDef : calculation factor : arithm. average, net value xNet mDef : calculated value) xRes xNet 69.72 g xRes 69.72 o 8.
-
Page 62: Recalculation
Operating the Scale Recalculation Features – Display of actual net weight during follow-on filling – Individual components (up to 99) Purpose – After the amounts of the components weighed in with a readout already weighed have been showing from »0« to the desired With this application program you component weight corrected, weighing continues... - Page 63 Factory Settings Preparation Turn on the scale: press e Printout: Application-defined output: > The Sartorius logo is displayed Auto print upon initialization: Select the “Recalculation” application in the Setup menu: press M All values Select : press the q soft key 2 x, then...
- Page 64 Operating the Scale Practical Example When weighing in formulation components, the second component is over-poured. Settings (changes in the factory settings required for this example): Setup: Application parameters: Application 1: Recalculation. Setup: Printout: Autoprint upon initialization: Only main values Step Press key(s) Display/Output (or follow instructions)
- Page 65 1 0 . 6 0 … or enter the desired value 9. Confirm the new value soft key Comp. Comp1 + 25.08 g Comp1 + 27.08 g Comp2 + 12.42 g Comp2 + 12.42 g R.div.+ 1.01226 RekD 1.00975 Follow-on filling amount for first component is displayed 10.
- Page 66 Operating the Scale 14. … and store soft key Add.6 Comp1 + 25.08 g (here, e.g., the 6th component) Comp2 + 10.73 g R.div.+ 1.01226 RCom1 + 25.39 g Comp3 + 22.03 g Comp4 + 31.49 g Comp5 + 107.50 g Comp6 + 812.61 g The actual net value (of the 6th...
-
Page 67: Calculation
Features Factory Settings Calculation Decimal places in calculated result: Purpose – You can store an equation and 2 decimal places configure the Setup menu to With this application program you initialize this program automatically can calculate a weight value using an with the stored equation (Setup: Soft Key Functions algebraic equation. - Page 68 Preparation Additional Functions Turn on the scale: press e In addition to the functions for: > The Sartorius logo is displayed – alphanumeric input, Select the “Calculation“ application program in the Setup menu: press M – taring (not during alphanumeric input),...
- Page 69 Practical Example Calculate the weight per unit area (grammage or gsm weight) of paper: determine the gsm of a sheet of A4 paper with the dimensions 0.210 m x 0.297 m = 0.06237 m . The gsm weight is a product of the division of the weight by the surface area.
-
Page 70: Differential Weighing
Operating the Scale Features Display page for results: Differential Weighing Values calculated for a sample – 4 different sequences for (backweight, loss, ratio1, ratio2) Purpose measuring the tare weights, initial – Special display page for statistics sample weights and the This application program enables you backweights (backweighing result): lets you define whether lot statistics... - Page 71 Differential Weighing: Defining the 3. Combined Weighing Factory Settings Weighing Sequence The tare and initial weight, in that Weighing sequence: order, of each sample is measured You can choose from among four Group weighing first, then the backweight of each sequences for measuring tare weights, Tare weighing: sample is measured.
- Page 72 Operating the Scale Printout for Differential Weighing The following printout is generated: Configured Backweighing Printout (Example) Generating Configured Printouts Automatically Dotted line --------------------- The configured backweighing printout Date/Time 16.11.1999 14:55:12 is generated automatically after Lot ID CH12345 backweighing, if one of the following Sample number Sample Sample ID...
- Page 73 Turn on the scale: press e and when the Wg. seq > The Sartorius logo is displayed; a self-test is performed option is set to “No” Select the “Differential weighing” application in the Setup menu: press M ) The last value with the stability...
- Page 74 Operating the Scale Equations Direct Selection of Lot/Sample/Value Backweight in %: backweight / initial weight* 100% When the measured values are dis- played, you can enter numbers and Loss in weight: backweight – initial weight letters to: Loss in %: (backweight –...
- Page 75 List Function for Differential Weighing The list function has 4 display pages: one each for lots, samples, values and results. Display Page for Lots LOTS: 792 Smpl.avail. The display page for lots shows all of the lots that have already been created, 1 Sample 1 Sample AB05...
- Page 76 Operating the Scale Selecting Display Pages in the List Function for Differential Weighing [alphanum] Create lot Create Display page for lots Rename lot Delete lot Delete Samples Delete [numeric] Delete sample Omit Include Display page for samples Omit sample Samples (Omit) Include sample Values...
- Page 77 View and Print Display Pages Deleting or Omitting a Lot or Sample Additional Functions You can use the manual mode to Lots can be deleted; samples can be In addition to the functions for: print display pages (for lots, samples, deleted or omitted.
- Page 78 Operating the Scale Practical Example Differential weighing: Combined weighing; create lot, determine the difference in weight between initial weights and backweights of three samples (with autoprint of the formatted backweighing record) Settings (changes in the factory settings required for this example): Setup: Application parameters: Application 1: Differential weighing: Combined weighing Step Press key(s)
- Page 79 9. Save tare value soft key Tare Max 6200 g d= 0.01g 100% Remove the empty container COMB.WGH: CH0001 #1 T isoTST Wg.seqOBackw Ini.wt 10. Measure the initial weight Fill the 1st container Max 6200 g d= 0.01g 100% (in this case: 24.52 g) Place filled container 2452 on scale...
- Page 80 Operating the Scale 18. Measure the initial weight Fill the container Max 6200 g d= 0.01g 100% (in this case: 25.79 g) Place filled container 2579 on scale COMB.WGH: CH0001 #3 T isoTST Wg.seqOBackw Ini.wt Max 6200 g d= 0.01g 100% 19.
- Page 81 24. Save the 3rd backweight Remove the 2nd container Max 6200 g d= 0.01g 100% Place the 3rd container on 8050 scale, soft key Backw. COMB.WGH: CH0001 #3 OResidueo isoTST Stat. Wg.seq OTare Result Configured backweighing printout -------------------- is generated 17.11.1998 12:53:23 CH0001...
-
Page 82: Checkweighing
Operating the Scale – Optional scale configuration in the – Initialization parameters are Checkweighing Setup menu for automatic overwritten after the soft Param. output to the interface port (print key has been pressed Purpose application parameters) of – Press c to delete the initialization This program is used to check the target value and tolerance limits parameters and end the... - Page 83 Preparation Response of Control Lines During Checkweighing Configurations: The checkweighing program often – always on requires a target value for comparison – activated at stability with the current value. This target has a tolerance range, which is defined 12-pin via Zener barrier by absolute weight values.
- Page 84 Additional Functions Turn on the scale: Press e In addition to the functions for: > The Sartorius logo is displayed; a self-test is performed – alphanumeric input, (not during initialization), Select the “Checkweighing“ application in the Setup menu: press M –...
- Page 85 Practical Example Checkweighing samples of 170 g, with an allowable tolerance of –5 g and +10 g. Printout of upper and lower tolerance limits. Weighed values are printed out automatically when stability is reached and the weight value is within the checkweighing range.
- Page 86 Operating the Scale 9. Enter value for upper limit 1 8 0 (170 g + 10 g) and save l soft key Setp 170.00 g 165.00 g 180.00 g 10. Weigh sample Place sample (in this case: 169.48 g) in container 169.48 g If the weight value is too low: isoTST...
-
Page 87: Time-Controlled Functions
Features Factory Settings Time-Controlled Functions – Time-controlled activation of scale Function after time interval: functions: Purpose Automatic printout of values – one time only, at a given time With this application program, you Automatic function restart: can configure the scale to perform is displayed in Setting= certain functions (such as automatic... - Page 88 Preparation Additional Functions Turn on the scale: press e In addition to the functions for: > The Sartorius logo is displayed – alphanumeric input, Select the “Time-controlled functions“ application in the Setup menu: – taring (not during alphanumeric press M...
- Page 89 Practical Example Document the evaporated amount of a sample with defined surface, temperature and air pressure at preset intervals of 1 minute, 30 seconds. Settings (changes in the factory settings required for this example): Setup: Application parameters: Application 2: Time-controlled functions Setup: Balance/scale functions: Taring: Without stability Setup: Printout: Application-defined output: Stability parameter: Without stability Step...
-
Page 90: Totalizing
Operating the Scale – Optional configuration in the Setup Factory Settings of Parameters Totalizing menu for stability-dependent storage Automatic storage: of the measured value: Balance/ Minimum load for automatic storage: Purpose scale functions, 10 digits Stability range This application program runs as Source of data for auto storage: –... - Page 91 Preparation Additional Functions Turn on the scale: press e In addition to the functions for: > TheSartorius logo is displayed; a self-test is performed – alphanumeric input, Select the “Totalizing” application program in the Setup menu: press M – taring (not during alphanumeric input), Select the : press the q soft key 2 x,...
- Page 92 Operating the Scale Practical Example Totalize counted pieces Settings (changes in the factory settings required for this example): Setup: App: Application 1: Counting Setup: App: Application 2: Off Setup: App: Application 3: Totalizing: Evaluated values: Net + calculated Setup: App: Application 3: Totalizing: Evaluation mode, MR function: Final evaluation, display + print Step Press key(s) Display/Output...
- Page 93 9. Store piece count soft key isoTST -------------------- 16.01.1997 11:06 1764.45 g 50 pcs 10. Unload the scale Remove parts from the scale 11. Place another load of parts Place parts on the scale on the scale (e.g., 60 pcs) isoTST 12.
-
Page 94: Formulation
Operating the Scale – Optional configuration in the Evaluated values: Formulation Setup menu for stability-dependent Evaluation mode, key function: storage of the measured value: Purpose Intermediate Balance/scale functions, Stability evaluation, print With this application program you range can add weight values and Printout of individual components: –... - Page 95 Additional Functions Turn on the scale: press e In addition to the functions for: > The Sartorius logo is displayed; a self-test is performed – alphanumeric input, Select the “Formulation” application in the Setup menu: press M – taring (not during...
- Page 96 Operating the Scale Practical Example Weighing in Components Settings (changes in the factory settings required for this example): Setup: App: Application 3: Formulation: Automatic storage: On, first value at stability Setup: App: Application 3: Formulation: Minimum load for automatic storage: 100 digits Setup: App: Application 3: Formulation: Evaluation mode, MR function: Final evaluation, print Step Press key(s)
- Page 97 8. Weigh in next component Place components Comp2 + 50.80 g (here: 50.80 g) in container Components are stored in the Totalization memory at stability and printed out Scale is tared automatically isoTST 9. Repeat step 7 as required -------------------- 10.
-
Page 98: Statistics
Operating the Scale Features – Press the soft key to delete the Statistics last value added to the totalizing – Storage of weight values and memory. The transaction counter Purpose calculated values value is reduced by one and a With this application program, you printout is generated. - Page 99 Factory Settings Soft Key Functions Printout of Statistics Automatic storage: Add weight values or The transaction or component counter application values to the is printed in front of each measured Minimum load for automatic storage: total in the totalizing value (weight). When an intermediate 10 digits memory.
- Page 100 Preparation Additinal Functions Turn on the scale: press e In addition to the functions for: > The Sartorius logo is displayed – alphanumeric input, Select the “Statistics” application in the Setup menu: press M – taring (not during alphanumeric input),...
- Page 101 Practical Example Totalize counted pieces and print out statistics Settings (changes in the factory settings required for this example): Setup: App: Application 1: Counting: Average piece weight updating: Manual Setup: App: Application 3: Statistics: Evaluated values:Calculated Setup: App: Application 3: Statistics: Evaluation mode, MR function: Final evaluation, display + print Step Press key(s) Display/Output...
- Page 102 Operating the Scale 9. Store piece count soft key isoTST -------------------- 16.01.1997 11:06 35 pcs 10. Unload the scale Remove parts from the scale 11. Place another load of parts Place parts on the scale on the scale (e.g., 29 pcs) isoTST 12.
-
Page 103: Extra Functions
Preparation Turn on the scale: press e Features > The Sartorius logo is displayed; a self-test is performed – Store a weight on the scale Select Extra function (F4) or Extra function (F5) in the Setup menu: press M in the second tare memory (without... - Page 104 Operating the Scale Practical Example Determine the Contents of Bottles: Bottle weight = 400 g. Settings (changes in the factory settings required for this example): Setup: Application parameters: Extra function (F4): 2nd tare memory: Automatic printout: Tare/preset tare Step Press key(s) Display/Output (or follow instructions) 1.
-
Page 105: Individual Identification Codes
Individual Identification Codes – The ID values are entered while the Factory Settings of the ID Names application program is active; (ID) ID1: press the soft key to toggle to ID2: the ID input mode. Purpose ID3: – Each ID value can have up to 20 ID4: With this function, you can assign characters. - Page 106 Operating the Scale Preparation Turn on the scale: press e > The Sartorius logo is displayed Select Extra function (F4) or Extra function (F5) in the Setup menu: press M Select : press the q soft key 2 x, then...
- Page 107 Practical Example Include company address and sample lot number on the printout. Each ID line begins with the name. Print this ID for each net value. Settings (changes in the factory settings required for this example): Setup: Application parameters: Extra function (F4): Identification codes Setup: Input: ID1: Company Setup: Input: ID2: Location Setup: Input: ID3: Street...
- Page 108 8. Save settings, exit the Setup menu oo soft key and select input mode for IDs soft key 9. Enter name of company a ... (such as Sartorius) see also page 37 10. Confirm input soft key 11. Repeat steps 10 and 11 for LOCATION: GOETTINGEN...
-
Page 109: Saving Values Manually In M
Saving Values Manually in M+ Preparation Turn on the scale: press e Purpose > The Sartorius logo is displayed This extra function “Manual storage in Select “Extra function (F4)” or “Extra function (F5)” in the Setup menu: app.3 memory” enables you to load... -
Page 110: Product Data Memory
Operating the Scale Product Data Memory – Optional configuration in the Setup Factory Settings menu to delete a single character No user-definable parameters. when entering a data record name Purpose by pressing c. Device settings: With this function, you can enter, Keys: CF function for input: Delete Soft Key Functions store and load data records for... - Page 111 Preparation Turn on the scale: press e > The Sartorius logo is displayed Select Extra function (F4) or Extra function (F5) in the Setup menu: press M Select : press the q soft key 2 x, Application parameters hen the O soft key once...
- Page 112 Operating the Scale Practical Example Create a new product base data record for initializing the checkweighing program, including: target value, minimum, maximum Settings (changes in the factory settings required for this example): Setup: Application parameters: Extra function (F4): Product data memory Setup: Application parameters: Application 2: Checkweighing Step Press key(s)
-
Page 113: Combining Applications
Combining Applications The following table summarizes the possibilities for combination of the application programs described here. Each line stands for one combination. The weighing function is generally available, and does not have to be combined with a calculating function. Application 1 Application 2 Application 3 (data records and (basic settings) - Page 114 Operating the Scale Application 1 Application 2 Application 3 (data records and (basic settings) (checking and control functions) documenting functions) – Time-controlled functions Totalizing – Time-controlled functions Formulation – Time-controlled functions Statistics Counting Time-controlled functions Totalizing Counting Time-controlled functions Formulation Counting Time-controlled functions Statistics...
-
Page 115: Practical Combination Of Several Applications (Example)
Practical Combination of Several Applications Example: Checkweighing with statistical evaluation You want to check a piece count, and have the results that lie within the tolerance range statistically evaluated and Printed as an ISO/GMP-compliant record. Settings (changes in the factory settings required for this example): Setup: App: Application 1: Counting Setup: App: Application 2: Checkweighing Setup: App: Application 3: Statistics: Automatic storage: On, first value at stability... - Page 116 Operating the Scale 5. Initialize Checkweighing Toggle to Checkweighing isoTST 6. Enter target, minimum and soft key Param. maximum values (here: target: 1 0 l soft key 7 l soft key 10 pcs; minimum: 7 pcs; maximum: 12 pcs) 7. Store input l soft key isoTST Setp...
-
Page 117: Data Output Functions
Data Output Functions There are 3 options for data output: – Output to the display and control unit – Output to a printer (generate a printout) – Output to a peripheral device (e.g., computer) via the interface port Output to the Display and Control Unit The display is divided into 9 sections. - Page 118 Operating the Scale Line for Measured Values This line shows: 1250é – The current weight value – Calculated values (such as piece counts) – User input (such as a lot number or equation) =W*18.3*0.9 Weight Unit Display This section shows: –...
- Page 119 Scale Information In the Setup menu, you can select Setup: Info: Device for a display of scale information. The display includes: information: – Software version number – Scale version number – Scale model – Scale serial number...
-
Page 120: Interface Port
– YDP03 The pin assignments in RS-232 cables – YDP01IS purchased from other manufacturers – YDP01IS-Label are often incompatible with Sartorius scales. Check the pin assignments – YDP02IS against the chart before connecting – YDP02IS-Label the cable, and disconnect any lines... - Page 121 Preparation Configuring the Interface Turn on the scale press: e > The Sartorius logo is displayed Call interface options: press M Select : press the q soft key, then the O soft key Device parameters Select press the q soft key 5 times,...
- Page 122 Operating the Scale Configuring a Printout Turn on the scale: press M Select : press the q soft key 3 times, then the O soft key once Printout Printout Application-defined Stability Without stability ο After stability output parameter ο Off Print on request, then tare ο...
- Page 123 Generating Printouts Acceptable for Legal Metrology: You can configure the Setup menu of the scale to generate data records that are acceptable for legal metrology on a Sartorius printer: – YDP02: – YDP03: – YDP01IS: – YDP01IS-Label: – YDP02IS:...
- Page 124 Operating the Scale Examples p (Print) Key Weight in grams 153.00 g Pressing this key causes the current Weight in Troy ounces 58.56 ozt value shown on the display to be prin- Piece count 253 pcs ted out (weight with unit, calculated Percentage 88.23 % value, alphanumeric readout)
- Page 125 Auto Print You can have the weight readout Net weight 153.00 g printed automatically . This printout Sample ID S ID 12345678901234 can be generated after a certain Display blank Stat number of display updates ; you can Display underload Stat also configure whether or not the Display overload...
- Page 126 Setup: Printout: ISO/GLP/GMP adjustment routine completed printout: Always on Difference between current and target Diff. + 0.00 g values after calibration The record is output to a Sartorius Dotted line -------------------- YDP03-0CE Data Printer or a Date/time 17.01.2000 16:25 computer.
- Page 127 Data Output Format (Line Format) Output Format With 16 Characters You can output the values displayed Display segments that are not activated are output as spaces. Characters in the line for measured values and without a decimal point are output without a decimal point. the weight unit with or without a data The following characters can be output, depending on the characters displayed ID code...
- Page 128 Operating the Scale Example: output weight of + 1255.7 g ID code characters I Status Stat Position 1 9 10 11 12 13 14 15 16 Identification (Identifier) * CR LF Weighing series no. (lot) L ID Position 1: Plus + or minus sign – or space Weight set number W ID Position 2:...
- Page 129 Data Input Format Format 1 Meaning You can connect a computer to your scale to send commands via the scale Weighing mode 1 interface port to control scale functions and applications. Weighing mode 2 The commands sent are control commands and may have different formats; Weighing mode 3 e.g., control commands can have up to 26 characters.
- Page 130 Operating the Scale Synchronization Handshake Transmitting Device: During data communication between The scale interface (Sartorius Balance Once XOFF has been received, it the scale and an on-line device Interface = SBI) has transmit and prevents further transmission of (computer), messages consisting receive buffers.
-
Page 131: Pin Assignment Charts
Pin Assignment Charts Pin Assignement Chart Terminal (scale) Zener Barrier YDI02-Z, Female Interface Connector: (14-pin): YDI03-Z (12 pin): 14-contact round connector, with screw-lock hardware for cable gland 14-contact 12-contact RS-232 signal RS-485 round round (SBI and XBPI) (XBPI) connector connector Control output “heavier”... -
Page 132: Cabling Diagram
! Warning: When Using Prewired RS-232 Connecting Cables! RS-232 cables purchased from other manufacturers often have incorrect pin assignments for use with Sartorius scales. Be sure to check the pin assignment against the chart below before connecting the cable, and disconnect any lines marked “Internally Connected”... - Page 133 Cabling Diagram (Connecting Cable for PC) (Connecting cable YCC01-03ISM5 – round – DB25-PC) Diagram for interfacing a computer via a Zener barrier to the scale using the RS-232C/V24 standard and cables up to 15 m (50 ft) long Cabling diagram: Connection assignments for the cable from the Zener barrier to an RS-232 PC interface.
- Page 134 Operating the Scale...
- Page 136 Operating the Scale...
-
Page 137: Service
For a verified or verifiable weighing strain-gauge load cells, as well as calibration and adjustment, return the instrument, you need to select the with Sartorius IWA, IU or IF analog menu access switch to the “closed” accuracy class. Which class you weighing platforms. Access to position. - Page 138 Service Scale Interval Maximum capacity Once these parameters have been Max. cap. configured, the A/D converter in The lowest scale interval d indicates The maximum capacity is the conjunction with the weighing cell is the weighing instrument’s resolution. maximum load that may be placed defined as a weighing instrument.
- Page 139 Balance/Scale Functions (Overview) Setup – A/D conv. Standard Ranges Single range scale Scale configuration Max. capacity: functions (accessible only with service Multi-interval scale password) Range 1: Range 2: Range 3: Max. capacity: Multiple range scale Range 1: Range 2: Range 3: Max.
- Page 140 Service Example 1: Configuring the A/D Converter with a Weighing Platform Connected (such as a Sartorius IWA platform) Step Press key(s) Display/Output (or follow instructions) 1. Remove the cap from the back of the scale housing and move the switch to the right 2.
- Page 141 Example 2: Configuring the A/D Converter with a Weighing Platform Connected Settings (changes in the factory settings required for this example) Setup: Balance/scale functions: Tare/zero at power on: Off Step Press key(s) Display/Output (or follow instructions) 1. Remove the cap from the back of the scale housing and move the switch to the right 2.
-
Page 142: Activating The Service Mode
Service Activating the Service Mode – The “S” service mode enables extensive adjustments to be performed. – Select the weighing mode (display shows – depending on the model) – Enter service code “XXXXXX” – Press the M key – The menu is displayed with an “... - Page 143 Enter Operator’s Weights Weighing parameters (linearization weights can be changed only in the service mode) Setup Device parameter ADC configuration (only visible in the service mode) Calibration/adjustment Function CAL key Parameter for external weight (Example:) Wt. ID (W ID): ABC001 Enter 14 characters max.
-
Page 144: Set/Delete Preload
Service Set/Delete Preload The preload can only be set or deleted when the service switch is off (after opening the switch, turn the display unit off and on again once). After you exit the adjustment, adjust the service switch to “on” and activate the display unit by turning it off and back on again once. -
Page 145: Replacing The Pcb
– If you conduct a high-voltage test, the electronic components on the PCB will definitely be destroyed. – Only technicians certified by Sartorius to work on explosion protected equipment may perform soldering work on the PCB! -
Page 146: Sbi/Bpi Toggling
PCB may be blown. Note: Only technicians certified by Sartorius to work on explosion-protected equipment may replace original fuses with an explosion protection rating. Because of the different amperages, it is very important to make sure that fuses are in the right position and that they have the right strength. -
Page 147: Error Codes And Messages
Cal./adj. interrupt adjustment process Err 07 Function not allowed in scales Contact your local Sartorius verified for use in legal metrology Service Center for information Function blocked on having the settings changed Err 08 The load on the scale is too Check whether “tare/zero... - Page 148 Err 340 Operating parameter (EEPROM) Turn the scale off, then back on is wrong again. If this error remains displayed, please contact your local Sartorius Service Center Err 341 RAM lost data, Leave the scale power on Battery needs to be recharged for at least 10 hrs.
- Page 149 Error Code/Message Displayed Cause Solution Reference updating not possible See “Counting” in “Operating Cannot update (with the counting application) the Scale” for reference updating criteria Input wrong (with any Follow the instructions for the Not a number xxxxx application program), e.g., application programs Too low xxxxx...
- Page 150 No valid backweights available Goes out automatically No statistics available in this lot In serial and combined weighing, Measure initial weights No net initial wts. no initial weights found available If any other errors occur, contact your local Sartorius Service Center!
-
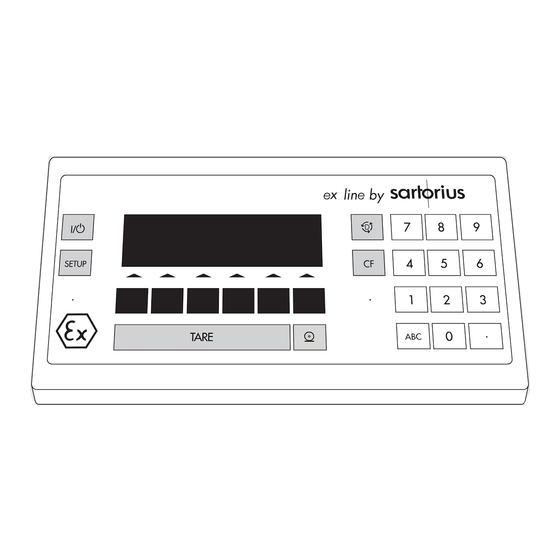
Page 151: Overview
Overview General View of the Terminal FCT01-X Pos. Designation Pos. Designation Toggle key for changing application programs Cable gland for connecting a weighing platform Numeric keys Print key Shift key for entering letters Tare key CF key (clear function) Function keys Serial communications port (14-pin) Setup key Power jack... -
Page 152: Specifications
Overview Specifications Model FCT01-X Accuracy class K, l or m Number of verification scale intervals for this module n ≤ Single range Max/e 6250 ≤ Multiple range Max 6250 ≤ Multi-interval Max 3100 Max/e 15,500 (for multi-interval only) Load cell supply voltage Amplitude 5.2 VDC Form: direct current (±2.6 VDC) Input signal range (measurement voltage) -
Page 153: Dimensions (Terminal Drawings)152
Dimensions (Terminal Drawings) FCT01-X Installation dimensions: All dimensions are given in millimeters. -
Page 154: Accessories (Options)
Overview Accessories (Options) Product Order No. Power supply (AC adapter) for use outside a hazardous area/location YPS02-Z ! Install the cable so that it is protected from damage. Connect the terminal of the housing to a terminal for equipotential bonding (PE=protective earthing or grounding conductor)! Power supply (AC adapter) for use within a hazardous area/location... - Page 155 Product Order No. Foot switch for hazardous areas/locations YPE05-X (Choice of functions to emulate keys on the display and control unit: p, t, D, [isoTST], c) ! Install the cable so that it is protected from damage. Data printer YDP03-0CE For hard copies with the date, time, statistical evaluation, transaction counter;...
-
Page 156: Ec Type Examination Certificates
Overview... - Page 158 Overview...
- Page 160 Overview...
- Page 162 Overview...
- Page 164 Overview...
- Page 168 Overview...
- Page 170 Overview...
-
Page 171: C Marking
If you use electrical equipment in by Sartorius and must check and, if which the weighing instrument is necessary, correct these modifications installations and under ambient used. -
Page 172: Plates And Markings
Overview... -
Page 173: Notes On Checking Verification
Notes on Checking Verification To use this weighing instrument in legal metrology the setting “ ” when the instrument is configured and the menu Trade access switch subsequently returned to the “locked” position. So that not all parameters relevant for verification are intercepted, the display of metrological data and the available weight units must be checked during the verification procedure. -
Page 174: Index
Overview Index General view of the terminal Page 150 Handshake Page 131 Accessories (options) Page 153 Acoustic signal Page 39 Identification codes (ID) Page 104 Adapting filter to ambient conditions Page 11 Interface Page 119 Adjustment Page 40 ISO/GLP/GMP printout Page 125 Adjustment, external Page 44... -
Page 176: Appendix
Appendix Entering the General Password Enter/Change Password § Select the Setup menu: Press the M soft key > SETUP is displayed § Select the device parameter: Press the q and O soft keys > The password prompt is displayed: $ Enter the General Password (see below) $ Confirm the password: Press the l soft key... - Page 179 All rights reserved. No part of this publication may be reprinted or translated in any form or by any means without the prior written permission of Sartorius AG. The status of the information, specifications and illustrations in this manual is indicated by the date given below.
Need help?
Do you have a question about the Factory Series and is the answer not in the manual?
Questions and answers