Advertisement
Advertisement
Table of Contents

Related Manuals for Swift S7 Series


Summary of Contents for Swift S7 Series
- Page 1 User Guide: the S7 Stereo Microscope Series...
-
Page 2: Table Of Contents
Welcome to your Swift S7 Series microscope! Whether you are a seasoned professional or a beginner hobbyist, Swift has the perfect microscope for you. This guide will introduce you to the components of your new microscope and help you begin using it. For more information about our microscopes, software downloads, product manuals, or customer service requests, please visit www.swiftoptical.com. -
Page 3: Prior To Use
Doing so will damage the microscope. II. Specifications The S7 series comes with either a binocular (S7-B) or a trinocular head (S7-T) and is highly customizable with optional additional eyepieces, objectives, illumination rings, and stands. The S7-T features a dedicated port for camera attachments. The below specifications show the standard models and which customizations are available. - Page 4 2.0X (WD = 30mm) Illumination options 56-bulb LED ring light, 6000-7000K, 100-240V 144-bulb LED ring light, 6000-7000K, 100-240V Stand options Plain stand Single-arm boom stand Dual-arm boom stand S7 Series optics specifications Eyepiece Standard Optional auxiliary objectives configuration 0.5X WD 100mm WD 165mm WD 30mm Mag.
- Page 5 28.6 3.5X 57.1 14.3 (20mm) 22.5X 10.5X 21.4 5.25X 42.8 10.7 (15mm) 67.5X 33.75X 135X 20X/10 14.3 28.6 180X Abbreviations: WD = Working distance Mag = Magnification FOV = Field of view...
-
Page 6: Parts Of The Microscope
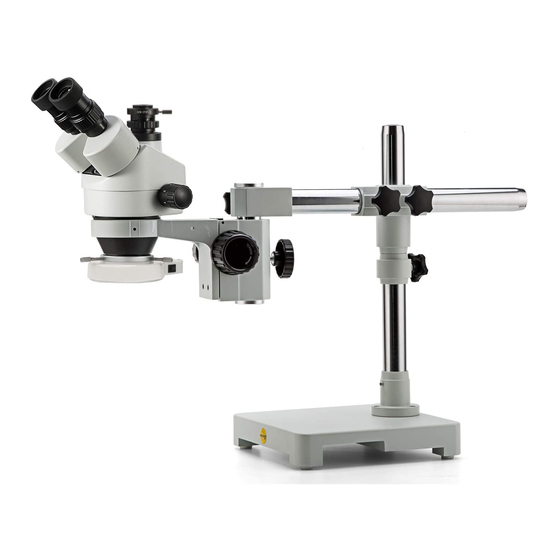
III. Parts of the microscope The below diagrams show the various available stand configurations for the S7 binocular and trinocular head models. The S7-B with plain stand: Fig.1... - Page 7 The S7-T with plain stand: Fig.2...
- Page 8 The S7-B with single-arm boom stand: Fig.3...
- Page 9 The S7-T with single-arm boom stand: Fig.4...
- Page 10 The S7-B with dual-arm boom stand: Fig.5...
- Page 11 The S7-T with dual-arm boom stand: Fig.6...
-
Page 12: Assembling The Microscope
IV. Assembling the microscope The components for the S7 series microscopes are shipped detached for protection. Open the styrofoam packing with care and do not leave any components attached to the packing being removed. Do not discard any of the packing materials until all of the components have been identified. - Page 13 The S7-B with plain stand: Fig.7 *Note: the ring light should only be attached to the bottom of the microscope head after the head has been securely inserted into the head holder.
- Page 14 The S7-T with plain stand: Fig.8 *Note: the ring light should only be attached to the bottom of the microscope head after the head has been securely inserted into the head holder.
- Page 15 The S7-B with single-arm boom stand: Fig.9 *Note: the ring light should only be attached to the bottom of the microscope head after the head has been securely inserted into the head holder.
- Page 16 The S7-T with single-arm boom stand: Fig.10 *Note: the ring light should only be attached to the bottom of the microscope head after the head has been securely inserted into the head holder.
- Page 17 The S7-B with dual-arm boom stand: Fig.11 *Note: the ring light should only be attached to the bottom of the microscope head after the head has been securely inserted into the head holder.
- Page 18 The S7-T with dual-arm boom stand: Fig.12 *Note: the ring light should only be attached to the bottom of the microscope head after the head has been securely inserted into the head holder.
-
Page 19: Using The Microscope
V. Using the microscope Interpupillary adjustment Adjust the two eyepiece tubes until only one circular field can be seen through the two eyepieces. If two separate circles appear, the interpupillary distance is too large; if two overlapping circles appear, the interpupillary distance is too small. The eyepiece tube allows a flexible adjustment of the interpupillary distance between 54 and 76mm. -
Page 20: Maintenance And Repair
Remove the eyepieces when not in use, and place covers on the eyepiece holders. Repair Do not attempt repairs on your own, particularly on the optical parts. Contact a Swift Optical representative through our customer service email or phone line with any issues. - Page 21 Issue Possible cause Solution Can not slide eyepiece The eyepiece locking Loose the locking screw into microscope tube screw in tube have not and tighten them once been loosen eyepiece is installed Double images Interpupillary distance is Readjust the eyepieces not correct Diopter adjustment is not Readjust the diopter rings...
-
Page 22: Warranty Information And Customer Support
● One (1) Year Warranty for Electrical and Video components. Does not cover light bulbs, batteries, fuses, or electrical cords. All warranties start from the original date of purchase. Swift provides the repair or replacement of warrantied parts for free, including labor, during the warranty period. -
Page 23: Ⅸ. Manual And Software Downloads
Ⅸ. Manual and software downloads Please visit www.swiftoptical.com for online download of instruction manuals and relevant software (Manuals are downloadable in the product details page under “Swift Basics” products and Software are downloadable under “Support” menu). Disclaimer: We are constantly working to improve our instruments and to adapt them in response to customer feedback.
Need help?
Do you have a question about the S7 Series and is the answer not in the manual?
Questions and answers