Table of Contents
Advertisement
Quick Links
Advertisement
Table of Contents

Related Manuals for Bodyworx JX735


Summary of Contents for Bodyworx JX735
-
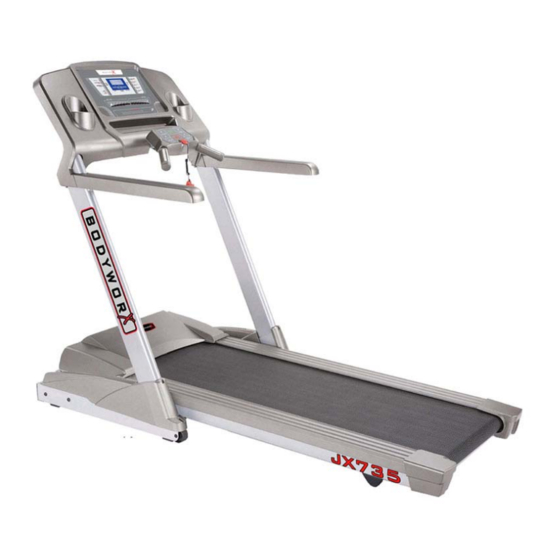
Page 2: Overview Drawing
1. OVERVIEW DRAWING... -
Page 3: Important Safety Instructions
2. IMPORTANT SAFETY INSTRUCTIONS When using an electrical appliance, basic precautions should always be followed, including the followings: Read all instructions before using the treadmill. DANGER – To reduce the risk of electric shock: Always unplug this appliance from the electrical outlet immediately after using and before cleaning. -
Page 4: Grounding Instructions
3. GROUNDING INSTRUCTIONS The products must be grounded first. If malfunction or breakdown occurs, grounding will provide a path of least resistance for electric current to reduce the risk of electric shock. The product is equipped with a cord having an equipment-grounding conductor and a grounding plug. -
Page 5: Motorized Treadmill Pre-Assembly
4. MOTORIZED TREADMILL PRE-ASSEMBLY Handrail control button and heart rate strap are optional items in the package 1. Heart rate can be measured in this treadmill. Attach strap to chest during exercise, the heart rate value will display on the PULSE window. 2. -
Page 7: Assembly Steps
5. ASSEMBLY STEPS 1. After pull out Control Wire with Guide Thread in right Upright (D), put left and right Uprights (C, D) to the suitable place and then fix with Allen Bolt (b). Ps. To avoid unexpected accident, always assemble the treadmill with an assistant, do not assemble by oneself. - Page 8 3. Turn Handlebar Assembly upwards and connect with the Computer. Tighten with Allen Bolt (c). 4. Put Computer Console (A) on the treadmill and connect all control wires. Then thread them into the tube of the left and right Handrails. Assemble Computer Console to the Handrails and fix with Screw (d).
- Page 9 5. After finish above steps, cap left and right Upper Handrail Covers (G, H) and Lower Handrail Covers (I, J) to the Uprights. Fix with Self Tapping Screw (e). Ps. When fix the screws, pay attention that do not damage control wires in the tube. Ps.
- Page 10 6. CAUTION Note: Made of high pressure, the cylinder must be takeN care to avoid danger caused by the impact with other objective. Note: If the cylinder is hit, it may cause damage and make the use not smooth. When the user is folding the treadmill, it may result in the falling of the frame and cause injury.
-
Page 11: Maintenance
7. MAINTENANCE 1. Walking Belt Centering. If the Walking Belt tracks off center to the right or left of the deck, first turn the power off. Then use 6mm Allen wrench to tighten the rear roller bolt on the side of the treadmill toward which the belt is moving. -
Page 12: Computer Instruction
8. Computer Instruction MP3 jack is optional, not all machines have this function Start Display 1. If the SAFETY KEY is taken off, the matrix screen will display the arrow downwards. If the SAFETY KEY is replaced, the matrix screen will display KGS (mile) for avoirdupois unit. -
Page 13: Operation Mode
II. Operation Mode: 1. Under start/ready status, press “Mode” to enter edit mode. 2. Under start/ready status, press Start to enter directly by “Manu run”. 3. When the SAFETY KEY is taken off and then replaced, it will not make reposition action any where it is. -
Page 14: Program Mode
(1) When TIME has bee set, the window will display a time value counting down from the target value, when the time reaches 0:00, the treadmill will stop automatically. (2) When TIME hasn’t been set, the window will display the exercise time, when the time reaches 99:00, the treadmill will stop automatically. - Page 15 **If the machine has HRC function, P8 Custom will be replaced by HRC function. The operation ways are as follows: HRC function:(This function must be attached with heart beat to finish) P8 HRC The program aims to exercise heartbeat. When operating, the heartbeat value is equal to the pre-set value, the angle and speed will keep steady to maintain the heartbeat value in certain range to achieve the exercising effect.
- Page 16 Pre-set Pre-set Pre-set Pre-set Error Signal Display: E1:The treadmill can’t read the speed value. E6:In the range of ADC, incline motor doesn’t run. E7:Incline is too height or too low(exceed the range). ** If it has any error signal, please connect with the sale agent...
- Page 18 Note:The machine has a function to switch between the metric system and the inch system , the switch operation method: Hold the ENTER key for 10 seconds at the Start/Ready position after power on. At this time , the window will display: 0(the inch system)...
- Page 19 (MPH) (KPH) SPEED AND ELEVATION CHANGES HILL CLIMB Level 1 ELEVATION (MPH) (KPH) Level 2 ELEVATION (MPH) (KPH) Level 3 ELEVATION (MPH) (KPH) Level 4 ELEVATION (MPH) (KPH) Level 5 ELEVATION (MPH) (KPH) Level 6 ELEVATION (MPH) (KPH) 10.4 10.4 10.4 10.4 10.4...
- Page 20 SPEED AND ELEVATION CHANGES HILL RUN Level 1 ELEVATION (MPH) (KPH) Level 2 ELEVATION (MPH) (KPH) Level 3 ELEVATION (MPH) (KPH) Level 4 ELEVATION (MPH) (KPH) Level 5 ELEVATION (MPH) (KPH) Level 6 ELEVATION (MPH) (KPH) 10.4 10.4 10.4 10.4 10.4 10.4 10.4...
- Page 21 SPEED CHANGES ONLY INTERVAL (MPH) Level 1 (KPH) (MPH) Level 2 (KPH) (MPH) Level 3 (KPH) (MPH) Level 4 (KPH) (MPH) Level 5 (KPH) (MPH) Level 6 (KPH) (MPH) Level 7 (KPH) 10.4 10.4 10.4 10.4 10.4 10.4 10.4 10.4 10.4 10.4 10.4...
- Page 22 (MPH) Level 9 (KPH) 12.0 12.0 12.0 12.0 12.0 12.0 12.0 12.0 12.0 12.0 12.0 12.0 (MPH) Level 10 (KPH) 12.8 10.4 12.8 10.4 12.8 10.4 12.8 10.4 12.8 10.4 12.8 10.4 12.8 10.4 12.8 10.4 12.8 10.4 12.8 10.4 12.8 10.4 12.8 10.4 SPEED CHANGES ONLY ROLLING (MPH)
- Page 23 (MPH) Level 9 (KPH) 10.4 12.0 12.8 12.0 12.8 12.0 12.8 12.0 12.8 12.0 12.8 12.0 12.8 12.0 12.8 12.0 12.8 12.0 12.8 11.2 (MPH) Level 10 (KPH) 10.4 12.0 12.8 13.6 12.8 13.6 12.8 13.6 12.8 13.6 12.8 13.6 12.8 13.6 12.8 13.6 12.8 13.6 12.8 11.2 SPEED CHANGES ONLY WEIGHT LOSS (MPH)
- Page 24 (MPH) Level 9 (KPH) 10.4 10.4 10.4 11.2 11.2 11.2 11.2 12.0 12.0 12.0 12.0 11.2 11.2 11.2 10.4 10.4 10.4 (MPH) Level 10 (KPH) 10.4 11.2 11.2 11.2 12.0 12.0 12.0 12.0 12.8 12.8 12.8 12.8 12.0 12.0 12.0 11.2 11.2 11.2 10.4 10.4...
Need help?
Do you have a question about the JX735 and is the answer not in the manual?
Questions and answers