Avaya J100 Using Instructions
Expansion module h. 323
Hide thumbs
Also See for J100:
- Quick start manual ,
- Installing and administering (528 pages) ,
- Installing (282 pages)
Table of Contents
Advertisement
Advertisement
Table of Contents

Related Manuals for Avaya J100


Summary of Contents for Avaya J100
- Page 1 Using Avaya J100 Expansion Module H. Release 6.8 January 2019...
- Page 2 RESERVES THE RIGHT TO TAKE LEGAL ACTION AGAINST YOU the express behalf of Avaya. End User agrees to indemnify and hold AND ANYONE ELSE USING OR SELLING THE SOFTWARE harmless Avaya, Avaya's agents, servants and employees against all WITHOUT A LICENSE.
- Page 3 MAY BE OBTAINED FROM MPEG LA, L.L.C. SEE HTTP:// written consent of Avaya can be a criminal, as well as a civil offense WWW.MPEGLA.COM. under the applicable law. Compliance with Laws...
- Page 4 Device Usage Consent By using the Avaya device you agree that Avaya, from time to time,may collect network and device data from your device and may use suchdata in order to validate your eligibility to use the device. U.S. Federal Communications Commission (FCC) Statements...
-
Page 5: Table Of Contents
Avaya J100 Expansion Module overview ........................8 Physical layout .................. 9 Avaya J100 Expansion Module icons ............... 9 Avaya J100 Expansion Module upgrade indication Chapter 3: Call operations..................... 10 ......................... 10 Making a call ........................10 Answering a call ..................11 Answering a call when on another call ........................ -
Page 6: Chapter 1: Introduction
Chapter 1: Introduction Purpose This document is intended for end users and provides an overview of the features available on Avaya J100 Expansion Module for H.323 firmware. It also describes procedures to set up Avaya J100 Expansion Module functionalities. Change history... -
Page 7: Chapter 2: Overview
You can attach up to three expansion modules to an Avaya J169/J179 IP Phone. Only one Avaya J100 Expansion Module can be attached to the phone which uses PoE. To attach two or three expansion modules, use a power supply unit. -
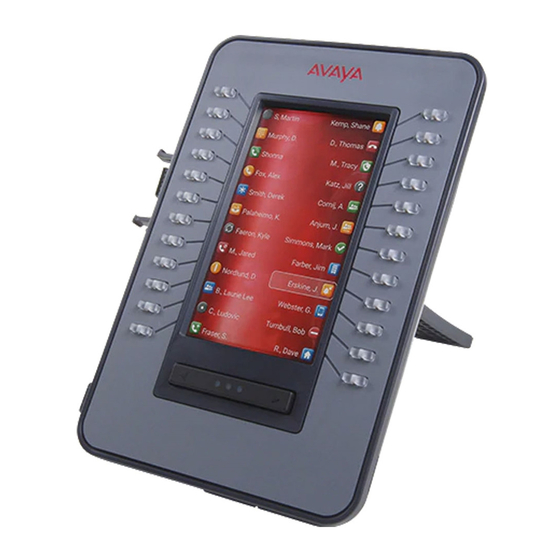
Page 8: Physical Layout
Name Description Line buttons with Line buttons used for receiving calls, making outgoing calls, and integrated LEDs answering them for other extensions or accessing features. Table continues… January 2019 Using Avaya J100 Expansion Module H.323 Comments on this document? infodev@avaya.com... -
Page 9: Avaya J100 Expansion Module Icons
LED is lit permanently. Avaya J100 Expansion Module icons Avaya J100 Expansion Module uses the icons of the phone model it is attached to. The icons are grayscaled and look identical on Avaya J100 Expansion Module attached to Avaya J169/J179 IP Phones. -
Page 10: Chapter 3: Call Operations
LED. Procedure Do one of the following: • Press the flashing line button on Avaya J100 Expansion Module to activate the default audio device and answer the call. • Pick up the handset. -
Page 11: Answering A Call When On Another Call
Some feature labels might be preset by the system administrator. Procedure On the Avaya J100 Expansion Module, press the labelled line button next to the feature you want to enable or disable. The LED flashes green or red depending on whether the feature is enabled or disabled. -
Page 12: Chapter 4: Settings
Adjusting the contrast is not supported by Avaya J100 Expansion Module. Note: Avaya J100 Expansion Module displays less characters in a line than JBM24 Button Module. If required, decrease the font size in the Options & Settings menu on the phone. -
Page 13: Customizing Keys
You can set the text size to Normal or Large. 5. Press Save. Customizing keys Avaya J100 Expansion Module key labels are preset by the system administrator. You can change these labels as required. For example, you can change a Help Desk extension to Help Desk. ®... -
Page 14: Restoring Customized Keys To Default
3. Scroll to Application Settings, and press Select. 4. Scroll to Restore Default Button Labels, and press Change. 5. In the new window, press Default. Related links Customizing keys on page 13 January 2019 Using Avaya J100 Expansion Module H.323 Comments on this document? infodev@avaya.com... -
Page 15: Chapter 5: Resources
Customer documentation for some programs is now available on the Avaya Documentation Portal at https://documentation.avaya.com. Important: For documents that are not available on the Avaya Documentation Portal, click Support on the top menu to open https://support.avaya.com. Using the Avaya Documentation Portal, you can: •... -
Page 16: Viewing Avaya Mentor Videos
Avaya Mentor videos provide technical content on how to install, configure, and troubleshoot Avaya products. About this task Videos are available on the Avaya Support website, listed under the video document type, and on the Avaya-run channel on YouTube. January 2019 Using Avaya J100 Expansion Module H.323... -
Page 17: Support
- In Search, type Avaya Mentor Videos to see a list of the available videos. - In Search, type the product name. On the Search Results page, select Video in the Content Type column on the left. - Page 18 .............. navigation ..............document changes ..............expansion module icons ................overview ................. physical layout ..............upgrade indication ............finding content on documentation portal ......15 icons ..................January 2019 Using Avaya J100 Expansion Module H.323 Comments on this document? infodev@avaya.com...
Need help?
Do you have a question about the J100 and is the answer not in the manual?
Questions and answers