Advertisement
DO
GUIDE
TST-902-DSW
Wall Dock for TST-902
DO
Install the Device
The Crestron
®
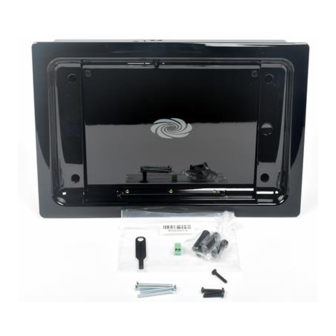
TST-902-DSW is an optional wall dock for the TST-902 Wireless Touch Screen.
Placing the touch screen into the wall dock enables its use as a stationary touch screen while
simultaneously charging its internal battery.
CAUTION: Allow an air gap of at least 12" (305 mm) in the wall cavity above and below the
TST-902-DSW for heat dissipation.
NOTE: The following steps are performed only after the TST-902-DSW-BB or
TST-902-DSW-PMK (both sold separately) has been installed. It is assumed the
TST-902-DSW-BB or TST-902-DSW-PMK has been secured to the stud according to the
instructions in the installation guide that came with each. It is also assumed that drywall is in
place and a cutout for the TST-902-DSW is made in the drywall.
To mount the TST-902-DSW, use the following procedure:
1. Hold the TST-902-DSW near the back box and connect the 2-pin power cable
to the port on the rear of the TST-902-DSW. (Wire size: 18 AWG maximum)
NOTE: The cradle for the TST-902 touch screen should be in the closed
position during installation of the TST-902-DSW.
2. Attach the TST-902-DSW to the back box using the four included 06-32 x 1-1/2" flat head
screws.
Drywall
TST-902-DSW
Screw (4)
06-32 x 1-1/2"
DO
TST-902-DSW-BB
Check the Box
QTY PRODUCT
1
Connector, 2-Pin
1
Key
4
Plug, Plastic, 0.35" x 0.5"
4
Screw, 06-32 x 3/4", Pan Head, Phillips
4
Screw, 06-32 x 1-1/2", Flat Head, Phillips
3. Hold the bezel near the TST-902-DSW, and connect the small plug from the thin cable on
the right side of the TST-902-DSW to the connector located behind the button on the right
side of the bezel.
TST-902-DSW
Bezel
Screw (4)
Plug (4)
06-32 x 3/4"
NOTE: If it becomes necessary to remove the bezel, carefully disconnect this cable.
4. Install the bezel using the four included 06-32 x 3/4" screws, but do not tighten the screws.
5. While viewing the assembly from directly in front of it, ensure the gaps on the left and right
sides of the cradle are about equal. Then, tighten the screws to secure the bezel.
6. Install the four included plastic plugs to cover the screws. Push each plug all the way into
its opening so the plug is recessed from the front surface of the bezel.
NOTE: If it becomes necessary to remove the bezel, use the pin tool that ships with the
TST-902. With the pin inserted into the plastic plug, pry the plug out of the opening.
COLOR
PART NUM.
2003574
4522222
Black
2042641
Black
2007246
2031703
Connect this plug
behind the button
on the right side
of the bezel.
Before tightening screws, view
installation from directly in front of
it, and ensure the gaps on the left
and right sides of the cradle are
about equal.
Advertisement
Table of Contents

Summary of Contents for Crestron TST-902-DSW
- Page 1 TST-902-DSW is an optional wall dock for the TST-902 Wireless Touch Screen. Placing the touch screen into the wall dock enables its use as a stationary touch screen while 3. Hold the bezel near the TST-902-DSW, and connect the small plug from the thin cable on simultaneously charging its internal battery.
- Page 2 FCC Rules. These limits are designed to provide reasonable protection against harmful interference in a residential installation. and trade names may be used in this document to refer to either the entities claiming the marks and names or their products. Crestron disclaims any proprietary interest in the marks and names of others.


Need help?
Do you have a question about the TST-902-DSW and is the answer not in the manual?
Questions and answers