
Related Manuals for JENCO VisionPlus 3177


Summary of Contents for JENCO VisionPlus 3177
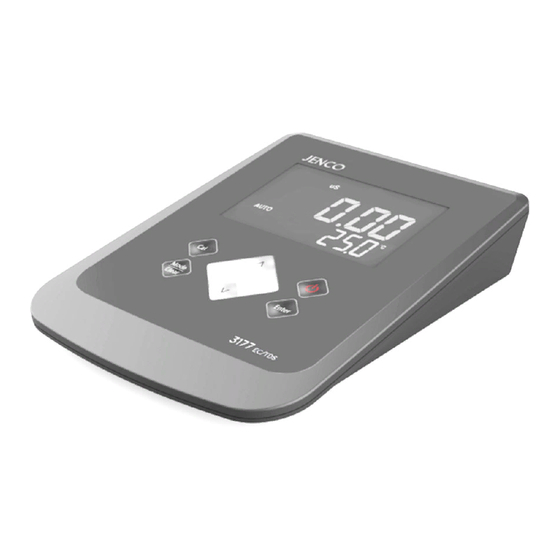
- Page 1 Operation Manual MODEL 3177 Microcomputer Based Conductivity/TDS/ Salinity/ Temperature Benchtop Meter 3177...
-
Page 2: Table Of Contents
CONTENTS GENERAL INTRODUCTION………………....2 INITIAL INSPECTION……...………………....2 POWER INPUT..…….……...………………....2 INSTALLING THE BATTERIES..…………....3 DISPLAY & KEYS FUNCTIONS…..……………...…………4 ..............4 Display ..............5 Keys OPERATIONAL PROCEDURES..……......6 ............6 A. Calibration ........8 B. Conductivity Measurements .......8 Preparing Standard Solutions ERROR DISPLAYS AND TROUBLESHOOTING..9 SPECIFICATIONS………………..……......10 WARRANTY…………………………......11... -
Page 3: General Introduction
INITIAL INSPECTION Carefully unpack the unit and accessories. Inspect for damages made in shipment. If any damage is found, notify your JENCO representative immediately. All packing materials should be saved until satisfactory operation is confirmed. -
Page 4: Installing The Batteries
INSTALLING THE BATTERIES To insert the batteries into the meter, follow the procedure outlined below. Use a Philip screw driver and unlock the battery cover by turning the screw driver in the counter clockwise direction. After unlocking the screw, take off the battery cover (Fig.1) Replace the old batteries with new ones and install them on the correct polarity position. -
Page 5: Display & Keys Functions
DISPLAY & KEYS FUNCTIONS A. Display Figure2: Active LCD screen 1. mS/cm- 7. mg/L- Millisiemens , indicates Milligrams/Liter indicates TDS Conductivity measurement. measurement. 2. BAT- 8. CELL K= Low battery indicator. Indicates conductivity cell constant value. 3. uS/cm- 9. %/ ℃- Microsiemens, indicates Indicates Temperature... -
Page 6: Keys
B. Keys On/Off- Press and hold this key for 2 seconds to power on and shut off the meter. Cal- During normal operation, this key will change the lear mode from “Measure” mode to “Calibration” mode. Mode / Clear- In measure mode, press this key for 0 second to sequentially display Conductivity, TDS and Salinity. -
Page 7: Operational Procedures
OPERATIONAL PROCEDURES A. Calibration Calibration setup contains six sections: TDS Constant, Temperature Coefficient, Temperature Reference, Probe Basic Cell Constant, Standard Solutions Calibration and K Value Input. To access these sections: Connect the conductivity probe to the unit and turn the unit In conductivity, TDS or salinity mode, allow temperature reading to stabilize, press “Cal”... - Page 8 Probe Basic Cell Constant The main display shows the Cell Constant of the conductivity probe (calibrated previously or default, the deviation range is 70% ~ 130%). The secondary display shows the current selected cell constant which is either 0.01, 0.10, 1.00 or 10.0. Press the “Up”...
-
Page 9: Conductivity Measurements
B. Conductivity Measurements Turn the unit on. Place the probe in the solution to be measured. Immerse the probe (at least 2” to 3” or 5~7cm from the tip). Shake the probe lightly to remove any trapped air bubbles in the conductivity cell. Press “Mode”... -
Page 10: Error Displays And Troubleshooting
"over " during measurements 1. Sample 1. Increase temperature sample temperature. undr < 0.0 ℃ 2. Replace cell. 2. Defective conductivity cell. [Note: If the meter still does not perform normally after the above measures are taken, call JENCO representative.]... -
Page 11: Specifications
SPECIFICATIONS Display Range Resolution Accuracy Conductivity 0.000 ~ 1.999 uS/cm / 0.001 uS/cm/ /TDS 0.000 ~ 1.999 mg/L 0.001 mg/L K=0.01 2.00 ~ 19.99 uS/cm/ 0.01 uS/cm/ ±0.5% F.S. 2.00 ~ 19.99 mg/L 0.01 mg/L 20.0 ~ 199.9 uS/cm/ 0.1 uS/cm/ 20.0 ~199.9 mg/ 0.1 mg/L Conductivity... -
Page 12: Warranty
If you purchased the item from our JENCO distributors and it is under warranty, please contact them to notify us of the situation.
Need help?
Do you have a question about the VisionPlus 3177 and is the answer not in the manual?
Questions and answers