JENCO VisionPlus pH 618N Operation Manual
Microcomputer based ph & temperature pocket meter
Hide thumbs
Also See for VisionPlus pH 618N:
- Operation manual (12 pages) ,
- Operation manual (12 pages)

Related Manuals for JENCO VisionPlus pH 618N


Summary of Contents for JENCO VisionPlus pH 618N
- Page 1 Operation Manual MODEL pH 618N Microcomputer Based pH & Temperature Pocket Meter pH618N...
-
Page 2: Table Of Contents
A. Replace the Batteries ..........2 B. Soak the Electrode ... 2 C. Setup and Calibrate the Electrode and Meter VISIONPLUS pH 618N OVERVIEW......3 ..........3 A. Meter Description ........ 3 B. VisionPlus Graphical Display OPERATION MODES AND KEYPAD OPERATIONS 4 ........... -
Page 3: Initial Inspection And Assembly
2. Soak the electrode in a 3M KCL solution for 2 hours before first use or after storage. C. Setup and Calibrate the Electrode and Meter VisionPlus pH 618N must be setup and calibrated before your first use. Please follow the instructions detailed in section USING VISIONPLUS pH... -
Page 4: Visionplus Ph 618N Overview
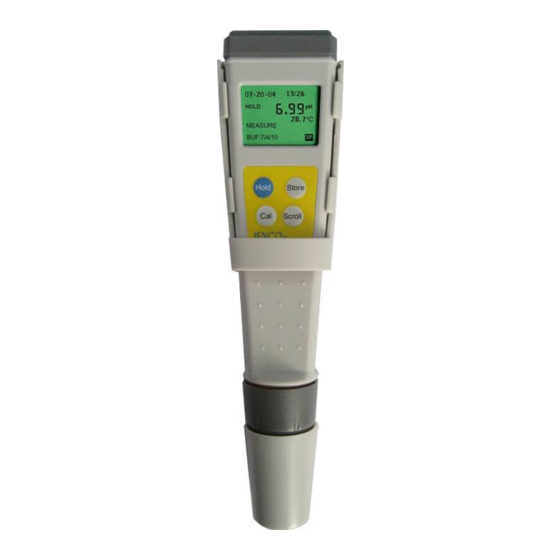
VISIONPLUS pH 618N OVERVIEW A. Meter Description 1. Battery cap 2. LCD screen 3. Keypad 4. Electrode collar 5. Electrode & ATC assembly (Electrode cap is not shown.) B. VisionPlus Graphical Display 1. DATE (MM-DD-YY) 2. HOLD mode indicator 3. MEASURE mode indicator 4. -
Page 5: Operation Modes And Keypad Operations
OPERATION MODES AND KEYPAD OPERATIONS A. Operation Modes VisionPlus pH meter has 6 operation modes: 1. Measure Mode. Measure Mode is used to make all pH and temperature measurements. 2. Calibration Mode. Calibration Mode is used to perform 1, 2 or 3 point calibration. 3. -
Page 6: Using Visionplus Ph 618N
Selects new buffer 0 second Select set. USING VISIONPLUS pH 618N A. Power ON/OFF Press “HOLD” key for 2 seconds or more. The unit will turn on and enter the “Measure Mode”. Repeat the process to turn off the unit. The unit will also automatically turn off after 10 minutes of no key activity. -
Page 7: Select Buffer
C. Select Buffer 1. Press “SCROLL” key for 5 seconds or more to enter “Buffer Select Mode”. 2. Press “SCROLL” key again to select either 7.00 (7.00/4.01/10.01) or 6.86 (6.86/4.00/9.18) buffer sets. 3. Press “STORE” key for 2 seconds to exit and return to “Measure Mode”. -
Page 8: Measure
Note: For accurate measurements, it is recommended that pH calibration is preformed once a week and after replacing the electrode. E. Measure Dip the meter into the test solution in the “Measure Mode”. F. Hold Data When the pH readings is stable, press “HOLD”... -
Page 9: Ongoing Maintenance
4. Press “CAL” key for 2-3 seconds to erase ALL stored data and return to “Measure Mode.” ONGOING MAINTENANCE A. Replace Electrode 1. Unscrew the electrode collar to remove the electrode & ATC assembly as shown in the right figure. 2. -
Page 10: Error Displays And Troubleshooting
ERROR DISPLAYS AND TROUBLESHOOTING pH LCD DISPLAY Possible cause(s) Display Disp Mode [Action(s)] a. Temperature over 0 to 99.9°C range. [Bring solution to a lower/higher temperature.] Measure "OVER" [Replace temperature Value probe.] b. No temperature sensor. [Use a temperature probe.] pH value over 0.00 0.0~ to14.00pH range . -
Page 11: Specifications
Weight 107 g WARRANTY Jenco Instruments, Ltd. warrants this product to be free from significant deviations in material and workmanship for a period of 1 year for the meter and 6 months for the electrode from date of purchase. If repair or adjustment is necessary and has... - Page 12 If you purchased the item from our Jenco distributors and it is under warranty, please contact them to notify us of the situation.
- Page 13 使用说明书(英文) 机型:618N 编制:TC CHEN 日期:2008-7-20 修改:杨启娜 日期:2009-4-3 文件编号:K618N-01 版本:02 核准:杨健寿 日期:2009-4-3 版本01:由618 MANUAL修改,纸型仍沿用618模式。删除了更换 日期电池部分,增加了清楚所有数据命令。 09-01-14:封面改为印刷版面,P2改插图。 09-4-3:修改P2~5,P8,P10,P11页码内容,增加BAT画面及地 址信息更正. 09-4-15: 电极头浸泡液改用3M KCL FOR 2 HOURS。...
Need help?
Do you have a question about the VisionPlus pH 618N and is the answer not in the manual?
Questions and answers