
Related Manuals for JENCO VisionPlus pH618N


Summary of Contents for JENCO VisionPlus pH618N
- Page 1 Operation Manual MODEL pH 618 Microcomputer Based pH&Temperature Pocket Meter pH618...
-
Page 2: Table Of Contents
CONTENTS INITIAL INSPECTION AND ASSEMBLY ....2 BEFORE YOUR FIRST USE ........2 A. Replace the Batteries ........... 2 B. Soak the Electrode............2 C. Setup and Calibrate the Electrode and Meter....2 VISIONPLUS pH 618 OVERVIEW......3 A. Meter Description............3 B. -
Page 3: Initial Inspection And Assembly
INITIAL INSPECTION AND ASSEMBLY Carefully unpack the instrument and accessories. Inspect for damages made in shipment. If any damage is found, notify your Jenco representative immediately. All packing materials should be saved until satisfactory operation is confirmed. BEFORE YOUR FIRST USE A. -
Page 4: Visionplus Ph 618 Overview
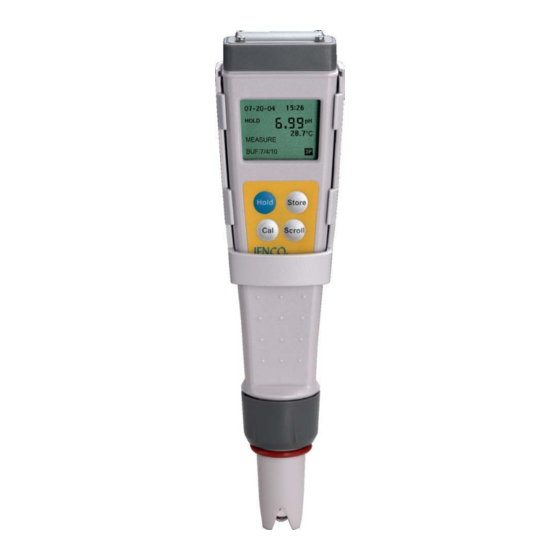
VISIONPLUS pH 618 OVERVIEW A. Meter Description 1. Battery cap 2. LCD screen 3. Keypad 4. Electrode collar 5. Electrode & ATC assembly (Electrode cap is not shown.) B. VisionPlus Graphical Display 1. DATE (MM-DD-YY) 2. HOLD mode indicator 3. MEASURE mode indicator 4. -
Page 5: Operation Modes And Keypad Operations
OPERATION MODES AND KEYPAD OPERATIONS A. Operation Modes VisionPlus pH meter has 6 operation modes: 1. Measure Mode. Measure Mode is used to make all pH and temperature measurements. 2. Calibration Mode. Calibration Mode is used to perform 1, 2 or 3 point calibration. 3. -
Page 6: Using Visionplus Ph 618
Operation Duration Function Mode Stores current pH Measure 2 seconds reading, date and time into memory. Date and Increases current 0 second STORE Time Set number. 2 seconds Leaves Recall Data Recall Data or more Mode. Buffer 2 seconds Leaves Buffer Select or more Select Mode. -
Page 7: Select Buffer
C. Select Buffer 1. Press “SCROLL” key for 5 seconds or more to enter “Buffer Select Mode”. 2. Press “SCROLL” key again to select either 7.00 (7.00/4.01/10.01) or 6.86 (6.86/4.00/9.18) buffer sets. 3. Press “STORE” key for 2 seconds to exit and return to “Measure Mode”. Note: There is no need to repeat this procedure every time unless one decides to change the buffer settings. -
Page 8: Measure
Note: For accurate measurements, it is recommended that pH calibration is preformed once a week and after replacing the electrode. E. Measure Dip the meter into the test solution in the “Measure Mode”. F. Hold Data 1. When the pH readings is stable, press “HOLD”... -
Page 9: Ongoing Maintenance
2. By pressing the “SCROLL” key, previous saved data will appear. 3. Press “STORE” key for 2 seconds to exit and return to “Measure Mode”. ONGOING MAINTENANCE A. Replace Electrode 1. Unscrew the electrode collar to remove the electrode & ATC assembly as shown in the right figure. -
Page 10: Error Displays And Troubleshooting
ERROR DISPLAYS AND TROUBLESHOOTING pH LCD DISPLAY Possible cause(s) Display Display Mode [Action(s)] a. Temperature over 0 to 99.9°C range. [Bring solution to a lower/higher temperature.] Measure "OVER" [Replace temperature Value probe.] b. No temperature sensor. [Use a temperature probe.] pH value over 0.00 to14.00pH range . -
Page 11: Specifications
Weight 105 g WARRANTY Jenco Instruments, Ltd. warrants this product to be free from significant deviations in material and workmanship for a period of 2 years for the meter and 6 months for the electrode from date of purchase. If repair or adjustment is necessary and has... - Page 12 If you purchased the item from our Jenco distributors and it is under warranty, please contact them to notify us of the situation. Jenco Service Department alone will determine if the product problem is due to deviations or customer misuse.
Need help?
Do you have a question about the VisionPlus pH618N and is the answer not in the manual?
Questions and answers