
Related Manuals for Gator GHDVR62R


Summary of Contents for Gator GHDVR62R
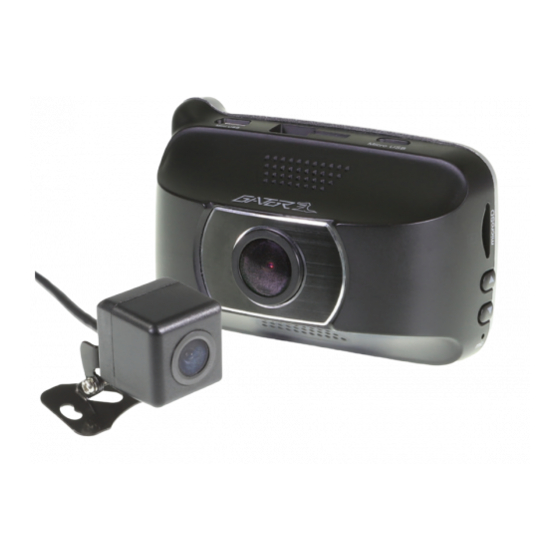
- Page 1 HDVR62R FULL HD 1080P DaSH cam reversing camera FRONT & REAR Manual RECORDING Full 2.7” Channel 1080P Resolution Screen Size Recording G Sensor Wide Angle Suction Mount...
-
Page 2: Introduction
Introduction Thank you for purchasing the Gator GHDVR62R FULL HD 1080P Dash Cam. Please ensure that you have read the product manual and instructions in full, prior to installation and use. Failure to do so may result in product failure/damage or incorrect operation and therefore impact the product performance. -
Page 3: Table Of Contents
Table of Contents Introduction............2 Product feature.............2 Table of contents..........3 Package components...........4 Universal hard wiring kit........4 Product structure..........5 Installation of Dash Cam........7 Fixing the Dash Cam..........8 Installation of reverse camera......8 Blue mirror image loop wire........8 Instructions for video and photo operation...9 Taking photos............9 Video/Photo playback..........9 Dash Cam Picture in Picture Screen....10... -
Page 4: Package Components
Package components 8G Micro SD GHDVR62R Mounting Card Bracket Car Charger Reversing camera Universal hard wiring kit GUNIHWC ( Sold seperately... -
Page 5: Product Structure
Product structure 1) Screen 2) Power ON/OFF 3) Camera Lens 4) Speaker... - Page 6 5) Micro SD Card slot 11) OK 6) Up 12) Reset 7) Down 13) Micro USB charger input 8) Microphone 14) Suction mount connection 9) Menu 15) Mini USB rear camera input 10) Mode...
-
Page 7: Installation Of Dash Cam
Installation of Dash Cam 1. Ensure windscreen is clean and free of debris. Use an Alcohol wipe to enhance suction. Attach suction cup to the windscreen and lock into position with the lever. 2. Fix where the vision is not blocked (Place close to rear-view mirror is recommended). -
Page 8: Fixing The Dash Cam
Fixing the Dash Cam Suggested Installation of Reversing Camera 1. Insert the Mini USB end of the reversing camera extension cable into the Mini USB interface of the Dash Cam. 2. Run the extension cable to the reversing cameras location. 3. Attach red wire from the extension cable to the reversing lamp of vehicle to trigger when reverse is activated for rear view. - Page 9 Fixing the Dash Cam (3.4m) (5.5m) Dash Cam (Red Trigger Wire) (1.1m) (43 cm) (Blue Mirror Wire reverses image) Powerwire (Reverse Tailight) Camera...
-
Page 10: Dash Cam Picture In Picture Screen
Dash Cam Picture in Picture Screen Default view is Picture in Picture (PIP). Press Mode button to switch between single or PIP views. When using reverse trigger wire, the screen view will revert to PIP once trigger has been disengaged. Resolution SD Card Primary... - Page 11 Instructions for video and photo playback When the Dash Cam is connected to a power source and recording, press the Menu button to enter into the Dash Cams settings. This will stop and save the current recording file and restart recording automatically when you exit the Menu.
-
Page 12: Dash Cam Settings
DASH CAM Settings Menu Settings Press the Menu button to get into the menu settings. You can navigate the settings menu by using the Up/Down buttons. To change or edit a selected setting, press the OK button. Press the menu button again to get out of the menu settings. - Page 13 DASH CAM Settings the Dash Cam will take a locked video. We recommend Normal Sensitivity to avoid false triggers. Note: With this function turned on it may fill up the SD card with locked video files. Re-format the SD card to create space. Park mode: OFF/ Vibration detection.
- Page 14 File Deletion: Delete One or All. Select to delete videos or photos taken. Video files, Event files (Locked files) or Picture files. Format: This feature allows you to format/delete all the files off your micro SD card. Date/Time: This feature will allow you to change the year, month, day and time.
-
Page 15: Resetting Dash Cam
Default Setting: This feature will reset all your settings and return your Dash Cam to the factory standard settings. Firmware Version: This simply shows the firmware/software employed by the Dash Cam’s hardware. Resetting DASH CAM To hard reset the device in the case of a system jam or crash. - Page 16 Data Backup: Remove SD Card from the Dash Cam and use a reader connected to a computer to access files and folders. EVENT folder is for locked files PICTURE folder is for picture files VIDEO folder is for video files Maintaining the Battery: To prolong the battery life you must charged your Dash Cam on a 5 volt home charger at least once a week for 2-3...
- Page 17 Formatting Card: It is advisable to format the card weekly if you have the setting Collision Detection, Park Mode on or create Locked files. This will fill up the card causing it to stop recording any footage. Lock Video Footage: Press OK button on the side of the display to activate the lock footage function.
-
Page 18: Product Specifications
Product specifications Dash Cam Display 2.7" High-resolution LCD screen Color Black Video Full HD 1920*1080P at 30fps Picture format Picture 1920*1080 pixels Viewing Angle 143 degree view angle Functions G-Sensor, Loop recording Reverse Camera Video HD 1280*720P at 25fps Viewing Angle 130 degree view angle Picture 1280*720 pixels... -
Page 19: Troubleshooting Guide
Troubleshooting guide If there are problems with the device, please refer to the following methods to resolve. Cannot take pictures or record video? Please check whether there is enough space on the micro SD card or internal storage. Stopping automatically while recording? Due to the high amount of HD video data being recorded, please use a high-speed Micro SD card. -
Page 20: Safety Information & Warnings
Safety information & warnings Do not use the Dash Cam in damp working conditions; the Dash Cam is not waterproof. Do not try opening the shell or trying to repair the Dash Cam by yourself. If the accessories for the Dash Cam have any problems, please take it to an authorised repair agent for repair. - Page 21 Technical assistance If you need assistance setting up or using your Gator product now or in the future, call Gator Support. Australia TEL: 03 – 8587 8898 FAX: 03 – 8587 8866 Mon-Fri 9am – 5pm AEST Please retain this user guide for future reference.
Need help?
Do you have a question about the GHDVR62R and is the answer not in the manual?
Questions and answers