Table of Contents
Advertisement
Advertisement
Table of Contents

Related Manuals for Gator GHDVR350


Summary of Contents for Gator GHDVR350
- Page 1 USER G UIDE G HDVR350 ...
-
Page 2: Product Overview
Introduction Thank you for purchasing the Gator HD Dash Cam 350. This product is designed to provide high definition recording of your trips for security and evidence in the case of an incident. Being portable, this convenient and durable multi-vehicle driving recorder can be used in a variety of situations for video recording. -
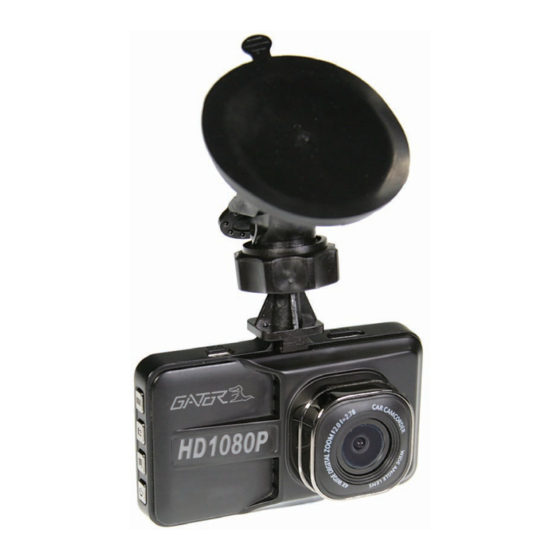
Page 3: Mounting Bracket
GDASH CAM350 User Guide Optional Accessory: GHWC The GATOR GWHC DASH CAM HARD WIRE KIT enables a professional installation of a GATOR DASH CAM into your vehicle. Instead of sourcing power from the accessory socket of the vehicle, the GHWC allows the dash cam to be wired directly to the vehicles fuse box. -
Page 4: Product Structure
Product Structure: 1) Record/OK 9) Mini USB Port 2) Mode Mini HDMI Port 3) Lock Button 11) Reset 4) Power 12) MIC 5) Down 13) Mounting Slot 6) Menu 14) LCD 7) Up 15) Lens 8) Micro SD Card Slot 16) Speaker... - Page 5 Button Instructions Power Button: When the DASH CAM is turned off, press it once to turn it on. While the system is on, hold down the power button to turn it off. Menu Button: Pressing this button once will open the menu. Pressing the menu button again while in the menu will change to the second settings tab.
-
Page 6: Extra Functions
MIC: Audio receiver for video recording. Extra Functions G-sensor Function: The G-sensor function activates in the case of a car accident by determining the gravitational acceleration (1g = 9.8 meters/second^2). When this function activates, the DASH CAM will save the accident footage in a non-delectable file in order to protect the footage. -
Page 7: Video Mode
Basic Instructions for Video and Photo Operation Powering on and off the device: To turn on the DASH CAM press the power key once, the red indication lamp will be light up if it is connected to a power source. To turn it off, hold down the power button and the device will turn off. -
Page 8: Photo Mode
Photo Mode Press the Mode button to switch to photo mode. There is a camera icon at the top left corner of the LCD to signify you are on photo mode. To take a photo, press the OK button. The screen will flash and make a camera sound when a picture is taken. -
Page 9: Battery Instructions
Menu Settings Press the Menu button to get into the menu settings. You can navigate the settings menu by using the Up/Down buttons. To change or edit a selected setting, press the OK button. Press the menu button again to get out of the menu settings. USB Mode ... - Page 10 Press the menu button again until you see the following Spanner and screwdriver. (SETUP MENU) Date/Time: This feature will allow you to change the year, month, day and time. To change the date simply use the arrow keys to go up or down. Press the OK button to move onto the next section. Again, use the arrow buttons to go up or down.
-
Page 11: Product Specification
Product Specification Product Feature HD Camera, HD Recording Built-in (Used to save the file in case of an emergency, and cannot G-sensor be deleted if the collision of vehicles happen) LCD Size 3” LCD Lens 120 Degree Wide Angle ... - Page 12 Frequently Asked Questions Under normal operating conditions, if there are problems with the device, please refer to the following methods to resolve. Cannot take pictures or record video? Please check whether there is enough space on the micro SD card or internal storage. ...
-
Page 13: Technical Assistance
Technical Assistance If you need assistance setting up or using your Gator product now or in the future, call Gator Support. Australia TEL: 03 – 8587 8898 FAX: 03 – 8587 8866 Mon-Fri 9am – 5pm AEST ...
Need help?
Do you have a question about the GHDVR350 and is the answer not in the manual?
Questions and answers