
Related Manuals for Gator GHDVR410


Summary of Contents for Gator GHDVR410
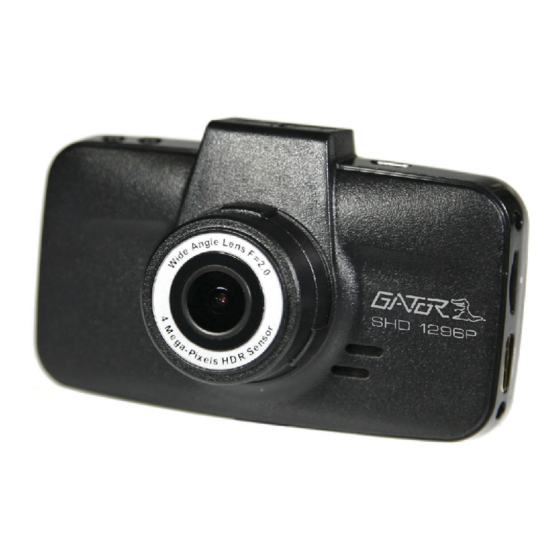
- Page 1 "#$%&'( !"#$%&'(&)*+,#&(-!'&.-/ !"#$%&'(%)*"(+,-%,. "#$%!!!!!!!!!&'()*+,+ Super Lane Departure 3” & Forward Collision 1296P Screen Size Resolution Data G Sensor Wide Angle ADAS Recording Warning System...
-
Page 2: Introduction
Introduction Thank you for purchasing the Gator GHDVR410 Super HD Dash Cam. Please ensure that you have read the product manual and instructions in full, prior to installation and use. Failure to do so may result in product failure/damage or incorrect operation and therefore impact the product performance. -
Page 3: Table Of Contents
Table of Contents Introduction…………………….……………………………………………………………...2 Product overview………………………..……………………………………………………2 Product features ……………………………………………………………………………..2 Table of contents ………………………………..………………………….…………….….3 Package components ………………………………..………………………….……….….4 Optional accessory……………………………………………………………………….…..4 Product structure………………………………...…………….…………………..…...…….5 Installation of suction mount………………..……………………….…...………….…..6 Installation of adhesive mount………………..……………..…………...………….…..6 Installation of Dash Cam…..…………………………………………………………………7 Indicator lights………….…………………………………………………………………...…8 Screen display icons……..……………………………………………………………….…..8 Button instructions ………………..……………..………………………..……….…………9 Extra functions ………………….……………….……………………………….……….…10 Instructions for playback, video and photo operation………….………………..…….…11 ... -
Page 4: Package Components
Optional accessory: GHWC The GATOR GHWC DASH CAM HARD WIRE KIT enables a professional installation of a GATOR DASH CAM into your vehicle. Instead of sourcing power from the accessory socket of the vehicle, the GHWC allows the dash cam to be wired directly to the vehicles fuse box. The DASH CAM will still function the same way as the accessory plug power lead but allows all cables to be hidden for a professional installation. -
Page 5: Product Structure
Product structure: !"#$%&$'()*+,-.%(/&0&$'(1"&$% !&$&(456(&$%.*/+,.7 ,8+*'&$'(1"&$% 2.$3 !"#$ "% 9.3.% ATTENTION: Please charge the unit for 8 hours before installation. The DASH CAM is not designed to be used on battery power alone; this is only for date and time functionality. Always power your DASH CAM with power adapter supplied. -
Page 6: Installation Of Suction Mount
Installation of suction mount 1. The GHDVR410 comes with two 2. The suction feet are attached to mounting options. One is an the mount by inserting in the holes, adhesive and the other is a suction and slide outwards to lock in mount. -
Page 7: Installation Of Dash Cam
Installation of Dash Cam Insert suction/ adhesive mount into the mounting bracket fixing point on the DASH CAM. Fix device onto a clean windscreen where the vision is not blocked (Place close to rear-view mirror is recommended). Don’t install device on airbag or within its working range. Insert Micro SD card into the DASH CAM Insert GPS logger cord into the Mini USB interface/ charging point of the DASH CAM;... -
Page 8: Indicator Lights
Indicator lights Screen display icons Battery Power or Micro SD Recording indicator battery mode card Locked file counter Camera Microphone 2304 Resolution 1296 0.0EV 2017/07/25 10:13:07 AE bias Date stamp Time... -
Page 9: Button Instructions
Button instructions Power Button: Press and hold the power button to turn it on or off. If powered by the vehicles power it will automatically turn on and start recording when the vehicles ignition is turned on. When the vehicles ignition is turned off, the DASH CAM will power off and automatically save the recorded files. -
Page 10: Extra Functions
Extra functions Micro SD Slot: Where the Micro SD card is inserted (Max size is 64GB Class 10). USB Interface: The USB port can be used to power and charge the DASH CAM, or be connected to a computer for data transfer. -
Page 11: Instructions For Playback, Video And Photo Operation
Instructions for playback, video & photo operation 1. Video and Photo Playback Mode (File Browser Interface) When in video recording mode press the Mode button twice to switch to SOS video and video/photo mode. Use Arrow Up and Down keys to switch between modes. At the top right corner of the LCD there is a video/camera icon to signify playback for videos and photos, and a video icon with hazard symbol to signify SOS lock mode videos. -
Page 12: Menu Setting Functions Explained
Menu setting features explained ATTENTION: For full access to menu options GPS antenna must be connected to the DASH CAM Resolution: Resolution can be set at 2560x1080 30P, 2304x1296 30P, 1920x1080 30P, HDR 1920x1080 30P, or 1280x720 60P and 1280x720 30P Record Time (Loop): This feature allows you to set the size of the files your DASH CAM will record before saving and creating a new file. - Page 13 G Sensor Setting: The G-sensor function activates in the case of a car accident by determining the gravitational acceleration (1g = 9.8 meters/second^2). When this function activates, the DASH CAM will save the accident footage in a non-deletable file in order to protect the footage. The G-sensor sensitivity can be adjusted to 2G,4G or 8G.
-
Page 14: Usb Mode
USB mode When connecting your DASH CAM via USB cable to your PC directly, the DASH CAM screen will display the message “USB connecting” options. This means connection is successful. ‘Mass Storage’ allows you to transfer your videos and photos to your PC. Or alternatively the SD Card should be removed from the DASH CAM and placed in a reader for safer transfer. -
Page 15: Product Specification
Product specifications Product Feature HD Camera, HD Recording CMOS sensor, 1/3" light sensation area, low light Light sensor G-sensor Sensitivity 2g/4g/8g/OFF LCD Size 3” LCD 160 Degree Wide Angle Fixed focus, F = 2.0 Lens ... -
Page 16: Trouble Shooting Guide
Trouble shooting guide Under normal operating conditions, if there are problems with the device, please refer to the following methods to resolve. Cannot take pictures or record video? Please check whether there is enough space on the micro SD card or internal storage. -
Page 17: Infringement Of Copyright Warning
Technical assistance If you need assistance setting up or using your Gator product now or in the future, call Gator Support. ...
Need help?
Do you have a question about the GHDVR410 and is the answer not in the manual?
Questions and answers