Table of Contents
Advertisement
Quick Links
Advertisement
Table of Contents

Related Manuals for FieldServer ProtoCessor ProtoNode RER Series


Summary of Contents for FieldServer ProtoCessor ProtoNode RER Series
- Page 1 ProtoNode RER and ProtoNode LER FPC-N34, FPC-N35, FPC-N36, FPC-N37, FPC-N38, FPC-N39 Startup Guide APPLICABILITY & EFFECTIVITY Explains the ProtoNode RER and LER hardware and how to install it. The instructions are effective for the above as of May 2012 Kernel Version: 6.04 Document Revision:...
-
Page 2: Table Of Contents
Appendix A Troubleshooting Tips if the ProtoNode is not working ............ 13 Appendix A.1. Check Wiring and Settings ........................ 13 Appendix A.2. Take Log With Our FieldServer Utilities.................... 13 Appendix A.3. LED Diagnostics for Modbus RTU Communications between the ProtoNode and the OEM Product .................................... -
Page 3: Introduction
The ProtoNode is always pre-configured by the OEM, requiring the end customer to only set of DIP switches to load a configuration file and set the specific network setting of the device. Note that Technical Support for the end‐user is provided by the device manufacturer and not FieldServer Technologies ProtoCessor group. BTL Mark – BACnet Testing Laboratory... -
Page 4: Bacnet/Lonworks Setup Through Protocessor Protonode Rer/Ler
Generic ProtoNode Startup Guide Page 4 of 25 BACNET/LONWORKS SETUP THROUGH PROTOCESSOR PROTONODE RER/LER Features 10/100BaseT Ethernet LAN interface (auto-sensing) Multiple Protocol Support Supports multiple configuration files and the ability to automatically load any of the stored files for different OEM controllers or protocols supported. ProtoNode- RER –... -
Page 5: Configure The Dip Switches
Generic ProtoNode Startup Guide Page 5 of 25 Configure the DIP Switches 2.4.1 Setting the Node/ID Device Instance (DIP Switch A0 – A7) The A Bank DIP switches on the ProtoNode RER allow users to set the Node-ID/Device Instance on the Field RS-485. -
Page 6: Using S0 - S3 Bank Of Dip Switches To Select And Load Configuration Files
Generic ProtoNode Startup Guide Page 6 of 25 2.4.3 Using S0 – S3 bank of DIP Switches to select and load Configuration Files The S bank of DIP switches, S0 - S3 is used to select and load a configuration file from a group of pretested/preloaded configuration files that the OEM has programmed for their end users. -
Page 7: Interfacing The Protonode To Host Oem Device
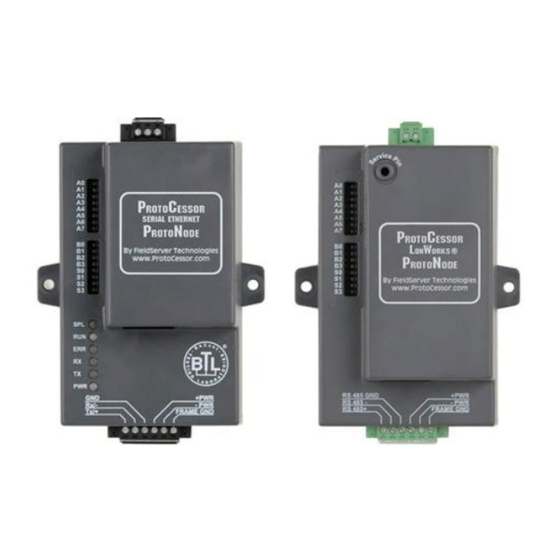
Generic ProtoNode Startup Guide Page 7 of 25 INTERFACING THE PROTONODE TO HOST OEM DEVICE ProtoNode RER and LER showing connection ports RS-485 Port for LonWorks Port Serial Field Protocol LonWorks Service Pin 10/100 BaseT Power +/- and FG Power +/- and FG Connection 9-30 VDC, 12-24 VAC Connection... -
Page 8: Wiring The Protonode Rer To Rs-485 Field Protocol
Generic ProtoNode Startup Guide Page 8 of 25 Wiring the ProtoNode RER to RS-485 Field Protocol Connection from ProtoNode RER to RS-485 Field Protocol The Field Protocol can be connected to the 3-pin connector on ProtoNode RER as shown: Figure 5: Connection from ProtoNode to RS-485 Field Protocol –BACnet MS/TP or Metasys N2 If the ProtoNode is the last device on the RS-485 trunk, then enable the End-of-line termination needs to be enabled. -
Page 9: Wiring The Protonode Ler Field Port To A Lonworks Network
Generic ProtoNode Startup Guide Page 9 of 25 Wiring the ProtoNode LER Field Port to a LonWorks network Connect the ProtoNode to the field network with the LonWorks terminal using a twisted pair non- shielded cable. LonWorks has no polarity. Power-Up the ProtoNode RER or LER Apply power to the device. -
Page 10: Connect The Protonode's Web Gui To Setup Ip Address For Bacnet/Ip Or Modbus Tcp
Generic ProtoNode Startup Guide Page 10 of 25 CONNECT THE PROTONODE’S WEB GUI TO SETUP IP ADDRESS FOR BACNET/IP OR MODBUS TCP Connect the PC to the ProtoNode via the Ethernet port Ethernet Port Figure 7: Ethernet port location of ProtoNode Connect a standard CAT5 Ethernet cable (straight through or cross) between the PC and ProtoNode The Default IP Address of the ProtoNode is 192.168.1.24, Subnet Mask is 255.255.255.0. -
Page 11: Use The Protonode Web Gui To Connect To The Protonode
Generic ProtoNode Startup Guide Page 11 of 25 Use the ProtoNode Web GUI to Connect to the ProtoNode Open PC web browser enter the default IP address of the ProtoNode 192.168.1.24 determine if the ProtoNode is up and communicating. Figure 8: FST Web GUI screen Set IP Address for BACnet/IP Open a PC web browser, enter the default IP address of the ProtoNode 192.168.1.24 and connect to the ProtoNode. - Page 12 Generic ProtoNode Startup Guide Page 12 of 25 ProtoCessor 1991 Tarob Court Milpitas, California 95035 USA Web: www.protocessor.com Tel: (408) 964 4444 Fax: (408) 262-2269 Toll Free: 888-509-1970 X141 email: support@protocessor.com...
-
Page 13: Appendix A Troubleshooting Tips If The Protonode Is Not Working
Verify IP address setting Verify wiring If the problem still exists, a log needs to be taken and sent to FieldServer. Appendix A.2. Take Log With Our FieldServer Utilities Once the log is complete, email it to support@protocessor.com. The log will allow us to rapidly diagnose the problem. - Page 14 Generic ProtoNode Startup Guide Page 14 of 25 For Windows 7: Go to > > > > Right-click on Local Area Connection > Properties Highlight > For Windows XP and Windows 7, select: Use the following IP address Click twice Double click on the FST Diag Utility.
- Page 15 Click the “Send Log” button located near the bottom of the dialog. The following dialog should appear. Push the ‘Locate Folder’ button to launch explorer and have it point directly at the correct folder. The file upload.zip must be sent to support@fieldserver.com. Step 4: Close the Program Press the exit button when the log is completed ProtoCessor 1991 Tarob Court Milpitas, California 95035 USA Web: www.protocessor.com...
-
Page 16: Appendix A.3. Led Diagnostics For Modbus Rtu Communications Between The Protonode And The Oem Product
The SYS ERR LED will go on solid 15 seconds after power up. It will turn off after 5 seconds. A steady red light will indicate there is a system error on the ProtoNode LER. If this occurs, immediately report the related “system error” shown in the error screen of the RUI interface to FieldServer Technologies for evaluation. -
Page 17: Appendix B Vendor Information
ProtoNode Startup Guide Page 17 of 25 Appendix B Vendor Information Appendix B.1. Additional DIP switch settings When more configuration settings are needed than possible via the external S Bank DIP Switches, then the user can access the A Bank DIP Switches internal to the ProtoNode. Note: The lid on top of the ProtoNode has to be removed in order to select the A Bank of DIP switches. -
Page 18: Appendix C Reference
ProtoNode Startup Guide Page 18 of 25 Appendix C Reference Appendix C.1. Specifications ProtoNode RER ProtoNode LER One 6-pin Phoenix connector, one RS-485 +/- One 6-pin Phoenix connector, one RS-485 +/- ground port, power +/- frame ground port ground port, power +/- frame ground port Electrical One 3-pin RS-485 Phoenix connector, one RS- One Ethernet 10/100 BaseT port... -
Page 19: Appendix C.1.1. Compliance With Ul Regulations
ProtoNode Startup Guide Page 19 of 25 Appendix C.1.1. Compliance with UL Regulations For UL compliance, the following instructions must be met when operating the ProtoNode. The units shall be powered by listed LPS or Class 2 power supply suited to the expected operating temperature range. - Page 20 ProtoNode Startup Guide Page 20 of 25 Address ProtoCessor 1991 Tarob Court Milpitas, California 95035 USA Web: www.protocessor.com Tel: (408) 964 4444 Fax: (408) 262-2269 Toll Free: 888-509-1970 X141 email: support@protocessor.com...
- Page 21 ProtoNode Startup Guide Page 21 of 25 Address ProtoCessor 1991 Tarob Court Milpitas, California 95035 USA Web: www.protocessor.com Tel: (408) 964 4444 Fax: (408) 262-2269 Toll Free: 888-509-1970 X141 email: support@protocessor.com...
- Page 22 ProtoNode Startup Guide Page 22 of 25 Address ProtoCessor 1991 Tarob Court Milpitas, California 95035 USA Web: www.protocessor.com Tel: (408) 964 4444 Fax: (408) 262-2269 Toll Free: 888-509-1970 X141 email: support@protocessor.com...
- Page 23 ProtoNode Startup Guide Page 23 of 25 Address ProtoCessor 1991 Tarob Court Milpitas, California 95035 USA Web: www.protocessor.com Tel: (408) 964 4444 Fax: (408) 262-2269 Toll Free: 888-509-1970 X141 email: support@protocessor.com...
- Page 24 ProtoNode Startup Guide Page 24 of 25 Address ProtoCessor 1991 Tarob Court Milpitas, California 95035 USA Web: www.protocessor.com Tel: (408) 964 4444 Fax: (408) 262-2269 Toll Free: 888-509-1970 X141 email: support@protocessor.com...
-
Page 25: Appendix D Limited 2 Year Warranty
FieldServer Technologies warrants its products to be free from defects in workmanship or material under normal use and service for two years after date of shipment. FieldServer Technologies will repair or replace any equipment found to be defective during the warranty period. Final determination of the nature and responsibility for defective or damaged equipment will be made by FieldServer Technologies personnel.
Need help?
Do you have a question about the ProtoCessor ProtoNode RER Series and is the answer not in the manual?
Questions and answers