Table of Contents
Advertisement
Quick Links
Advertisement
Table of Contents

Related Manuals for SUNSTONE Orion c Series


Summary of Contents for SUNSTONE Orion c Series
- Page 1 Orion c Series Welding System User Manual...
-
Page 2: Table Of Contents
c Series User Manual Table of Contents Chapter 1: Setup and Assembly . . . . . . . . . . . . . . . . . . p . -
Page 3: What Is In The Box
c Series User Manual Chapter 1: Welder Setup & Assembly Power Supply Setup BACK PANEL What is in the Box The Orion has an internal switching power supply that can accept both 120 and 240VAC . 1 . Plug the female end of the power cable into the “90-240 VAC” port . ALL 100c MODELS: 2 . -
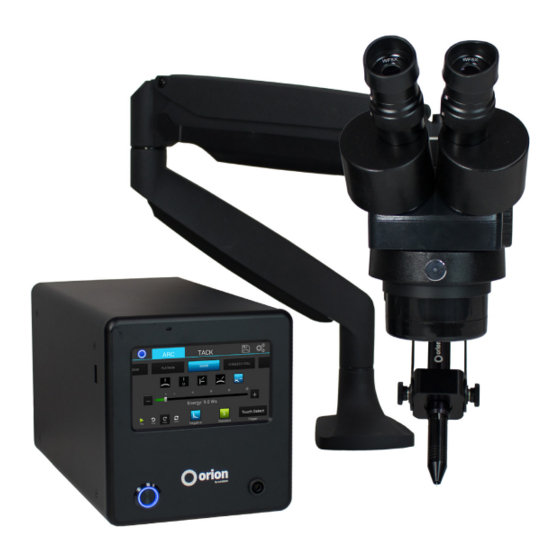
Page 4: Articulating Arm And Microscope Setup
c Series User Manual Articulating Arm and Microscope Setup ATTACH MICROSCOPE TO THE ARTICULATING ARM 1 . Place the microscope body into the round clamp at the top of the articulating arm . MOUNT THE ARTICULATING ARM TO THE TABLETOP 2 . -
Page 5: Microscope Lcd Filter Shutter
c Series User Manual Microscope LCD Filter Shutter ADJUST THE WELDING STYLUS POSITION, ANGLE, AND HEIGHT The Microscope LCD Filter Shutter allows an unobstructed working view before welding and completely protects your 1 . Loosen the screws on either side of the stylus holder to (1) move the stylus holder forward or backward and (2) to eyes during the welding process . -
Page 6: Electrode Setup
c Series User Manual • Adjust the Darkening Lens Position by loosening/tightening the adjuster knobs on the back of the Darkening Lens WORK PIECE TO ELECTRODE PRESSURE Arm . Touch the workpiece to the electrode with very light pressure . Too much pressure will cause the workpiece to stick to •... -
Page 7: Arc Screen
c Series User Manual Chapter 2: The Touch Screen Interface PRESSURIZED GAS SAFETY There are several important rules that should be followed when using a Below is an explanation of all the various buttons and options found on the Orion user interface . compressed shielding gas such as argon . -
Page 8: Tack Screen
c Series User Manual Tack Screen Save/Load Screen 1 . Top Navigation Bar: Allows the 1 . List of Saved Welds: Current list user to change screens . of welds that are saved on the 1 . Arc Button: Switches the welder . -
Page 9: Settings Tab - Gas Screen
4 . Title: Shows the user what setting they are adjusting . *Sunstone recommends staying in the Green area and avoiding the Yellow / Red area . 5 . Maximum Value: Shows the user the highest amount the slider can go . -
Page 10: Settings Tab - System Screen
Select Medium from the Pre-Weld delay section . • Select Foot Pedal for the Trigger Type . 6 . Enter Test Suite Button: Allows access to diagnostic screens for use with Sunstone Support . • Touch the Play button . -
Page 11: Electrode Placement Examples
c Series User Manual Electrode placement examples Butt Weld (big) Butt Weld (small) T-Joint Weld Add Metal (big) Add Metal (small) General Weld Parameter Settings • These settings are to help users get started . Remember to adjust the power up and down as needed . 26 AWG wire/chain/jump ring Earring Post Retip Prong (26 AWG wire)
Need help?
Do you have a question about the Orion c Series and is the answer not in the manual?
Questions and answers