Table of Contents
Advertisement
Quick Links
Advertisement
Table of Contents

Subscribe to Our Youtube Channel
Related Manuals for SUNSTONE Zapp Plus


Summary of Contents for SUNSTONE Zapp Plus
- Page 1 Zapp Plus ™ Users Guide Version 20231107 • Part #1620...
- Page 2 ING LLC PRODUCT OR ANY THIRD PARTY PRODUCTS THAT ARE USED IN OR WITH THE SUNSTONE ENGINEERING LLC PRODUCT, OR LOSS OF USE OF THE SUNSTONE ENGINEERING LLC PRODUCT OR ANY THIRD PARTY PRODUCTS THAT ARE USED IN OR WITH THE SUNSTONE ENGINEERING LLC PRODUCT, EVEN IF SUNSTONE ENGINEERING LLC HAS BEEN ADVISED OF THE POSSIBILITY OF SUCH DAMAGES.
-
Page 3: Table Of Contents
Contents Welder Setup & Assembly ....................... 1 Electrode Setup ........................2 How to Use the Dial ......................3 How to Make a Weld ......................4 Recommended Weld Settings ....................6 Electrode Care & Shield Gas Setup ..................7 Microscope Tips .........................10 Appendix A ..........................11 How to Connect the Basic Cables With Auto Darkening Lens ......11 How to Place the Welding Stylus .................12... - Page 4 Permanent Jewelry Training Video Watch this video for permanent jewelry training, setup recommendations, time-saving tips and tricks, and more! Pulse Arc Welding Workbook and Safety Guide Download this document to access advanced welding techniques and safety information.
-
Page 5: Welder Setup & Assembly
WITHOUT LENS/MICROSCOPE The Zapp Plus does not require the use of any lens or microscope. Always wear proper eye protection when you are using the Zapp Plus. The provided welding glasses will protect your eyes from damage due to the arc flash. - Page 6 Zapp User Manual ™ Install the Tungsten Electrode Onto the Welding Stylus Refer to the Stylus Components Chart (Figure 2.4) to install the tungsten electrode (D). • Remove the Stylus Hull (E) by pulling it away from Figure 2.1. To install the electrode, first remove the Stylus Shaft (A) from the Stylus Hull (E) by pulling them apart.
-
Page 7: How To Use The Dial
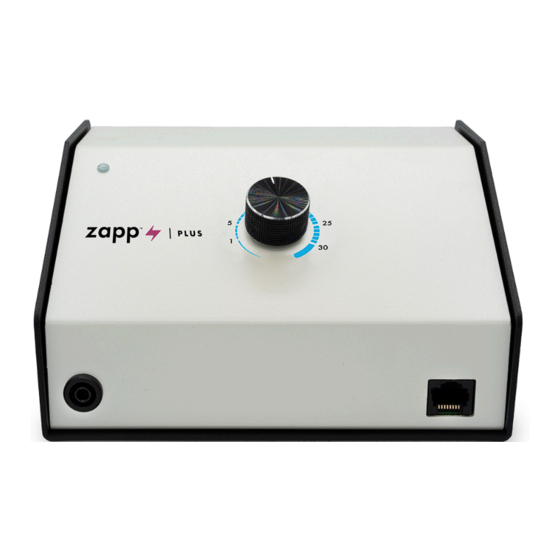
Weld On/Off When the Zapp Plus is initially powered on it is ready to weld. A small green light in the upper left corner, near the knob, will illuminate when the Zapp Plus is ready to weld. Power the unit off if a non-weld state is desired. -
Page 8: How To Make A Weld
Never operate the welder without eye protection. • If you are using an Auto Darkening Lens (ADL) with the Zapp Plus, refer to Appendix A before proceeding. • If you are using a swing arm micro- scope or the PJ Scope, refer to Appendix B before proceeding. - Page 9 Zapp Plus, so ignore the labels and focus on the row labeled “None”. Create lower-powered practice welds on the left and higher powered welds as you move right (maximizing at 30J). Tip: When the electrode touches the workpiece, don’t back away from the electrode until after the weld is completed.
- Page 10 Zapp User Manual ™ Weld Settings for Chain Below are energy settings for Sunstone’s chains. 6 • Questions? Call or Text +1-801-658-0015...
-
Page 11: Electrode Care & Shield Gas Setup
Electrode Tip Electrode Tip become contaminated (workpiece material on the elec- Figure 7.1. trode). Sunstone recommends cleaning or changing the electrode when it sticks to the workpiece. A clean, sharp electrode will give the best results when welding permanent jewelry. - Page 12 Always secure the pressurized gas tank to a fixed Purchase premium argon gas from Sunstone. Call +1 801-658-0015 visit www.sunstonewelders.com/gas. • Delivered directly to your door! • Right-sized tank fits almost anywhere! • Premium argon gas for your Zapp Plus! 8 • Questions? Call or Text +1-801-658-0015...
- Page 13 If you experience a large shielding gas leak, open all of the doors and windows in the room. SHIELDING GAS TANK AND REGULATOR SETUP The following instructions are specific for a Sunstone argon regulator. Other regulators may operate differently. Consult instructions that may have come with other regulators. •...
-
Page 14: How To Connect The Basic Cables With Auto Darkening Lens
The darkening lens or microscope will automatically darken when the weld Figure 10.1. The back panel of the Zapp Plus. Argon Gas Port (A). Stylus Port (B). Power Port (C). takes place, which allows the operator to have a view of the work piece and remain protected from the flash during the welding process. -
Page 15: How To Place The Welding Stylus
Figure 11.1 (the stylus should be angled down). • Connect the Stylus Cord to the back of the Zapp Plus to the stylus port as seen in Figure 10.1. Mounting Zapp Plus Stylus in Upgraded Darkening Lens: •... -
Page 16: Microscope Arm Mounting Options
Zapp User Manual ™ Appendix B Microscope Arm Mounting Options If you purchased the Zapp Plus with an arm-mounted Figure 12.1. Attach Angled microscope, carefully follow these instructions. Bracket (C) to Microscope Arm Assembly (A). Mounting Option 1 - Clamp to Table This option is best for tables with accessible edges and for mounting without drilling holes in the table. - Page 17 • A plastic cable guide cover (E) can be clipped on over the angled bracket if desired. See Figure 12.4. Figure 13.1. Remove the plate from the arm, Mounting Option 2 - Bolt through Table run the carriage bolt (F) through the mounting Mounting Option 2 is best for tables without accessible plate (H), then re-attach...
- Page 18 RJ45 Shutter Cable to connect the welder to the back • Refer to the setup instructions that shipped and bottom of the microscope head. The other end of the cable connects to the port in the front of the Zapp Plus. (See with the PJ Scope. Figure 2.1) •...
-
Page 19: How To Adjust Microscope Focus
You’ll find one knob on each side of the microscope arm. How to Place the Welding Stylus • If using a microscope with the Zapp Plus, insert the Welding Stylus into the holder at the bottom of the Microscope Arm Assembly as shown in Figure 15.2. - Page 20 The Microscope LCD Filter Shutter System provides an unobstructed working view before welding and com- pletely protects your eyes during the welding process. The Zapp Plus’ internal computer verifies the Micro- scope LCD Filter Shutter System has been activated before allowing the weld to take place. Should the shutter not activate, the microscope lens is equipped with >UV 16 and >IR 16 for maximum eye protection.
- Page 21 The workbook also provides useful tips specific to different types of metals and how to use the welder in different applications. The workbook can be found together with this user manual. If the workbook is missing, call Sunstone for a complimentary replacement copy at +1 801-658-0015.
- Page 22 1-15 Joules 0.75-1.5 mm Spot Size 0.5-1.0 mm Spot Size 1 weld every 2 seconds 1 weld per second ©2023 Sunstone Engineering LLC. Sunstone is a registered trademark and Orion is a trademark of Sunstone Engineering LLC. All rights reserved.
- Page 23 s ional’s Permanent Jewelry Welder Orion 100c Orion 100s Orion 200i When you need a bit more The world’s bestselling pulse arc For large shops who value power, a bit more energy welder! Most of the features and production efficiencies—or control, try the 100c! power you’ll need.
- Page 24 1693 American Way Ste 5 • Payson UT 84651 USA Tel. +1-801-658-0015 wwww.sunstonewelders.com...
Need help?
Do you have a question about the Zapp Plus and is the answer not in the manual?
Questions and answers