
Subscribe to Our Youtube Channel
Related Manuals for REMKO Easy-Control EC1


Summary of Contents for REMKO Easy-Control EC1
- Page 1 Operating and installation instructions REMKO remote controls Easy-Control remote control for heat pumps EC 1 0242-2019-11 Edition 1, en_GB Read the instructions prior to performing any task!
- Page 2 Read these operating instructions carefully before commis- sioning / using this device! These instructions are an integral part of the system and must always be kept near or on the device. Subject to modifications; No liability accepted for errors or mis- prints! Translation of the original...
-
Page 3: Table Of Contents
Table of contents Safety and usage instructions......................4 1.1 General safety notes........................4 1.2 Identification of notes........................4 1.3 Personnel qualifications........................4 1.4 Dangers of failure to observe the safety notes................4 1.5 Safety-conscious working....................... 4 1.6 Safety notes for the operator......................5 1.7 Safety notes for installation, maintenance and inspection.............. -
Page 4: Safety And Usage Instructions
REMKO remote controls Safety and usage instructions CAUTION! This combination of symbol and signal word 1.1 General safety notes warns of a potentially hazardous situation, which if not avoided may cause injury or mate- Carefully read the operating manual before com- rial and environmental damage. -
Page 5: Safety Notes For The Operator
The setup, connection and operation of the plete and return the "certificate of warranty" to units and its components must be undertaken REMKO GmbH & Co. KG at the time when the in accordance with the usage and operating units are purchased and commissioned. -
Page 6: Transport And Packaging
REMKO remote controls 1.11 Transport and packaging The devices are supplied in a sturdy shipping con- tainer or inside the heat pump casing. Please check the equipment immediately upon delivery and note any damage or missing parts on the delivery and inform the shipper and your contrac- tual partner. -
Page 7: Technical Data
Technical data 2.1 Unit data Series Easy-Control EC1 Power supply V/Hz 230 AC, 50 Current load (heating cycle pump) Probe NTC3950, l0K ± 0.5/± 1 Accuracy °C/F Set the temperature °C 5-35 Temperature display °C 5-99 Ambient temperature °C 0-45 Humidity (non-condensing) % rel. -
Page 8: Unit Description
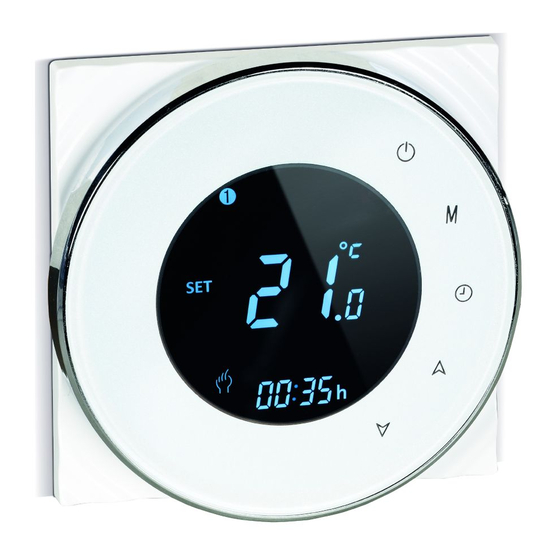
REMKO remote controls Unit description Scope of delivery The Easy-Control remote control EC 1 is a touch Description Quantity display with an integrated room probe. Operation is intuitive and self-explanatory due to its clear Easy-Control EC 1 arrangement. For example, to enter the desired... -
Page 9: Operation
Operation Remote control display Keys for the remote control settings Fig. 3: Remote control display The remote control display is realised through the Fig. 4: Keys on the remote control corresponding symbols on the touch display. The remote control is operated using the relevant Days of the week keys on the touch display. - Page 10 REMKO remote controls Setting the time and the day of the week Setting the time programs - Press the “Clock” key [12]. The minute display You have the option of storing six different time flashes. programs in the EC1 per day.
- Page 11 To set or change the switching times and room temperature, proceed as follows: Programming Parameter Unit Press Actual time Minutes Actual time Hours Press Press Actual day of the week 1-7 (Monday-Sunday) Block programming day 1-5 (Monday-Friday) Programming Parameter Unit Press Switching time 1 time Minutes...
- Page 12 REMKO remote controls Programming day 6 (Saturday) Programming Parameter Unit Press 22 x Switching time 1 time Minutes Press 23 x Switching time 1 time Hours Switching time 1 temperature Room target temperature Press 24 x Press 25 x Switching time 2 time...
- Page 13 Programming day 7 (Sunday) Programming Parameter Unit Press 40 x Switching time 1 time Minutes Switching time 1 time Hours Press 41 x Press 42 x Switching time 1 temperature Room target temperature Press 43 x Switching time 2 time Minutes Press 44 x...
- Page 14 REMKO remote controls Access to the expert level In order to access the expert level, the Easy-Control remote control must be deactivated with the “ ” key. Once the remote control has been deactivated, press the “M" key and “ ” key at the same time for approx.
-
Page 15: Electrical Wiring
The remote control must be freely accessible and must not be obstructed, free air circulation must be guar- anteed. Fig. 5: Installation schematic with two remote controls A1: Remote control 1 Easy-Control EC1 Control line Easy-Control A3/B3 A2: Remote control 2 Easy-Control EC1 (e.g. - Page 16 AC 95~240V IP20 Close Open A(RED) B(WHITE) Modbus Fig. 6: Terminal layout A: Remote control Easy-Control EC1 (e.g. 2 x 0.75 mm screened) B: I/O module A3 = red 1: Power supply 230V/2~/50Hz B3 = white 2: Control line Easy-Control A3/B3...
-
Page 17: Installation
Installation DANGER! All electrical installation work is to be performed by specialist companies. Disconnect the power supply when connecting the electrical terminals. The thermostat is suitable for a standard flush- mounted socket. Proceed with the installation as follows: Mount the display. For installation, turn the round display clock- wise to release the display from the mounting plate. -
Page 18: Addressing The Ec1
Expert level ¯ A maximum of three probes can be supplied with mains voltage via the power supply of the REMKO Settings I/O module. If further remote controls are still to be installed, they must be supplied with a separate ¯... -
Page 19: Index
Index General ......4 Identification of notes ....4 Addressing of the probe . - Page 20 REMKO QUALITY WITH SYSTEMS Air-Conditioning | Heating | New Energies Telephone +49 (0) 5232 606-0 REMKO GmbH & Co. KG Hotline within Germany +49 (0) 5232 606-0 Klima- und Wärmetechnik Telefax +49 (0) 5232 606-260 Im Seelenkamp 12 E-mail info@remko.de...
Need help?
Do you have a question about the Easy-Control EC1 and is the answer not in the manual?
Questions and answers