Table of Contents
Advertisement
Operating instructions
Combisteamer
Unit
Model
Type of energy
SpaceCombi Compact
6.10
Electric
MagicPilot
SpaceCombi Junior
6.23
MagicPilot
10015160-0ABBE--
Version
HandClean
WaveClean
1-point core temperature sensor
4-point core temperature sensor
(optional)
Software version: 1.49.0.0.
en-GB
Fold out the cover page to view the operating,
control and display elements.
Operating instructions
Advertisement
Table of Contents

Related Manuals for MKN SpaceCombi Compact MagicPilot


Summary of Contents for MKN SpaceCombi Compact MagicPilot
- Page 1 Operating instructions Combisteamer Fold out the cover page to view the operating, control and display elements. Unit Model Type of energy Version SpaceCombi Compact 6.10 Electric HandClean MagicPilot WaveClean SpaceCombi Junior 6.23 1-point core temperature sensor MagicPilot 4-point core temperature sensor (optional) Software version: 1.49.0.0.
- Page 2 Fax +49 53 31 / 89-280 Copyright All rights to text, graphics and pictures in this documentation are held by MKN Maschinenfabrik Kurt Neubauer GmbH & Co. KG. Distribution or duplication is only permitted with the prior written consent of MKN.
-
Page 3: Table Of Contents
Directory of contents 1 Introduction ................ 7 1.1 About this manual ................ 7 1.1.1 Explanation of signs ................... 8 1.2 Intended use .................. 9 1.3 Warranty ..................... 9 2 Safety information ............... 10 3 Description of the unit ............ 13 3.1 Overview of the unit ................ 13 3.2 Features ................... 13 3.2.1 Characteristics .................. 13 3.2.2 Operating modes .................. 14 3.2.3 Types of cooking ... - Page 4 Directory of contents 5.4.2 Measuring the core temperature when cooking frozen food .... 28 5.5 Making the basic settings .............. 29 5.5.1 Opening the Setting menu ................ 29 5.5.2 Retrieving equipment information ............. 30 5.5.3 Setting the date and time ................. 31 5.5.4 Presetting the language selection ............ 32 5.5.5 Activating and cancelling inhibit operation ...
- Page 5 Directory of contents 6.10.1 Preparing for cleaning ................ 57 6.10.2 Selecting the cleaning level .............. 57 6.10.3 Inserting the cleaning cartridge .............. 58 6.10.4 Starting automatic cleaning .............. 58 6.10.5 Cancelling automatic cleaning .............. 58 6.10.6 Ending automatic cleaning .............. 59 6.11 Cleaning the cooking zone manually .......... 59 6.11.1 Preparing the cooking zone .............. 59 6.11.2 Starting the cleaning program ...
- Page 6 Directory of contents Operating instructions...
-
Page 7: 1 Introduction
Introduction 1 Introduction 1.1 About this manual The instruction manual is part of the unit and contains information: • on safe operation • on cleaning and care • on remedial actions in case of faults Observe and adhere to the following instructions: •... -
Page 8: Explanation Of Signs
Introduction 1.1.1 Explanation of signs DANGER Imminent threat of danger Failure to comply will lead to death or very severe injuries. WARNING Possible threat of danger Failure to comply can lead to death or very severe injuries. CAUTION Dangerous situation Failure to observe precautions can result in slight to moderately severe injuries. -
Page 9: Intended Use
Introduction 1.2 Intended use This unit is intended to be used solely for commercial purposes, particularly in commercial kitchens. This unit may only be used with suitable accessories and for the cooking of food. It is forbidden to use the unit for purposes, which include the following: •... -
Page 10: 2 Safety Information
Safety information 2 Safety information The unit complies with applicable safety standards. Residual risks associated with operation or risks resulting from incorrect operation cannot be ruled out and are mentioned specifically in the safety instructions and warnings. The operator must be familiar with regional regulations and observe them. - Page 11 Safety information Fire prevention Risk of fire from dirt and grease deposits • Clean the unit when finished using it. • Do not use the unit as a deep fat fryer. Risk of fire from overheating • Do not store any combustible objects or plastic containers in the cooking zone.
- Page 12 Safety information • Follow the instructions of the cleaning agent manufacturer. • Do not cool shock the unit by cooling it abruptly. • Clean the cooking zone carefully. The cooking zone sensor protrudes into the cooking zone. • Do not use any bleaching or chlorine-containing cleaners. •...
-
Page 13: 3 Description Of The Unit
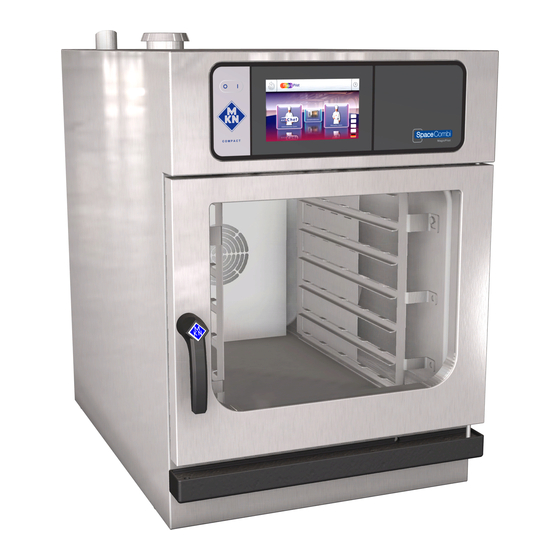
Description of the unit 3 Description of the unit 3.1 Overview of the unit Image: SpaceCombi with base frame Operating control Core temperature sensor (covered) Support rack USB port (covered) Insulated window Frame foot (adjustable) Cooking zone door Base frame (optional) Door handle Housing Discharge chute, door... -
Page 14: Operating Modes
Description of the unit • Cooking zone door hinged at right • Cooking zone door hinged at left (optional) • WaveClean • AutoShower • Barcode scanner (optional) • Steam Exhaust System (SES) 3.2.2 Operating modes Manual cooking In the Manual cooking mode, individual cooking modes and equipment functions can be actuated directly. -
Page 15: Expanded Cooking Functions
Description of the unit The cooking temperature is always higher than the current core temperature by the set value (Delta-T value, cooking temperature difference). The resulting cooking time is longer than with other cooking modes. Delta-T cooking is especially well-suited for general cooking. The food being cooked remains tender and juicy with little weight loss. - Page 16 Description of the unit Start time delay When using the start time delay, temperatures that promote the growth of harmful microorganisms on the food being cooked can occur in the cooking zone. Observe food processing regulations. The start time delay can be used to set a waiting period until the program starts.
-
Page 17: Core Temperature Measurement
Description of the unit Manual humidification can be used only in the hot air and Delta-T hot air cooking modes. Idle time With the idle time expanded cooking function, a cooking step can be inserted during which the heating and the fans are programmed to switch off for a certain period of time. -
Page 18: Usb Port
Description of the unit 3.2.7 USB port The unit is equipped with a USB port (USB 2.0). HACCP logs can be exported via the USB port. A wireless or corded barcode scanner (optional) can be connected to the USB port. 3.2.8 HACCP logging All cooling programs run are recorded in the HACCP log. -
Page 19: Application
Description of the unit Symbol Operating and display element Function Language selection button • Indicates that the operating language for the unit can be selected here by tapping a country's flag Selection and the number of se- lectable languages can be spe- cified in the Equipment functions menu in the "Languages"... -
Page 20: Magicpilot Equipment Controls
Description of the unit Type of cooking Standard value Setting range (°C) Change incre- (°C) ments (°C) Steaming 0 - 99 Combisteaming 0 - 99 Hot air 0 - 99 Regeneration 20 - 99 3.5 MagicPilot equipment controls Image: Main menu Back button "Manual cooking"... - Page 21 Description of the unit Back button Window Information bar Manual cleaning field Help button N ext page arrow symbol Image: Automatic cooking, AutoChef menu Back button FlexiHelp button "autoChef" button "Perfection" field Barcode scanner button Next page arrow symbol Information bar Separating bar Image: Manual cooking menu Back button...
-
Page 22: Touchscreen Operation
Description of the unit 3.5.1 Touchscreen operation The touchscreen can be operated with latex gloves. Tapping on the touchscreen executes commands that operate the unit. Action Function To select or activate display elements such as buttons, fields, tabs. Tap twice To execute special functions by tapping a button twice rapidly Wiping gesture... - Page 23 Description of the unit Symbol Display element Function Window Windows have a coloured border and are opened from menus or higher-level windows. Functions are executed and settings displayed in windows. Depending on the function, there are several win- dow types, for instance, Find. Field Fields are areas in windows or menus defined by separating bars.
- Page 24 Description of the unit Symbol Display element Function Lock This symbol indicates that screen lock has been activated. Only the lock symbol is active. If the operator taps on the lock symbol, a numeric keypad appears. The screen is unlocked by enter- ing a specific combination of numbers.
-
Page 25: 4 Putting The Unit Into Service
Putting the unit into service 4 Putting the unit into service Prerequisite Any remaining packaging removed from the cooking zone Protective film pulled off the housing 1. Clean the unit. 2. Record the information from the nameplate, (see "Nameplate"). 3. Switch on the unit and select the Combisteaming cooking program in the Manual cooking mode. -
Page 26: 5 Operating The Unit
Operating the unit 5 Operating the unit Explanatory video clips can be selected under VideoAssist by press the Help button. 5.1 Switching the unit on and off 5.1.1 Switching on Press the On Off "I O" button to "I". The unit is now on. The control system starts the power-on process automatically. -
Page 27: Close
Operating the unit 5.2.2 Close Image: Closing the single stage door latch Requirement Door handle in initial position Close the cooking zone door with pressure. The cooking zone door is closed. 5.3 Loading and emptying the unit CAUTION Risk of burns from hot liquid •... -
Page 28: Using The Core Temperature Sensor
Operating the unit 5.4 Using the core temperature sensor WARNING Risk of injury from a bursting core temperature sensor • The core temperature sensor can burst as the result of overheating of the measuring tip. • Never heat a core temperature sensor with a cigarette lighter or other heat source. -
Page 29: Making The Basic Settings
Operating the unit 1. Use a hand drill to make a hole for inserting the sensor. 2. Place the food to be cooked on the baking sheet or into the cooking pan. 3. Place the cooking sheet or cooking pan into the unit. 4. -
Page 30: Retrieving Equipment Information
Operating the unit • Select languages • Audio settings • Select signal tones • Date and time • Select cookbook • Import the manufacturer's cookbook • Cookbook lock • Import HansDampf programs • Software update • Import additional content • Export log data •... -
Page 31: Setting The Date And Time
Operating the unit 5.5.3 Setting the date and time Observe the displayed date and time format carefully. If values are invalid, the entry is not accepted. Image: Date and time setting window Requirement The Settings menu is displayed 1. Tap the "Set date and time" field. The Setting window opens. -
Page 32: Presetting The Language Selection
Operating the unit 5.5.4 Presetting the language selection A maximum of 5 languages can be specified for language selection in the main menu. Highlighted fields represent the specified languages. Fields that are not highlighted are languages that have not been specified. -
Page 33: Activating And Cancelling Inhibit Operation
Operating the unit 5.5.5 Activating and cancelling inhibit operation Activating inhibit operation Requirement The "Inhibit operation ON" function is activated in the Setting menu Tap and hold the centre of the information bar for 3 seconds. The FlexiHelp button disappears and the lock symbol appears in the information bar. -
Page 34: Basic Functions
Operating the unit 5.6 Basic functions 5.6.1 Setting the cooking temperature The temperature range differs, depending on the cooking mode. At a cooking temperature outside the allowed temperature range, the display turns red. Image: Cooking temperature setting window Temperature field Roller Setting window Confirm button... -
Page 35: Setting The Cooking Time And Continuous Operation
Operating the unit 5.6.2 Setting the cooking time and continuous operation Image: Setting the cooking time to continuous operation Cooking time field Continuous operation button Setting window Confirm button Requirement Cooking program selected 1. Tap the Cooking time field. The Setting window is displayed. 2. - Page 36 Operating the unit Setting the cooking time Image: Setting the cooking time Cooking time field Cooking time button Setting window Confirm button Roller Requirement Cooking program selected 1. Tap the Cooking time field. The Setting window is displayed. 2. Tap the Cooking time button. 3.
-
Page 37: Setting The Core Temperature
Operating the unit 5.6.3 Setting the core temperature Image: Core temperature setting window for internal and external display Core temperature field Temperature roller Setting window Confirm button (optional) roller Requirement Cooking program selected Cooking time set 1. Tap the Cooking time field. The Cooking time setting window is displayed. -
Page 38: Setting The Fan Speed And Direction Of Rotation
Operating the unit 5.6.4 Setting the fan speed and direction of rotation Image: Setting the fan speed and direction of rotation Fan setting field Fan rotation direction roller Setting window Confirm button Fan speed roller Requirement Cooking program selected 1. Tap the Fan setting field. The Setting window opens. -
Page 39: Exporting The Haccp Log
Operating the unit 5.6.6 Exporting the HACCP log Requirement USB flash drive inserted User logged in with password under equipment settings 1. Tap the "Export HACCP" field. The Operating instructions window opens. 2. Tap the Confirm button. The HACCP log is exported to the USB flash drive. The Confirm window opens. -
Page 40: Creating A Cooking Program
Operating the unit 5.8.2 Creating a cooking program Requirement The unit is on The Manual cooking menus is displayed Cooking mode selected 1. Tap the Cooking temperature field. The Setting window is displayed. 2. Using a wiping gesture, set the rollers to the desired value. 3. - Page 41 Operating the unit 2. Modify the desired settings for the first step. The first step of the cooking program has been created. Adding cooking program steps Up to 20 steps can be added to a cooking program. Image: Adding a step in the menu item Requirement Cooking program is created and is open 1.
- Page 42 Operating the unit Deleting a cooking program step If a cooking program has only one step, it cannot be deleted. The function is not active. Image: Deleting a step Requirement Cooking program is created and is open 1. Select the step. 2.
-
Page 43: Saving The Cooking Program
Operating the unit 5.9.2 Saving the cooking program Cooking programs that have been created can be saved prior to starting or after completion of the cooking program. To save a cooking program, at least one cooking program name and one category must be specified. Image: Green tab and cooking program in the Save window Green tab "Subcategory"... - Page 44 Operating the unit Entering a category 1. Tap the "Category" field. The Automatic cooking (autoChef) menu is displayed. 2. Tap the field with the desired Category . The category is set. The Automatic cooking (autoChef) menu closes. The category is displayed in the Save window. Entering a subcategory (optional) 1.
-
Page 45: Exporting A Cooking Program
Operating the unit Selecting characteristics of the food to be cooked (optional) 1. Tap the "Frozen food" field. The Frozen food menu is displayed. 2. Tap the "Yes" button or the "No" button. Tapping Yes selects the food to be cooked as a frozen food. Assigning an identification (optional) 1. -
Page 46: Automatic Cooking (Autochef)
Operating the unit 5.10 Automatic cooking (autoChef) In the "Automatic cooking" mode, all cooking programs stored in the unit are available. The cooking program is selected in the Automatic cooking menu. 5.10.1 Opening the Automatic cooking menu Requirement The unit is on The main menu is displayed Tap the "Automatic cooking"... - Page 47 Operating the unit 2. Tap the field with the desired category. The Subcategory menu is displayed. 3. Tap the field with the desired subcategory. The Recipe menu with all recipes in the subcategory is displayed. 4. Tap the field with the desired recipe. The cooking program is selected and being loaded.
-
Page 48: Starting The Cooking Program
Operating the unit 5.10.3 Starting the cooking program The current step in the cooking program is highlighted. Upon completion, the following step automatically appears in the display. Requirement Cooking program open 1. Tap the "START" button in the information bar. The cooking program starts. -
Page 49: Modifying The Cooking Program
Operating the unit If the cooking zone door is not opened, the fan continues to run at a low speed at intervals. This achieves even cooking. 5.10.5 Modifying the cooking program Tabs available only within cooking programs or the cooking step display. -
Page 50: Deleting A Cooking Program
Operating the unit 5. Save the cooking program. All modifications to the cooking program are saved. The saved cooking program is modified. 5.10.6 Deleting a cooking program Requirement Cooking program open Cooking program not started 1. Tap the green tab. 2. - Page 51 Operating the unit Requirement USB flash drive inserted Automatic cooking open User-created cooking programs are saved in the cookbook 1. Tap the "autoChef" button in the information bar. The autoChef window opens. 2. Tap the "Export cooking programs" field. The Operating instructions window opens. Read the displayed operating instructions.
-
Page 52: Pausing And Finishing Use
Operating the unit 5.11 Pausing and finishing use Switch off the unit during pauses and when finished using it. Period of idleness lasting more than 2 days Requirement GN containers, baking sheets and grates removed from the cooking zone No food to be cooked in the cooking zone 1. -
Page 53: 6 Cleaning And Caring For The Unit
Cleaning and caring for the unit 6 Cleaning and caring for the unit CAUTION Risk of burns from hot surfaces • Allow surfaces to cool prior to cleaning. ATTENTION Risk of physical damage from extremely abrupt cooling • Do not cool shock the unit by cooling it abruptly. ATTENTION Risk of physical damage from improper cleaning •... -
Page 54: Cleaning The Housing
Cleaning and caring for the unit 6.3 Cleaning the housing Prerequisite Unit disconnected from the electric mains and cooled ATTENTION Risk of physical damage from improper cleaning • Do not clean the housing with highly abrasive or chemically aggressive cleaning agents. •... -
Page 55: Cleaning The Door Seal
Cleaning and caring for the unit 6.6 Cleaning the door seal ATTENTION Risk of physical damage from improper cleaning Animal fats in combination with high temperatures can damage the door seal very quickly if it is not maintained properly. • Clean the door seal regularly. •... -
Page 56: Removing Calcium Deposits From The Unit
Cleaning and caring for the unit ATTENTION Risk of physical damage from deposits • Check the steam outlet and connected piping for deposits. Use a liquid cleaner containing at most 20% sodium or potassium hydroxide. Flushing with water is not necessary. 1. -
Page 57: Cleaning The Cooking Zone Automatically With Waveclean
Cleaning and caring for the unit 6.10 Cleaning the cooking zone automatically with WaveClean Automatic cleaning is cancelled in the event of a power failure. On cancellation, automatic rinsing of the cooking zone is initiated. Despite different cleaning times, all cleaning levels required the same amount of water. -
Page 58: Inserting The Cleaning Cartridge
Cleaning and caring for the unit 6.10.3 Inserting the cleaning cartridge Use only cleaning cartridges with an undamaged wax seal. If the wax seal is damaged, the cleaner can enter the cleaning circuit prematurely or not dissolve completely, so that complete cleaning is no longer assured. -
Page 59: Ending Automatic Cleaning
Cleaning and caring for the unit 6.10.6 Ending automatic cleaning Requirement Automatic rinsing has ended or cleaning time has elapsed 1. Open cooking zone door. 2. Remove the empty cleaning cartridge. 3. Thoroughly rinse away any remaining cleaner or rinse aid. 4. -
Page 60: Spraying The Cleaner
Cleaning and caring for the unit 6.11.3 Spraying the cleaner CAUTION Dangerous situation Failure to observe precautions can result in slight to moderately severe injuries. • Wear protective clothing. • Wear breathing protection. ATTENTION Risk of physical damage from exceeding the recommended acting time of the cleaner •... -
Page 61: Rinsing The Cooking Zone Door With Autoshower
Cleaning and caring for the unit 6.12 Rinsing the cooking zone door with AutoShower 6.12.1 Starting AutoShower Image: Starting AutoShower Requirement The unit is on Main menu is displayed Cooking zone temperature less than 70 °C 1. Tap the "Equipment functions" button. The Equipment functions menu is displayed. -
Page 62: Removing And Installing The Air Diverter
Cleaning and caring for the unit 6.13 Removing and installing the air diverter CAUTION Pinch hazard from rotating fan • Prior to working on the unit, ensure that the unit has been disconnected from the mains. • Do not operate the unit without the air diverter. Removing the air diverter Prerequisite Unit disconnected from power 1. -
Page 63: 7 Troubleshooting
Troubleshooting 7 Troubleshooting 7.1 Emergency mode In order to allows limited use in case of error, the unit has several different emergency programs. Emergency operation is activated automatically and displayed. After elimination of the error indicated, the controls switch back into normal operation automatically. A reset is not necessary. -
Page 64: Nameplate
Troubleshooting The unit is on No errors displayed Equipment functions displayed 1. Open the Settings menu. 2. Enter the password. 3. Tap the "CombiDoctor" field. 4. Using a wiping gesture, set the roller to the desired self-diagnostic program. The set self-diagnostic program displays the elapsed time. 5. -
Page 65: 8 Dispose Of Unit In An Environmentally Responsible Manner
Dispose of unit in an environmentally responsible manner 8 Dispose of unit in an environmentally responsible manner The unit has been designed to provide a lifetime of 10 years with average use. Did not dispose of the unit in normal trash. These materials damage your health and the environment when disposed of in normal trash or treated improperly. -
Page 66: 9 Manufacturer's Declaration
Manufacturer's declaration 9 Manufacturer's declaration Operating instructions... - Page 68 www.mkn.eu...
Need help?
Do you have a question about the SpaceCombi Compact MagicPilot and is the answer not in the manual?
Questions and answers