Table of Contents
Advertisement
Read the operating instructions prior to
commissioning
Operating instructions
Combisteamer
Unit
FlexiCombi MagicPilot
Model
Type of energy
FKGCOD615T
Gas
FKGCOD621T
FKGCOD115T
FKGCOD121T
FKGCOD215T
FKGCOD221T
10014472-0ABBE-I
Version
WaveClean
Door with hygiene glazing
4-point core temperature sensor
(optional)
Sous-vide core temperature
sensor (optional)
Software version 1.79
en-GB
Advertisement
Table of Contents

Related Manuals for MKN FlexiCombi MagicPilot FKGCOD615T


Summary of Contents for MKN FlexiCombi MagicPilot FKGCOD615T
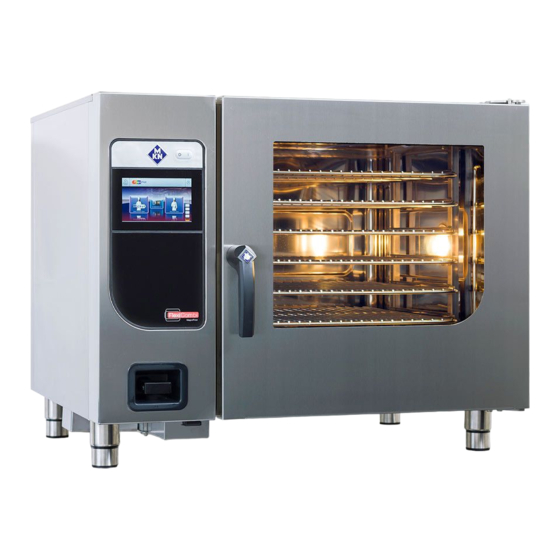
- Page 1 Read the operating instructions prior to commissioning Operating instructions Combisteamer Unit Model Type of energy Version FlexiCombi MagicPilot FKGCOD615T WaveClean FKGCOD621T Door with hygiene glazing FKGCOD115T 4-point core temperature sensor FKGCOD121T (optional) FKGCOD215T Sous-vide core temperature FKGCOD221T sensor (optional) Software version 1.79 10014472-0ABBE-I en-GB...
- Page 2 Operating and display elements a On/Off "I O" button f "Automatic cooking" button b Help button g "Equipment functions" button c Operating element with h Back button touchscreen d "Manual cooking" button i Information bar e Language selection button Operating instructions...
- Page 3 Fax +49 5331 89-280 Internet www.mkn.com Copyright All rights to text, graphics and pictures in this documentation are held by MKN Maschinenfabrik Kurt Neubauer GmbH & Co. KG. Distribution or duplication is only permitted with the prior written consent of MKN.
-
Page 4: Table Of Contents
Directory of contents 1 Introduction ................. 9 1.1 About this manual ................ 9 1.1.1 Explanation of signs ................ 10 1.2 Intended use ................... 11 1.3 Warranty .................. 11 2 Safety information ............ 12 3 Rules of conduct when the smell of gas is detected .. 16 4 Description of the unit ............. 17 4.1 Overview of the unit ... - Page 5 Directory of contents 5.3.2 Closing the single stage door latch ............ 31 5.3.3 Opening the 2-stage door lock .............. 31 5.3.4 Closing the 2-stage door lock .............. 32 5.4 Loading and emptying the unit ............. 32 5.4.1 Loading and emptying ................ 33 5.4.2 Loading and emptying with a tray rack trolley ...
- Page 6 Directory of contents 5.7 Using the core temperature sensor .......... 73 5.7.1 Measuring with a 4-point core temperature sensor ......... 74 5.7.2 Measuring with a sous-vide core temperature sensor ...... 74 5.7.3 Measuring the core temperature when cooking frozen food .... 75 5.7.4 Core temperature display with time-controlled cooking process ...
- Page 7 Directory of contents 6.11.4 Starting automatic cleaning .............. 101 6.11.5 Cancelling automatic cleaning ............. 101 6.11.6 Ending automatic cleaning .............. 101 6.12 Cleaning the cooking zone manually ........ 102 6.12.1 Preparing the cooking zone .............. 102 6.12.2 Starting the cleaning program ............. 102 6.12.3 Spraying the cleaner ...
-
Page 8: Directory Of Contents
Directory of contents Operating instructions... -
Page 9: 1 Introduction
Introduction 1 Introduction 1.1 About this manual The operating instructions are part of the unit and contain information: • On safe operation, • On cleaning and care, • On remedies in case of faults. Be aware of the following notes and adhere to them: •... -
Page 10: Explanation Of Signs
Introduction 1.1.1 Explanation of signs DANGER Imminent threat of danger Failure to comply will lead to death or very severe injuries. WARNING Possible threat of danger Failure to comply can lead to death or very severe injuries. CAUTION Dangerous situation Failure to comply can lead to slight or moderately severe injuries. -
Page 11: Intended Use
Introduction 1.2 Intended use This unit is intended to be used solely for commercial purposes, particularly in commercial kitchens. This unit may only be used with suitable accessories and for the cooking of food. It is forbidden to use the unit for purposes, which include the following: •... -
Page 12: 2 Safety Information
Safety information 2 Safety information The unit complies with applicable safety standards. Residual risks associated with operation or risks resulting from incorrect operation cannot be ruled out and are mentioned specifically in the safety instructions and warnings. The operator must be familiar with regional regulations and observe them. - Page 13 Safety information Defective unit Risk of injury from a defective unit • Disconnect a defective unit from the electric mains. • Use gas shut-off valve to isolate unit from gas supply. • Do not operate a defective unit. • Allow only an authorized technician to repair the unit. Escaping gas or exhaust Risk of asphyxiation and explosion from escaping gas •...
- Page 14 Safety information Risk of a line breaking if subjected to high tensile load • Secure the unit to the building with a chain for strain relief on the connection lines, so that there is no stress on the connection lines, if the unit moves.
- Page 15 Safety information Improper use Risk of physical damage from improper use • Use only original accessories. • Train operators regularly. • Do not heat food warmer plates or tins of preserved food. • Do not cover air inlet and outlet openings. •...
-
Page 16: 3 Rules Of Conduct When The Smell Of Gas Is Detected
Rules of conduct when the smell of gas is detected 3 Rules of conduct when the smell of gas is detected DANGER Risk of asphyxiation and explosion from escaping gas Follow the rules of conduct when the smell of gas is detected. •... -
Page 17: 4 Description Of The Unit
Description of the unit 4 Description of the unit The unit is a convection steamer, which is suitable for most cooking methods used in commercial kitchens. It can be used with either Convection or unpressurised live steam, either individually, in sequence, or in conjunction with moist or dry heat. -
Page 18: Floor-Standing Unit
Description of the unit 4.1.2 Floor-standing unit Image: Unit with tray trolley a Tray rack j Hand shower b Insulated window k Nameplate c Door handle l Equipment leg d Cooking zone door m Control unit e Guide rail (right) n Housing f Tray trolley o Air inlet... -
Page 19: Features
Description of the unit 4.2 Features 4.2.1 Characteristics • 4-point core temperature sensor • Sous-vide core temperature sensor or a second 4-point core temperature sensor (optional) • Hand shower (optional) • Cooking zone door with hygienic glazing • One-step door lock •... -
Page 20: Waveclean Automatic Cleaning
Description of the unit 4.2.5 WaveClean automatic cleaning With WaveClean automatic cleaning,the cooking zone is cleaned with the aid of a cleaning cartridge intended specifically for the program and then rinsed clean. 4.2.6 CombiDoctor (self-diagnostic program) CombiDoctor uses a selectable self-diagnostic program to check the components used for climate control and cleaning. -
Page 21: Types Of Cooking
Description of the unit 4.3.2 Types of cooking Steaming Steaming is a cooking mode, in which the food to be cooked is cooked gently by means of steam in a temperature range of 30 °C to 130 °C.. Combisteaming Combisteaming is a cooking mode, in which the steaming and convection cooking modes are combined. -
Page 22: Expanded Cooking Functions
Description of the unit 4.3.3 Expanded cooking functions Expanded cooking functions can be used to modify individual cooking steps for the particular food being cooked. The following expanded cooking functions are available: PerfectHOLD PerfectHOLD is a cooking function, in which the food to be cooked is kept warm in the unit at a temperature range of 50 °C to 100 °C after the actual cooking process, until it is ready to be served. - Page 23 Description of the unit RackControl2 RackControl is ideal for rolling cooking. With the extended RackControl2 cooking function, different foods such as potatoes, cauliflower, peas, carrots and meat can be cooked simultaneously for different times. RackControl2 monitors the various cooking times in one process. When a cooking time has elapsed, a signal sounds and the food being cooked can be removed.
-
Page 24: Core Temperature Measurement
Description of the unit After-cooking button The After-cooking button allows the cooking process to continue for a previously defined time, after the cooking program has elapsed. Time2Serve Using the extended Time2Serve cooking function, different products can be ready to serve at the same time. The serving time is specified. -
Page 25: Magicpilot Equipment Controls
Description of the unit 4.4 MagicPilot equipment controls Image: Main menu a Back button e Button Language selection b Information bar f "Manual cooking" button c "WaveClean" button (optional) g "Unit functions" button d Help button h "Automatic cooking" button Image: Automatic cooking menu, autoChef a Back button e FlexiHelp button... - Page 26 Description of the unit Image: Manual cooking menu a Back button d "Convection" field e Next page arrow symbol b Information bar c FlexiHelp button f Separating bar Image: Equipment functions menu a Back button d Window b Information bar e Manual cleaning field c FlexiHelp button f Next page arrow symbol...
-
Page 27: Loading Capacity
Description of the unit 4.5 Loading capacity 4.5.1 Plate capacity during regeneration The cooking time and cooking temperature depend on the number of plates. Version Plate diameter 28 cm 32 cm on grate on tray rack or tray trolley 4.5.2 Loading capacity Tray rack trolley and tray trolley Version Per shelf maximum (kg) -
Page 28: Temperature Standard Setting
Description of the unit 4.6.2 Temperature standard setting The adjustment range for the cooking zone temperature depends on the cooking mode. Cooking mode Standard value Adjustment Alteration (°C) range (°C) increments (°C) Steaming 30 - 130 Combisteaming 30 - 250 Convection 30 - 250 Regeneration... -
Page 29: 5 Operating The Unit
2018-04-11. This requires that the lowest possible acrylamide level must be achieved when cooking potato products. MKN therefore recommends the following for potato products: • Do not exceed a cooking temperature of 220 °C, unless the food manufacturer states, that this is safe for his product. -
Page 30: Switching The Unit On And Off
Operating the unit 5.2 Switching the unit on and off 5.2.1 Switching on Press the On Off "I O" button to "I". The unit is now on. The control system starts the power-on process automatically. The progress bar at the lower edge of the touchscreen displays the status of the process. -
Page 31: Closing The Single Stage Door Latch
Operating the unit 5.3.2 Closing the single stage door latch Image: Closing the single stage door latch Requirement Door handle in initial position Close the cooking zone door with pressure. The cooking zone door is closed. 5.3.3 Opening the 2-stage door lock Image: Opening the 2-stage door lock On size 6 and size 10, first rotate the door handle anti- clockwise. -
Page 32: Closing The 2-Stage Door Lock
Operating the unit 5.3.4 Closing the 2-stage door lock Image: Closing the two-stage door latch Requirement Door handle in initial horizontal position 1. Close the cooking zone door with pressure. The cooking zone door latches. 2. Rotate the door handle downwards. The cooking zone door is locked. -
Page 33: Loading And Emptying
Operating the unit 5.4.1 Loading and emptying Loading 1. Open the cooking zone door. 2. Insert food-containing trays into the support racks. 3. Close the cooking zone door. 4. Start the cooking process. Emptying 1. Open the cooking zone door. 2. - Page 34 Operating the unit Loading with a tray rack trolley Requirement Remove support racks and place guide rails on pins. Food-containing trays resting securely on the tray rack 1. Open the cooking zone door. 2. Rotate the lever on the tray rack trolley. The tray rack is secured to prevent its rolling down.
-
Page 35: Loading And Emptying With A Tray Trolley
Operating the unit 5.4.3 Loading and emptying with a tray trolley Image: Loading and emptying with a tray trolley a Tray rack e Cleaning cartridge holder b Push handle f Guide rail (left) c Tray trolley g Guide rail (right) d Locking casters Loading with a tray trolley Requirement Checked that food-containing trays are sitting securely in the tray... -
Page 36: Equipment Functions Menu
Operating the unit Emptying with a tray trolley 1. Open the cooking zone door. 2. Insert the push handle into the tray trolley. 3. Retract the tray trolley. 4. Remove all food residues from the drain screen. 5. Leave the cooking zone door slightly ajar. This extends the service life of the door seal. -
Page 37: Controlling The Main Menu
Operating the unit 5.5.1 Controlling the main menu The main menu can be directly controlled from each program step. Requirements Cooking program or Settings menu called up 1. Tap the Back button. The previous menu or program step is displayed. 2. - Page 38 Operating the unit In addition to those described in this chapter, there are the following further functions. Audio settings Selection of the volume of the signal tones. Operation lock Various settings depending on whether and when the operation lock is to be activated. Entering and changing the code word.
-
Page 39: Retrieving Equipment Information
Operating the unit Cookbook lock Lock function for the cooking programs in autoChef. Setting Function Unlocked Deleting, changing and overwriting the cooking programs is possible Locked Changes in the cooking steps, for example temperature increases, are possible. The preset values apply again, when the cooking program is next called up. -
Page 40: Setting The Date And Time
Operating the unit 5.5.5 Setting the date and time Observe the displayed date and time format carefully. If values are invalid, the entry is not accepted. Requirements The Settings menu is displayed 1. Tap the "Set date and time" field. The Settings window opens. -
Page 41: Setting Favourites
Operating the unit 2. Select or deselect the language by tapping the fields with the country's flag. The selected languages are displayed. 3. Tap the "OK" button. Languages have been preset for language selection and are available in the main menu. 5.5.7 Setting favourites The window for Settings for favourites is used to select, which view of the operating field is shown after the unit has been started. -
Page 42: Activating And Cancelling Inhibit Operation
Operating the unit 5.5.8 Activating and cancelling inhibit operation The display can be locked either by tapping and holding the information bar or automatically after a specified time without touching the display. The time until the display is locked is set in the parameter level. -
Page 43: Setting The Background Lighting
Operating the unit 5.5.9 Setting the background lighting Image: Setting the brightness Requirements The Settings menu is displayed 1. Tap the "Background lighting" field. 2. The menu for Brightness in percent is displayed. The roller displays the current value. 3. Using a wiping gesture, set the roller to the desired value. 4. -
Page 44: Possible Settings In The Parameter Level
Operating the unit 5.5.11 Possible settings in the parameter level Requirement The Settings menu is displayed 1. Tap the "Settings parameters" field. The Settings parameters menu is displayed. 2. Using a wiping gesture, set the rollers to the desired parameter. The designation of the selected parameter is displayed. - Page 45 Operating the unit Basic setting Parameter Standard Adjustment Explanation value range Cooking SES: Use at the end 0 = Deactivated Default setting for Steam Exhaust System of the cooking if new cooking programs are being created 1 = Activated program Query message: 0 = No query Setting for behaviour after interruption of...
-
Page 46: Importing Video
Operating the unit 5.5.12 Importing video Requirements WMV format Data size < 50 MB 1. Create the directory VideosCustom on a USB flash drive. 2. Save the desired video in this directory. USB flash drive prepared. 3. Insert the USB flash drive into the MultiPort. 4. -
Page 47: Importing Recipes
Operating the unit 5.5.14 Importing recipes When converting into a HTML format, the text and graphics must be separate. For example in Microsoft Word, the text is saved under file type with the "Web page, filtered" storage filter. Before importing, make sure that the file type ends with "html". Requirements HTML format Data size <... -
Page 48: Basic Functions
Operating the unit 5.6 Basic functions 5.6.1 Setting the cooking temperature ATTENTION Increased wear Continuous use of the unit with cooking temperatures above 250 °C will result in increased wear. The temperature range differs, depending on the cooking mode. At a cooking temperature outside the allowed temperature range, the display turns red. -
Page 49: Setting The Cooking Time And Continuous Operation
Operating the unit 5.6.2 Setting the cooking time and continuous operation Setting the cooking time Image: Setting the cooking time a Cooking time field d Cooking time button b Setting window e Confirm button c Rollers Requirement Cooking program selected 1. - Page 50 Operating the unit Image: Setting the cooking time to continuous operation a Cooking time field c Continuous operation button b Setting window d Confirm button Requirement Cooking program selected 1. Tap on Cooking time field. The Setting window is displayed. 2.
-
Page 51: Setting The Core Temperature
Operating the unit 5.6.3 Setting the core temperature Image: Core temperature setting window for internal and external display a Core temperature field d Temperature roller b Setting window e Confirm button c Roller for Type of core temperature sensor Requirement Cooking program selected Cooking time set 1. -
Page 52: Setting The Fan Speed And Direction Of Rotation
Operating the unit 5.6.4 Setting the fan speed and direction of rotation Image: Setting the fan speed and direction of rotation a Fan setting field d Roller for Fan rotation direction b Setting window e Confirm button c Fan speed roller Requirement Cooking program selected 1. -
Page 53: Exporting The Haccp Log
Operating the unit 5.6.5 Exporting the HACCP log Requirement USB flash drive inserted User logged in with password under unit settings 1. Tap the "Export HACCP" field. 2. Select the time period of the logs. 3. Tap the Confirm button. The Operating instructions window opens. -
Page 54: Using Perfection (Regeneration)
Operating the unit 5.6.6 Using Perfection (regeneration) Image: Settings window for Perfection cooking mode d Cooking time field a "Start" button b Cooking mode field e Moisture field c Temperature field Starting Perfection Requirements Food to be cooked is on the insert in the rack Door closed Manual cooking menu displayed 1. -
Page 55: Using Perfecthold
Operating the unit 2. Wait for the cooking time to end. The heating of the unit is ended. The "Stop" button is replaced with the "Start" button. The cooking time is reset. Perfection is ended. 5.6.7 Using PerfectHold Image: PerfectHOLD settings window a Cooking time field d Rollers b Settings window... -
Page 56: Ready2Cooksetting
Operating the unit 5.6.8 Ready2CookSetting Image: Parameters window for "Ready2Cook" settings d Read button a Rollers b Write button e Display c Keypad button Requirement Equipment function menu open 1. Tap on "Equipment setting s" field field. 2. Set PIN 111 and confirm. 3. -
Page 57: Using Start-Time Preselection
Operating the unit 5.6.9 Using start-time preselection Setting start-time preselection Image: Settings window for start-time preselection a Start-time preselection field c Rollers b Start-time preselection window d Confirm button Requirements Cooking program ended AutoChef automatic cooking menu open Extended cooking function selected 1. - Page 58 Operating the unit Changing start-time preselection Image: Changing the Settings window for start-time preselection a Start-time preselection field d Confirm button b Start-time preselection window e Rollers c Start time button Requirements Cooking program ended AutoChef automatic cooking menu open Extended cooking function selected 1.
-
Page 59: Steam Exhaust System (Ses)
Operating the unit 5.6.10 Steam Exhaust System (SES) Steam Exhaust System (SES) automatically sucks the steam out of the cooking zone. It is switched on as standard and can be switched off for individual programs. Image: Steam Exhaust System (SES) selection window a Steam Exhaust System field Requirements Manual cooking menu open Desired cooking mode selected... -
Page 60: Rackcontrolusing 2
Operating the unit 5.6.11 RackControlUsing 2 During the cooking process, set parameters such as cooking time or core temperature can be altered for selected racks. The cooking process is not interrupted. Parameters such as cooking zone humidity, cooking zone temperature and fan speed can be called up and set. Changes only apply to the cooking program currently running, and they are not adopted as default settings. - Page 61 Operating the unit Image: Settings window for RackControl2 core temperature a Settings field d Core temperature button b Core temperature field e Confirm button c Core temperature window f Rollers Requirements Manual cooking field selected 1. Tap the RackControl2 field. 2.
- Page 62 Operating the unit RackControlEnding 2 Image: Ending RackControl2 window early a Continue field c Settings window b Stop button d Rack field Requirements RackControl2 started Preheating temperature not reached 1. Tap the RackControl2 window. The last Settings display is shown. 2.
-
Page 63: Familymixusing
Operating the unit 5.6.12 FamilyMixUsing Image: FamilyMix selection window a Start button d Settings field b Product overview field e FamilyMix field c Product field Image: FamilyMix settings window a Start button c Settings field b Extended cooking time button d RackTimer field Requirements Manual cooking field selected Cooking program loaded... -
Page 64: Using The Continue Cooking Function
Operating the unit 4. Tap the "Start" button. The display changes to "Ready2Cook". The unit heats up. The "Start" button is replaced with the "Stop" button. 5. Wait for the cooking time to end. The heating of the unit is ended. The "Stop"... - Page 65 Operating the unit Requirements Cooking program selected RackTimer function set 1. Tap the "Start" button. The unit heats up. The cooking program starts. The "Start" button is replaced with the "Stop" button. 2. Press the "Stop" button. The cooking program is interrupted. The "Continue cooking"...
-
Page 66: Setting Manual Humidification
Operating the unit 5.6.14 Setting manual humidification Image: Settings window for manual humidification d Humidity level field a "Start" button b Manual humidification field e Fan setting field c Temperature field Requirement The cooking program is running 1. Tap on the Equipment functions field. The Equipment functions menu is open. -
Page 67: Setting The Rest Stage
Operating the unit 5.6.15 Setting the rest stage The Insert rest stage function is possible at any time. Without saving, the stage only applies to the current cooking program. Image: Window for Insert rest stage a Start button b Rest stage field Requirements Automatic cooking menu open Cooking program selected 1. -
Page 68: Qualitycontrolusing
Operating the unit 5.6.16 QualityControlUsing QualityControl is a cooking time optimisation function, which adjusts the temperature automatically. It optimises the preheating process. It is switched on as standard and can be switched off for individual programs. The particular setting applies to all cooking programs until it is changed. -
Page 69: Using Low-Temperature Cooking
Operating the unit 5.6.17 Using low-temperature cooking Image: Settings window for Delta-T cooking mode d Cooking time field a "Start" button b Cooking mode field e Moisture field c Cooking temperature difference field Starting low-temperature cooking Requirement Food being cooked on tray in the slide-in unit Core temperature sensor set Door closed Manual cooking menu displayed... -
Page 70: Using Delta-T Cooking
Operating the unit 2. Wait for the cooking time to end. The heating of the unit is ended. The "Stop" button is replaced with the "Start" button. The cooking time is reset. Low-temperature cooking is ended. 5.6.18 Using Delta-T cooking Image: Settings window for Delta-T cooking mode d Core temperature field a "Start"... -
Page 71: Using The Barcode Scanner
Operating the unit Ending Delta-T cooking Requirements Delta-T cooking started Cooking time has not elapsed 1. Tap the "Stop" button in the information bar. 2. Wait for the cooking time to end. The heating of the unit is ended. The "Stop" button is replaced with the "Start" button. The cooking time is reset. -
Page 72: Preparing A Usb Flash Drive For Importing And Exporting
Operating the unit 5.6.20 Preparing a USB flash drive for importing and exporting Requirement USB flash drive is formatted USB flash drive is not write-protected 1. Create folder structure for importing and exporting. 2. Create "autoChefImages" folder name. Data exchange of photos in PNG format, resolution 249x111 pixels. -
Page 73: Using The Core Temperature Sensor
Operating the unit 5.7 Using the core temperature sensor WARNING Risk of injury from a bursting core temperature sensor • The core temperature sensor can burst as the result of overheating of the measuring tip. • Never heat a core temperature sensor with an open flame or other heat source. -
Page 74: Measuring With A 4-Point Core Temperature Sensor
Operating the unit 5.7.1 Measuring with a 4-point core temperature sensor Image: Core temperature sensor with four measuring points Insert the core temperature sensor completely into the food being cooked. Insert the core temperature sensor into the thickest point of the food being cooked. -
Page 75: Measuring The Core Temperature When Cooking Frozen Food
Operating the unit 5.7.3 Measuring the core temperature when cooking frozen food When cooking frozen food, measuring with a sous-vide core temperature sensor is not possible. Image: Drilling a hole with a hand drill 1. Use a hand drill to make a hole for inserting the sensor. 2. -
Page 76: Core Temperature Display Outside The Cooking Process
Operating the unit 5.7.5 Core temperature display outside the cooking process Requirement Core temperature sensor in the food being cooked 1. Open the Equipment function menu. 2. Tap the "Measure core temperature" button on the second page. The core temperature is displayed. 5.8 Manual cooking Cooking modes and other functions are available in the Manual cooking mode. -
Page 77: Creating A Cooking Program Step
Operating the unit 5.8.2 Creating a cooking program step Requirement The unit is switched on The Manual cooking menu is displayed Cooking mode selected 1. Tap the Cooking temperature field. The Setting window is displayed. 2. Using a wiping gesture, set the rollers to the desired value. 3. - Page 78 Operating the unit 9. Using a wiping gesture, set the roller to the desired value. 10.Tap the Confirm button. The Setting window closes. 11.Using a wiping gesture, change to the next page and make further settings. 12.Tap the Fan field. The Setting window is displayed.
-
Page 79: Creating And Managing Your Own Cooking Programs
Operating the unit 5.9 Creating and managing your own cooking programs Cooking modes and other functions are available in the Manual cooking menu. Using these components, users can create their own programs. ATTENTION Risk of physical damage from data loss Regularly save your own cooking programs on an external memory medium, for example a USB flash drive. -
Page 80: Saving The Cooking Program
Operating the unit Deleting a cooking program step If a cooking program has only one step, it cannot be deleted. The function is not active. 8. Select the step. 9. A wiping gesture upward opens the next page. The next page for the step is displayed. 10.Tap the "Delete step"... - Page 81 Operating the unit Image: Green tab and cooking program in the Save window a Green tab e "Subcategory" field b "Save cooking program" field f "Screen" field c "Cooking program name" field g Next page arrow symbol d "Category" field h "Save"...
- Page 82 Operating the unit Entering a subcategory (optional) 1. Tap the "Subcategory" field. The Subcategory menu is displayed. 2. Tap the field with the desired Subcategory . The subcategory is set. The Subcategory menu closes. The subcategory is displayed in the Save window. Assigning an image (optional) 1.
- Page 83 Operating the unit Assigning an identification (optional) 1. Tap the "Identification" field. The Identification menu is displayed. 2. Key in the barcode on the keypad. 3. Scan with the barcode scanner. Scan the barcode and assign to a cooking program or to food to be cooked.
-
Page 84: Exporting A Cooking Program
Operating the unit 5.9.3 Exporting a cooking program Previously exported cooking programs on the USB flash drive will be overwritten. Requirement Cooking program open Cooking program saved USB flash drive inserted 1. Tap the Green tab. The Tab window opens. 2. -
Page 85: Finding And Opening A Cooking Program
Operating the unit 5.10.2 Finding and opening a cooking program Finding and opening cooking program via category Cooking programs can be found in the Automatic Cooking menu via categories and subcategories. Arrow symbols in a window always display the next or previous page. -
Page 86: Starting The Cooking Program
Operating the unit 5.10.3 Starting the cooking program The current step in the cooking program is highlighted. Upon completion, the following step automatically appears in the display. Requirement Cooking program open 1. Tap the "START" button in the information bar. The cooking program starts. -
Page 87: Modifying The Cooking Program
Operating the unit 5.10.5 Modifying the cooking program Tabs available only within cooking programs or the cooking step display. Tapping the tabs provides faster access to their functions. The current step in the cooking program is highlighted and can be modified. All settings of a step can be modified. After the settings are made, the modified cooking program can be saved. -
Page 88: Deleting A Cooking Program
Operating the unit 5.10.6 Deleting a cooking program Requirement Cooking program open Cooking program not started 1. Tap the Green tab. 2. The Tab window opens. 3. Tap the "Delete cooking program" field. The Delete window is displayed. 4. Tap the "Yes" button. The cooking program is being deleted. - Page 89 Operating the unit 3. Tap the Confirm button. All user-created cooking programs are exported to the USB flash drive from the cookbook. The Confirm window is displayed. 4. Tap the Confirm button. Close the Confirm window. The cooking programs are exported. Importing cooking programs When being imported, new cooking programs are added to the Cookbook.
-
Page 90: Videoassist
Operating the unit 3. Tap the Confirm button. All cooking programs on the USB flash drive are imported to the cookbook. The Operating instructions window is displayed. 4. Tap the "OK" button. The cooking programs are imported. 5.11 VideoAssist 5.11.1 Watching a video Requirement Videos saved on the unit. -
Page 91: Pausing And Finishing Use
Operating the unit 2. Tap the videos to be deleted. The Delete symbol appears behind the designation of the video. If you tap again on the video, the selection deletes this video. 3. Touch the Confirmation field. The marked videos are deleted. 5.12 Pausing and finishing use Switch off the unit during pauses and at end of use. -
Page 92: 6 Cleaning And Caring For The Unit
Cleaning and caring for the unit 6 Cleaning and caring for the unit CAUTION Risk of burns from hot surfaces • Allow surfaces to cool prior to cleaning. CAUTION Risk of chemical burns from cleaning agent • Follow the instructions of the cleaning agent manufacturer. •... -
Page 93: Preventing Corrosion
Cleaning and caring for the unit From the red light phase, the unit displays a cleaning reminder. The unit can continue to be used, but if it is not cleaned, the cleaning reminder will appear more frequently. Traffic light phase Explanation grey Pollution level low... -
Page 94: Cleaning The Handle, Operating Elements And Operating Panel Membrane
Cleaning and caring for the unit 6.4 Cleaning the handle, operating elements and operating panel membrane ATTENTION Risk of physical damage from improper cleaning • Do not clean the surface with highly abrasive or chemically aggressive cleaning agents. • Do not clean the surface with highly abrasive sponges. Requirements Unit is disconnected Clean the door handle, operating elements and control panel with a damp cloth and commercially available detergent. -
Page 95: Cleaning The Door Seal
Cleaning and caring for the unit 2. Clean the touchscreen within 20 seconds. The Cleaning window closes. The equipment functions menu is displayed. The touchscreen is clean. 6.6 Cleaning the door seal ATTENTION Risk of physical damage from improper cleaning Animal fats in combination with high temperatures can damage the door seal very quickly if it is not maintained properly. -
Page 96: Cleaning The Steam Outlet
Cleaning and caring for the unit 6.8 Cleaning the steam outlet Image: Cleaning the steam outlet ATTENTION Risk of physical damage from deposits • Check the steam outlet and connected piping for deposits. Use a liquid cleaner containing at most 20% sodium or potassium hydroxide. -
Page 97: Removing Calcium Deposits From The Unit
Cleaning and caring for the unit Requirement Unit and hood disconnected from the electric mains Unit and hood cool 1. Clean the housing daily with warm water and a commercially available cleaner. 2. Push the grease filter upwards. 3. Pull the grease filter on the underside of the hood forward to remove it. -
Page 98: Automatically Cleaning Cooking Zone With Waveclean (Optional)
Combisteamer. The use of unsuitable cleaning agents often causes damage to units. MKN makes great efforts to be able to offer a cleaning agent, which on the one hand achieves an outstanding cleaning performance, but which on the other hand does not attack and damage the convection steamer. -
Page 99: Preparing For Cleaning
Cleaning and caring for the unit 6.11.1 Preparing for cleaning ATTENTION Risk of physical damage from improper cleaning • Do not clean the unit with a high-pressure cleaner or water jet. Requirement GN containers, baking trays and grates removed from the cooking zone 1. -
Page 100: Inserting The Cleaning Cartridge
Cleaning and caring for the unit 6.11.3 Inserting the cleaning cartridge Use only cleaning cartridges with an undamaged wax seal. If the wax seal is damaged, the cleaner can enter the cleaning circuit prematurely or not dissolve completely, so that complete cleaning is no longer assured. -
Page 101: Starting Automatic Cleaning
Cleaning and caring for the unit 6.11.4 Starting automatic cleaning Requirements Water connection is open The unit is on Cleaning level selected Cleaning cartridge inserted Cooking zone temperature at 60 °C Tap the "START STOPP" button. The display shows the remaining time. 6.11.5 Cancelling automatic cleaning 1. -
Page 102: Cleaning The Cooking Zone Manually
Cleaning and caring for the unit 6.12 Cleaning the cooking zone manually 6.12.1 Preparing the cooking zone ATTENTION Risk of physical damage from improper cleaning • Do not clean the unit with a high-pressure cleaner or water jet. Requirement GN containers, baking trays and grates removed from the cooking zone 1. -
Page 103: Allowing The Cleaner To Act
Cleaning and caring for the unit 6.12.4 Allowing the cleaner to act Close the cooking zone door. The acting time starts. The display shows the remaining time until the "Flush cooking zone" stage. 6.12.5 Starting cleaning The acting time has elapsed, the cleaning process starts automatically. -
Page 104: Swinging The Air Diverter Open And Closed
Cleaning and caring for the unit 6.13 Swinging the air diverter open and closed CAUTION Pinch hazard from rotating fan • Prior to working on the unit, ensure that the unit has been disconnected from the mains. • Do not operate the unit without the air diverter. Image: Air diverter fastener a Air diverter b Top fastener... -
Page 105: Inspecting The Unit
Cleaning and caring for the unit 6.14 Inspecting the unit 6.14.1 Performing a visual inspection ATTENTION Risk of physical damage from improper inspection • Inspect in accordance with the inspection intervals. • Have inspections performed by a capable user. • In the event of damage or signs of wear, contact customer service immediately and stop using the unit. - Page 106 Cleaning and caring for the unit Requirement Water connection open Power optimisation system deactivated (optional) Cooking zone empty, without grates and without containers, with support rack or tray trolley Unit switched on No errors displayed The Settings menu displayed 1. Tap on "CombiDoctor" field. 2.
-
Page 107: 7 Transporting The Unit
Transporting the unit 7 Transporting the unit WARNING Danger of tipping of the unit due to damaged castors If the casters are damaged, the unit may tip over and seriously injure you. • Do not move the unit with the parking brakes tightened. •... -
Page 108: 8 Troubleshooting
Troubleshooting 8 Troubleshooting If a fault occurs during operation, the error number and error message are displayed. Use CombiDoctor to analyse the cause, if the cooking result or cleaning with WaveClean is different from that expected, and if an error message is not displayed. 8.1 Emergency mode Emergency programs handle the limited further operation of the appliance until servicing. -
Page 109: Nameplate
Troubleshooting Fault no. Error message displayed Description Measure to be taken • Vapour sensor defective Vapour elimination is now only • Contact Customer service controlled by the software. This results in higher water consumption. • Water pressure too low As permanent error message •... -
Page 110: 9 Carrying Out Maintenance
Carrying out maintenance 9 Carrying out maintenance The manufacturer recommends professional maintenance of the unit by trained technical personnel at maintenance intervals of 12 months. With heavier use, a maintenance interval of 6 months is recommended. Operating instructions... -
Page 111: 10 Dispose Of Unit In An Environmentally Responsible
Dispose of unit in an environmentally responsible manner 10 Dispose of unit in an environmentally responsible manner The unit has been designed to provide a lifetime of 10 years with average use. Do not dispose of unit or the unit's components together with non- recyclable waste. -
Page 112: 11 Manufacturer's Declaration
Manufacturer's declaration 11 Manufacturer's declaration EC Declaration of Conformity Manufacturer MKN Maschinenfabrik Kurt Neubauer GmbH & Co. KG • Halberstädter Straße 2a • 38300 Wolfenbüttel, Germany We hereby declare, that the following product: Description of the unit Unit for cooking food in commercial applications Designation / Unit type FlexiCombi gas combisteamer / FKGCOD... - Page 113 Manufacturer's declaration EC Declaration of Conformity Adduced basis for verification EN 203-1:2014 EN 203-2-2:2006 EN 203-3:2009 EN 55014-1:2006 EN 55014-2:1997 EN 60335-1:2002 + A11:2004 + A12:2006 + A13:2008 + A14:2010 + A15:2011 + A1:2004 + A2:2006 EN 60335-2-102:2006 + A1:2010 EN 61000-3-2:2014 EN 61000-3-3:2013 The manufacturer bears the sole responsibility for issuing this Declaration of Conformity.
- Page 114 Manufacturer's declaration Declaration of Conformity Manufacturer MKN Maschinenfabrik Kurt Neubauer GmbH & Co. KG • Halberstädter Straße 2a • 38300 Wolfenbüttel, Germany We hereby declare, that the following product: Description of the unit Unit for cooking food in commercial applications Designation / Unit type FlexiCombi gas combisteamer / FKGCOD...
- Page 115 Manufacturer's declaration Declaration of Conformity Adduced basis for verification EN 203-1:2014 EN 203-2-2:2006 EN 203-3:2009 EN 55014-1:2006 EN 55014-2:1997 EN 60335-1:2002 + A11:2004 + A12:2006 + A13:2008 + A14:2010 + A15:2011 + A1:2004 + A2:2006 EN 60335-2-102:2006 + A1:2010 EN 61000-3-2:2014 EN 61000-3-3:2013 The manufacturer bears the sole responsibility for issuing this Declaration of Conformity.
- Page 116 Manufacturer's declaration Declaration of Conformity Manufacturer MKN Maschinenfabrik Kurt Neubauer GmbH & Co. KG • Halberstädter Straße 2a • 38300 Wolfenbüttel, Germany We hereby declare, that the following product: Description of the unit Unit for cooking food in commercial applications Designation / Unit type FlexiCombi gas combisteamer / FKGCOD...
- Page 117 Manufacturer's declaration Declaration of Conformity Adduced basis for verification EN 203-1:2014 EN 203-2-2:2006 EN 203-3:2009 EN 55014-1:2006 EN 55014-2:1997 EN 60335-1:2002 + A11:2004 + A12:2006 + A13:2008 + A14:2010 + A15:2011 + A1:2004 + A2:2006 EN 60335-2-102:2006 + A1:2010 EN 61000-3-2:2014 EN 61000-3-3:2013 The manufacturer bears the sole responsibility for issuing this Declaration of Conformity.
-
Page 118: Keyword Index
Keyword index After-cooking .......... 24 Images Automatic cooking (autoChef) Importing images ........ 46 Cooking program, deleting...... 88 Cooking program, modifying..... 87 Low-temperature cooking ...... 21 Exporting cooking program....... 88 Find and open cooking program .... 85 Importing cooking programs ..... 89 Main menu.......... - Page 120 www.mkn.com...
Need help?
Do you have a question about the FlexiCombi MagicPilot FKGCOD615T and is the answer not in the manual?
Questions and answers