Table of Contents
Advertisement
Quick Links
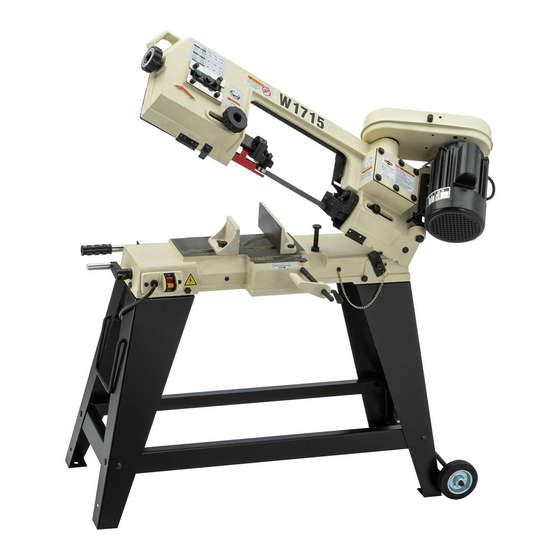
MODEL W1715
4" X 6" Metal Cutting
Bandsaw
OWNER'S MANUAL
(FOR MODELS MANUFACTURED SINCE 2/19)
Phone: 1-360-734-3482 • On-Line Technical Support: tech-support@woodstockint.com
COPYRIGHT © JULY, 2003 BY WOODSTOCK INTERNATIONAL, INC., REVISED FEBRUARY, 2019 (AL)
WARNING: NO PORTION OF THIS MANUAL MAY BE REPRODUCED IN ANY SHAPE OR FORM WITHOUT
THE WRITTEN APPROVAL OF WOODSTOCK INTERNATIONAL, INC.
#5435JT
Printed in China
Advertisement
Table of Contents

Related Manuals for Shop fox W1715


Summary of Contents for Shop fox W1715
- Page 1 MODEL W1715 4" X 6" Metal Cutting Bandsaw OWNER'S MANUAL (FOR MODELS MANUFACTURED SINCE 2/19) Phone: 1-360-734-3482 • On-Line Technical Support: tech-support@woodstockint.com COPYRIGHT © JULY, 2003 BY WOODSTOCK INTERNATIONAL, INC., REVISED FEBRUARY, 2019 (AL) WARNING: NO PORTION OF THIS MANUAL MAY BE REPRODUCED IN ANY SHAPE OR FORM WITHOUT THE WRITTEN APPROVAL OF WOODSTOCK INTERNATIONAL, INC.
- Page 2 This manual provides critical safety instructions on the proper setup, operation, maintenance, and service of this machine/tool. Save this document, refer to it often, and use it to instruct other operators. Failure to read, understand and follow the instructions in this manual may result in fire or serious personal injury—including amputation, electrocution, or death.
-
Page 3: Table Of Contents
Contents Blade Guides ........24 INTRODUCTION........2 Woodstock Technical Support ....2 Feed Rate ........24 Blade Speed ........25 Controls and Features ......5 Blade Terminology ......26 SAFETY..........6 Blade Selection ......... 27 Standard Machinery Safety Instructions ..6 Metal Chip Inspection Chart ....28 Additional Safety Instructions for ACCESSORIES........ -
Page 4: Introduction
Model W1715 (For Machines Mfd. Since 2/19) INTRODUCTION Woodstock.Technical.Support This machine has been specially designed to provide many years of trouble-free service. Close attention to detail, ruggedly built parts and a rigid quality control program assure safe and reliable operation. - Page 5 Power Transfer ................... V‐Belt Drive Bearings............... Shielded & Permanently Lubricated Centrifugal Switch/Contacts Type............... N/A Main Specifications Operation Info Blade Speeds................78, 108, 180 FPM Std. Blade Length................... 64‐1/2 in. Blade Size Range..................1/2 in. Model W1715 Machine Specifications, Page 1 of 2...
- Page 6 Serial Number Location ................. ID on Body Frame ISO 9001 Factory ....................No Certified by a Nationally Recognized Testing Laboratory (NRTL) .......... No Features Horizontal and Vertical Operation Automatic Shut‐Off 3/4 HP Motor Work Stop Model W1715 Machine Specifications, Page 2 of 2...
-
Page 7: Controls And Features
Model W1715 (For Machines Mfd. Since 2/19) Controls.&.Features Figure.1. Machine Identification. 1. Motor 10.. Vise Crank 2. Pulley Cover 11. ON/OFF Switch 3. Blade 12. Vise Jaws 4. Blade Guard Adjustment Knob 13. Stand Wheels 5. Tilting Tracking Mechanism 14. Stand 6.. -
Page 8: Safety
Model W1715 (For Machines Mfd. Since 2/19) SAFETY SAFETY For.Your.Own.Safety, Read.Manual.Before.Operating.Machine The. purpose. of. safety. symbols. is. to. attract. your. attention. to. possible. hazardous. conditions.. This. manual.uses.a.series.of.symbols.and.signal.words.intended.to.convey.the.level.of.importance.of.the. safety.messages..The.progression.of.symbols.is.described.below..Remember.that.safety.messages.by. themselves. do. not. eliminate. danger. and. are. not. a. substitute. for. proper. accident. prevention. mea- sures—this.responsibility.is.ultimately.up.to.the.operator! - Page 9 Model W1715 (For Machines Mfd. Since 2/19) WEARING.PROPER.APPAREL..Do not wear FORCING.MACHINERY..Do not force machine. It clothing, apparel, or jewelry that can become will do the job safer and better at the rate for entangled in moving parts. Always tie back which it was designed.
-
Page 10: Additional Safety Instructions For Metal Cutting Bandsaws
Model W1715 (For Machines Mfd. Since 2/19) Additional.Safety.Instructions.for.. Metal.Cutting.Bandsaws READ.and.understand.this. USE.this.and.other.machinery.with.caution. entire.manual.before.using. and. respect.. Always. consider. safety. first,. this.machine..Serious.per- as. it. applies. to. your. individual. working. sonal. injury. may. occur. conditions.. No. list. of. safety. guidelines. can. if. safety. and. operational. -
Page 11: Electrical
Model W1715 (For Machines Mfd. Since 2/19) ELECTRICAL Circuit.Requirements This machine must be connected to the correct size and type of power supply circuit, or fire or electrical damage may occur. Read through this section to determine if an The machine must be properly set up adequate power supply circuit is available. -
Page 12: Grounding Requirements
Model W1715 (For Machines Mfd. Since 2/19) Grounding.Requirements This machine MUST be grounded. In the event of certain types of malfunctions or breakdowns, grounding provides GROUNDED 110V 5-15 RECEPTACLE a path of least resistance for electric current to travel—in order to reduce the risk of electric shock. -
Page 13: Setup
Model W1715 (For Machines Mfd. Since 2/19) SETUP Unpacking This machine has been carefully packaged for safe This machine presents transportation. If you notice the machine has been serious injury hazards damaged during shipping, please contact your authorized to untrained users. Read Shop Fox dealer immediately. -
Page 14: Inventory
Model W1715 (For Machines Mfd. Since 2/19) Inventory The following is a list of items shipped with your machine. Before beginning setup, lay these items out and inventory them. Note: If you cannot find an item on this list, carefully check around/inside the machine and packaging materials. -
Page 15: Cleaning Machine
Model W1715 (For Machines Mfd. Since 2/19) Cleaning.Machine To prevent corrosion during shipment and storage of your machine, the factory has coated the bare metal surfaces of your machine with a heavy-duty rust prevention compound. Gasoline.and.petroleum. products.have.low.flash. If you are unprepared or impatient, this compound can points.and.can.explode. -
Page 16: Site Considerations
Model W1715 (For Machines Mfd. Since 2/19) Site.Considerations Weight.Load Physical.Environment Refer to the Machine.Specifications for the The physical environment where your machine is weight of your machine. Make sure that the operated is important for safe operation and the surface upon which the machine is placed will longevity of its components. -
Page 17: Assembly
Model W1715 (For Machines Mfd. Since 2/19) Assembly Before beginning the assembly process, refer to Items. Needed.for.Setup and gather everything you need. Ensure all parts have been properly cleaned of any heavy-duty rust-preventative applied at the factory (if applicable). Be sure to complete all steps in the assembly procedure prior to performing the Test.Run. - Page 18 Model W1715 (For Machines Mfd. Since 2/19) 7. Slide axle through holes in wheel-mounting bracket (see Figure 9). 8. Slide wheels onto axle on outside of mounting brackets, and secure them with (2) cotter pins (see Figure 9). Wheel Axle Figure 9.
- Page 19 Model W1715 (For Machines Mfd. Since 2/19) 15. Use a straightedge to check alignment of the pulley wheels, as shown in Figure 13, and adjust them as needed. 16. When the pulley wheels are aligned, tighten the set screws on both pulleys.
-
Page 20: Test Run
Model W1715 (For Machines Mfd. Since 2/19) Test.Run Once assembly is complete, test run the machine to ensure it is properly connected to power and safety components are functioning properly. If you find an unusual problem during the test run, immediately stop the machine, disconnect it from power, and fix the problem BEFORE operating the machine again. -
Page 21: Operations
Model W1715 (For Machines Mfd. Since 2/19) OPERATIONS General This machine will perform many types of operations that are beyond the scope of this manual. Many of these operations can be dangerous or deadly if performed incorrectly. The instructions in this section are written with the understanding that the operator has the necessary knowledge and skills to operate this machine. -
Page 22: Operation Tips
Model W1715 (For Machines Mfd. Since 2/19) Operation.Tips The following tips will help you safely and effectively operate your bandsaw and help you get the maximum life out of your saw blades. Horizontal.Cutting • Use the work stop to quickly and accurately cut multiple pieces of stock to the same length (see Figure.18). -
Page 23: Vertical Operation
Model W1715 (For Machines Mfd. Since 2/19) Vertical.Operation Blade The Model W1715 can easily be set up for vertical cutting Guide operations to make cuts that are not a straight cut Cover through the entire workpiece, such as curves or pattern cuts. -
Page 24: Head Locking Pin
Model W1715 (For Machines Mfd. Since 2/19) 6. Install the safety bracket and lock it in place with the pin shown in Figure.25 to keep the saw from falling. Notch Note: To ensure the safety bracket fits securely in the notch on the body frame, the safety bracket may need to be slightly "modified"... -
Page 25: Using The Vise
Model W1715 (For Machines Mfd. Since 2/19) Using.the.Vise The vise is designed to secure the workpiece during horizontal cutting operations. Always use the vise when cutting with the bandsaw in the horizontal position. Tools.Needed. Machinist's Square ..........1 To.use.the.vise.on.your.bandsaw,.do.these.steps: Scale 1. DISCONNECT BANDSAW FROM POWER! 2. -
Page 26: Blade Guides
Model W1715 (For Machines Mfd. Since 2/19) Blade.Guides The blade guides should be as close to the workpiece as Adjustment Knob possible. This will help ensure straight cuts by keeping the blade from twisting and drifting off the cut line. -
Page 27: Blade Speed
Model W1715 (For Machines Mfd. Since 2/19) Blade.Speed The bandsaw is capable of operating at 78, 108, or 180 FPM. The speed can easily be adjusted by changing the Gear Pulley Motor Pulley V-belt placement. Figure.32 shows an illustration of each pulley to belt combination, and the following list provides the blade speeds in feet per minute. -
Page 28: Blade Terminology
Model W1715 (For Machines Mfd. Since 2/19) Blade.Terminology Selecting the right blade for the cut requires a knowledge of various blade characteristics. Use the illustration in Figure.34 and the following descriptions to better understand blade characteristics. A.. Kerf: The width of the cut by the blade during cutting. -
Page 29: Blade Selection
Model W1715 (For Machines Mfd. Since 2/19) Blade.Selection Blade.Size Material The Model W1715 accepts only ⁄ " x 0.025 x 64 ⁄ " blades. Tool Steel Stainless Steel Tooth.Pitch Bearing Bronze Mild Steel Usually measured as TPI (Teeth Per Inch), tooth pitch Hard Brass determines the size/number of the teeth. -
Page 30: Metal Chip Inspection Chart
Model W1715 (For Machines Mfd. Since 2/19) thin & curled thin & curled Metal.Chip.Inspection.Chart thin & curled The best method of evaluating the performance of your metal cutting operation is to inspect the chips thin & curled short, hard & thick that are formed from cutting. -
Page 31: Accessories
Model W1715 (For Machines Mfd. Since 2/19) ACCESSORIES Metal.Cutting.Bandsaw.Accessories The following Metal Cutting Bandsaw accessories may be available through your local Woodstock International Inc. Dealer. If you do not have a dealer in your area, these products are also available through online dealers. -
Page 32: Maintenance
Model W1715 (For Machines Mfd. Since 2/19) MAINTENANCE General For optimum performance from this machine, this maintenance schedule must be strictly followed. Ongoing To maintain a low risk of injury and proper machine operation, if you ever observe any of the items below,... -
Page 33: Service
Model W1715 (For Machines Mfd. Since 2/19) SERVICE General This section covers the most common service adjustments or procedures that may need to be made during the life of your machine. If you require additional machine service not included in this section, please contact Woodstock International... -
Page 34: Blade Tracking
Model W1715 (For Machines Mfd. Since 2/19) 9. Briefly turn bandsaw ON then OFF to position blade and resume previous tracking. —If tracking needs adjustment, see Blade.Tracking in next section. —If tracking is fine, proceed to Blade.Tension. Blade.Tracking Blade tracking has been properly set at the factory. -
Page 35: Blade Tension
Model W1715 (For Machines Mfd. Since 2/19) Blade.Tension Proper blade tension is essential to long blade life, straight cuts, and efficient cutting times. Two major signs that you do not have the correct blade tension are: 1) The blade stalls in the cut and is slipping on the wheels, and 2) the blade frequently breaks from being too loose. -
Page 36: Blade Guide Bearings
Model W1715 (For Machines Mfd. Since 2/19) Blade.Guide.Bearings The blade guide bearings must be properly adjusted to make square cuts. One bearing on each assembly has an eccentric bushing that allows it to be adjusted so the blade is square to the vise. The bearings are secured... -
Page 37: Changing V-Belt
Model W1715 (For Machines Mfd. Since 2/19) Changing.V-Belt Check the V-belt periodically for signs of glazing, cracking, or fraying. If any of these conditions are present, change the V-belt. To.change.the.V-belt,.do.these.steps: 1. DISCONNECT BANDSAW FROM POWER! 2. Loosen the V-belt tension hex bolt on the motor mounting plate to allow the motor to pivot (see Figure.49). -
Page 38: Troubleshooting
Model W1715 (For Machines Mfd. Since 2/19) Troubleshooting The following troubleshooting tables cover common problems that may occur with this machine. If you need replacement parts or additional troubleshooting help, contact our Technical Support. Note: Before contacting Tech Support, find the machine serial number and manufacture date, and if available, your original purchase receipt. - Page 39 Model W1715 (For Machines Mfd. Since 2/19) PROBLEM POSSIBLE.CAUSE CORRECTIVE.ACTION Blades break often. 1. The workpiece is loose in the vise. 1. Clamp the workpiece tighter, or use a jig to hold the workpiece. 2. Refer to Feed Rate on Page 24, or Blade Speed on 2.
-
Page 40: Electrical Safety Instructions
Model W1715 (For Machines Mfd. Since 2/19) Electrical.Safety.Instructions These pages are current at the time of printing. However, in the spirit of improvement, we may make changes to the electrical systems of future machines. Compare the manufacture date of your machine to the one stated in this manual, and study this section carefully. -
Page 41: Electrical Components
Model W1715 (For Machines Mfd. Since 2/19) Electrical.Components Power Cord Figure.51. ON/OFF switch wiring. Figure.52. Start capacitor. Wiring.Diagram Capacitor Read 35MFD 250VAC Page 38 110V STOP Motor Before Wiring Ground Switch Ground WARNING ACCIDENTAL INJURY Neutral HAZARD! Disconnect power supply before... -
Page 42: Parts
Model W1715 (For Machines Mfd. Since 2/19) PARTS Main 20 112 84 75 84-1 35V2 35V2-2 35V2-5 35V2-3 35V2-1 35V2-4 56-1 126A 56-2 126A-1 126A 58A-1 59A-1 77V2 59V2-1 11V2 59V2 37V2 176V2 175V2 12 67 174V2 20 130 15-1... - Page 43 Model W1715 (For Machines Mfd. Since 2/19) Main.Parts.List PART # DESCRIPTION PART # DESCRIPTION X1715001 HEX BOLT M6-1 X 12 X1715051 FLAT WASHER 8MM X1715002 HEX NUT M6-1 X1715052 HEX BOLT M8-1.25 X 25 X1715003 FLAT WASHER 6MM X1715053 HEX BOLT M12-1.75 X 75 X1715004V2 STAND LEG (RIGHT) V2.09.17...
- Page 44 Model W1715 (For Machines Mfd. Since 2/19) Main.Parts.List.(Cont.) PART # DESCRIPTION PART # DESCRIPTION X1715101 WORM GEAR PULLEY X1715137 LOCK WASHER 6MM X1715103 BLADE TENSION PLATE X1715156 PHLP HD SCR M5-.8 X 25 X1715104 HEX BOLT M8-1.25 X 35 X1715157...
- Page 45 Model W1715 (For Machines Mfd. Since 9/17)
- Page 46 Fold along dotted lIne place stamp Here Woodstock international inc. p.o. box 2309 bellingham, Wa 98227-2309 Fold along dotted lIne tape along edges--please do not staple...
-
Page 47: Warranty
Woodstock International, Inc. will repair, replace, or arrange for a dealer refund at its expense and at its option, the Shop Fox machine or machine part, which in proper and intended use has proven to be defective, provided that the original owner returns the product prepaid to an authorized warranty or repair facility as designated by our Bellingham, Washington office with proof of their purchase of the product within two years, and provides Woodstock International, Inc.
Need help?
Do you have a question about the W1715 and is the answer not in the manual?
Questions and answers