Advertisement
Available languages
Available languages
Quick Links
Advertisement

Subscribe to Our Youtube Channel
Related Manuals for TEFAL Mecha Congee


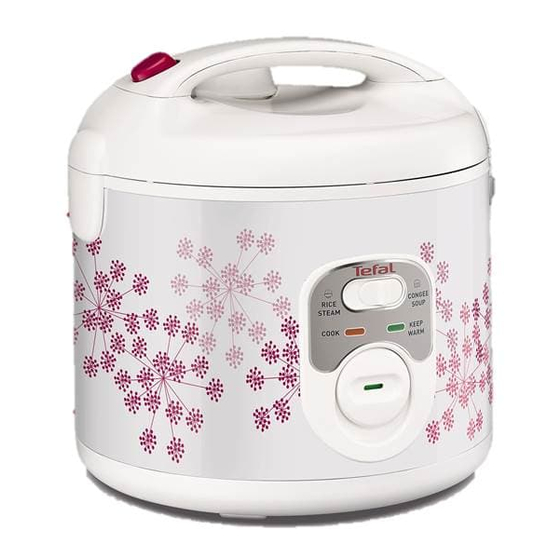
Summary of Contents for TEFAL Mecha Congee
- Page 1 Mecha Congee www.tefal.com...
- Page 2 控制面板 Control box / / Kotak kawalan...
-
Page 4: Before The First Use
DESCRipTioN 1. Steam basket 12. Condensation collector 2. Graduation for water and rice 13. Control box 3. Removable ceramic bowl a. RICE/STEAM cooking mode 4. Measuring cup b. Cooking indicator light (orange) 5. Spoon support c. Control switch 6. Spoons d. Keep warm indicator light 7. Power cord (green) 8. Lid opening button e. CONGEE/SOUP cooking mode 9. Lid Handle f. Mode switch 14. Hotplate 10. Micro pressure valve 11. - Page 5 • Slightly rotate the bowl in both directions, so as to ensure good contact between the bottom of the bowl and the hotplate. • Check that the condensation collector is correctly placed in position, if not, please install it by pushing firmly into the groove - fig. 6. • Close and lock the lid. • Plug in the appliance. • Do not switch on the appliance until all of the above stages have been completed. • Avoid to switch on the appliance with an empty cooking bowl empty. • Do not touch the heating plate when the product is plugged. Never place your hand on the steam vent during cooking, as there is a danger of burns. Never use the lid handle to transport the product when it is full.
- Page 6 Rinse the rice thoroughly before cooking. CookiNg gUiDE FoR WHiTE RiCE -10 CUpS Measuring cups of Weight of white Water level in the Approximative Serves white rice rice bowl ( + the rice) cooking time* 300 g 2 cup mark 3per.-4per. 20 min 600 g 4 cup mark 5per.-6per. 24 min 900 g 6 cup mark 8per.-10per. 29 min 1200 g 8 cup mark 13per.-14per. 34 min 1500 g 10 cup mark 16per.-18per. 38 min CookiNg gUiDE FoR WHiTE RiCE - 5,5 CUpS CookiNg gUiDE FoR WHiTE RiCE - 5,5 CUpS Measuring cups of Measuring cups of...
-
Page 7: Rice Cooking
RiCE CookiNg The cooking time given in the tables above is a rice cooking time guide. • Place the appliance on a flat, stable, heat-resistant work surface away from water splashes and any other sources of heat. • Pour the required quantity of rice into the bowl using the measuring cup provided. Then fill with cold water up to the corresponding “CUP” mark printed in the bowl (See cooking guide above) - fig. 7. • Close the lid. Note: Always add the rice first otherwise you will have too much water. • Check that the appliance is plugged in. Turn the mode switch to the left to choose “RICE/STEAM” mode - fig. 8 and then press downwards on the control switch, the orange cooking indicator illuminates showing that cooking has begun - fig. 9. • When cooking finished, it will turn to keep warm automatically, the “KEEP WARM” indicator light is on - fig. 10. - Page 8 STEAM CookiNg (FoR vEgETABlES, FiSH, ETC.) Measuring the ingredients • The maximum quantity of water in the bowl should not exceed the maximum CUP mark shown in “CUP” on the bowl - fig. 7. Exceeding this level may cause overflow during use. • The water level should be lower than the steam basket. preparation • Pour water into the bowl, never exceed the maximum CUP mark. • Place the steam basket in the bowl - fig. 11. • Add the ingredients in the steam basket. To steam cook • Turn the mode switch to the left to choose “RICE/STEAM” mode - fig. 8 and then press downwards on the control switch, the orange cooking indicator illuminates showing that cooking has begun - fig. 9.
- Page 9 SoUp CookiNg To cook soup • Turn the switch to the right to choose “CONGEE/SOUP” mode - fig. 12 and then press downwards on the control switch, the orange cooking indicator illuminates showing that cooking has begun - fig. 9. • To finish cooking procedure, turn upwards on the control switch to its top position. The green “KEEP WARM” indicator light comes on and the appliance turns to keep warm function - fig. 13. kEEp WARM FUNCTioN On completion of cooking, for rice or steam cooking, the appliance enters automatically to the “KEEP WARM” function. The control switch comes up to its top position and the green “KEEP WARM” indicator light comes on. For congee or soup cooking, it will turn to keep warm function when you turn upwards on the control switch to its top position and the green “KEEP WARM” indicator light comes on. The food is thus kept warm until ready to serve. Be careful that keep warm long hours would affect the quality of rice. To switch off this function, unplug the appliance - fig. 14.
- Page 10 Bowl, steam basket, condensation collector, micro pressure valve and the steam basket • To clean the micro-pressure valve, remove it from the lid - fig. and open it by rotating in the direction of “open” - fig. 16 • After cleaning it, wipe dry. Allow the two triangle to next - fig.
- Page 11 TECHNiCAl TRoUBlESHooTiNg gUiDE Malfunction description Causes Solution Any indicator lamp off and no Verify the main plug is well Rice cooker not plugged. heating. engaged in the product body. Problem of The connection of Any Indicator lamp off and Send to authorized service the indicator lamp or Indicator heating. center for repair. lamp is damaged. Cooking Indicator lamp off, Cook button is not in cooking Put the cook button in low keep warm indicator on. position. position (cooking). Lid is badly closed. Open and close again the lid. Stop the cooking (unplug the Micropressure valve not well product) and check the valve Steam leakage during using. positioned or uncomplete. is complete (2 parts locked together) and well positioned. Lid or micropressure valve Send to authorized service gasket is damaged. center for repair. Rice half cooked or overtime Too much or not enough water Refer to IFU for water cooking compared to rice quantity.
- Page 12 目錄 1. 蒸籠 12. 露水收集器 2. 水和米刻度 13. 控制面板 3. 陶晶內鍋 a. 飯/蒸煮”煮食模式 4. 量杯 b. 煮飯顯示燈(橙色) 5. 湯勺支架 c. 開關掣 6. 湯勺 d. 保溫顯示燈(綠色) 7. 電源線 e. 粥/湯”煮食模式 8. 開蓋按鈕 f. 模式掣 9. 煲蓋手挽 14. 發熱板 10. 微壓閥 15. 感應器 11. 煲蓋 初次使用前 電飯煲開封 • 從包裝中取出電飯煲,拆除各附件和包裝資料。 • 按下手挽上的按鈕,打開電飯煲蓋- fig. 1.
- Page 13 • 電飯煲插上電源。 • 以上步驟全部完成後電飯煲方可通電。 • 避免於內鍋清空的情況下開啟電飯煲。 • 當電源接通時請勿接觸發熱板。 烹飪過程中,切勿將手放在排氣孔上,以防燙傷。盛滿食物時切勿持 著蓋柄運送. 只可使用隨電飯煲提供的內鍋。請勿在沒有內鍋的情況下將水或其他 食材放入飯煲內。 煮飯 量度米和水 – 陶晶內鍋的最大容量 • 鍋內的刻度線是以公升和量杯為單位,用以量煮飯用水 - fig. 7. • 電飯煲附帶塑膠杯用來量米。表中列出不同人數所需的米量。1量杯 平杯的米約重150克。 • 下表提供不同類型的米的煮法。為達到最佳效果,建議烹調一般的 米,而非黏身、可能黏煲底的“易煮”米。烹調其他種類的米時, 如糙米或菰米,所需水量應亦應有所調節,請見下表。 • 煮1量杯白米(供2小份量或1份量),用1量杯白米,然後加入1.5量杯 水。某些種類的米煮1量杯米時可能會黏煲底。煮食其他份量的白米 請參考以下煮食建議。 • 米和水的總量最多不應超過內鍋內側(視乎不同產品)5.5或10杯水位 線(視乎不同產品) - fig. 7. 視乎不同種類的米需要加入的水量也不 同。詳見下表。 米煮前應徹底淘洗。 白米的烹調方法 - 10 杯米 內鍋中的水位 白米的量杯數量 白米重量 可供享用人數 大約烹調時間* (加入米) 300 克...
- Page 14 白米的烹調方法 - 5.5 杯米 內鍋中的水位 白米的量杯數量 白米重量 可供享用人數 大約烹調時間* (加入米) 300 克 2 杯刻度 3 到4 人 25 分鐘 450 克 3 杯刻度 4 到5 人 29 分鐘 600 克 4 杯刻度 5 到6 人 33 分鐘 825 克 5.5 杯刻度 8 到10 人 37 分鐘 米煮前應徹底淘洗。 白米的烹調方法 - 10 杯米 大約烹調時間* 內鍋中的 用米數量 白米重 可供享用 米的種類 水位 煮飯功能 (量杯) 量...
- Page 15 電飯煲會根據內鍋中的水量和材料份量自行決定準確的烹調時間米吸 光水後煮飯程序會自動停止,繼而進入「保溫」模式(綠色保溫顯示 燈會亮起)。 達到煮飯最佳效果的建議 • 米量好後,用筲箕在水喉下徹底沖洗一段長時間(不用淘洗的意大利 米除外)。 • 然後將洗淨的米和相應份量的水加入內鍋中。 • 確保米均勻攤鋪在煲中以使烹調均勻。 • 可根據個人味道加鹽調味。 • 可用清湯代替水,但煲底的米有可能會輕微燒焦。 • 煮飯時切勿打開煲蓋,否則蒸汽溢出會影響烹調時間及米飯味道。 • 煮飯完成,“保溫”指示燈亮著時,攪拌米飯,然後讓米飯放煲中 數分鐘,這樣能讓米飯粒粒分明。 蒸煮(如蔬菜、魚類等) 量度材料 • 內鍋中的最大水量不應超過內鍋的最大“杯” • 刻度中的最高水位 - fig. 7.。超過該水位有可能導致煮 • 食過程中溢出水。 • 水面應低於蒸籠。 準備運作 • 內鍋中加入水。水量不能超過內鍋的最大“杯”刻度中的最高水位。 • 將蒸籠放入內鍋中 - fig. 11.。 • 將材料放入蒸籠。 蒸煮 • 將模式掣往左扭,選擇「煮飯/蒸煮」模式 - fig. 8,然後按下控制 鈕,橙色煮飯燈亮起表示開始煮飯- fig. 9。 • 可隨時根據需要改變煮食時間,要結束蒸煮只需把開關掣撥向上。 綠色保溫燈亮起,飯煲進入保溫狀態。 • 鍋中沒有水時,電飯煲會自動進入保溫狀態,“保溫”指示燈會著 - fig. 10。...
- Page 16 煲粥 煲粥 • 將模式掣往右扭,選擇「粥/湯」模式- fig. 12.,然後按下控制鈕, 橙色燈亮起表示開始烹煮- fig. 9.。 • 必需將控制鈕調至最高位置才能完成整個烹煮過程。飯煲進入保溫 狀態後綠色保溫燈會亮起- fig. 13.。 • 可根據個人口味調節水量。一般而言,1杯米需要8 杯水。 煲湯 煲湯 • 將模式掣往右扭,選擇「粥/湯」模式 - fig. 12,然後按下控制鈕, 橙色燈亮起表示開始烹煮 - fig. 9。 • 必需將控制鈕調至最高位置才能完成整個煮飯過程。飯煲進入保溫 狀態後綠色「保溫」燈會報亮起- fig. 13.。 保溫功能 完成煮飯或蒸煮過程後,飯煲會自動進入「保溫」功能,控制鈕會跳 至最高位置,綠色「保溫」燈會亮起。若煮粥或湯,當控制鈕調至最 高位置後,飯煲會進入保溫狀態,而綠色「保溫」燈會亮起。煮好的 食物處於保溫狀態並隨時可享用。請注意長時間保溫會影響米飯的口 感。要結束功能,拔除電飯煲電源- fig. 14.。 烹調完成 • 打開煲蓋。 • 用電飯煲附設的膠湯勺將食物取出,然後再蓋上煲蓋。 • 煲內的食物將處於保溫狀態,可再次享用。 • 保溫後拔除電源。 烹飪結束時,請不要在沒戴手套的情況下直接觸碰內鍋。...
- Page 17 清潔和保養 露水收集器 • 每次使用後清空及清洗露水收集器。 • 按露水收集器的塑膠蓋兩端將其取出- fig. 15.。 • 將露水收集器穩固地插回固定槽中。 內鍋、蒸籠、露水收集器及微壓閥 • 清洗微壓閥時,請將微壓閥從煲蓋上取下- fig. 16 ,然後沿“開啟”方 向旋轉,將微壓閥打開- fig. 16。清洗完畢後,擦乾微壓閥,並對準兩 個配件中的三角形- fig. 16,沿“關閉”方向旋轉,直到發出“咔” 聲,然後將其放回電飯煲蓋。 • 用熱水、洗潔精及海綿清洗內鍋- fig. 17、露水收集器- fig. 18、 微壓閥- fig. 19、湯勺及量杯。不建議使用去污粉及金屬百潔布。 • 如果煲底上黏上食物,清洗前先將內鍋浸泡一會兒。 • 小心擦乾內鍋。 • 切勿將電飯煲放在水中,或將水倒入其中,只能將水倒入內鍋中。 陶晶內鍋保養 • 建議勿在陶晶內鍋內切食物,好使塗層能盡量長久保持完好。 • 攪拌食物或取出食物時請使用塑膠或木制器具,切勿使用金屬器 具,以免損壞內鍋表面。 • 為防止腐蝕,切勿將醋加入內鍋。 • 初次使用或多次使用後,內鍋表面的顏色可能會產生變化。這是由 於蒸汽及水的作用造成,不會影響電飯煲的使用,亦不會對人體有 害。電飯煲仍可繼續放心使用。 電飯煲其他配件的清洗及保養 • 清洗電飯煲前將電源拔除。 • 用濕布擦拭電飯煲外部、煲蓋內側– Fig.20 及電源線,然後擦乾。 切勿使用腐蝕性或具磨損性的清潔產品。 • 切勿用水清洗電飯煲內部,以免損壞熱力感應器。...
- Page 18 技術疑難排解 失靈情況 原因 解決方法 檢查電源線插頭是否牢插 有顯示燈不亮而且不發熱 飯煲未插掣 在飯煲 顯示燈的連接問題或顯示 有顯示燈不亮但發熱 送交認可服務中心維修 燈損壞. 煮飯顯示燈不亮但保溫顯 煮飯鈕並非處於煮飯位置 將煮飯鈕調校至低位(煮飯) 示燈亮 未妥善蓋上 打開蓋再蓋上 停止煮飯(拔掉電源線)並檢查 飯半熟或煮飯時間過長 微壓閥未放好或不完整 閥是否完整(兩部分互相緊鎖) 和安放妥當 蓋或微壓閥墊片損壞 送交認可服務中心維修 有關水量的資料可查閱 飯半熟或煮飯時間過長 相對於米量放水太多或太少 「使用說明」 將選擇鈕轉變至「煮飯/ 飯半熟 選了煲湯鈕. 蒸煮」位置 自動保溫功能失靈(飯煲維持 送交認可服務中心維修 在煮飯狀態或不發熱) 每次使用後必需清空露 沒有安放露水收集器或收集 漏水到檯上 水收集器,並且檢查收 器滿溢...
- Page 19 kETERANgAN 1 Bakul kukusan 12 Pengumpul wap 2 Penanda air dan nasi 13 Kotak kawalan 3 Mangkuk seramik a. Mod memasak NASI/KUKUS boleh ditanggalkan b. Lampu penunjuk 4 Cawan penyukat memasak (oren) 5 Pemegang senduk c. Suis kawalan 6 Senduk d. Lampu penunjuk kekal 7 Wayar kuasa panas (hijau) 8 Butang penutup e. Mod memasak BUBUR/SUP 9 Pemegang penutup f. Suis mod 10 Injap tekanan mikro 14.
- Page 20 • Pusingkan sedikit mangkuk ke kedua-dua belah arah untuk memastikan bahagian bawah mangkuk bersentuhan dengan plat panas. • Periksa sama ada pengumpul wap diletakkan dengan betul, jika tidak sila tekan dengan kemas ke dalam alurnya - fig. 6. • Tutup dan kunci penutup. • Pasangkan plag peralatan. • Jangan buka suis peralatan sehinggalah kesemua langkah di atas telah dilengkapkan. • Elakkan memasang suis peralatan sekiranya mangkuk masakan kosong. • Jangan sentuh plat panas semasa peralatan sedang digunakan. Jangan sesekali meletakkan tangan di atas corong wap ketika memasak untuk mengelakkan bahaya melecur. Jangan menggunakan pemegang penutup untuk mengangkut produk sewaktu ianya penuh. pakai mangkuk nasi yang disediakan sahaja.
- Page 21 Cuci beras sepenuhnya sebelum memasak. pANDUAN MEMASAk UNTUk BERAS pUTiH - 10 CAWAN Sukatan beras Paras air dalam Anggaran masa Berat beras putih Hidangan putih (cawan) mangkuk (+ beras) memasak* 300 g Paras 2 cawan 3-4 hidangan 20 min 600 g Paras 4 cawan 5-6 hidangan 24 min 900 g Paras 6 cawan 8-10 hidangan 29 min 1200 g Paras 8 cawan 13-14 hidangan 34 min 1500 g Paras 10 cawan 16-18 hidangan 38 min pANDUAN MEMASAk UNTUk BERAS pUTiH - 5,5 CAWAN CookiNg gUiDE FoR WHiTE RiCE - 5,5 CUpS Measuring cups of Sukatan beras...
- Page 22 MEMASAk NASi Masa memasak yang diberikan dalam jadual hanyalah anggaran dan sebagai panduan sahaja. • Letakkan peralatan di atas permukaan yang rata, stabil, tahan panas dan jauh daripada percikan air dan sumber haba. • Tuangkan kuantiti beras yang dikehendaki ke dalam mangkuk dengan menggunakan cawan penyukat yang disediakan. Kemudian isikan air sejuk sehingga ke tanda “CAWAN” di dalam mangkuk tersebut. (Sila rujuk kepada panduan memasak di atas) - fig. 7. • Tutup penutup. Nota: Sentiasa masukkan beras terlebih dahulu untuk mengelakkan air yang berlebihan.
- Page 23 • Jangan buka penutup semasa memasak kerana wap akan keluar dan akan mengganggu masa memasak dan rasa masakan. • Setelah selesai memasak, apabila lampu penunjuk “KEKAL PANAS” menyala, kacau nasi dan biarkan di dalam periuk untuk beberapa minit lagi untuk memperolehi biji-biji nasi yang sempurna. MENgUkUS (UNTUk SAyURAN, ikAN DAN SEBAgAiNyA) Menyukat bahan-bahan • Kuantiti air yang maksimum di dalam mangkuk tidak boleh melebihi paras maksimum “CAWAN” yang ditanda pada mangkuk - fig. 7. Melebihi paras ini mungkin mengakibatkan limpahan semasa penggunaan. • Paras air sepatutnya lebih rendah daripada bakul kukusan. penyediaan • Masukkan air ke dalam mangkuk tetapi jangan melebihi paras maksimum “CAWAN”.
- Page 24 • Anda boleh mengubahsuai paras air mengikut kesukaan. Secara amnya, ia memerlukan lebih kurang 8 cawan air untuk satu cawan beras. MEMASAk SUp Untuk memasak sup • Pusing suis mod ke kanan untuk memilih mod “BUBUR/SUP” - fig. 12 dan kemudian tekan suis kawalan ke bawah, kemudian tekan suis kawalan ke bawah, penunjuk memasak oren akan menyala menunjukkan bahawa ia sedang memasak - fig. 9. • Untuk menamatkan prosedur memasak, anda mesti menolak suis kawalan ke kedudukan teratas. Lampu penunjuk hijau “KEKAL PANAS” menyala dan peralatan bertukar kepada fungsi kekal panas - fig. 13. FUNgSi pANAS SEMUlA Apabila selesai memasak, untuk masakan nasi atau kukus, peralatan akan bertukar secara otomatik kepada fungsi “KEKAL PANAS”. Suis kawalan akan berada di kedudukan teratas dan lampu penunjuk hijau “KEKAL PANAS akan menyala. Untuk masakan bubur atau sup, ia akan bertukar ke fungsi kekal panas apabila anda menolak suis kawalan ke kedudukan...
- Page 25 MENCUCi DAN MENyElENggARA pengumpul wap • Pengumpul wap perlu dikosongkan dan dicuci selepas setiap penggunaan. • Untuk membuka pengumpul, tekan kedua-dua belah penutup plastik dan keluarkannya - fig. 15. • Untuk memasang kembali pengumpul wap, tekan dengan ketat ke dalam alur. Mangkuk, bakul kukusan, pengumpul wap dan injap tekanan mikro • Apabila mencuci injap tekanan mikro, sila alihkan daripada penutup - fig. 16 dan buka dengan memutarnya ke arah “buka” - fig. 16, Selepas mencuci, sila keringkannya dan cantumkan kedua-dua segitiga bersama - fig. 16, dan putarkan ke arah “tutup” sehingga bunyi “ka” kedengaran...
- Page 26 Mencuci dan menjaga bahagianbahagian lain peralatan • Tanggalkan plag peralatan sebelum mencuci. • Cuci bahagian luar periuk nasi, bahagian dalam penutup - fig. 20 dan wayar dengan kain lembap dan keringkan. Jangan gunakan produk yang kesat. • Jangan gunakan air untuk mencuci bahagian dalam peralatan kerana ia mungkin mengakibatkan kerosakan kepada sensor haba. JADUAl pENyElESAi MASAlAH Penerangan Kerosakan Penyebab Penyelesaian Mana-mana lampu penunjuk Pastikan palam utama Periuk nasi tidak dicucuh pada tidak menyala dan tidak bersambung dengan betul ke palam. memanas. badan produk. Masalah penyambungan lampu Mana-mana lampu penunjuk Hantar kepada pusat servis yang penunjuk atau lampu penunjuk tidak menyala dan memanas. bertauliah untuk dibaiki. rosak. Lampu penunjuk memasak tidak Butang memasak tidak dalam Letakkan butang memasak di menyala, lampu kekal panas kedudukan memasak.
-
Page 27: การท� า ความสะอาด
ส ่ ว นประกอบ 1. ถำดนึ ่ ง อำหำร 12. ถำดรองไอน� ้ ำ 2. มำตรบอกระดั บ น� ้ ำ 13. แผงควบคุ ม กำรท� ำ งำน a. เมนู หุ ง ข ้ำว/นึ ่ ง 3. หม ้อเซรำมิ ก ถอดได ้ 4. ถ... - Page 28 การใช ้ ง านหม้ อ หุ ง ข้ า ว ส � า หร ับ 4 โปรแกรมการท� า งาน • เช ็ ด ท� า ความสะอาดภายนอกหม้ อ ช ั ้ นใน (โดยเฉพาะก้ น หม้ อ ) ด้ ว ยความระม ัดระว ัง แน...
- Page 29 • ตำรำงด ้ำนล่ ำ งนี ้ เ ป็ นค� ำ แนะน� ำ ส � ำ หรั บ กำรหุ ง ข ้ำวชนิ ด ต่ ำ งๆ เพื ่ อ ให ้ได ้ผลลั พ ธ์ ท ี ่ ด ี ท ี ่ ส ุ ด แนะน�...
- Page 30 ซำวข ้ำวก่ อ นหุ ง ตารางแนะน� า การหุ ง ชนิ ด ต่ า งๆ เวลำที ่ ใ ช ้ ในกำรหุ ง โดยประมำณ * ระดั บ น� ้ ำ ในหม ้อช ั ้ น ปร ิ ม ำณข ้ำว โปรแกรมหุ ง ข ้ำว ชนิ...
- Page 31 หม้ อ หุ ง ข้ า วจะก� า หนดเวลาที ่ ใช ้ ใ นการหุ ง อย่ า งอ ัตโนม ัติ ขึ ้ น อยู ่ ก ับปริ ม าณน� ้ า และข้ า วที ่ ใส ่ ล งในหม้ อ ช ั ้ นใน (ดู ต าราง แนะน�...
- Page 32 การนึ ่ ง • เปล ี ่ ย นโหมดโดยกดสว ิ ต ช ์ ไ ปทำงซ ้ ำยเพ ื ่ อ เล ื อ กโหมด "ข ้ำว/ไอน � ้ ำ " - fig. 8 จำกนั ้ น กดสวิ ต ช ์ ค วบคุ ม ลงล่ ำ ง ไฟส ี ส ้ มแสดงสถำนะประกอบอำหำร สว่...
- Page 33 โปรแกรม อุ ่ น อาหาร เมื ่ อ ส ิ ้ น สุ ด กำรประกอบอำหำร ส � ำ หรั บ กำรหุ ง ข ้ำวหรื อ นึ ่ ง อำหำร เครื ่ อ งใช ้ ไฟฟ้ ำ นี ้ จ ะข ้ำมไปยั ง ฟั ง ก์ ช ั ่ น “อุ ่ น อำหำร” โดยอั ต โนมั ต ิ สวิ...
- Page 34 หม้ อ ช ั ้ นใน ถาดรองไอน� ้ า ฝาระบายไอน� ้ า ไมโคร-เพรสเชอร์ วาล์ ว และถาดนึ ่ ง อาหาร • เมื ่ อ ท� ำ ควำมสะอำดฝำระบำยไอน� ้ ำ ไมโคร-เพรสเชอร์ วำล์ ว ให ้ ถอดออกจำกฝำปิ ด - fig. 16 และเปิ ด โดยหมุ น ไปที ่ ต � ำ แหน่ ง “เปิ ด ” - fig. 16 หลั...
- Page 35 ตารางแก้ ไ ขปั ญ หาข ัดข้ อ ง ค� า อธิบายการท� า งานผิดปกติ สาเหตุ การแก้ ป ั ญ หา ตรวจสอบว่ ำ ปลั ๊ ก หลั ก ต่ อ เข ้ำ หลอดไฟไม่ ต ิ ด และตั ว ท� ำ ควำมร ้อนไม ไม่...
- Page 36 TEFAL/T-FAL INTERNATIONAL GUARANTEE: COUNTRY LIST www.tefal.com GROUPE SEB ARGENTINA S.A. 2 años Billinghurst 1833 3° 0800-122-2732 ARGENTINA 2 years C1425DTK Capital Federal Buenos Aires ՓԲԸ <<ԳՐՈՒՊՊԱ ՍԵԲ>> ՀԱՅԱՍՏԱՆ 2 տարի 2 years 125171,ՄՈՍԿՎԱ, ԼԵՆԻՆԳՐԱԴՅԱՆ 010 55-76-07 ARMENIA ԽՃՈՒՂԻ, 16A, ՇԻՆ.3...
- Page 37 FINLAND 2 years Kutojantie 7 02630 Espoo GROUPE SEB France France Continentale + 1 an Service Consommateur Tefal 09 74 50 47 74 Guadeloupe, Martinique, 1 year 112 Ch. Moulin Carron, TSA 92002 Réunion, Saint-Martin 69134 ECULLY Cedex GROUPE SEB DEUTSCHLAND GmbH /...
- Page 38 NORGE 815 09 567 Tempovej 27 NORWAY 2 years 2750 Ballerup ﻋ ُﻣﺎﻥ ﺳﻠﻁﻧﺔ 24703471 1 year www.tefal-me.com OMAN 801 300 420 2 lata GROUPE SEB POLSKA Sp. z o.o. POLSKA ul. Bukowińska 22b koszt jak za 2 years POLAND połączenie lokalne...
- Page 39 2 años ESPAÑA 902 31 24 00 C/ Almogàvers, 119-123, Complejo 2 years SPAIN Ecourban 08018 Barcelona TEFAL SVERIGE SUBSIDIARY OF 2 år SVERIGE 08 594 213 30 GROUPE SEB NORDIC SWEDEN 2 years Truckvägen 14 A, 194 52 Upplands Väsby...
- Page 40 TEFAL/T-FAL INTERNATIONAL GUARANTEE Date of purchase: ....../ Date d'achat / Fecha de compra / Data da compra / Data d'acquisto / Kaufdatum / Aankoopdatum / Købsdato / Inköpsdatum / Kjøpsdato / Ostopäivä...
- Page 41 p. 1 – 8 ZH p. 9 – 15 MS p. 16 – 23 TH p. 24 – 32 NC00129492...
Need help?
Do you have a question about the Mecha Congee and is the answer not in the manual?
Questions and answers