Advertisement
Available languages
Available languages
Quick Links
Download this manual
See also:
Instruction Manual
Advertisement

Related Manuals for TEFAL FUZZY LOGIC


Summary of Contents for TEFAL FUZZY LOGIC
- Page 1 Ref. NC00010232...
- Page 2 RICE COOKER FUZZY LOGIC www.groupeseb.com...
-
Page 4: Description Of Functions
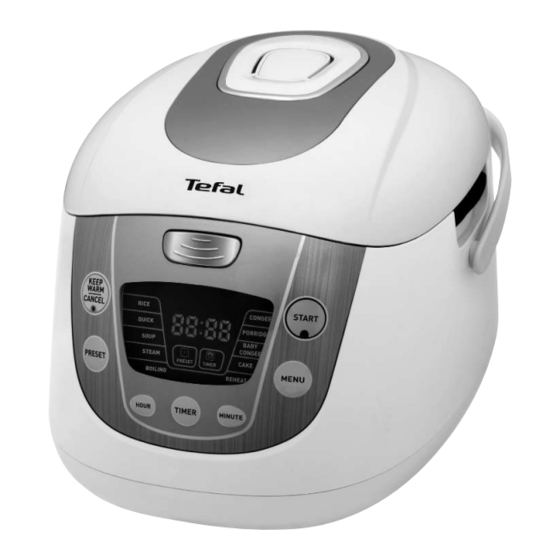
Features Description of the drawing Steam tray Graduation for water and rice Condensation collector Removable non-stick bowl Handle Measuring cup Lid opening button Spoons Control box Power cord Hotplate Micro pressure valve Sensor Removable inner steam shield Description of functions START: Starts the selected cooking menu (the light switches on). -
Page 5: Before First Use
REPARATION Product This rice cooker is equipped with 13 functions: Rice cooking, Quick cooking, Soup cooking, Steam cooking, Boiling water rice cooking, Congee cooking, Porridge cooking, Baby congee cooking, Cake cooking, Reheat, Keep warm, Timer and Preset. At the end of the cooking period, the appliance will automatically switch over to keep warm which will last up to 24h. - Page 6 For all uses: • Carefully wipe the outside of the bowl (especially the bottom). Make sure that there are no foreign residues or liquid underneath the bowl and on the heating element. Fig.5 • Place the bowl into the appliance, making sure that it is correctly positioned. Fig.6 Make sure that the sensor moves when you put the bowl on it.
- Page 7 1. Rice cooking - Fig. 8 • Pour the required quantities of rice and water into the bowl. • Close the lid. • Plug in the appliance. • Choose the menu "RICE" using the menu button (a). The orange back light of "RICE" position in LED screen flashes (b).
- Page 8 5. Boiling water rice cooking - Fig. 12 • Pour the required quantities of rice and boiling water into the bowl. • Close the lid. • Plug in the appliance. • Choose the menu "BOILING" using the menu button (a). The orange back light of "BOILING" position in LED screen flashes (b).
- Page 9 8. Baby congee cooking - Fig. 15 • Pour the ingredients into the bowl. • Close the lid. • Plug in the appliance. • Choose the menu "BABY CONGEE" using the menu button (a). The orange back light of "BABY CONGEE" position in LED screen flashes (b). The "START" button indicate light flashes.
- Page 10 13. Preset function • You have the possibility to adjust the time of the end of the cooking period by pressing the "PRESET" button. • Choose the Menu and set the cooking timer you want (for SOUP , STEAM, CONGEE, PORRIDGE, BABY CONGEE functions).
-
Page 11: Cleaning And Maintenance
• Serve the food using the plastic spoon provided with your appliance and reclose the lid. • The food remaining in the container will keep warm for any second serving in the coming 24 hours. • Press "KEEP WARM/CANCEL". • Unplug the appliance. Some recommendations for better results with the cooking of rice: •... - Page 13 • • • • • • • • • • • • • • •...
- Page 14 • • • • • • • • 1200 • 49 min 39 min 49 min 44 min 49 min 40 min 46 min 38 min 50 min 42 min 49 min 39 min 44 min 41 min...
- Page 15 • • • • • • • • • • • • • • • • • • • • • • • • • •...
- Page 16 • • • • • • • • • • • • • • • • • • • • • • • • •...
- Page 17 • • • • • • • • • • • • • • • • • • • • • • • • • •...
- Page 18 • • • • • •...
- Page 19 • • • • • • • • • • • • • • • 要 : • • • • (b-c) • •...
- Page 20 ( / / /...
- Page 21 • • • • • • • • • • • • • • •...
- Page 22 • • • • • • • • (1.8 8-10 1200 11-14 • (Round white rice)
- Page 23 • • • • • • • • • • • • • • • • • • • • • • • • • • • • •...
- Page 24 • • • • • • • • • • • • • • • • • • • • • •...
- Page 25 • • • • • • • • • • • • • • • • • • • • • • • • " " ( • " " " " " " •...
- Page 26 • • • • • •...
- Page 27 • • • • • • • • • • • • • • • • • • • (b-c) • •...
- Page 28 Ciri-ciri Keterangan gambarajah Dulang kukusan Penutup Pembahagi air dan nasi Pengumpul wap Mangkuk masakan tidak lekat Pemegang Cawan penyukat Butang penutup Senduk Kotak kawalan Wayar kuasa Plat panas Injap tekanan mikro Sensor Pelindungan wap boleh tanggal Keterangan Fungsi MULA: Memulakan menu masakan yang telah dipilih (lampu akan menyala). KEKAL PANAS/BATAL: Fungsi kekal panas akan dimulakan secara automatik selepas selesai memasak.
- Page 29 PENYEDIAAN Produk Periuk nasi ini dilengkapi dengan 13 fungsi. Memasak nasi, Masakan ringkas, Memasak sup, Mengukus, Mendidih, Memasak bubur cair, Memasak bubur likat, Memasak bubur bayi, Memasak kek, Memanas semula, Kekal panas, Penentu masa dan Preset. Setelah selesai memasak, peralatan akan bertukar ke mod kekal panas secara automatik yang tahan sehingga ke 24 jam.
- Page 30 Untuk semua penggunaan: • Lap bahagian luar mangkuk masakan (terutamanya di bahagian bawah). Pastikan tiada sebarang bendasing atau cecair di bawah mangkuk dan di atas elemen pemanas. Rajah. 5 • Letakkan mangkuk masakan di dalam peralatan dan pastikan ia diletakkan pada kedudukan yang tepat.
- Page 31 1. Memasak nasi – Rajah 8 • Tuangkan beras dan air ke dalam mangkuk. • Tutup penutup. • Sambungkan plag peralatan. • Pilih menu “NASI” pada butang menu . Lampu berwarna oren di belakang “NASI” akan berkelip pada skrin LED (b). Lampu penunjuk butang “MULA”...
- Page 32 • Setelah selesai memasak, peralatan akan bertukar ke kekal panas secara automatik, lampu penunjuk “KEKAL PANAS/BATAL” berwarna hijau akan menyala, paparan akan menunjukkan “b”. 5. Mendidih – Rajah 12 • Tuangkan beras dan air mendidih ke dalam mangkuk. • Tutup penutup. •...
- Page 33 8. Memasak Bubur Bayi – Rajah 15 • Tuangkan bahan-bahan ke dalam mangkuk. • Tutup penutup. • Sambungkan plag peralatan. • Pilih menu “BUBUR BAYI” pada butang menu (a). Lampu berwarna oren di belakang “BUBUR BAYI” akan berkelip pada skrin LED (b). Lampu penunjuk butang “MULA”...
- Page 34 13. Fungsi Preset • Anda boleh mengubahsuai masa tamat memasak dengan menekan butang “PRESET”. • Pilih menu dan tentukan masa yang dikehendaki (untuk fungsi SUP , KUKUS, BUBUR CAIR, BUBUR LIKAT, BUBUR BAYI). Tekan “PRESET” dan kemudian pilih masa tamat memasak dengan menekan butang “JAM”...
- Page 35 • Hidangkan makanan menggunakan senduk plastik yang disertakan bersama dengan peralatan dan tutup semula penutup periuk nasi. • Baki makanan di dalam periuk nasi akan kekal panas sehingga ke 24 jam. • Tekan “KEKAL PANAS/BATAL”. • Tanggalkan plag peralatan. Cadangan untuk memperolehi nasi yang lebih baik. •...
- Page 36 Mencuci injap tekanan mikro • Apabila mencuci injap tekanan mikro, sila alihkan daripada penutup – Rajah 24 buka dengan memutarnya ke arah “buka” – Rajah 24 (b-c). Selepas mencuci, sila keringkannya dan cantumkan kedua-dua segitiga bersama – Rajah 24 dan putarkan ke arah “tutup”...
Need help?
Do you have a question about the FUZZY LOGIC and is the answer not in the manual?
Questions and answers