Advertisement
Available languages
Available languages
Quick Links
IP67
Waterproof
Electronics
Fan is Ip55
Designed and developed in England
S
TERLING POWER PRODUCTS
BATTERY CHEMISTRY MODULE
Advanced charging technology
Installations / Instructions
Inc temperature
sensor
Optional extra
Daisy chain digital
o
60 C battery
temp trip
www.sterling-power.com
www.sterling-power.usa.com
& manual
Made in Taiwan
English
French
Deutsch
WARNING
To remove upper lid
The lid is secured by two tabs
to the base.
Simply use one hand.
Thumb on one tab and finger
on the other tab.
more than about 3 mm
tab to clear the lid then simply
lift off the lid.
Do not press too far as excess
distance could break the tabs.
Damaged tabs cannot be
covered by warranty
Warranty:
2 year return to factory
conditional warranty
Press in no
for the
RoHS
compliant
Advertisement

Related Manuals for Sterling Power Products Pro Charge Ultra


Summary of Contents for Sterling Power Products Pro Charge Ultra
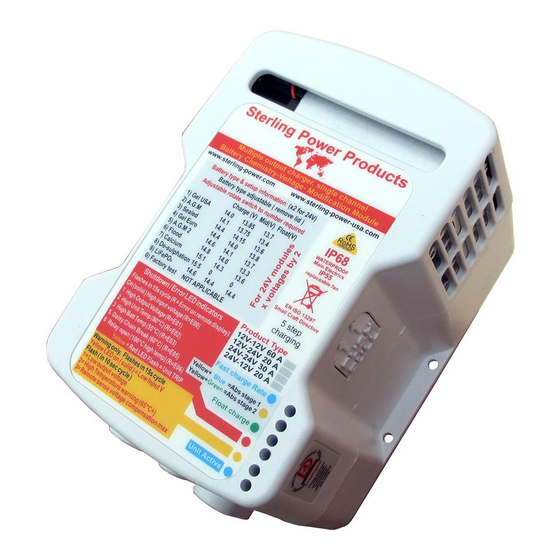
- Page 1 IP67 English French Waterproof Electronics Deutsch Fan is Ip55 Designed and developed in England TERLING POWER PRODUCTS BATTERY CHEMISTRY MODULE Advanced charging technology Installations / Instructions & manual Inc temperature sensor Optional extra Daisy chain digital 60 C battery temp trip WARNING To remove upper lid The lid is secured by two tabs...
- Page 2 Why do I need the chemistry module? including a de-sulphation cycle. LiFePO cycle with Most boats or specialised vehicles have multi-battery BMS integrated off ability. bank installations. This type of installation can cause 6) 4 models: 12V-12V up to 60A, 24V-24V up to 30A. problems if the battery chemistries in the installation are 12-24V up to 30A at 24V and 24V - 12V, up to 50A at 12V.
- Page 3 and the 230V /110V AC isolated, then, connect the input Gel / Exide spec. This program is, as per the positive cable first, then the output positive cable, then recommendation of Exide, set at a voltage of 14.4V for the negative. about 10-12 hrs.
- Page 4 To Remove lid The product will auto start when power is supplied to the input Gently press in the side of the device from the battery charger. Negative side slots and lift lid off Number key Positive Aluminium Optional. High battery temperature trip / BMS remote off. The 2 connectors in position 2 should come linked, if linked then the Heat sink 12 v...
- Page 5 80 amp fuse on the output to the aux battery , the fuse should be positioned within 15 inches / 350 mm of the battery, a range of high current pre fused cables are available from Sterling Power products...
- Page 6 H Charge Float mean is that the remote has received a corrupt readout signal from the Sterling Power Products BCM (merely momentary). 12.2 Please note for 24V only operations you set up as 12V. I.e. if you want to set a voltage, for example, 26V you set in the parameters for 13V.
-
Page 7: Basic Installation
Basic installation more than one unit can be used this is all that is required to make the unit work Any manufactures’ multi-output charger can be used, Negative (up to the product’s rating) and as long as the charger can deliver Positive power when not connected to a battery ie the terminal is live Aluminium... - Page 8 Remote volt sensor Negative Positive Aluminium ( if used ) Heat sink 12 v 40 mm For compensating for voltage drop on long run cables Fig 4 Attach a small sense cable to position 14 ( remote voltage measurement ) and the system will increase the voltage up to about 1V (if necessary) above set voltage to compensate for voltage drop in long cable runs.
- Page 9 Multiple units on single output charger For information only to show product flexibility Single output charger Ground / Chassis Boat grounding Negative Negative Positive Positive Aluminium Aluminium AC circuit breaker Heat sink Heat sink 12 v 12 v 40 mm 40 mm 12 v 12-12V...
- Page 10 This warranty provides you specific legal rights and you may also have other rights, which vary from state to state. This warranty is in lieu of all other, expressed or implied. Sterling Power USA Sterling Power Products Ltd Warranty Service Center Unit 8, Wassage way...
- Page 11 Ip67 English French Waterproof Electronics Deutsch Fan is IP55 Designed and developed in England STERLING POWER PRODUCTS MODULE DE CHARGE BATTERIE (MCB) Technologie de charge avancée Installation / Instruction & manuel Sonde température incluse sonde optionnelle protection sur-chauffe batteries alarme 60°...
- Page 12 Quel est l’intérêt de ce produit? (LiFePO ) avec système de gestion, peuvent être Une grande partie des bateaux et des véhicules paramétrées, comprend un cycle de désulfatation. spécialisés possèdent différents parcs de batteries. Ce 6) 4 modèles: 12V-12V jusqu’à 60A, 24V-24Vjusqu’à type d’installation pose des problèmes si les batteries 30A.
- Page 13 Quel est l’intérêt de ce produit? Avantages de ce produit. Une grande partie des bateaux et des véhicules 1)Facile à installer, il suffit d’insérer le MCB sur le câble spécialisés possèdent différents parcs de batteries. Ce reliant le chargeur aux batteries. On ajoute ensuite un type d’installation pose des problèmes si les batteries câble négatif, et les câbles utiles pour la connexion des utilisées dans chaque parc sont de technologies...
- Page 14 Ce produit démarre automatiquement dès qu’il est alimenté par le chargeur de batteries. Pour enlever le couvercle pressez Correspondance des chiffres: doucement sur les encoches latérales Negative Optionnel coupure en cas de haute température et soulevez le couvercle. Positive batteries / Gestionnaire batteries remote off. Les 2 Aluminium terminaisons sont livrées connectées.
- Page 15 Démarrage et tests de procédure. Une fois que l’appareil est correctement installé, le chargeur principal est éteint, aucune Led n’est allumée. Allumer le chargeur de batteries, la séquence de départ est la suivante: 1) bleue ‘puissance on’ la LED du bas est allumée. 2) Environ 0.5 seconde après, pour vérifier leur bon fonctionnement, toutes les LEDs s’allument..
- Page 16 H Charge Float Si ‘crc’ est affiché à un moment ou un autre ignorez ce signal, Sterling Power Products ceci indique qu’un message erroné a été envoyé par le BCM. 12.2 C’est en général une erreur temporaire. Notez que pour les systèmes 24V on paramètre les opérations...
-
Page 17: Installation De Base
installation de base Tout ce qu’il faut pour que l’appareil fonctionne N’importe quel chargeur à sorties multiples convient, ( Il doit être adapté à la capacité du BCM le chargeur doit pouvoir fournir Negative de la puissance quand il n’est pas connecté à la batterie. Dissipateur Positive chaleur... - Page 18 Sonde de tension Negative Positive Dissipateur Pour compenser les chutes de tension le long d’un câble chaleur 12 v Aluminium 40 mm Fig 4 Relier par un petit câble en position 14 (erreur dans le texte anglais il indique 15) ( mesure tension à...
- Page 19 Sorties multiples sur un chargeur une seule sortie pour informations montre la flexibilité du produit chargeur simple sortie Terre / Chassis Terre bateau Negative Negative Positive Positive Dissipateur Dissipateur Dijoncteur courant alternatif chaleur chaleur 12 v 12 v Aluminium Aluminium 40 mm 40 mm 12 v...
-
Page 20: Garantie
Pour faire une réclamation sous garantie, vérifier le numéro de téléphone sur internet. Nous ferons les meilleurs efforts pour remplacer ou réparer le produit, s‘il est défectueux suivant les critères de la garantie. Sterling Power Products Ltd Sterling Power USA Unit 8, Wassage way... - Page 21 IP67 Deutsch wasserdichte Elektronik Lüfter = IP55 Designed in England TERLING POWER PRODUCTS BATTERIE-LADE-ADAPTER Fortschrittliche Ladetechnik Installationsanleitung Inkl. Temperatursensor Optional Digitaler Ketten-Sensor 60 C Auslösung ACHTUNG Entfernung der Abdeckung Die Abdeckung ist durch 2 Laschen gesichert, welche am Hauptgehäuse sind. Nutzen Sie nur 1 Hand.
- Page 22 Warum benötige ich einen Batterie-Lade-Adapter? Umgebungstemperatur anpasst. Viele Boote oder Fahrzeuge haben verschieden 8) Spannungssensorkabel-Anschluss zum Ausgleich Batterie Typen installiert. Dieses kann zu Problemen des Spannungsabfalls vom Adapter zur Batterie. führen, da die Batterien mit unterschiedlichen 9) 6 LEDs zur Ladeüberwachung und Fehleranzeige Spannungen geladen werden sollten (z.B.
- Page 23 Warum benötige ich einen Batterie-Lade-Adapter? fühler können angeschlossen werden. Viele Boote oder Fahrzeuge haben verschieden Batterie 2) Verändert Einfach-Ladegeräteausgänge in ein Multi- Typen installiert. Dieses kann zu Problemen führen, da Stufen-Ladegerät. die Batterien mit unterschiedlichen Spannungen 3) 12V-24V, 24V-12V, 24V-24V und 12V-12V Modelle geladen werden sollten (z.B.
- Page 24 Der Ladeadapter startet automatisch, Zum Abnehmen des Deckels drücken Sie die Laschen sobald eine Spannung vom Ladegerät geliefert wird. Negative vorsichtig nach innen. Funktionen und Anschlüsse: Positive Aluminium Optional. Sicherheitsschaltung über Ketten-Sensor oder BMS. Zum Anschluss entfernen Sie die Verbindung und ersetzen diese Heat sink 12 v durch eine Schleife mit Ketten-Sensoren.
- Page 25 Startprozedur. Nachdem der Ladeadapter korrekt angeschlossen ist und das Eingangs-Ladegerät ausgeschaltet ist, sollten KEINE LEDs leuchten. Schalten Sie das Eingangs-Ladegerät ein: 1) die untere blaue LED (Eingangsspannung vorhanden) leuchtet. 2) Anschließen leuchten alle LEDs kurz auf. 3) Dann blinkt die obere blaue LED für x - Mal. Dieses blinken zeigt den Batterietyp an. z.B. 3x blinken = Batterietyp 3 4) Nach der Anzeige gehen sind alle LEDs aus und der Lüfter fängt an zu laufen.
- Page 26 Wenn ‘crc’ angezeigt wird, bedeutet dieses nur, dass 1 Datenpaket nicht H Charge Float korrekt gelesen werden konnte. Sollte diese Anzeige nicht ständig Sterling Power Products fortbestehen, dann besteht kein Anlass zur Sorge. 12.2 Wenn Sie ein 24V Gerät haben, werden alle Einstellungen als 12V vorgenommen.
- Page 27 es kann auch Basis Installation mehr als 1 Gerät verbaut werden minimale Anforderung zum Betrieb Es kann jedes Ladegerät/Netzteil verwendet werden Negative solange das Gerät eine Spannung liefert, Positive ohne dass eine Batterie angeschlossen ist. Aluminium Schutzleiter / Chassis Kühlkörper 12 v Boots-Erdung 40 mm...
- Page 28 Batterie-Spannungs-Sensor Negative Positive Aluminium ( falls gewünscht ) Heat sink 12 v 40 mm Gleicht den Spannungsabfall auf dem Ladekabel aus. Fig 4 Verbinden Sie ein dünnes Kabel mit dem Anschluss 14 und dem positiven Batteriepol, parallel zu dem vorhandenen Ladekabel. Aktivierungs-Ausgang Negative Positive...
- Page 29 Mehrere Geräte an einem Ladegerät mit nur 1 Ausgang Ladegerät mit 1 Ausgang Ground / Chassis Boat grounding Negative Negative Positive Positive Aluminium Aluminium AC circuit breaker Heat sink Heat sink 12 v 12 v 40 mm 40 mm 12 v 12-12V 12-24V unit...
- Page 30 Schaden durch die Garantie gedeckt ist. Bitte lesen Sie alle Unterlagen bezüglich Ihres Kaufes genau durch. Unsere Garantie deckt nur Geräte welche direkt von Sterling Power Products gekauft wurden. Wir können leider keine Garantieforderungen durch andere Sterling Power Händler akzeptieren. Durch den Kauf oder die Entgegennahme eines Produktes stimmen Sie zu, dass Sterling Power USA LLC und Sterling Power LTD nicht für Zufalls- oder Folgeschaden verantwortlich gemacht werden können.
Need help?
Do you have a question about the Pro Charge Ultra and is the answer not in the manual?
Questions and answers