Table of Contents
Advertisement
Quick Links
Advertisement
Table of Contents

Subscribe to Our Youtube Channel
Related Manuals for Pepperl+Fuchs WRM-F301-IO-B15-2V15


Summary of Contents for Pepperl+Fuchs WRM-F301-IO-B15-2V15
- Page 1 FACTORY AUTOMATION MANUAL WRM-F301-IO-B15-2V15 SmartBridge Interface...
- Page 2 WRM-F301-IO-B15-2V15 With regard to the supply of products, the current issue of the following document is ap- plicable: The General Terms of Delivery for Products and Services of the Electrical Indus- try, published by the Central Association of the Electrical Industry (Zentralverband Elektrotechnik und Elektroindustrie (ZVEI) e.V.) in its most recent version as well as the...
-
Page 3: Table Of Contents
WRM-F301-IO-B15-2V15 Introduction................. 4 Content of this Document ..............4 Target Group, Personnel..............4 Symbols Used ..................5 Product Description ..............6 Use and Application................6 Application Types and Benefits ............7 The Function of the SmartBridge Interface ........7 The Function and Structure of the SmartBridge App ....... 9 LED Indicators and Operating Elements ......... -
Page 4: Introduction
WRM-F301-IO-B15-2V15 Introduction Introduction Content of this Document This document contains information required to use the product in the relevant phases of the product life cycle. This may include information on the following: Product identification Delivery, transport, and storage Mounting and installation... -
Page 5: Symbols Used
WRM-F301-IO-B15-2V15 Introduction Symbols Used This document contains symbols for the identification of warning messages and of informative messages. Warning Messages You will find warning messages, whenever dangers may arise from your actions. It is mandatory that you observe these warning messages for your personal safety and in order to avoid property damage. -
Page 6: Product Description
Machine control, e.g., PLC Mobile device such as a tablet with the SmartBridge app IO-Link devices, such as the Pepperl+Fuchs ultrasonic sensor UC500 shown in the figure, provide a variety of process and device data (e.g., distance values, sound cone width, switching delay, device name, etc.). -
Page 7: Application Types And Benefits
WRM-F301-IO-B15-2V15 Product Description Application Types and Benefits For the following application types, the SmartBridge® system provides a valuable advantage: Clearer Application Parameterization of IO-Link Devices Intelligent sensors and actuators often have many functions with widely differing parameters. With the SmartBridge app, it is very simple to display and modify functions and the associated parameters. - Page 8 WRM-F301-IO-B15-2V15 Product Description Master Mode In master mode, the SmartBridge interface actively communicates with the connected IO-Link device. This mode should be selected only if no additional IO-Link master module is connected on the control side. Depending on the type of connection, 3 application types can be identified in master mode: Master Offline This is the default function.
-
Page 9: The Function And Structure Of The Smartbridge App
WRM-F301-IO-B15-2V15 Product Description Master Inline 4/5-pin In this case, the use of the SmartBridge interface is enabled without a time lag in the process data on the machine control. In this "special case," signal line Q2 (pin 2, input) is diverted without modification to Q1 in the SmartBridge interface, and then connected to the control system. - Page 10 WRM-F301-IO-B15-2V15 Product Description IO-Link device. The GDD is responsible for the graphical representation of process data in the form of scales, graphs, etc., as well as buttons for parameterization. If no GDD exists for a particular sensor, a default GDD is displayed. The default GDD contains an image of the connected device and information about the "Vendor Name,"...
- Page 11 WRM-F301-IO-B15-2V15 Product Description "Graphical View" Menu Figure 2.8 If a GDD is available for the connected IO-Link device, the app will switch to the Graphical View menu right after the connection has been successfully established. If no GDD is available, a default GDD is displayed. The default GDD contains an image of the connected device and information about the "Vendor Name,"...
- Page 12 WRM-F301-IO-B15-2V15 Product Description "IODD View" Menu Figure 2.9 IODD View using the example of distance sensor OMT550-R200-2EP-IO-V31 Line-by-line representation of information, functions, and device parameters in the re- spective menu Menu structure of the IODD View You can use this menu to perform the following operations for the connected IO-Link device:...
- Page 13 WRM-F301-IO-B15-2V15 Product Description "SmartBridge Settings" Menu This menu provides information about system data and settings for the SmartBridge interface. Figure 2.11 Information Displays the serial number and designation of the SmartBridge interface. Displays the firmware version of the IO-Link processor and system processor.
- Page 14 WRM-F301-IO-B15-2V15 Product Description "App Settings" Menu This menu is used to adjust various settings within the SmartBridge® app. Figure 2.12 Caution! Resetting to factory settings clears data! Please note that if you reset the SmartBridge app, all stored IODDs and GDDs belonging to previously connected IO-Link devices will be deleted.
-
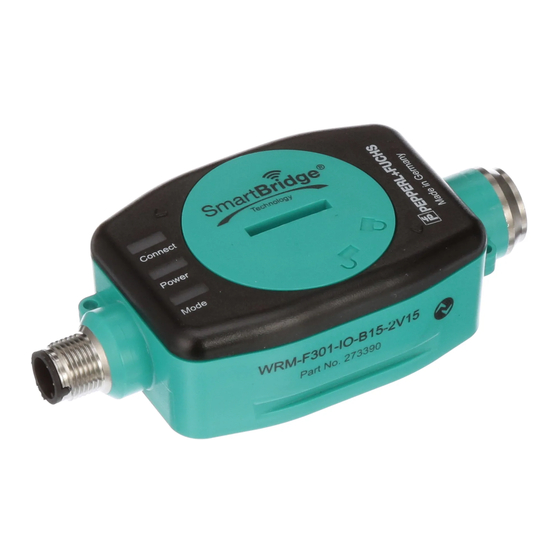
Page 15: Led Indicators And Operating Elements
WRM-F301-IO-B15-2V15 Product Description LED Indicators and Operating Elements LED Indicators The SmartBridge interface is equipped with 3 indicator LEDs for carrying out visual function checks and rapid diagnostics. The "Connect" LED has 1 color (blue), while the "Mode" (yellow/green) and "Power" (green/red) LEDs have 2 colors. -
Page 16: Interfaces And Connections
WRM-F301-IO-B15-2V15 Product Description Operating Elements The SmartBridge interface is mainly operated via the SmartBridge app. The only operating element is the reset button. This is only accessible after opening the cover. Figure 2.14 1. Open the cover (1) of the interface using a suitable tool (e.g., a coin) by turning it counter- clockwise. -
Page 17: Delivery Scope And Accessories
WRM-F301-IO-B15-2V15 Product Description Cover microSD card slot USB 2.0 micro-B socket Connections IO-Link Figure 2.16 M12x1 connector plug, 5-pin, connection to the machine control/external 24 VDC power supply M12x1 socket, 5-pin, connection for IO-Link device Delivery Scope and Accessories Scope of Delivery The SmartBridge interface is supplied with a mounting bracket and a Quick Start Guide. -
Page 18: Installation
WRM-F301-IO-B15-2V15 Installation Installation Installing the SmartBridge Interface Mounting If you wish to use the SmartBridge interface in a stationary position for longer periods, we would recommend the use of the supplied mounting clamp. The mounting clamp has two 4.5 mm holes to mount the interface using screws. -
Page 19: Installing The Smartbridge App
WRM-F301-IO-B15-2V15 Installation Inline 4/5-pin IO-Link Device 4 C/Q 4 C/Q Bluetooth Figure 3.3 Connection for "inline 4/5-pin" Monitor mode has the following connection: Monitor 24 V DC IO-Link IO-Link Device Master 4 C/Q Bluetooth Figure 3.4 Connection for "Monitor" Note! Use the machine control to ensure the correct wiring. -
Page 20: Data Logging-Preparation And Activation
Installation Downloading the SmartBridge App 1. Go to the relevant app store. 2. Search for the "SmartBridge – Sensor Technology 4.0" app by Pepperl+Fuchs GmbH Figure 3.5 App icon for SmartBridge 3. Follow the instructions to download and install the SmartBridge app. - Page 21 WRM-F301-IO-B15-2V15 Installation Figure 3.7 1. Open the cover (1) of the interface using a suitable tool (e.g., a coin) by turning it counter- clockwise. 2. Remove the cover (1). 3. Insert the microSD card into the slot (2). 4. Place the cover (1) back in the opening and secure by turning it clockwise.
-
Page 22: Commissioning
WRM-F301-IO-B15-2V15 Commissioning Commissioning Commissioning the SmartBridge® System Note! The process outlined below applies both to the initial commissioning of the SmartBridge system and to recommissioning. Once the drivers for an IO-Link device have been downloaded via the SmartBridge app, they are stored in a library on the mobile device. In this way, recommissioning is possible with a previously known IO-Link device, even without an Internet connection (e.g., when operating in areas/plants without an Internet connection). - Page 23 WRM-F301-IO-B15-2V15 Commissioning 2. Press the button for the (desired) SmartBridge®. The authentication dialog starts. SmartBridge® Authentication When establishing a connection between the mobile device and the SmartBridge interface, an authentication process first takes place between the communication partners. For this, each SmartBridge interface has a unique device key.
- Page 24 WRM-F301-IO-B15-2V15 Commissioning Figure 4.3 3. Select "SPECIALIST" as the user role to be able to use the entire range of programming features. 4. The rights of each user role are defined in detail in the respective IODD. The "SPECIALIST" role has the most privileges. Users with the "OBSERVER" role are restricted to read only access to the data.
- Page 25 WRM-F301-IO-B15-2V15 Commissioning Figure 4.4 Note! The respective manufacturer of the IO-Link devices is responsible for providing the driver files (IODD, GDD). These files are stored in a central location online, to which the SmartBridge App has access.
- Page 26 WRM-F301-IO-B15-2V15 Commissioning Setting the Application 1. Set the desired application in the Startup Mode field. Figure 4.5 Application setting: • "Monitor" in monitor operating mode • "Master Offline" in master operating mode • "Master Inline 3-pin" in master operating mode •...
- Page 27 WRM-F301-IO-B15-2V15 Commissioning 3. First, save the file under the name "ConfSBA.ini" on your PC. Below is an example with the interface name "SBridge1" and the new device key "1A4F." Figure 4.6 4. Copy the file "ConfSBA.ini" from the PC to the microSD card.
- Page 28 Twinsburg, Ohio 44087 · USA Tel. +1 330 4253555 E-mail: sales@us.pepperl-fuchs.com Asia Pacific Headquarters Pepperl+Fuchs Pte Ltd. Company Registration No. 199003130E Singapore 139942 Tel. +65 67799091 E-mail: sales@sg.pepperl-fuchs.com www.pepperl-fuchs.com Subject to modifications / DOCT-5055A Copyright PEPPERL+FUCHS • Printed in Germany 04/2019...
Need help?
Do you have a question about the WRM-F301-IO-B15-2V15 and is the answer not in the manual?
Questions and answers