Advertisement
Log Set Assembly: LOGS-SL750TRS-D
Model: SL-750TRS-IPI-D
STEP 1.
CAUTION: Logs are fragile!
Carefully remove the logs from the packaging.
STEP 2.
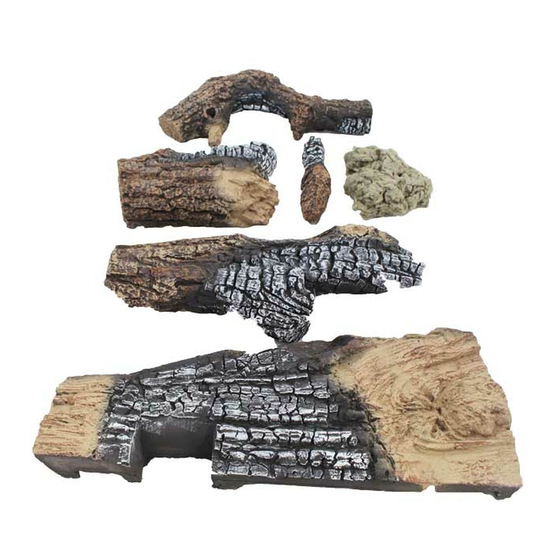
LOG #1 (SRV2065-701) Place log #1 on left fl at side of
the burner assembly. Pull the log forward and slide it to
the right until the notches under the log are in the burner
grooves.
STEP 3.
LOG #2 (SRV2066-702) Place log #2 on the grate bar
and push it back against refractory. The pilot should be
centered within the large notch on log #2.
LOG NOTCHES
Heat & Glo • SL-750TRS-IPI-D • 2066-935 Rev. E • 9/06
LOG PLACEMENT
INSTRUCTIONS
1 1
2 2
3 3
1 1
1
1
4 4
5 5
2 2
Advertisement
Table of Contents

Related Manuals for Heat & Glo LOGS-SL750TRS-D


Summary of Contents for Heat & Glo LOGS-SL750TRS-D
- Page 1 Log Set Assembly: LOGS-SL750TRS-D LOG PLACEMENT Model: SL-750TRS-IPI-D INSTRUCTIONS STEP 1. CAUTION: Logs are fragile! Carefully remove the logs from the packaging. LOG NOTCHES STEP 2. LOG #1 (SRV2065-701) Place log #1 on left fl at side of the burner assembly. Pull the log forward and slide it to the right until the notches under the log are in the burner grooves.
- Page 2 NOTCH STEP 4. LOG #3 (SRV2066-703) Place log #3 on right side of grate. The notch on the log should fi t over the bar on the LOG/BURNER DETAIL CONTACT AREA far right side of the grate. Push the right side of log #3 against the grate tab and pull the left side forward until it comes into contact with the burner detail as shown in Figure 1.
Need help?
Do you have a question about the LOGS-SL750TRS-D and is the answer not in the manual?
Questions and answers