Festo CPX-CEC-C1 Electronic Manual
Codesys controller for cpx terminal.
Hide thumbs
Also See for CPX-CEC-C1:
- Manual (73 pages) ,
- Electronic manual (87 pages) ,
- Manual (59 pages)

Related Manuals for Festo CPX-CEC-C1


Summary of Contents for Festo CPX-CEC-C1
- Page 1 CPX Terminal Electronics Manual CoDeSys Controller Type CPX−CEC−C1 Manual 569 122 en 0907NH [745 684]...
- Page 3 ....... . . 569 122 © (Festo AG & Co. KG, D 73726 Esslingen, Germany, 2009) Internet: http://www.festo.com E−Mail:...
- Page 4 This product uses open−source software which is subject to the GNU General Public License, Version 2". The licensing conditions of the GPL are located either in the product’s engineering tool or at the following addresses: http://<IP address of the device>/product−information.html http://www.gnu.org/copyleft/gpl.html Festo P.BE−CPX−CEC−E N en 0907NH...
-
Page 5: Table Of Contents
......1−5 The CoDeSys provided by Festo programming environment ... . . - Page 6 ............B−1 Festo P.BE−CPX−CEC−E N en 0907NH...
-
Page 7: Designated Use
The type CPX−CEC−C1 CoDeSys−Controller documented in this manual is intended exclusively for use in Festo CPX terminals for installation in a machine or an automation control system. In combination with a CPX terminal, the CPX−CEC−C1 is used for controlling pneumatic and electric actuators (valves,... -
Page 8: Safety Instructions
Make sure that no persons are in the operating range of · the drives or any other connected actuators. Do not switch on the compressed air supply until the · system is correctly installed and parameterised. Festo P.BE−CPX−CEC−E N en 0907NH... - Page 9 Do not connect, disconnect or open pressurised tubing. · The tubing must always be vented before removal · (release compressed air). Use suitable protective equipment (e.g. safety goggles, · safety shoes, etc.). Festo P.BE−CPX−CEC−E N en 0907NH...
-
Page 10: Target Group
This manual is intended exclusively for technicians trained in control and automation technology, who have experience in installing, commissioning, programming and diagnosing positioning systems. Service Please consult your local Festo Service if you have any technical problems. VIII Festo P.BE−CPX−CEC−E N en 0907NH... -
Page 11: Important User Instructions
... means that failure to observe this instruction may result in damage to property. The following pictogram marks passages in the text which describe activities with electrostatically sensitive compo nents: Electrostatically sensitive components: Improper handling can result in damage to components. Festo P.BE−CPX−CEC−E N en 0907NH... - Page 12 Pictograms Information Recommendations, tips and cross−references to other information sources. Accessories: Information on necessary or useful accessories for the Festo product. Environment: Information on the environmentally friendly use of Festo products. Text markings The bullet indicates activities which may be carried out in ·...
-
Page 13: Notes On The Use Of This Manual
Notes on the use of this manual This manual refers to the following versions: CoDeSys Controller CPX−CEC−C1 from software status Rev. 01 Programming environment CoDeSys provided by Festo from Version 2.3 This manual contains information on the function, fitting, installation and commissioning of the the CPX−CEC−C1 type CoDeSys Controller. - Page 14 Ethernet Physical protocol and network for connecting various devices FHPP (Festo Handling and Uniform field bus data profile for positioning controllers from Festo Positioning Profile) Field bus node Provides the connection to specific field buses. Transmits control signals to the connected modules and monitors their ability to function.
- Page 15 A target support package combines all configuration and expansion files Package) that are needed to make a specific controller (target) usable for the programming environment CoDeSys provided by Festo. UDP (User Datagram A minimal, connectionless network protocol that has a lower protocol Protocol) overheat compared to TCP.
- Page 16 Contents and general instructions Festo P.BE−CPX−CEC−E N en 0907NH...
-
Page 17: System Summary
System summary Chapter 1 1−1 Festo P.BE−CPX−CEC−E N en 0907NH... - Page 18 ......1−5 The CoDeSys provided by Festo programming environment ... . .
-
Page 19: The Codesys Controller Cpx−Cec
The CoDeSys controller CPX−CEC−... The CoDeSys controller CPX−CEC−... is a modern control system for CPX terminals, which makes it possible to program with CoDeSys provided by Festo as per IEC 61131−3. The CoDeSys controller is available in the following variants: Variant... - Page 20 1. System summary Characteristics of the CoDeSys controller Programming with CoDeSys provided by Festo as per IEC 61131−3 Programming and communication via Ethernet Process visualisation within CoDeSys provided by Festo, with a type FED operator unit or with the software VipWin...
-
Page 21: The Operating Modes Of The Cpx−Cec−C1
Remote Controller Field Bus (field bus node required) The individual operating modes are briefly presented in the following: Stand Alone operating mode CPX−CEC−C1 CPX terminal controlled by the CPX−CEC−C1 Fig. 1/1: Stand Alone operating mode 1−5 Festo P.BE−CPX−CEC−EN en 0907NH... - Page 22 1. System summary Remote Controller Ethernet operating mode Ethernet CPX−CEC−C1 connected to an Ethernet network for communication CPX terminal controlled by the CPX−CEC−C1 Fig. 1/2: Remote Controller Ethernet operating mode 1−6 Festo P.BE−CPX−CEC−EN en 0907NH...
- Page 23 CPX−CEC−C1 connected to the field bus for communication over the field bus node. CPX field bus node, hier: CPX−FB13 CPX terminal controlled by CPX−CEC−C1 Fig. 1/3: Remote Controller Field Bus operating mode (field bus node required) 1−7 Festo P.BE−CPX−CEC−EN en 0907NH...
-
Page 24: The Codesys Provided By Festo Programming Environment
1. System summary The CoDeSys provided by Festo programming environment Use CoDeSys provided by Festo to commission and program the CoDeSys controller. CoDeSys provided by Festo offers a convenient user interface with the following functions: Configuration and parameterisation of the CPX−CEC−C1 with control configuration Programming as per IEC 61131−3... - Page 25 1. System summary CoDeSys provided by Festo is supplied with the Target Support Package for the CoDeSys controller. It also contains additional functions that are specially adapted to the CoDeSys controller. Information about which functions of CoDeSys provided by Festo are supported by the CoDeSys controller and which additional functions are available can be found in the online help (key word Functional Overview").
-
Page 26: Programming Languages
1. System summary 1.3.1 Programming languages CoDeSys provided by Festo offers five of the programming languages standardised in IEC 61131−3; see Tab. 1/2. Each of these programming languages has certain characteristics that are especially suited for solving specific tasks. Programming... -
Page 27: Libraries
1. System summary 1.3.2 Libraries To make programming easier, CoDeSys provided by Festo makes it possible to organise into libraries objects that are usable independently of projects, such as modules, declarations and visualisations. A library administrator, with which you can integrate and view libraries, is available for this purpose. -
Page 28: Meaning Of The Led Displays
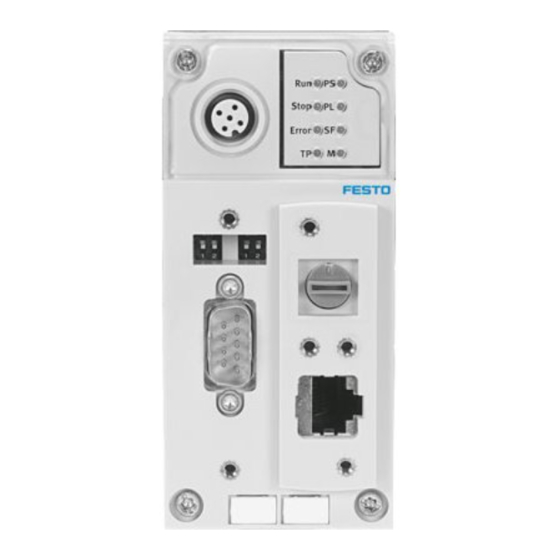
Meaning of the LED displays The LEDs on the cover indicate the operating status of the CPX−CEC−C1 and are arranged in two groups. Controller LEDs (see section 4.2) STOP ERROR CPX−specific LEDs Fig. 1/4: LED displays of the CPX−CEC−C1 1−12 Festo P.BE−CPX−CEC−EN en 0907NH... -
Page 29: Cpx−Specific Leds
(default) Power off/on is necessary · The operating voltage/ Check the operating voltage sensor supply is not connection of the electronics applied LED is off Tab. 1/3: Displays of the LED PS 1−13 Festo P.BE−CPX−CEC−EN en 0907NH... - Page 30 The system error LED flashes depending on the class of error which has occurred. Error class 1 (minor error): flash once, pause Error class 2 (error): flash twice, pause Error class 3 (serious error): flash three times, pause Tab. 1/5: Displays of the LED SF 1−14 Festo P.BE−CPX−CEC−EN en 0907NH...
- Page 31 The Force function is enabled (see CPX system manual, system parameter Force mode; function LED flashes no. 4402). Tab. 1/6: Displays of the LED M Information on the controller LEDs can be found in section 4.2. 1−15 Festo P.BE−CPX−CEC−EN en 0907NH...
- Page 32 1. System summary 1−16 Festo P.BE−CPX−CEC−EN en 0907NH...
-
Page 33: Installation
Installation Chapter 2 2−1 Festo P.BE−CPX−CEC−E N en 0907NH... - Page 34 ......2−17 Complying with protection class IP65/IP67 ......2−18 2−2 Festo P.BE−CPX−CEC−E N en 0907NH...
-
Page 35: General Installation Instructions
EMERGENCY STOP (e.g. switching off power sources, load voltage supply, compressed air, etc.). Information about fitting the CPX terminal can be found in the CPX system manual type P.BE−CPX−SYS−... 2−3 Festo P.BE−CPX−CEC−EN en 0907NH... -
Page 36: Dismantling And Fitting
TORX screwdriver size T10. 2. Pull the CoDeSys controller carefully and without tilting away from the contact rails of the interlinking block. CPX−CEC−C1 Interlocking block Contact rails Screws Fig. 2/1: Dismantling/fitting of the CoDeSys controller 2−4 Festo P.BE−CPX−CEC−EN en 0907NH... -
Page 37: Fitting
4. Place the screws so that the self−cutting threads can be used. Tighten the screws by hand. 5. Tighten the screws with a TORX screwdriver size T10 with torque 0.9 ... 1.1 Nm. 2−5 Festo P.BE−CPX−CEC−EN en 0907NH... -
Page 38: Connection And Display Elements
CPX−CEC−C1: Status LEDs DIL switch 1 RUN/STOP rotary switch DIL switch 2 Ethernet interface Connection for a handheld of (10/100BaseT, RJ45) type CPX−MMI CANopen interface (9−pin Sub−D plug) Fig. 2/2: Connection and display elements CPX−CEC−C1 2−6 Festo P.BE−CPX−CEC−EN en 0907NH... -
Page 39: Setting Of The Switches Of The Codesys Controller
Rotary switch Setting Meaning STOP CPX−CEC−C1 stopped The STOP LED lights up yellow 1 ... F CPX−CEC−C1 started The RUN LED lights up green Tab. 2/1: Switch settings of the RUN/STOP rotary switch 2−7 Festo P.BE−CPX−CEC−EN en 0907NH... -
Page 40: Dil Switches
CPX−CEC−C1 DIL switch 2 Termination switched off DIL 2.1: OFF DIL 2.2: OFF Termination switched on DIL 2.1: ON DIL 2.2: OFF All further switch settings are reserved. Tab. 2/3: Setting the CAN bus termination 2−8 Festo P.BE−CPX−CEC−EN en 0907NH... -
Page 41: Ethernet Interface
Metal covering Shield Screening Tab. 2/4: Pin assignment of the Ethernet interface If the Ethernet interface is not used, close it with the AK−RJ45 cover. In this way you will comply with protection class IP65/IP67. 2−9 Festo P.BE−CPX−CEC−EN en 0907NH... -
Page 42: Ethernet Cable
PC, you will require a patch or crossover cable. The interface automatically recognises which cable is connected and automatically converts the signals. Note Use the RJ−45 plug from Festo in order to comply with protection class IP65/IP67. Type FBS−RJ45−8−GS Observe the fitting instructions for the plug. -
Page 43: Communication Interfaces
If a drive controller with external voltage supply is connected, CAN ground (optional), pin 6 cannot be used on the CPX−CEC−C1. FE: Functional earthing Tab. 2/5: Pin assignment for the CANopen interface The connected CAN bus slaves are not supplied with power over the CANopen interface. 2−11 Festo P.BE−CPX−CEC−EN en 0907NH... - Page 44 Use a twisted, screened 4−core cable as CAN bus line. The CoDeSys controller communicates with the drive controllers via the CAN bus line. If the Festo CAN bus plug is used, a cable diameter of 5 ... 8 mm or 7 ... 10 mm is permitted. Note...
- Page 45 You can disconnect the plug from the node without interrupting the bus cable (T−Tap function). Note The clamp strap in the Festo CAN bus plug is connected only capacitively internally with the metal housing of the Sub−D plug. This prevents equalizing currents from flowing via the screening of the CAN bus cable (Fig.
- Page 46 Clamp strap for screening connection Protective cap if connection is not used CAN bus outgoing (OUT) CAN bus incoming (IN) Sub−D plug connected capacitively Fig. 2/4: CAN bus plug from Festo, type FBS−SUB−9−BU−2x5POL−B 2−14 Festo P.BE−CPX−CEC−EN en 0907NH...
- Page 47 CAN bus interface. Connect the screen. · There are further possibilities of connecting the CAN bus with adapters, which can be ordered separately from Festo. These adapters and additional accessories can be found under: è www.festo.com/catalogue M12 adapter 5−pin (protection class IP65), type FBA−2−M12−5POL...
-
Page 48: Connection Of An Operator Unit Type Fed
Fig. 2/5: CPX terminal with CPX−CEC−C1 and operator unit type FED incl. optional Ethernet interface Connect an operator unit of type FED with Ethernet interface to the CoDeSys controller using an Ethernet cable. 2−16 Festo P.BE−CPX−CEC−EN en 0907NH... -
Page 49: Connection Of A Handheld Type Cpx−Mmi
To ensure the consistency of the displayeed data, the connection to the CPX−MMI is interrupted during a program download. Use only the following original cables (è www.festo.com/catalogue) for connecting the handheld: Type Cable length in [m] KV−M12−M12−3,5 KV−M12−M12−1,5 Tab. -
Page 50: Complying With Protection Class Ip65/Ip67
Connecting cable and Protective cap plug of the CPX −MMI type ISK−M12 Rotary switch Cover type AK−RJ45 If connection is not used Included in scope of delivery Tab. 2/7: Connections and covers for protection class IP65/IP67 2−18 Festo P.BE−CPX−CEC−EN en 0907NH... -
Page 51: Commissioning
Commissioning Chapter 3 3−1 Festo P.BE−CPX−CEC−E N en 0907NH... - Page 52 ............3−14 3−2 Festo P.BE−CPX−CEC−E N en 0907NH...
-
Page 53: Prerequisites For Commissioning
· actuators and without compressed air. 1. Install the program environment CoDeSys provided by Festo on a PC on which you carry out commissioning, configuration and programming. Detailed installation instructions can be found on the accompanying CD ROM. Observe the instructions on the cover of the CD−ROM. - Page 54 9. Select the desired CoDeSys controller. 10. Carry out the Set as active PLC" function. 11. Back up the project. You can now log in to the controller, if necessary. Fig. 3/1: Network configuration using the example of the CPX−CEC−C1 3−4 Festo P.BE−CPX−CEC−EN en 0907NH...
-
Page 55: Configuration Of The Cpx Modules
1. Click in the window PLC Configuration" on the nodes to the left of the CPX−CEC−... 2. Click with the right mouse key on the element IOModules[FIX]". Fig. 3/2: Configuration of the CPX modules Now you can perform module configuration automatically or manually. 3−5 Festo P.BE−CPX−CEC−EN en 0907NH... - Page 56 The I/O modules of a CPI module are not included in automatic module configuration. In this case, carry out a manual module configuration (see next section) or perform the Scan" function in the CP Modules" register. Fig. 3/3: CP Modules" register 3−6 Festo P.BE−CPX−CEC−EN en 0907NH...
- Page 57 The rotary switch of the CPX−CEC−C1, for example, occupies only 4 bits of inputs, but 4 bytes are reserved. Alternatively, you can also manually address the inputs and outputs. Information can be found in the online help. 3. Back up the project. 3−7 Festo P.BE−CPX−CEC−EN en 0907NH...
-
Page 58: Configuration Of The Canopen Slaves
You will find detailed information on configuration of the CANopen slaves in the online help and in the file CANopen for 3S Runtime Systems V2_...pdf" in the installation directory of CoDeSys provided by Festo. 3−8 Festo P.BE−CPX−CEC−EN en 0907NH... -
Page 59: Parameterisation
Power OFF/ON Handheld type CPX−MMI Parameterisation is carried Parameterisation is saved only locally out via menu−listed entries in the CPX terminal and is lost with with the handheld Power OFF/ON Tab. 3/1: Possibilities of parameterisation 3−9 Festo P.BE−CPX−CEC−E N en 0907NH... -
Page 60: Parameterisation Via Control Configuration In Codesys
In the following, parameterisation is described using the example of the Root node: Click in PLC Configuration" on the symbol for the · CPX−CEC. Settings Set the following parameters in the Settings" register, · if necessary: Fig. 3/4: Settings" register 3−10 Festo P.BE−CPX−CEC−E N en 0907NH... - Page 61 CoDeSys controller: Fig. 3/5: Module #0" register Network configuration (logout) Look for the controller for which you want to prepare the · new CoDeSys project in the Network configuration" register: Fig. 3/6: Network configuration" register 3−11 Festo P.BE−CPX−CEC−E N en 0907NH...
- Page 62 System parameters Set the system parameters in the System Parameters" · register: Fig. 3/7: System Parameters" register Trace parameters Set the following parameters in the Trace Parameters" · register: Fig. 3/8: Trace Parameters" register 3−12 Festo P.BE−CPX−CEC−E N en 0907NH...
-
Page 63: Parameterisation Via The Handheld Type Cpx−Mmi
Note Parameterisations via the handheld are saved only locally in the CPX terminal and are lost with Power OFF/ON. Further information on parameterising with the handheld can be found in the manual type P.BE−CPX−MMI−1−... 3−13 Festo P.BE−CPX−CEC−E N en 0907NH... -
Page 64: Forcing
LED. However, the forced output signal is not transferred to the processing image of the outputs. The online display in CoDeSys provided by Festo does not show the forced, physical output signal, but the status from the processing image. 3−14... - Page 65 3. Commissioning Note The online display in CoDeSys provided by Festo always shows the signal status valid in the process diagram. When forcing with the handheld type CPX−MMI, observe the following: Forced input states are transferred to the processing image and therefore recognized by the controller.
- Page 66 3. Commissioning 3−16 Festo P.BE−CPX−CEC−E N en 0907NH...
-
Page 67: Diagnosis
Diagnosis Chapter 4 4−1 Festo P.BE−CPX−CEC−E N en 0907NH... - Page 68 ........4−7 4−2 Festo P.BE−CPX−CEC−E N en 0907NH...
-
Page 69: General Error Response Of The Codesys Controller
The CoDeSys controller makes available the following error handling mechanisms in user programs: System event CPX_system_fault Channel/module diagnosis in the flag words Module support in the Festo_CPX.lib You will find detailed information on error handling in user programs in the online help. 4−3 Festo P.BE−CPX−CEC−EN en 0907NH... - Page 70 Online diagnosis without See online help programming User program Detailed diagnostic evaluation: See online help System event CPX_system_fault Channel/module diagnosis in the flag words Module support in the Festo_CPX.lib Tab. 4/1: Diagnostics options of the CoDeSys controller 4−4 Festo P.BE−CPX−CEC−EN en 0907NH...
-
Page 71: Diagnosis Via Controller Leds
(RUN/STOP switch is in position 0") LED lights up PLC program started Set RUN/STOP · (RUN/STOP switch is in switch to position LED is off position 1 ... F") 0" Tab. 4/3: Displays of LED STOP 4−5 Festo P.BE−CPX−CEC−EN en 0907NH... - Page 72 LED lights up Data transfer active (LED flashes irregularly) LED flashes Ethernet connection to the Check · parameterisation PC not OK the connection the IP address LED is off Tab. 4/5: Displays of the LED TP 4−6 Festo P.BE−CPX−CEC−EN en 0907NH...
-
Page 73: Further Diagnostics Options
CPX−MMI can be found in the CPX system manual type P.BE−CPX−SYS−... You will find detailed information on diagnostics for the controller configuration in CoDeSys provided by Festo and user programs in the online help. 4−7 Festo P.BE−CPX−CEC−EN en 0907NH... - Page 74 4. Diagnosis 4−8 Festo P.BE−CPX−CEC−EN en 0907NH...
- Page 75 Technical appendix Appendix A A−1 Festo P.BE−CPX−CEC−E N en 0907NH...
-
Page 76: A. Technical Appendix
..........A−3 A−2 Festo P.BE−CPX−CEC−E N en 0907NH... -
Page 77: A.1 Technical Data
200 s/1k instructions LED display (bus−specific) Ethernet connection: link/traffic LED display (product−specific) RUN: PLC status: started STOP: PLC status: stopped ERR: PLC run−time error Electronic supply, sensor supply Load supply System fault Modify/forcing active A−3 Festo P.BE−CPX−CEC−E N en 0907NH... - Page 78 20 ... 70 °C Ambient temperature 5 ... 50 °C Relative air humidity 95 %, non−condensing Product weight 155 g Dimensions W x L x H 50 mm x 107 mm x 55 mm A−4 Festo P.BE−CPX−CEC−E N en 0907NH...
- Page 79 Index Appendix B B−1 Festo P.BE−CPX−CEC−E N en 0907NH...
-
Page 80: B. Index
B. Index B−2 Festo P.BE−CPX−CEC−E N en 0907NH... - Page 81 ........3−14 Front end display (FED) ......2−16 B−3 Festo P.BE−CPX−CEC−E N en 0907NH...
- Page 82 ....... 2−9 Protection class IP65/IP67 ..... . . 2−18 B−4 Festo P.BE−CPX−CEC−E N en 0907NH...
- Page 83 ........B−5 Festo P.BE−CPX−CEC−E N en 0907NH...
- Page 84 B. Index B−6 Festo P.BE−CPX−CEC−E N en 0907NH...
Need help?
Do you have a question about the CPX-CEC-C1 and is the answer not in the manual?
Questions and answers