Table of Contents
Advertisement
Quick Links
Advertisement
Table of Contents

Subscribe to Our Youtube Channel
Related Manuals for ATEN VC1280


Summary of Contents for ATEN VC1280
- Page 1 2-Port 4K HDMI / VGA to HDMI Converter Switch VC1280 User Manual www.aten.com...
-
Page 2: Emc Information
VC1280 User Manual EMC Information FEDERAL COMMUNICATIONS COMMISSION INTERFERENCE STATEMENT: This equipment has been tested and found to comply with the limits for a Class A digital device, pursuant to Part 15 of the FCC Rules. These limits are designed to provide reasonable protection against harmful interference when the equipment is operated in a commercial environment. -
Page 3: User Information
VC1280 User Manual User Information Online Registration Be sure to register your product at our online support center: International http://eservice.aten.com Telephone Support For telephone support, call this number: International 886-2-8692-6959 China 86-400-810-0-810 Japan 81-3-5615-5811 Korea 82-2-467-6789 North America 1-888-999-ATEN ext 4988... -
Page 4: Package Contents
VC1280 User Manual Package Contents 1 VC1280 2-Port 4K HDMI / VGA to HDMI Converter Switch 1 RS-232 Terminal Block 1 Power Adapter 1 User Instructions Note:Make sure that all of the components are present and in good order. If anything is missing or was damaged in shipping, contact your dealer. -
Page 5: Table Of Contents
Connecting the VC1280 Unit ........8... - Page 6 VC1280 User Manual Appendix Safety Instructions......... . . 19 General .
-
Page 7: About This Manual
VC1280 User Manual About this Manual This user manual is provided to help you get the most from the VC1280 unit. It covers all aspects of installation, configuration, and operation. An overview of the information found in the manual is provided below. -
Page 8: Conventions
For information about all ATEN products and how they can help you connect without limits, visit ATEN on the Web or contact an ATEN Authorized Reseller. Visit ATEN on the Web for a list of locations and telephone numbers: International http://www.aten.com... -
Page 9: Introduction
The VC1280 offers three source switching modes – HDMI, VGA, and AUTO, it allows you to switch rapidly and intuitively via a pushbutton for real-time use. When the VC1280 operates on the AUTO input mode, it transmits the first detected input to the HDMI display, and automatically switches to a newly plugged-in source when it detects the signals. -
Page 10: Features
Superior video quality – up to 4K (3840 x 2160 @ 30Hz) RS-232 Channel Transmission – allows you to connect to serial terminals or serial devices for firmware upgrade Supports Auto Switch – the VC1280 automatically switches to a newly plugged-in source Supports Consumer Electronic Control (CEC) ... -
Page 11: Planning The Installation
Computer to the VC1280 1.8 m HDMI VC1280 to the display HDMI Compatible Products The VC1280 is compatible with a wide range of ATEN video splitters, video switches, and video extender transmitters. Visit our official web site for more details. -
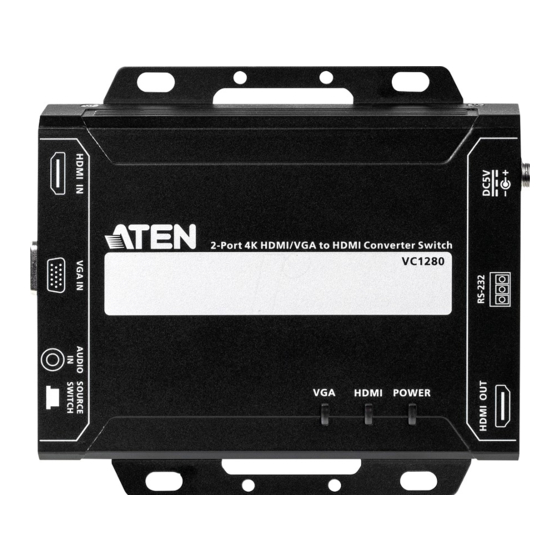
Page 12: Components
LEDs to the right of this pushbutton. For details, see Top View, page 6. Auto LED When LED lights orange, it means the VC1280 is in Auto mode. For more details, see Source Input Operation, page 9. HDMI LED When LED lights orange, it means the VC1280 is in HDMI mode. -
Page 13: Rear View
VC1280 User Manual Rear View No. Component Description HDMI Out Port Connects to the HDMI In port on the display device. RS-232 Port Connects to an RS-232 main controller, such as a PC or Control system. Power Jack Connects to the Power Adapter. -
Page 14: Top View
Chapter 1. Introduction Top View You can find the unit’s LEDs on the top and front panel as illustrated below. See the table below for details on LED indication. 1 2 3 No. LED Indication Description VGA Input Status LED Lights green The VGA signal is stable. -
Page 15: Hardware Setup
Hardware Setup 1. Please review the safety information regarding the placement of this device in Safety Instructions, page 19. 2. Do not power on the VC1280 until all the necessary hardware is connected. Mounting the VC1280 Unit You can mount the VC1280 to the wall or on a rack. -
Page 16: Connecting The Vc1280 Unit
VC1280 (Rear) VC1280 (Front) 1. Connect the HDMI In Port on the VC1280 to the HDMI Out Port on your video source device using an HDMI cable. 2. Connect the VGA In Port on the VC1280 to the VGA Out Port on your video source device using a VGA cable. -
Page 17: Operation
Chapter 3 Operation Selecting the Input Mode Source Input Operation Press the Source Switch Pushbutton on the VC1280 to switch between different input modes - Auto, HDMI, and VGA mode. Refer to the table below for details. Input Mode Description... -
Page 18: Source Switch Pushbutton
Chapter 3. Operation Source Switch Pushbutton Press the Source Switch Pushbutton located on the front panel to switch among the Auto Switch, HDMI, and VGA input mode Auto LED HDMI LED VGA LED Source Switch Pushbutton RS-232 Commands You can change the input mode using RS-232 commands. Refer to the table below for a list of available tasks and the corresponding commands. -
Page 19: The Firmware Upgrade Utility
Introduction The purpose of the Windows-based Firmware Upgrade Utility is to provide an easy process for upgrading the VC1280. The program comes as part of a Firmware Upgrade Package that is specific for each device. As new firmware versions become available, new firmware upgrade packages are posted on our website. -
Page 20: Preparation
To prepare for the firmware upgrade, do the following: 1. Use an RS-232 cable to connect a COM port on your computer to the RS- 232 Serial Port of your VC1280 using the RS-232 Terminal Block provided in the package. -
Page 21: Starting The Upgrade
VC1280 User Manual Starting the Upgrade To upgrade the firmware: 1. Run the downloaded firmware upgrade package file either by double- clicking the file icon, or by opening a command line and entering the full path to it. The Firmware Upgrade Utility welcome screen appears: Note:The screens shown in this section are for reference only. - Page 22 Chapter 4. The Firmware Upgrade Utility 4. Click Next to perform the upgrade. The Status LEDs VGA, HDMI, and power will flash while the upgrade is in process. If you enabled Check Firmware Version, the Utility compares the device's firmware level with that of the upgrade files. If it finds that the device's version is higher than the upgrade version, it brings up a dialog box informing you of the situation and gives you the option to continue or cancel.
- Page 23 VC1280 User Manual If you didn't enable Check Firmware Version, the Utility installs the upgrade files without checking whether they are a higher level, or not. Status messages appear in the Status Messages panel, and the progress toward completion is shown on the Progress bar.
-
Page 24: Upgrade Succeeded
Chapter 4. The Firmware Upgrade Utility Upgrade Succeeded After the upgrade has completed, all port LEDs will stop flashing and a screen appears to inform you that the procedure was successful: Click Finish to close the Firmware Upgrade Utility. Upgrade Failed If the Upgrade Succeeded screen doesn't appear, it means that the upgrade failed to complete successfully. -
Page 25: Firmware Upgrade Recovery
VC1280 User Manual Firmware Upgrade Recovery There are three conditions that call for firmware upgrade recovery: When a firmware upgrade is manually aborted. When the mainboard firmware upgrade fails. When the I/O firmware upgrade fails. To perform a firmware upgrade recovery, do the following: 1. - Page 26 Chapter 4. The Firmware Upgrade Utility This Page Intentionally Left Blank...
-
Page 27: Appendix
Appendix Safety Instructions General This product is for indoor use only. Read all of these instructions. Save them for future reference. Follow all warnings and instructions marked on the device. Do not place the device on any unstable surface (cart, stand, table, etc.). If the device falls, serious damage will result. - Page 28 Appendix If an extension cord is used with this device make sure that the total of the ampere ratings of all products used on this cord does not exceed the extension cord ampere rating. Make sure that the total of all products plugged into the wall outlet does not exceed 15 amperes.
-
Page 29: Rack Mounting
VC1280 User Manual Rack Mounting Before working on the rack, make sure that the stabilizers are secured to the rack, extended to the floor, and that the full weight of the rack rests on the floor. Install front and side stabilizers on a single rack or front stabilizers for joined multiple racks before working on the rack. -
Page 30: Technical Support
Support Documentation Software Updates Telephone Support 1-888-999-ATEN ext 4988 When you contact us, please have the following information ready beforehand: Product model number, serial number, and date of purchase Your computer configuration, including operating system, revision level, expansion cards, and software ... -
Page 31: Specifications
VC1280 User Manual Specifications Function Specifications Video Input Interfaces 1 x HDMI Type A Female (Black) 1 x VGA HDB-15 Female (Blue) Impedance HDMI: 100 Ώ VGA HDB-15: 75 Ώ Max. Distance 1.8 m - VGA HDB-15 (1920 x 1200) - Page 32 Appendix Function Specifications Power Connectors 1 x DC Jack (Black) with locking Consumption DC 5V:1.8W:8BTU Environmental Operating Temperature 0 - 40°C Storage Temperature -20 - 60°C Humidity 0 x 80% RH, Non-Condensing Physical Properties Housing Metal Weight 0.43 Kg (1.04 lb) Dimensions (L x W x H) 14.32 x 12.30 x 3.00 cm (5.64 x 4.84 x 1.18 in.) with Bracket...
-
Page 33: Limited Warranty
What is covered by the Limited Hardware Warranty ATEN will provide a repair service, without charge, during the Warranty Period. If a product is detective, ATEN will, at its discretion, have the option to (1) repair said product with new or repaired components, or (2) replace the entire product with an identical product or with a similar product which fulfills the same function as the defective product.
Need help?
Do you have a question about the VC1280 and is the answer not in the manual?
Questions and answers