
Related Manuals for Samus SM450 Series


Summary of Contents for Samus SM450 Series
- Page 1 FREE STANDING OVEN 50x50 Gas & Electrical Oven USER MANUAL MANUAL DE UTILIZARE...
- Page 2 Dear User, Our objective is to make this product provide you with the best output which is manufactured in our modern facilities in a careful working envi- ronment, in compliance with total quality concept. Therefore, we suggest you to read the user manual carefully before us- ing the product and, keep it permanently at your disposal.
-
Page 3: Table Of Contents
CONTENTS Important warnings Introduction of the Appliance Important warnings Electrical Connection Scheme Chain Lashing Illustration Installation Of Your Oven Technical Features Of Your Oven If The Appliance Does Not Operate Description Of Oven And Control Panels Control Panels Using Cooker Section Using Hot Plates Using Oven Section Cooking Time Table... -
Page 4: Important Warnings
IMPORTANT WARNINGS 1.WARNING: To avoid electrocution, ensure that the electri- cal circuit of the product is open before replacing the lamp. 2.WARNING:Before touching the connection terminals, all supply circuit should be disconnected. 3.WARNING:While operating the grill, the reachable sec- tions can be hot. Keep the children away. 4.WARNING:Any inadvertent cooking made with fats and oils can be dangerous and cause fire. - Page 5 during when the appliance in use, ensure that the kitchen is well ventilated and retain the natural venti- lation holes or install a mechanical ventilation system. (Hood on top of the oven) Sustained usage of the ap- pliance may require additional ventilation. For example opening a window or if available, increasing the venti- lation level of a mechanical ventilation system.
- Page 6 seconds stop the operation of the system and open the section door and/or wait for at least 1 minute be- fore igniting the burner. 19.Do not use steam cleaners to clean the appliance. 20.Before opening the oven door clean the remnants on it.
-
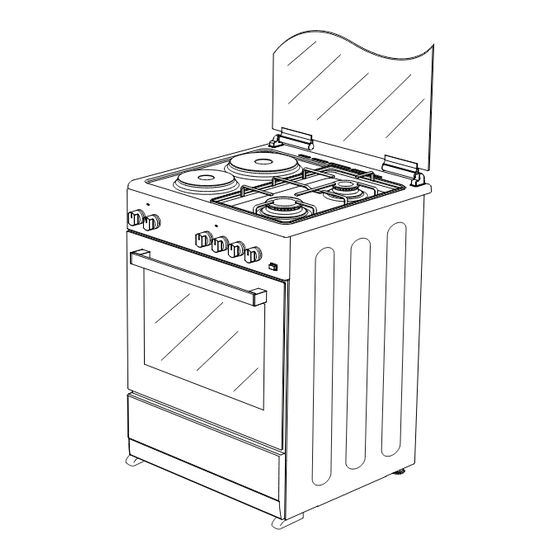
Page 7: Introduction Of The Appliance
INTRODUCTION OF THE APPLIANCE 8. Glass Door 15. Push Button (Sheet Metal Door*) Lighter 1. Hotplate Ø145mm* 9. Cooker Section Led Lamp* 16. Deep Tray* 2. Hotplate Ø180mm* 10. Oven Section Led Lamp* 17. Door 3. Middle Burner 11. Control Panel 18. -
Page 8: Important Warnings
IMPORTANT WARNINGS Electrical Connection and Security 1.Your oven requires 16 or 32 Ampere fuse according to the appliance’s power. If necessary, installation by a qualified electrician is recommended. 2.Your oven is adjusted in compliance with 220-240V~50/60Hz. (220-240V AC /380-415V 3NAC,50/60Hz.) electric supply. If the mains are different from this specified value, contact your authorized service. -
Page 9: Electrical Connection Scheme
fix the appliance to the wall using the chain and hooked screw supplied. Ensure that the hook is screwed into the wall securely. 8.Please use flexible hose for gas connection. ELECTRICAL CONNECTION SCHEME FUSE SWITCH (25A/40A) CONSUMER UNIT 3x4mm² 3x4mm² JUNCTION BOX 610mm 400V 3N~50/60Hz... -
Page 10: Installation Of Your Oven
INSTALLATION OF YOUR OVEN 20 mm 20 mm 500 -600 mm min. TECHNICAL FEATURES OF YOUR OVEN SPECIFICATIONS 50x50 Outer width 500mm Outer depth 510mm Outer height 850mm Lamp power Bottom heating element 1000W Top heating element 800W Grill heating element 1500W 220-240V AC,50/60Hz Or Supply Voltage... -
Page 11: If The Appliance Does Not Operate
BURNER INJECTOR VALUES ACCORDING TO G20/20 mbar G25/25 mbar G31/37 mbar THE GAS TYPE Injector Ø mm 0,96 1,30 1,30 Power kW 3,50 3,50 3,50 Burner Consuption 0,330 0,330 Gr/h,m³/h Injector Ø mm 0,85 1,15 1,15 Rapid Power kW 2,90 2,90 2,90 Burner... -
Page 12: Description Of Oven And Control Panels
DESCRIPTION OF OVEN and CONTROL PANELS Tumspit Top + Bottom heating Turbo heating + Fan element Bottom + Top heating Lamp elements + Fan Bottom heating element Grill heating element+Fan + Fan Grill burner / Grill heating Grill heating element element Grill heating Top heating element... - Page 13 Front Rear Rear left Front left Grill burner Oven burner Timer Thermostat electric electric burner burner or heating (optional) (optional) (optional) hot plate hot plate (middle (big element or heating burner) burner) element...
-
Page 14: Using Cooker Section
USING COOKER SECTION Using Gas Burners: Closed WOK Burner 24-28cm Big Burner 22-24cm Fully open Normal Burner 18-22cm Small Burner 12-18cm Half open 1. In order to obtain maximum output, be careful that the saucepan which will be used should be flat bottomed, and use the saucepans with dimensions given herein above. -
Page 15: Using Hot Plates
USING HOT PLATES LEVEL 1 LEVEL 2 LEVEL 3 LEVEL 4 LEVEL 5 LEVEL 6 80mm 200W 250W 450W 145mm 250W 750W 1000W 180mm 500W 750W 1500W 145mm rapid 500W 1000W 1500W 180mm rapid 850W 1150W 2000W 145mm 155W 250W 400W 750W 1000W... -
Page 16: Using Oven Section
USING OVEN SECTION Using oven burners 1. If your oven equipped with burners that operates with gas, appropri- ate knob should be used in order to ignite the burners. Some models have automatic ignition from the knob; it is easy to ignite the burner by turning the knob. -
Page 17: Cooking Time Table
COOKING TIME TABLE Meals Temperature (°C) Rack Position Cooking Time (min.) Creamed cake 150-170 30-35 Pastry 200-220 35-45 Biscuit 160-170 20-25 Cookie 160-170 20-35 Cake 160-180 25-35 Braided cookie 200-220 30-40 Filo Pastry 180-220 35-45 Savory pastry 160-180 20-30 Lamb meat 210-230 90-120 Veal... -
Page 18: Installation Of The Oven Door
INSTALLATION OF THE OVEN DOOR Figure 3 Figure 4 Figure 3.1 Figure 3.2 Figure 4.1 Figure 4.2 Completely open Bring the hinge Afterwards, close To remove the the oven door by lock to the widest the oven door as to oven door, pull it pulling it to your- angle as shown in... -
Page 19: Changing The Oven Lamp
CHANGING THE OVEN LAMP In order to avoid the possibility of an electric shock, ensure that the circuit of the appliance is open before changing the lamp. (The open-cir- cuit is an electrical circuit that does not conduct current.) 1- First of all, cut the electrical connection of the appliance and ensure that the appliance is cooled down. -
Page 20: Accesories
ACCESORIES *Deep Tray Used for pastries, deep fried foods and stew recipes. In case of frying directly on the grill for cakes, frozen foods and meat dishes, it can be used of oil pick-up tray. Tray Used for pastries (cookies, biscuits etc.) and frozen foods. -
Page 21: Reduced Gas Flow Rate Setting For Hob Taps
1. Please use driver with special head for removed and install nozzle as (Figure-8) 2. Please remove nozzle (Figure -9) from burner with special nozzle driver and install new nozzle (Figure -10) Figure-8 Figure-9 Figure-10 REDUCED GAS FLOW RATE SETTING FOR HOB TAPS 1. -
Page 22: Removal Of The Lower And Upper Burner And Installation Of The Injector To The Gas Oven
REMOVAL OF THE LOWER AND UPPER BURNER AND INSTALLATION OF THE INJECTOR TO THE GAS OVEN Removal of the Upper Burner: With the help of a screw driver, remove the screw as shown in Figure 13. As shown in Figure 14, remove the burner from its place by pulling it to yourself. -
Page 23: Gas Hose Passage Way
GAS HOSE PASSAGE WAY 1. Connect the appliance to the gas pip- ing tap in shortest possible route and in a way that ensure no gas leakage will occur. 2. In order to carry on a tightness and sealing safety check ensure that the knobs on the control panel are closed and the gas cylindir is open. -
Page 24: Using The Grill Deflector Sheet
USING THE GRILL DEFLECTOR SHEET* 1. A safety panel is designed to protect control panel and the but- tons when the oven is in Grill mode Figure-23 (Figure 23) 2. Please use this safety panel in or- der to avoid the heat to damage con- trol panel and the buttons when the oven is Grill mode. -
Page 25: Environmentally-Friendly Disposal
ENVIRONMENTALLY-FRIENDLY DISPOSAL Dispose of packaging in an environmentally-friendly manner. This appliance is labelled in accordance with European Directive 2012/19/EU concerning used electrical and electronic appliances (waste electrical and electron- ic equipment - WEEE). The guideline determines the framework for the return and recycling of used applianc- es as applicable throughout to the EU. - Page 26 Draga utilizatorule; Obiectivul nostru este să ne asigurăm că acest produs dă cele mai bune rezultate, fiind produsin fabrica noastră modernă într-un mediu de lucru îngrijit, conform conceptului nostru de calitate totală. Din acest motiv, vă recomandăm să citiţi cu atenţie manualul de utilizare înainte de a folosi produsul şi să-l păstraţi mereu la îndemână.
- Page 27 CONTINUT Avertismente Importante Descrierea Aparatului Instalarea Aragazuluilegăturile Schemă De Conectare Electrıcă Exemplu de fixare prin lanț Montarea cuptorului Caracteristicile Tehnice Ale Aragazului In Cazul In Care Nu Functioneaza Descrierea Aragazului Si A Panoului De Comandă Panouri de control Utılızarea Vatră Secțıunea Folosirea Plitelor Electrice Folosırea Cuptoruluı...
-
Page 28: Avertismente Importante
AVERTISMENTE IMPORTANTE 1. AVERTISMENT:Înainte de înlocuirea lămpii, pentru evitarea eletrocutării, asiguraţi-vă că cir- cuitul electric este închis. 2. AVERTISMENT:Înainte de atingerea termina- lelor de conexiune, toate circuitele de alimentare trebuie deconectate. 3. AVERTISMENT:În timpul funcţionării grill-ului, părţile accesibile pot fi fierbinţi.Menţineţi copiii departe. - Page 29 11. Utilizarea unei plitei pe gaz va elibera umiditate şi produse de ardere în camera unde este montată. Atunci când produsul este în funcţiune, asiguraţi-vă că bucătăria este bine ventilată şi menţineţi găurile naturale de ventilare sau montaţi un sistem mecanic de ventilare.
- Page 30 18. ”Nu utilizaţi sistemul pentru o perioadă mai mare de 15 secunde. Dacă arzătorul nu se aprinde la final- izarea celor 15 secunde, opriţi funcţionarea sistemu- lui şi deschideţi uşa secţiunii şi/sau aşteptaţi cel puţin 1 minut înainte de reaprinderea arzătorului." 19.
-
Page 31: Descrierea Aparatului
DESCRIEREA APARATULUI 8. Capac din sticlă 15. Buton brichetă (Capac din metal*) 16. Tavă adâncă* 9. Lampă cu led pentru* aragaz 17. Capac cuptor 1. Plita Electrica Ø145mm* 10. Lampă cu led pentru cuptor* 18. Mâner cuptor 2. Plita Electrica Ø180mm* 11. -
Page 32: Instalarea Aragazuluilegăturile
INSTALAREA ARAGAZULUILEGĂTURILE ELECTRICE şi SECURITATEA 1.Aragazul are nevoie de o siguranţă de 16 Amp. Vă recomandăm să efectuaţi instalarea cu ajutorul unui electrician calificat. 2.Aragazul se alimentează de la o sursă electrică de 220-240V~50/60Hz. (220-240V AC /380-415V 3NAC,50/60Hz.) Dacă reţeaua electrică are altă valoare, luaţi legătura cu serviciul autorizat. -
Page 33: Schemă De Conectare Electrıcă
SCHEMĂ DE CONECTARE ELECTRICĂ FUSE SWITCH (25A/40A) CONSUMER UNIT 3x4mm² 3x4mm² JUNCTION BOX 610mm 400V 3N~50/60Hz 400V 2N~50/60Hz 220-240V~50/60Hz 220-240V~50/60Hz Neutral Neutral Neutral Neutral Neutre Neutre Neutre Neutre Live Earth Earth Earth Phase Earth Terre Terre Terre Terre Erdung Erdung Erdung Erdung H05 VV-F 3G 4mm²... -
Page 34: Montarea Cuptorului
MONTAREA CUPTORULUI 20 mm 20 mm 500 -600 mm min. CARACTERISTICILE TEHNICE ALE ARAGAZULUI SPECIFICATII 50x50 L Ăţ Imea Exterioară 500mm Grosimea Exterioară 510mm În Ă L Ţ Imea Exterioar Ă 850mm Bec Alimentare Arz Ă Tor Superior 1000W Arz Ă Tor Inferior 800W Rezistenta Grill 1500W... -
Page 35: In Cazul In Care Nu Functioneaza
VALORILE INJECTORULUI ARZĂTORULUI ÎN FUNC Ţ IE DE G30/28- G20/20mbar G25/25mbar TIPUL DE GAZ 30mbar Injector Ø mm 0,96 1,30 1,30 Arzatorul Putere kW 3,50 3,50 3,50 Consum Gr/h,m³/h 0,330 0,330 Injector Ø mm 0,85 1,15 1,15 Arzatorul Putere kW 2,90 2,90 2,90... -
Page 36: Descrierea Aragazului Si A Panoului De Comandă
DESCRIEREA ARAGAZULUI SI A PANOULUI DE COMANDĂ Rotisor Ventilator Rezistenta Superioara/ Putere Arzator Tur- Inferioara bo+Ventilator Rezistenta Superioara/ Lampă Inferioara Si Ventilator Rezistenta Inferioara Si Rezistenta Gril+Ventilator Ventilator Rezistenta Gril+Rotisor Rezistenta Gril Rezistenta Gril+ Lampă Putere Arzator Superior Timer Putere Arzator Inferior Flacara Aprindere Electrica BUTON TERMOSTAT;... - Page 37 Plită electrică fron- Plită electrică posterio- Arzător stânga spate Arzător frontal stânga tală ară (arzător mijlociu) (arzător mare) Arzător grill sau ele- Arzător cuptor (opţional) Cronometru (opţional) Termostat (opţional) ment de încălzire sau element de încălzire...
-
Page 38: Utılızarea Vatră Secțıunea
UTILIZAREA VATRĂ SECȚIUNEA Folosirea arzătoarelor: Înseam n ă Pozi ţie Închis. Ochi WOK 24-28cm Flac ăra este stins ă. Ochi mare 22-26cm Complet deschisa Ochi mediu 18-22cm Ochi mic 12-18cm Jumătate deschis 1. Pentru a obţine un randament maxim, vasul pe care îl folosiţi trebuie să aibă... -
Page 39: Folosırea Cuptoruluı
Plitele electrice au un standard de 6 nivele de temperatura (asa cum este descris mai sus) Cand folositi pentru prima data plitele electrice mentineti-le in pozitia 6 pentru 5 minute. Acest lucru va face ca agentul ce se afla pe plitele electrice sa se duca in momentul arderii. -
Page 40: Gătıt Ora De Masă
GĂTIT ORA DE MASĂ Temperatura Pozi ţia Gr Timpul De G Ãtit Feluri De Mâncare (°C) Ãtarului (Min.) Prãjiturã C U Cremã 150-170 30-35 Pateuri 200-220 35-45 Biscui Þi 160-170 20-25 Fursecuri 160-170 20-35 Prãjituri 160-180 25-35 Prãjituri Garnisite 200-220 30-40 Pateuri Sub Þiri 180-220... -
Page 41: Montarea Uşii Cuptorului
11. Pentru a curăţa geamul din faţă al cuptorului, desfaceţi şaibele de fixare cu o şurubelniţă şi curăţaţi-l peste tot. După uscare, aşezaţi garniturile la loc şi reinstalaţi geamul MONTAREA UŞII CUPTORULUI Ilustraţia 3 Ilustraţia 4 Ilustraţia 3.1 Ilustraţia 3.2 Ilustraţia 4.1 Ilustraţia 4.2 Trageţi către dumnea-... -
Page 42: Schimbarea Becului Din Cuptor
SCHIMBAREA BECULUI DIN CUPTOR Pentru a evita riscul de electrocutare, înainte de schimbarea becului asigu- raţi-vă că aparatul este deconectat de la reţea. (deconectarea de la reţea în- seamnă că aparatul nu este alimentat cu curent) 1- Pentru început, deconectaţi aparatul de la reţea şi asiguraţi-vă... -
Page 43: Accesorii
ACCESORII Tava adâncă Se utilizează pentru produse de panificaţie, prăjeli şi mâncăruri cu sos. De asemenea, se poate folosi şi ca recipient pentru adunarea grăsimii în cazul în care folosiţi grătarul pen- tru coacerea checurilor, dezgheţarea produ- selor congelate şi prăjirea cărnii. Tavă... -
Page 44: Operatiunea De Schimbare A Duzelor
OPERATIUNEA DE SCHIMBARE A DUZELOR: 1. Va rugam sa folositi o surubelnita cu cap special pentru inlaturarea si instalarea duzelor ca in (Ilustraţia 8) 2. Va rugam sa inlaturati duza (Ilustraţia 9) de la arzator cu surubelnita speciala si instalati noua duza (Ilustraţia 10) Ilustraţia 8 Ilustraţia 9 Ilustraţia 10... -
Page 45: Demontarea Arzătorului Din Partea De Sus Şi De Jos A Cuptorului Cu Gaze
DEMONTAREA ARZĂTORULUI DIN PARTEA DE SUS ŞI DE JOS A CUP- TORULUI CU GAZE Demontarea arzătorului din partea de sus: Cu ajutorul unei şurubelniţe, deşurubaţi şurubul aşa după cum vedeţi în ilus- traţia 13. Trageţi către dumneavoastră arzătorul şi scoateţi-l din loc aşa după cum vedeţi în ilustraţia 14. -
Page 46: Trecerea Furtunului De Gaz
TRECEREA FURTUNULUI DE GAZ 1. Pentru a vă asigura că nu apar scurgeri de gaz, conectați produsul la robinetul de gaz utilizând cea mai scurtă rută posibilă. 2. Pentru a efectua o verificare de etanșei- tate, asigurați-vă că butoanele de pe panoul de control sunt închise iar rezervorul de gaz este deschis. -
Page 47: Utilizarea Panoului Deflector Al Cuptorului
UTILIZAREA PANOULUI DEFLECTOR AL CUPTORULUI (opțional) 1. În momentul când cuptorul se află în modul Grill, un panou de siguranță este amplasat pentru a proteja panoul de Ilustraţia 23 control și butoanele (Ilustraţia 23) 2. Plasați panoul de siguranță sub panoul de control al cuptorului, de- schizând protecția frontală... -
Page 48: Eliminarea Într-O Manieră Prietenoasă Cu Mediul Înconjurător / Informaţii Despre Ambalaj
ELIMINAREA ÎNTR-O MANIERĂ PRIETENOASĂ CU MEDIUL ÎNCON- JURĂTOR Eliminaţi ambalajul într-o manieră prietenoasă cu mediul înconjurător. Acest produs este etichetat conform Directivei Europene 2012/19/UE privind produsele electrice şi electronice utili- zate (deşeu de echipament electric şi electronic - DEEE). Această directivă determină contextul pentru returnarea şi reciclarea produselor utilizate aplicându-se pe teritoriul Uniunii Europene.
Need help?
Do you have a question about the SM450 Series and is the answer not in the manual?
Questions and answers