MR TAPCON Operating Instructions Manual
Voltage regulator
Hide thumbs
Also See for TAPCON:
- Operating instructions manual (334 pages) ,
- Operating instructions manual (252 pages) ,
- Operating instructions manual (280 pages)

Related Manuals for MR TAPCON


Summary of Contents for MR TAPCON
- Page 1 Voltage regulator ® TAPCON Operating Instructions 4077638/07 EN . Three-winding transformer...
- Page 2 © All rights reserved by Maschinenfabrik Reinhausen Dissemination and reproduction of this document and use and disclosure of its content are strictly prohibited unless expressly permitted. Infringements will result in liability for compensation. All rights reserved in the event of the granting of patents, utility models or designs.
-
Page 3: Table Of Contents
4.5.4 Front interface .............................. 34 4.5.5 Assemblies................................ 34 Operating concept .......................... 39 Packaging, transport and storage .................. 44 Suitability, structure and production .................... 44 Markings ............................ 44 Transportation, receipt and handling of shipments................ 44 ® Maschinenfabrik Reinhausen GmbH 2019 4077638/07 EN TAPCON... - Page 4 Setting date and time........................ 76 Commissioning wizard........................ 76 Function tests ........................... 77 7.5.1 Checking measured values and status of digital inputs and outputs .............. 78 7.5.2 Testing a control function ............................ 78 7.5.3 Checking parallel operation.......................... 79 ® TAPCON 4077638/07 EN Maschinenfabrik Reinhausen GmbH 2019...
- Page 5 Setting the switching pulse for controlling the motor-drive unit ................. 128 8.8.2 Setting motor runtime monitoring ........................ 130 8.8.3 Setting the switching direction........................... 131 8.8.4 Setting switching direction monitoring....................... 131 Line drop compensation ......................... 132 8.9.1 R&X compensation ............................ 133 8.9.2 Z compensation.............................. 134 ® Maschinenfabrik Reinhausen GmbH 2019 4077638/07 EN TAPCON...
- Page 6 Analog tap position capture.......................... 136 8.11 Parallel operation (optional)...................... 139 8.11.1 Parallel operation methods .......................... 139 8.11.2 Configuring parallel operation ........................... 141 8.11.3 TAPCON® 2xx retrofit............................ 144 8.11.4 Detecting parallel operation via group inputs (optional) .................. 145 8.12 Monitoring functions........................ 145 8.12.1 Voltage monitoring ............................ 145 8.12.2 Current monitoring ............................ 148...
- Page 7 Information about device ........................ 235 8.24.1 Hardware................................ 235 8.24.2 Software ................................ 236 8.24.3 Parallel operation .............................. 236 8.24.4 Topology ................................ 237 8.25 Import/export manager ........................ 238 8.25.1 Exporting data .............................. 238 8.25.2 Importing data (software version 3.44 and later).................... 240 ® Maschinenfabrik Reinhausen GmbH 2019 4077638/07 EN TAPCON...
- Page 8 8.27.1 Linking functions ............................... 244 8.27.2 Linking digital outputs and control system messages .................. 246 8.28 Setting screensaver ........................ 248 8.29 TAPCON® Personal Logic Editor (TPLE).................. 249 8.29.1 Function ................................ 249 8.29.2 Configuring TPLE.............................. 263 Maintenance and care .................... 267 Fault elimination ...................... 268 10.1...
-
Page 9: Maschinenfabrik Reinhausen Gmbh 2019 4077638/07 En Tapcon
Table of contents 14.9 Ambient conditions ......................... 302 14.10 Standards and directives ........................ 303 Glossary .......................... 306 List of key words ...................... 307 ® Maschinenfabrik Reinhausen GmbH 2019 4077638/07 EN TAPCON... -
Page 10: Introduction
1.4 Notation conventions This section contains an overview of the symbols and textual emphasis used. 1.4.1 Hazard communication system Warnings in this technical file are displayed as follows. ® TAPCON 4077638/07 EN Maschinenfabrik Reinhausen GmbH 2019... - Page 11 Indicates measures to be taken to prevent damage to property. Table 1: Signal words in warning notices Pictograms warn of dangers: Pictogram Definition Warning of a danger point Warning of dangerous electrical voltage ® Maschinenfabrik Reinhausen GmbH 2019 4077638/07 EN TAPCON...
-
Page 12: Information System
Aim of action ü Requirements (optional). ► Step 1 of 1. ð Result of step (optional). ð Result of action (optional). Multi-step instructions Instructions which consist of several process steps are structured as follows: ® TAPCON 4077638/07 EN Maschinenfabrik Reinhausen GmbH 2019... -
Page 13: Typographic Conventions
Software operating controls Press Continue button …>…>… Menu paths Parameter > Control parameter Italics System messages, error messages, Function monitoring alarm triggered signals [► Number of pages]. Cross reference [► 41]. Table 3: Typographic conventions ® Maschinenfabrik Reinhausen GmbH 2019 4077638/07 EN TAPCON... -
Page 14: Safety
2.1 Appropriate use The TAPCON® serves to keep the output voltage of a three-winding trans- former constant. The product is designed solely for use in stationary large- scale electrical energy systems and facilities. - Page 15 This can lead to injuries and property dam- age. ▪ Never operate a current transformer with an open secondary circuit; short- circuit the current transformer to prevent this. ▪ Observe the information in the current transformer operating instructions. ® Maschinenfabrik Reinhausen GmbH 2019 4077638/07 EN TAPCON...
-
Page 16: Personnel Qualification
▪ Only use spare parts that have been approved by Maschinenfabrik Rein- hausen GmbH. ▪ Contact Maschinenfabrik Reinhausen GmbH. 2.3 Personnel qualification The person responsible for assembly, commissioning, operation, mainte- nance and inspection must ensure that the personnel are sufficiently quali- fied. ® TAPCON 4077638/07 EN Maschinenfabrik Reinhausen GmbH 2019... -
Page 17: Personal Protective Equipment
▪ Always wear the personal protective equipment required for the job at hand. ▪ Never wear damaged personal protective equipment. ▪ Observe information about personal protective equipment provided in the work area. ® Maschinenfabrik Reinhausen GmbH 2019 4077638/07 EN TAPCON... - Page 18 Hard hat To protect from falling and flying parts and mate- rials. Hearing protection To protect from hearing damage. Protective gloves To protect from mechanical, thermal, and electri- cal hazards. ® TAPCON 4077638/07 EN Maschinenfabrik Reinhausen GmbH 2019...
-
Page 19: It Security
▪ Change the password at regular intervals. ▪ Export the security log [►Section 8.25.1, Page 238] at regular intervals. ▪ Check the log files regularly for unauthorized system access and other se- curity-related events. ® Maschinenfabrik Reinhausen GmbH 2019 4077638/07 EN TAPCON... - Page 20 ETH1.1 8081 SSL-protected web visualization (alternative port) Table 4: Interfaces and open ports of the OT1205 assembly Port is closed if you activate the device's SSL encryption. Figure 2: Interfaces of the CPU assembly ® TAPCON 4077638/07 EN Maschinenfabrik Reinhausen GmbH 2019...
- Page 21 ETH 2.x (only for MR service) ETH 2.x HTTP for web-based visualization ETH 2.x HTTPS for web-based visualization ETH 2.x FTPS (only for MR service) ETH 2.x 8080 HTTP for web-based visualization ETH 2.x 8081 HTTPS for web-based visualization Table 5: Interfaces and open ports of the CPU assembly Port is closed if you activate the device's SSL encryption.
- Page 22 3 IT security Not available with TLS version >= 1.2 The device uses the SHA256 hash function to save passwords. Also refer to 2 Exporting data [► 238] 2 General [► 86] ® TAPCON 4077638/07 EN Maschinenfabrik Reinhausen GmbH 2019...
-
Page 23: Product Description
▪ Store the parts in a dry place until installation. 4.2 Function description of the voltage regulation The TAPCON® is used to keep the output voltage of a three-winding trans- former constant. The three-winding transformer consists of one high voltage winding and two undervoltage windings. -
Page 24: Performance Features
4 Product description To regulate the voltage, the TAPCON® compares the measured voltage of the active undervoltage winding U with a defined desired voltage U actual desired The difference between U and U is the control deviation (dU). actual desired The TAPCON®... - Page 25 – Monitoring of OLTC temperature (optional) – Tap-change statistics of on-load tap-changer – Optional: on-load tap-changer oil level – Optional: oil filter unit – Status of the motor-drive unit (motor protective switch, motor is running) ® Maschinenfabrik Reinhausen GmbH 2019 4077638/07 EN TAPCON...
-
Page 26: Operating Modes
Tap-change operation via SCADA Value adjustment via SCADA Table 7: Overview of operating modes Optional when connecting TAPCON® to a control system (SCADA) You can use the Remote behavior [►Section 8.2.3, Page 86] parameter to set the behavior ® TAPCON 4077638/07 EN... -
Page 27: Design
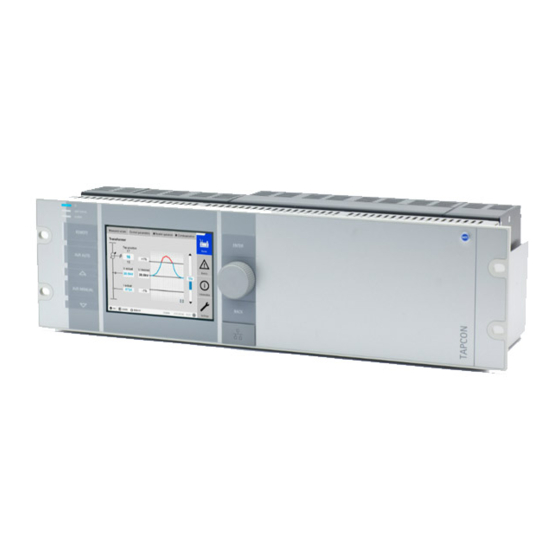
4 Product description 4.5 Design The device is designed as a 19 inch slide-in housing with modular hardware equipment. The device's individual assemblies are described in the following section. Figure 4: Front view ® Maschinenfabrik Reinhausen GmbH 2019 4077638/07 EN TAPCON... -
Page 28: Operating Controls
Navigation through individual menu items and parameters. BACK key Exit the current menu. Go to the previous menu level. Key without function if a digital input is used to toggle between local/re- mote. ® TAPCON 4077638/07 EN Maschinenfabrik Reinhausen GmbH 2019... -
Page 29: Display Elements
1 Power supply LED 2 AVR STATUS LED 3 ALARM LED 4 REMOTE LED 5 AVR AUTO LED 6 RAISE VOLTAGE LED 7 AVR MANUAL LED 8 LOWER VOLTAGE LED 9 Display ® Maschinenfabrik Reinhausen GmbH 2019 4077638/07 EN TAPCON... - Page 30 4 Product description Display The display for the TAPCON® is divided into the following areas: Figure 7: Display 1 Display area 2 Secondary navigation or naviga- tion path 3 Primary navigation 4 Status bar ® TAPCON 4077638/07 EN Maschinenfabrik Reinhausen GmbH 2019...
- Page 31 2 Upper limit of bandwidth 3 Trend of measured voltage 4 Delay time T1/T2 5 Trend of corrected voltage (correc- 6 Lower limit of bandwidth tion due to compensation or paral- lel operation) ® Maschinenfabrik Reinhausen GmbH 2019 4077638/07 EN TAPCON...
- Page 32 1 Designation of transformer 2 Tap position of the on-load tap- changer (next, current, previous) 3 Voltage 4 Control deviation in % (with correc- tion) 5 Current 6 Winding currently being regulated (marked in blue) ® TAPCON 4077638/07 EN Maschinenfabrik Reinhausen GmbH 2019...
-
Page 33: Additional Operating Controls And Display Elements When Using The Mcontrol Touch Panel (Optional)
Activate manual mode. LOWER key Send a control command to the motor-drive unit to reduce the voltage. Only possible in manual mode. Not available if local/remote is toggled using a digital input. ® Maschinenfabrik Reinhausen GmbH 2019 4077638/07 EN TAPCON... -
Page 34: Front Interface
4.5.5.2 CPU (central processing unit) I The CPU I assembly is the central computing unit for the device. It contains the following interfaces: ▪ Internal system interface RS232 (COM1) ▪ Serial interface RS232/485 (COM2) ® TAPCON 4077638/07 EN Maschinenfabrik Reinhausen GmbH 2019... - Page 35 ▪ 2x CAN bus (CAN 1, CAN 2) Figure 12: CPU I assembly 4.5.5.3 Voltage measurement and current measurement The UI 1 assembly is used for measuring 1-phase voltage and current. Figure 13: UI 1 assembly ® Maschinenfabrik Reinhausen GmbH 2019 4077638/07 EN TAPCON...
- Page 36 ▪ DIO 28-15: 28 inputs, 15 outputs (6 N/O contacts, 9 change-over con- tacts) ▪ DIO 42-20 (HL): 42 inputs, 20 outputs (8 N/O contacts, 12 change-over contacts) Figure 15: DIO 42-20 assembly ® TAPCON 4077638/07 EN Maschinenfabrik Reinhausen GmbH 2019...
- Page 37 The following interfaces are available: ▪ 2x RJ45 (ETH12, ETH22) ▪ 2x Duplex-LC (SFP module) (ETH11, ETH21) The media converter is designed to be transparent for the network and does not have its own IP address. ® Maschinenfabrik Reinhausen GmbH 2019 4077638/07 EN TAPCON...
- Page 38 – 2x RJ45 (ETH23, ETH24), device-internal connection – 2x Duplex-LC (SFP module) (ETH21, ETH22), redundancy connection The following redundancy functions are available to you according to your order: ▪ PRP (standard setting) ▪ RSTP ® TAPCON 4077638/07 EN Maschinenfabrik Reinhausen GmbH 2019...
-
Page 39: Operating Concept
If you want to operate the device via the controls and visualization at the same time, you have to log in on the device and via the visualization. ® Maschinenfabrik Reinhausen GmbH 2019 4077638/07 EN TAPCON... - Page 40 In these operating instructions, the path for navigating to a parameter is al- ways shown in an abridged form: Go to Settings > Parameters > Time syn- chronization. Setting parameters There are various ways to configure the settings, depending on the parame- ter. ® TAPCON 4077638/07 EN Maschinenfabrik Reinhausen GmbH 2019...
- Page 41 ð If operating via the front panel, the numerical keypad appears. Figure 20: Entering a value 2. Enter the desired value and confirm with 3. Press the Accept button to save the modified parameter. ® Maschinenfabrik Reinhausen GmbH 2019 4077638/07 EN TAPCON...
- Page 42 Parameter search You can use the quick search function in the parameter menu to search for a parameter. Enter the name of the desired parameter in the Search entry field. Figure 22: Quick search ® TAPCON 4077638/07 EN Maschinenfabrik Reinhausen GmbH 2019...
- Page 43 2. Select the Expert mode checkbox. ð Expert mode is active. Hiding/showing parameters Depending on how you set the parameters, the device will hide or show ad- ditional parameters related to this function. ® Maschinenfabrik Reinhausen GmbH 2019 4077638/07 EN TAPCON...
-
Page 44: Packaging, Transport And Storage
▪ Completeness based on the delivery slip ▪ External damage of any type The checks must take place after unloading when the crate or transport con- tainer can be accessed from all sides. ® TAPCON 4077638/07 EN Maschinenfabrik Reinhausen GmbH 2019... -
Page 45: Storage Of Shipments
▪ Ensure sufficient carrying capacity of the ground. ▪ Keep entrance paths free. ▪ Check stored goods at regular intervals. Also take appropriate action after storms, heavy rain or snow and so on. ® Maschinenfabrik Reinhausen GmbH 2019 4077638/07 EN TAPCON... -
Page 46: Mounting
6.2 Electromagnetic compatibility The device has been developed in accordance with applicable EMC stan- dards. The following points must be noted in order to maintain the EMC standards. ® TAPCON 4077638/07 EN Maschinenfabrik Reinhausen GmbH 2019... -
Page 47: Wiring Requirement Of Installation Site
▪ For signal transmission, use shielded lines with individual conductors (out- going conductor / return conductor) twisted in pairs. ▪ Connect full surface of shielding (360º) to device or to a nearby grounding bar. ® Maschinenfabrik Reinhausen GmbH 2019 4077638/07 EN TAPCON... -
Page 48: Wiring Requirement In Control Cabinet
▪ The device's connection cables must be laid in close contact with the grounded metal housing or in metallic cable ducts with a ground connec- tion. ▪ Signal lines and power lines/switching lines must be laid in separate cable ducts. ® TAPCON 4077638/07 EN Maschinenfabrik Reinhausen GmbH 2019... -
Page 49: Information About Shielding The Can Bus
► Connect the CAN bus cable shielding to just one device. Connecting shielding Connect the shielding for the CAN bus cable to the 9-pin D-sub connector: Figure 26: Connection of CAN bus cable shielding to the 9-pin D-sub connector ® Maschinenfabrik Reinhausen GmbH 2019 4077638/07 EN TAPCON... -
Page 50: Minimum Distances
Mounting in a 19" frame (in accordance with DIN 41494 Part 5) To mount the device in a 19" frame, proceed as follows: 1. Place cage nuts in the desired locations on the 19" frame. ® TAPCON 4077638/07 EN Maschinenfabrik Reinhausen GmbH 2019... - Page 51 Mounting in a control panel with a 19" flush control panel frame (optional) To mount the device in a control panel, proceed as follows: ü Scope of delivery is complete. Figure 29: Scope of delivery ® Maschinenfabrik Reinhausen GmbH 2019 4077638/07 EN TAPCON...
- Page 52 1. Produce the cut-out in the control panel. Figure 30: Producing the cut-out in the control panel 2. Mounting cage nuts Figure 31: Mounting cage nuts 3. Secure frame to control panel. Figure 32: Securing frame to control panel ® TAPCON 4077638/07 EN Maschinenfabrik Reinhausen GmbH 2019...
-
Page 53: Connecting Device
► Ground the device with a protective conductor using the grounding screw on the housing. ► Note the phase difference of the secondary terminals for the current transformer and voltage transformer. ► Connect the output relays correctly to the motor-drive unit. ® Maschinenfabrik Reinhausen GmbH 2019 4077638/07 EN TAPCON... -
Page 54: Cable Recommendation
Signal outputs* Shielded 1.5 mm Signal inputs Shielded 1 mm 400 m (<25 Ω/km) Signal outputs Shielded 1 mm RS232, SUB-D Shielded 0.25 mm 25 m RS485; SUB-D Shielded 0.25 mm 140 m CAN bus Shielded 0.75 mm² 2,000 m (total CAN bus) ® TAPCON 4077638/07 EN Maschinenfabrik Reinhausen GmbH 2019... -
Page 55: Information About Connecting Serial Interfaces Rs232 And Rs485
► Only use data cables which comply with the description below. RS232 (D-SUB 9-pole) For connecting the device via the RS232 interface (COM2), use a data cable with the following structure: Figure 35: RS232 data cable (9-pole) ® Maschinenfabrik Reinhausen GmbH 2019 4077638/07 EN TAPCON... - Page 56 ▪ Plug housing is metallic or metal-plated ▪ Cable shielding is connected with the plug using one of the two following variants: – Shielding is screwed down with traction relief. – Shielding is soldered with plug housing. ® TAPCON 4077638/07 EN Maschinenfabrik Reinhausen GmbH 2019...
-
Page 57: Information About Laying Fiber-Optic Cable
▪ Provide a sufficient cable reserve near distributor cabinets. Lay the re- serve such that the fiber-optic cable is neither bent nor twisted when tight- ened. ® Maschinenfabrik Reinhausen GmbH 2019 4077638/07 EN TAPCON... -
Page 58: Mounting Terminating Resistor Of Can Bus
ü Use only the specified cables for wiring. Note the cable recommendation. ► Connect the lines to be wired to the device to the system periphery as shown in the connection diagrams supplied. ® TAPCON 4077638/07 EN Maschinenfabrik Reinhausen GmbH 2019... -
Page 59: Wiring The Cpu Assembly
6 Mounting 6.5.6 Wiring the CPU assembly 1. Connect the ETH 2.2 interface to a PC to access the web-based visualiza- tion. Figure 39: Connection to a PC via Ethernet interface ® Maschinenfabrik Reinhausen GmbH 2019 4077638/07 EN TAPCON... - Page 60 2. Connect the ETH 1 interface to the control system (SCADA) in accor- dance with the connection diagram. Figure 40: SCADA connection Observe the information on connecting serial interfaces [►Section 6.5.2, Page 55]. ® TAPCON 4077638/07 EN Maschinenfabrik Reinhausen GmbH 2019...
-
Page 61: Wiring The Ui Assembly
To wire the UI assembly, proceed as follows: 1. Guide the cables into the corresponding plug terminals and fasten them using a screwdriver. Figure 42: Example: Plug for voltage measurement ® Maschinenfabrik Reinhausen GmbH 2019 4077638/07 EN TAPCON... -
Page 62: Wiring The Aio 2/Aio 4/Aio 8 Assembly
Incorrectly connected and configured analog inputs/outputs may result in damage to the device and sensor. ► Follow information about connecting analog sensors. ► Configure analog inputs and outputs according to the connected sensors. ® TAPCON 4077638/07 EN Maschinenfabrik Reinhausen GmbH 2019... - Page 63 The AIO 2, AIO 4 and AIO 8 assemblies have a separate plug connector for each channel (input or output). The plugs are assigned as follows: Figure 46: Plug assignment of AIO 2 and AIO 4 assemblies ® Maschinenfabrik Reinhausen GmbH 2019 4077638/07 EN TAPCON...
- Page 64 Figure 47: Connection example for a 4...20 mA sensor PT100/PT1000 sensor Depending on type, you must connect a PT100 sensor or PT1000 sensor as follows: ▪ 2-wire: pin ▪ 3-wire: pin ▪ 4-wire: pin , and ® TAPCON 4077638/07 EN Maschinenfabrik Reinhausen GmbH 2019...
- Page 65 Figure 48: Connection example for a PT100/PT1000 sensor Wiring analog inputs/outputs 1. Guide the leads into the plug terminal and fasten them using a screw- driver. Figure 49: Inserting the leads into the plug connector ® Maschinenfabrik Reinhausen GmbH 2019 4077638/07 EN TAPCON...
-
Page 66: Wiring The Dio Assembly
Figure 50: Fastening the plug (analog inputs/outputs) 6.5.9 Wiring the DIO assembly 1. Guide the leads into the plug terminal in accordance with the supplied connection diagram and fasten them using a screwdriver. Figure 51: Inserting the leads ® TAPCON 4077638/07 EN Maschinenfabrik Reinhausen GmbH 2019... -
Page 67: Wiring The Mc 2-2/Sw3-3 Assembly
6.5.10 Wiring the MC 2-2/SW3-3 assembly 1. Insert the supplied SFP module into the corresponding Ethernet interface in accordance with the connection diagram and fold the clasp down. Figure 53: Engaging the SFP module ® Maschinenfabrik Reinhausen GmbH 2019 4077638/07 EN TAPCON... - Page 68 6 Mounting 2. Remove the SFP module dust plug. Figure 54: Removing the dust plug 3. Insert the fiber-optic cable into the SFP module. Figure 55: Inserting the fiber-optic cable ® TAPCON 4077638/07 EN Maschinenfabrik Reinhausen GmbH 2019...
-
Page 69: Connecting The Power Supply
▪ Triggering characteristic: B or C Conductor cross-section For the power supply circuit, use a conductor cross-section suitable for the miniature circuit breaker that you have selected, but at least 1.5 mm (AWG 15). ® Maschinenfabrik Reinhausen GmbH 2019 4077638/07 EN TAPCON... -
Page 70: Checking Functional Reliability
Check the following: ▪ Once you have connected the device to the grid, the display shows the MR logo and then the operating screen. ▪ The voltage display LED on the top left of the device's front panel lights The device is fully mounted and can be configured. The actions required for this are described in the following chapter. -
Page 71: Commissioning
► Check the entire configuration before commissioning. 7.1 Performing tests Please contact Maschinenfabrik Reinhausen GmbH (MR) if any aspect of the tests is not clear. 7.1.1 Ground test For commissioning, carry out a ground test (check of the impedance of the protective bonding) in accordance with IEC 61010-1. - Page 72 SION QS3.241 assembly using a constant current source and measure the voltage between the measurement point and the protective conductor. ð The measured voltage must remain less than 10 V over a duration of 1 minute. ® TAPCON 4077638/07 EN Maschinenfabrik Reinhausen GmbH 2019...
-
Page 73: Performing A Dielectric Test
UI 3 N, L1, L2, L3 2.2 kV AC 2 s 5 s > 4 mA k1, l1, k2, l2, k3, l3 UI 5-3, UI 5-4 N, L1, L2, L3 2.2 kV AC 2 s 5 s > 4 mA k1, l1, k2, l2, k3, l3 ® Maschinenfabrik Reinhausen GmbH 2019 4077638/07 EN TAPCON... - Page 74 85...265 VAC/VDC wide-range power supply, other- wise the device may be damaged. Note the nameplate. Sample dielectric test set-up Figure 59: Sample set-up of the dielectric test for a device designed with the OT 1205 wide-range power supply ® TAPCON 4077638/07 EN Maschinenfabrik Reinhausen GmbH 2019...
-
Page 75: Setting The Language
Settings > General > Language. Figure 61: Setting the language 2. Select the desired language from the list box. 3. Press the Accept button to save the modified parameter. ð The "Restart device" dialog appears. ® Maschinenfabrik Reinhausen GmbH 2019 4077638/07 EN TAPCON... -
Page 76: Setting Date And Time
▪ User name: admin ▪ Password: admin To set the parameters with the help of the commissioning wizard, proceed as follows: 1. Log in as a user with the necessary access rights. ® TAPCON 4077638/07 EN Maschinenfabrik Reinhausen GmbH 2019... -
Page 77: Function Tests
▪ User name: admin ▪ Password: admin During the function test, you must set the most important parameters. Details on the parameters listed can be found in the Operation [►Section 8, Page 84] chapter. ® Maschinenfabrik Reinhausen GmbH 2019 4077638/07 EN TAPCON... -
Page 78: Checking Measured Values And Status Of Digital Inputs And Outputs
ð If the actual voltage is outside the bandwidth, the device returns the on-load tap-changer to the original operating position after 20 sec- onds. 12. Press to select manual mode. 13. Press to lower the on-load tap-changer 1 step. ® TAPCON 4077638/07 EN Maschinenfabrik Reinhausen GmbH 2019... -
Page 79: Checking Parallel Operation
Make sure that the conditions below have been fulfilled. ▪ All TAPCON® units are set to the same operating parameters for "desired value" and "delay time T1" [►Section 8.4.3, Page 106] ▪ "Activate parallel operation" [►Section 8.11.2.1, Page 141] parameter set to ON ▪... - Page 80 ð The status display in the Parallel operation menu lights up blue. ð The two TAPCON® must be within the bandwidth. 6. Set the desired value of both TAPCON® to the voltage currently mea- sured [►Section 8.4.1, Page 91]. 7. On one of the two transformers, raise the tap position of the on-load tap- changer by one setting;...
- Page 81 7. Set the value determined for the "circulating reactive current blocking limit" for the TAPCON® units in parallel operation as well. If one TAPCON® or all of the TAPCON® units indicate Circulating reactive current blocking limit exceeded even though the control inputs are correctly connected for all TAPCON®...
- Page 82 3. Compare the tap position displays of master and follower . All of the TAPCON® units must display the same tap position. If this is not the case, switch all TAPCON® units to the same tap position. Figure 63: Comparing the tap position 1 Master...
- Page 83 12. Press on the master and follower to manually set the desired step. ð The function tests for the tap synchronization method are complete. Installation and commissioning of the device is complete. ® Maschinenfabrik Reinhausen GmbH 2019 4077638/07 EN TAPCON...
-
Page 84: Operation
2. Activate automatic assignment of the IP address via DHCP on the PC. 3. Enter the visualization's IP address http://192.168.165.1, or if SSL encryption is active enter https://192.168.165.1, on the PC in the browser. ð The visualization is accessed. ® TAPCON 4077638/07 EN Maschinenfabrik Reinhausen GmbH 2019... - Page 85 2. Go to Communication on the device to display the device's IP address. Figure 66: Displaying Communication 3. Assign the PC an unique IP address in the same subnet as the device (e.g. 192.0.1.100). ® Maschinenfabrik Reinhausen GmbH 2019 4077638/07 EN TAPCON...
-
Page 86: General
Hardware only The device accepts commands via digital inputs. SCADA only The device accepts commands via SCADA. Hardware and SCADA The device accepts commands via digital inputs and SCADA. Table 14: Selecting Remote behavior ® TAPCON 4077638/07 EN Maschinenfabrik Reinhausen GmbH 2019... -
Page 87: Accessing Online Help
The web-based visualization has an online help section. To call up the online help, proceed as follows: 1. Call up the web-based visualization with the PC. 2. Select the MR logo in the status line. ð The online help appears. 8.2.5 Activating/deactivating the USB interface This parameter lets you deactivate the USB interface. -
Page 88: Activating/Deactivating Service User Access
You can only set the parameters for ETH 1 if the device is equipped with the optional control system connection via Ethernet (TCP/IP): ▪ IEC 61850 ▪ IEC 60870-5-104 ▪ Modbus (Modbus type TCP active) ▪ DNP3 (DNP3 transmission type TCP active) ® TAPCON 4077638/07 EN Maschinenfabrik Reinhausen GmbH 2019... - Page 89 Be sure to enter a valid network mask that is not 0.0.0.0, otherwise it will not be possible to connect to the device. Gateway address ETH 1/ETH 2.2 You can use this parameter to set the gateway's IP address. ® Maschinenfabrik Reinhausen GmbH 2019 4077638/07 EN TAPCON...
- Page 90 ▪ Only ETH 2.x ▪ ETH 1 and ETH 2.x You can only set this parameter if the device is equipped with the optional control system connection via Ethernet (TCP/IP) and the optional interface for visualization. ® TAPCON 4077638/07 EN Maschinenfabrik Reinhausen GmbH 2019...
-
Page 91: Control
You can set 3 different desired values. The device always uses one of the set desired values for control. You can define the desired value used for control by means of the "Select desired value" parameter or with the digital inputs. ® Maschinenfabrik Reinhausen GmbH 2019 4077638/07 EN TAPCON... - Page 92 You have to set the parameters for both winding 1 (W1) and winding 2 (W2). Setting the desired value To set the desired value, proceed as follows: 1. Go to Settings > Parameters > Control > Desired value. 2. Enter desired value. ® TAPCON 4077638/07 EN Maschinenfabrik Reinhausen GmbH 2019...
- Page 93 Desired value setting release input. If this is not done, the de- vice uses the set desired value 1. You have to set the parameters for both winding 1 (W1) and winding 2 (W2). ® Maschinenfabrik Reinhausen GmbH 2019 4077638/07 EN TAPCON...
- Page 94 In order to configure the step-by-step setting of the desired value, you can set the parameters as described below. You have to set the parameters for both winding 1 (W1) and winding 2 (W2). ® TAPCON 4077638/07 EN Maschinenfabrik Reinhausen GmbH 2019...
- Page 95 2 Remote behavior [► 86] 8.4.1.6 Active power-dependent adjustment of desired voltage value The TAPCON® Dynamic Setpoint Control (TDSC) function is used to adapt the desired voltage value depending on the measured active power. This al- lows you to compensate for a voltage drop during increased load or an in- crease in voltage due to a decentralized feed-in.
- Page 96 Response to value falling below active power P If the measured active power P falls below the set parameter P , the meas value U is adopted as the desired value. ® TAPCON 4077638/07 EN Maschinenfabrik Reinhausen GmbH 2019...
- Page 97 ▪ Parameter ▪ Digital inputs TDSC on and TDSC off (optional) ▪ Control system command (optional) If you activate TDSC, the line drop compensation (R&X compensation or Z compensation) function is deactivated. ® Maschinenfabrik Reinhausen GmbH 2019 4077638/07 EN TAPCON...
- Page 98 8.4.1.7 Active power-dependent adjustment of desired voltage value with 3 different desired values The TAPCON® Dynamic Setpoint Control (TDSC) function is used to adapt the desired voltage value depending on the measured active power. This al- lows you to compensate for a voltage drop during increased load or an in- crease in voltage due to a decentralized feed-in.
- Page 99 Minimum desired value Measured active power Maximum desired value meas Active power at minimum de- Set desired value when mea- sired value sured active power = 0 Active power at maximum de- sired value ® Maschinenfabrik Reinhausen GmbH 2019 4077638/07 EN TAPCON...
- Page 100 If the measured active power 0 ≤ P ≤ P , the desired value is calculated meas using the following formula: To activate the active power-dependent adjustment of the desired voltage value, you need to set the following parameters: ® TAPCON 4077638/07 EN Maschinenfabrik Reinhausen GmbH 2019...
- Page 101 0. 1. Go to Settings > Parameter > Control > TDSC U0. 2. Enter desired value at active power 0. 3. Press the Accept button to save the modified parameter. ® Maschinenfabrik Reinhausen GmbH 2019 4077638/07 EN TAPCON...
- Page 102 Desired BCD input value 49 V 50 V 51 V 52 V 53 V 54 V 55 V 56 V 57 V 58 V 59 V 60 V 61 V 62 V ® TAPCON 4077638/07 EN Maschinenfabrik Reinhausen GmbH 2019...
- Page 103 82 V 83 V 84 V 85 V 86 V 87 V 88 V 89 V 90 V 91 V 92 V 93 V 94 V 95 V 96 V 97 V ® Maschinenfabrik Reinhausen GmbH 2019 4077638/07 EN TAPCON...
- Page 104 117 V 118 V 119 V 120 V 121 V 122 V 123 V 124 V 125 V 126 V 127 V 128 V 129 V 130 V 131 V 132 V ® TAPCON 4077638/07 EN Maschinenfabrik Reinhausen GmbH 2019...
-
Page 105: Bandwidth
Determining bandwidth In order to set the correct value, the transformer's step voltage and nominal voltage must be known. Note that a large bandwidth will result in a large control deviation. ® Maschinenfabrik Reinhausen GmbH 2019 4077638/07 EN TAPCON... -
Page 106: Delay Time T1
Control commands will also not be issued to the motor-drive unit if the mea- sured voltage returns to the tolerance bandwidth within the set delay time . However, if the measured voltage deviates from the set bandwidth for ® TAPCON 4077638/07 EN Maschinenfabrik Reinhausen GmbH 2019... - Page 107 ▪ Linear time response ▪ Integral time response Linear time response With linear time response, the device responds with a constant delay time regardless of the control deviation. ® Maschinenfabrik Reinhausen GmbH 2019 4077638/07 EN TAPCON...
-
Page 108: Delay Time T2
▪ The delay time T2 must be greater than the maximum operating time of the motor-drive unit. ▪ The delay time T2 must be less than the value set for delay time T1. ® TAPCON 4077638/07 EN Maschinenfabrik Reinhausen GmbH 2019... - Page 109 To set the delay time T2 proceed as follows: 1. Go to Settings > Parameters > Control > Delay time T2. 2. Set delay time T2. 3. Press the Accept button to save the modified parameter. ® Maschinenfabrik Reinhausen GmbH 2019 4077638/07 EN TAPCON...
-
Page 110: Winding Selection
▪ Autom. winding selection mode ▪ Change delay Apparent current ▪ Change delay Voltage ▪ W1: U> Switching limit ▪ W2: U> Switching limit ▪ W1: U< Switching limit ▪ W2: U< Switching limit ® TAPCON 4077638/07 EN Maschinenfabrik Reinhausen GmbH 2019... - Page 111 The initial status after switching on the device is winding 1. ▪ If the switching limits for both windings are exceeded at the same time in the same direction (e.g. winding 1 U> and winding 2 U>), the TAPCON® regulates the winding last active.
-
Page 112: Manually Selecting Winding (Optional)
You can use this parameter to set the change delay for the automatic wind- ing selection using the calculated apparent current. Once the delay time has elapsed, the TAPCON® regulates the winding with the greater apparent cur- rent. To set the change delay for winding selection using the calculated apparent current, proceed as follows: 1. -
Page 113: Setting The Monitoring Of The Unregulated Winding
1. Go to Settings > Parameters > Three-winding transformer > Monitor- ing of unregulated winding. 2. Select the desired option from the list box. 3. Press the Accept button to save the modified parameter. ® Maschinenfabrik Reinhausen GmbH 2019 4077638/07 EN TAPCON... -
Page 114: Transformer Data
2. Enter the primary transformer voltage. 3. Press the Accept button to save the modified parameter. Secondary transformer voltage With this parameter, you can set the secondary voltage of the voltage trans- former in V. ® TAPCON 4077638/07 EN Maschinenfabrik Reinhausen GmbH 2019... - Page 115 You can use this parameter to set the phase angle correction for your trans- former circuit. To do so, proceed as follows: 1. Go to Settings > Parameters > Transformer data > Phase angle cor- rection. ® Maschinenfabrik Reinhausen GmbH 2019 4077638/07 EN TAPCON...
- Page 116 To set the current-transformer circuit, proceed as follows: 1. Go to Settings > Parameters > Transformer data > Current-trans- former circuit. 2. Select the desired option. 3. Press the Accept button to save the modified parameter. ® TAPCON 4077638/07 EN Maschinenfabrik Reinhausen GmbH 2019...
-
Page 117: Circuit Examples For Voltage Transformers And Current Transformers
If you use this circuit, set the device as follows: Parameter Option Voltage-transformer circuit 1 Ph phase voltage Current-transformer circuit 1 Ph phase current Phase angle correction 0° Table 22: Circuit 1-A Circuit 1-B ® Maschinenfabrik Reinhausen GmbH 2019 4077638/07 EN TAPCON... - Page 118 ) / √3. If you use this circuit, set the device as follows: Parameter Option Voltage-transformer circuit 3 Ph differential voltage Current-transformer circuit 3 Ph total current Phase angle correction 0° Table 24: Circuit 1-C ® TAPCON 4077638/07 EN Maschinenfabrik Reinhausen GmbH 2019...
- Page 119 ▪ The current I is ahead of voltage U by 30°. This corresponds to a phase shift of -30°. ▪ The voltage drop on a phase conductor is determined by the current I ® Maschinenfabrik Reinhausen GmbH 2019 4077638/07 EN TAPCON...
- Page 120 ▪ The voltage drop on a phase conductor is determined by the current I If you use this circuit, set the device as follows: Parameter Option Voltage-transformer circuit 3 Ph differential voltage Current-transformer circuit 3 Ph phase current Phase angle correction -30° Table 27: Circuit 1-F ® TAPCON 4077638/07 EN Maschinenfabrik Reinhausen GmbH 2019...
- Page 121 UI measuring channels 3-phase measurement (channels 1, 2, 3) Measurement mode Phase-phase Table 28: Circuit 3-A Circuit 3-B ▪ Three-phase measurement. ▪ The voltage transformers are connected between the phase and neutral conductor. ® Maschinenfabrik Reinhausen GmbH 2019 4077638/07 EN TAPCON...
- Page 122 If you use this circuit, set the device as follows: Parameter Option Voltage-transformer circuit Current-transformer circuit Phase angle correction -30° UI measuring channels 3-ph. voltage, 1-ph. current Measurement mode Phase-phase Table 30: Circuit 3-C ® TAPCON 4077638/07 EN Maschinenfabrik Reinhausen GmbH 2019...
- Page 123 ▪ Three-phase voltage measurement, single-phase current measurement. ▪ The voltage transformers are connected between the phases. ▪ The current transformer is connected to phase L3. Parameter Option Voltage-transformer circuit Current-transformer circuit Phase angle correction 90° ® Maschinenfabrik Reinhausen GmbH 2019 4077638/07 EN TAPCON...
- Page 124 Option Voltage-transformer circuit 3 Ph phase voltage Current-transformer circuit 3 Ph phase current Phase angle correction 0° UI measuring channels 3-ph. voltage, 1-ph. current Measurement mode Phase-neutral Table 33: Circuit 3-F Circuit 3-G ® TAPCON 4077638/07 EN Maschinenfabrik Reinhausen GmbH 2019...
- Page 125 ▪ The current transformer is connected to phase L3. Parameter Option Voltage-transformer circuit 3 Ph phase voltage Current-transformer circuit 3 Ph phase current Phase angle correction 120° UI measuring channels 3-ph. voltage, 1-ph. current Measurement mode Phase-neutral Table 35: Circuit 3-H ® Maschinenfabrik Reinhausen GmbH 2019 4077638/07 EN TAPCON...
-
Page 126: Measurement
To set the control variable, proceed as follows: 1. Go to Settings > Parameters > Measurement > Control variable. 2. Select the option you want. 3. Press the Accept button to save the modified parameter. ® TAPCON 4077638/07 EN Maschinenfabrik Reinhausen GmbH 2019... -
Page 127: Regulation Mode
To set the power factor display, proceed as follows: 1. Go to Settings > Parameters > Measurement > Negative power factor display. 2. Select the desired option. 3. Press the Accept button to save the modified parameter. ® Maschinenfabrik Reinhausen GmbH 2019 4077638/07 EN TAPCON... -
Page 128: Control Of The Motor-Drive Unit
If the TAPCON® is operated as a follower in parallel operation in this case, then the TAPCON® issues the switching pulse until one of the following re- quirements has been met: ▪... - Page 129 8 Operation Time-controlled switching Selecting the "Time-controlled switching pulse" option causes the pulse TAPCON® to issue the switching pulse for a set duration. A pause is en- forced after every switching pulse before another switching pulse is is- sued. If you use a motor-drive unit from Maschinenfabrik Reinhausen GmbH, you need to select the "Time-controlled switching pulse"...
-
Page 130: Setting Motor Runtime Monitoring
Setting the switching pulse pause You can use this parameter to set the switching pulse pause between 2 switching pulses. The TAPCON® can only issue another switching pulse once the switching pulse pause has elapsed. To set the switching pulse pause, proceed as follows: 1. -
Page 131: Setting The Switching Direction
Automatic regulation is blocked until you acknowledge [►Section 8.19.1, Page 187] the event. Switching direction monitoring is not active if you control the motor-drive unit with a continuous pulse [►Section 8.8.1, Page 128]. ® Maschinenfabrik Reinhausen GmbH 2019 4077638/07 EN TAPCON... -
Page 132: Line Drop Compensation
▪ Z compensation You have to set the parameters for both winding 1 (W1) and winding 2 (W2). Figure 80: Setting line drop compensation Note the description below for configuration of line drop compensation. ® TAPCON 4077638/07 EN Maschinenfabrik Reinhausen GmbH 2019... - Page 133 To select R&X compensation, proceed as follows: 1. Go to Settings > Parameters > Compensation > Compensation method. 2. Select R&X compensation option. 3. Press the Accept button to save the modified parameter. ® Maschinenfabrik Reinhausen GmbH 2019 4077638/07 EN TAPCON...
- Page 134 To keep the voltage constant for the consumer, you can use Z compensation to activate a current-dependent increase in voltage. You can also define a limit value to avoid excess voltage on the transformer. Figure 83: Z compensation ® TAPCON 4077638/07 EN Maschinenfabrik Reinhausen GmbH 2019...
- Page 135 To set the voltage limit value, proceed as follows: 1. Go to Settings > Parameters > Compensation > Voltage limit value. 2. Enter voltage limit value. 3. Press the Accept button to save the modified parameter. ® Maschinenfabrik Reinhausen GmbH 2019 4077638/07 EN TAPCON...
-
Page 136: Tap Position Capture
For the analog tap position capture, you must set which tap positions corre- spond to the minimum analog signal and maximum analog signal. The device is configured at the factory according to the order. However, should modifications be necessary, note the following sections. ® TAPCON 4077638/07 EN Maschinenfabrik Reinhausen GmbH 2019... - Page 137 3. Press the Accept button to save the modified parameter 8.10.2.2 Resistor contact series Carry out the calibration at an ambient temperature that corresponds to nor- mal operating conditions. This allows you to reduce measurement errors due to temperature fluctuations. ® Maschinenfabrik Reinhausen GmbH 2019 4077638/07 EN TAPCON...
- Page 138 ð Step 4: The device determines the offset and once complete moves onto step 5. 13. Step 5: Press the Next button to complete calibration. ð Calibration of tap position capture using the resistor contact series has been undertaken successfully. ® TAPCON 4077638/07 EN Maschinenfabrik Reinhausen GmbH 2019...
-
Page 139: Parallel Operation (Optional)
If the tap position is not the same, the fol- lowers switch to the tap position received from the master. This ensures that the transformers operating in parallel are always in the same tap position. ® Maschinenfabrik Reinhausen GmbH 2019 4077638/07 EN TAPCON... - Page 140 Follower chronization CAN bus address Master/follower switching characteristics Maximum tap difference Yes (if follower) Error if no communication present Behavior if no communi- cation present Parallel operation error delay time Table 39: Parameter ® TAPCON 4077638/07 EN Maschinenfabrik Reinhausen GmbH 2019...
-
Page 141: Configuring Parallel Operation
Auto. tap synchroniza- Automatic assignment of master or follower. tion If no master is detected, the TAPCON® with the lowest CAN bus address is automatically designated as the mas- ter. All other TAPCON® are designated as followers. Table 40: Setting tap synchronization ®... - Page 142 After the set delay time for parallel operation error messages has elapsed, the follower issues the Permitted tap difference to master exceeded message. ® TAPCON 4077638/07 EN Maschinenfabrik Reinhausen GmbH 2019...
- Page 143 To set the behavior, proceed as follows: 1. Go to Settings > Parameters > Parallel operation > Behavior if no communication present. 2. Select the desired option. 3. Press the Accept button to save the modified parameter. ® Maschinenfabrik Reinhausen GmbH 2019 4077638/07 EN TAPCON...
-
Page 144: Tapcon® 2Xx Retrofit
If you wish to operate several devices in parallel operation with existing de- vices, you have to activate the TAPCON® 2xx retrofit function on each de- vice. Figure 88: Parallel operation of 2 devices with one TAPCON® 2xx. The TAPCON® 2xx retrofit function must be active on both devices. ®... -
Page 145: Detecting Parallel Operation Via Group Inputs (Optional)
8 Operation To activate the TAPCON® 2xx retrofit function, proceed as follows: ü Reverse prefix of phase angle correction. 1. Go to Settings > Parameters > TAPCON® 2xx retrofit > TAPCON® 2xx retrofit. 2. Select the option you want. 3. Press the Accept button to save the modified parameter. - Page 146 ▪ Relative/absolute limit value ▪ Limit value [V]: Absolute limit value ▪ Limit value [%]: Limit value relative to desired voltage value ▪ Hysteresis limit value ▪ Delay time limit value ▪ Behavior limit value ® TAPCON 4077638/07 EN Maschinenfabrik Reinhausen GmbH 2019...
- Page 147 Hysteresis limit value You can use this parameter to set the hysteresis. You can use this to avoid the unnecessary generation of messages if the measured value fluctuates around a threshold value. ® Maschinenfabrik Reinhausen GmbH 2019 4077638/07 EN TAPCON...
-
Page 148: Current Monitoring
For monitoring the transformer's current load current, you can set 4 limit val- ues: ▪ I<<: Lower limit 2 ▪ I<: Lower limit 1 ▪ I>: Upper limit 1 ▪ I>>: Upper limit 2 ® TAPCON 4077638/07 EN Maschinenfabrik Reinhausen GmbH 2019... - Page 149 With current measurements via the analog input, the value is rela- tive to the maximum value of the analog input (e.g. 100% = 20 mA). ▪ Hysteresis limit value ▪ Delay time limit value ▪ Behavior limit value ® Maschinenfabrik Reinhausen GmbH 2019 4077638/07 EN TAPCON...
- Page 150 Hysteresis limit value You can use this parameter to set the hysteresis. You can use this to avoid the unnecessary generation of messages if the measured value fluctuates around a threshold value. ® TAPCON 4077638/07 EN Maschinenfabrik Reinhausen GmbH 2019...
-
Page 151: Power Monitoring
|cos φ|< Table 44: Limit values for power monitoring You can set the following parameters for each limit value: ▪ Limit value: Absolute limit value ▪ Hysteresis limit value ▪ Delay time limit value ® Maschinenfabrik Reinhausen GmbH 2019 4077638/07 EN TAPCON... -
Page 152: Power Flow Monitoring
8.12.4 Power flow monitoring A reversal of power flow occurs if the active power is negative. You can set the following parameters for this: ▪ Hysteresis ▪ Delay time ▪ Behavior ® TAPCON 4077638/07 EN Maschinenfabrik Reinhausen GmbH 2019... - Page 153 ▪ Automatic regulation remains active. Event only ▪ The Reversal of power flow event is issued. ▪ If Z compensation is activated, this function is deacti- vated. ▪ Automatic regulation remains active. ® Maschinenfabrik Reinhausen GmbH 2019 4077638/07 EN TAPCON...
-
Page 154: Tap Position Monitoring (Optional)
▪ Delay time (optional) ▪ Behavior limit value Delay time limit value You can use this parameter to set the delay time in order to delay the issuing of the event message. ® TAPCON 4077638/07 EN Maschinenfabrik Reinhausen GmbH 2019... -
Page 155: Bandwidth Monitoring
2 Tap position monitoring (optional) [► 154] 8.12.6 Bandwidth monitoring The following limit values are monitored via bandwidth monitoring. The set bandwidth [►Section 8.4.2, Page 105] is used for this purpose. ▪ Upper bandwidth ▪ Lower bandwidth ® Maschinenfabrik Reinhausen GmbH 2019 4077638/07 EN TAPCON... - Page 156 To set bandwidth monitoring, proceed as follows: 1. Go to Settings > Parameters > Bandwidth monitoring. 2. Select the desired parameter. 3. Set parameter. 4. Press the Accept button to save the modified parameter. ® TAPCON 4077638/07 EN Maschinenfabrik Reinhausen GmbH 2019...
-
Page 157: Phase Symmetry Monitoring
3 phases. The following parameters are available for configuring phase difference monitoring: ▪ ∆U-3ph ▪ ∆U-3ph behavior ▪ ∆U-3ph delay ▪ ∆φ-3ph ▪ ∆φ-3ph behavior ▪ ∆φ-3ph delay ® Maschinenfabrik Reinhausen GmbH 2019 4077638/07 EN TAPCON... - Page 158 You can use this parameter to specify a limit value for the phase angle differ- ence. ∆U-3ph/∆φ-3ph delay time You can use this parameter to set the delay time in order to delay the issuing of the event message. ® TAPCON 4077638/07 EN Maschinenfabrik Reinhausen GmbH 2019...
-
Page 159: Switching Interval Monitoring
Maximum permissible number of tap-change operations If the maximum permissible number of tap-change operations within the set time interval is exceeded, the device triggers a corresponding response. ® Maschinenfabrik Reinhausen GmbH 2019 4077638/07 EN TAPCON... - Page 160 Switching to man- The event is displayed for the set duration of the response. The ual mode TAPCON® automatically switches to manual mode. Auto blocking The event is displayed for the set duration of the response. Au- tomatic voltage regulation is blocked. You can wait for the blocking time to expire or switch to manual mode by hand and then to auto mode.
-
Page 161: Target-Tap-Position Operation
The current measured values can be displayed in the measured value screen. The following measured values are displayed: ▪ Voltage ▪ Current ▪ Power factor (cos ϕ) ▪ Frequency ▪ Reactive power ▪ Active power ▪ Apparent power ® Maschinenfabrik Reinhausen GmbH 2019 4077638/07 EN TAPCON... -
Page 162: Displaying Measured Value Recorder (Optional)
Winding 1: Frequency (average value) W1: φ_m U1/I1 Winding 1: Phase angle U1/I1 (average value) W1: φ_m U2/I2 Winding 1: Phase angle U2/I2 (average value) W1: φ_m U3/I3 Winding 1: Phase angle U3/I3 (average value) ® TAPCON 4077638/07 EN Maschinenfabrik Reinhausen GmbH 2019... - Page 163 Winding 2: Neutral conductor current (average value) W2: I_m L1 Winding 2: Current L1 (average value) W2: I_m L2 Winding 2: Current L2 (average value) W2: I_m L3 Winding 2: Current L3 (average value) ® Maschinenfabrik Reinhausen GmbH 2019 4077638/07 EN TAPCON...
- Page 164 W1: φ U2/I2 Winding 1: Phase angle U2/I2 W1: φ U3/I3 Winding 1: Phase angle U3/I3 W1: cos(φ) L1 Winding 1: Power factor L1 W1: cos(φ) L2 Winding 1: Power factor L2 ® TAPCON 4077638/07 EN Maschinenfabrik Reinhausen GmbH 2019...
- Page 165 Winding 2: Current L2 W2: I L3 Winding 2: Current L3 W2: U L1 Winding 2: Voltage L1 W2: U L2 Winding 2: Voltage L2 W2: U L3 Winding 2: Voltage L3 ® Maschinenfabrik Reinhausen GmbH 2019 4077638/07 EN TAPCON...
- Page 166 2. Select the signals to be displayed in the list. 3. If necessary, set the desired axis for each signal. 4. Enter the start time and end time for the measured value display. ® TAPCON 4077638/07 EN Maschinenfabrik Reinhausen GmbH 2019...
- Page 167 7. Use the mouse to drag a selection window in order to zoom into the dia- gram. Select the button to reduce the diagram back to its original size. 8. Select the button to save the displayed measured values as a csv file. ® Maschinenfabrik Reinhausen GmbH 2019 4077638/07 EN TAPCON...
-
Page 168: Setting The Average Value Interval
▪ Average value interval = 1 s: approx. 6 days ▪ Average value interval = 86,400 s (= 24 h): approx. 1,340 years ® TAPCON 4077638/07 EN Maschinenfabrik Reinhausen GmbH 2019... -
Page 169: Displaying Temperature Curve (Optional)
If using additional temperature sensors (generic temperature 1...8), you can display the temperature curve for these temperatures over the last 10 days. To do so, proceed as follows: ► Go to Information > Gener. temperatures. ® Maschinenfabrik Reinhausen GmbH 2019 4077638/07 EN TAPCON... -
Page 170: On-Load Tap-Changer Monitoring
Under "OLTC" you can display information about the on-load tap-changer: ▪ Current tap position ▪ Total tap-change operations (operations counter) Figure 104: OLTC To retrieve information on the hardware, proceed as follows: ► Go to Information > OLTC. ® TAPCON 4077638/07 EN Maschinenfabrik Reinhausen GmbH 2019... -
Page 171: Displaying Tap-Change Operation Statistics (Optional)
10 days. Figure 105: Tap-change operation statistics To display the tap-change operation statistics, proceed as follows: ► Go to Information > Tap-change operation statistics. ® Maschinenfabrik Reinhausen GmbH 2019 4077638/07 EN TAPCON... -
Page 172: Motor Current Index (Mci)
2 Unknown The tap-change operation type is unknown. This is the case after the device has been restarted or if the motor protective switch has been triggered. Table 50: Tap-change operation types ® TAPCON 4077638/07 EN Maschinenfabrik Reinhausen GmbH 2019... - Page 173 You can use this parameter to activate or deactivate Motor Current Index monitoring. To activate/deactivate Motor Current Index monitoring, proceed as follows: 1. Go to Settings > Parameters > Motor Current Index > Limit value monitoring. 2. Select the desired option. ® Maschinenfabrik Reinhausen GmbH 2019 4077638/07 EN TAPCON...
- Page 174 2. Enter the desired value. 3. Press the Accept button to save the modified parameter. 8.15.3.2 Displaying the MCI You can display the progression and the extreme values of the Motor Cur- rent Index. ® TAPCON 4077638/07 EN Maschinenfabrik Reinhausen GmbH 2019...
- Page 175 : Call up last page. ▪ : Update the display. To call up the MCI values, proceed as follows: 1. Go to Information > MCI values. 2. Where necessary, select the navigation buttons to change pages. ® Maschinenfabrik Reinhausen GmbH 2019 4077638/07 EN TAPCON...
-
Page 176: Displaying Information About Contact Wear (Only Oiltap®)
8.15.4 Displaying information about contact wear (only OILTAP®) If you are monitoring an on-load tap-changer of type OILTAP®, you can dis- play the current wear values of the main switching contacts (MSCA, MSCB) and transition contacts (TCA, TCB). ® TAPCON 4077638/07 EN Maschinenfabrik Reinhausen GmbH 2019... -
Page 177: Maintenance (Optional)
MR standards. Oil sample An oil sample must be taken and analyzed; the limit values specified by MR for added insulating oil must be observed. Oil filter unit The oil filter of the oil filter unit must be replaced. -
Page 178: Setting Operator Interval For Oltc Maintenance
You can use the parameter for the date of the next maintenance to define the target date for the next maintenance. The duration parameter sets how long this interval is to be. The device uses this to calculate the current main- tenance progress. ® TAPCON 4077638/07 EN Maschinenfabrik Reinhausen GmbH 2019... -
Page 179: Setting Operator Interval For Transformer Maintenance
The device uses this to calculate the current main- tenance progress. Event (yellow) You can use this parameter to set the maintenance progress (as a percent- age) after which the device is to issue an event message (yellow). ® Maschinenfabrik Reinhausen GmbH 2019 4077638/07 EN TAPCON... -
Page 180: Undertaking And Confirming Maintenance
If you have exchanged (other position) or replaced con- tacts, then enter the contact wear found on the mounted contacts (for new contacts: 0.000 mm) and select "Yes" in the prompt that reads "Contacts exchanged/replaced" to confirm it. Table 52: Maintenance parameters ® TAPCON 4077638/07 EN Maschinenfabrik Reinhausen GmbH 2019... - Page 181 (movable contact) Thickness of the contact coating Thickness of the worn contact when new (fixed contact) coating (movable contact) The wear thickness z to be entered is determined as follows: z = x ® Maschinenfabrik Reinhausen GmbH 2019 4077638/07 EN TAPCON...
- Page 182 5. Press the Accept button to save the changed parameters. ð Only for OILTAP®: A prompt appears asking if the contacts were ex- changed or replaced. 6. Only for OILTAP®: Press Yes or No to confirm the prompt. ® TAPCON 4077638/07 EN Maschinenfabrik Reinhausen GmbH 2019...
-
Page 183: Displaying Maintenance Overview
To display the maintenance overview, proceed as follows: ► Go to Information > Maintenance. 8.17 Configuring analog inputs and outputs (optional) You can flexibly configure the device's analog inputs and outputs and assign device functions. ® Maschinenfabrik Reinhausen GmbH 2019 4077638/07 EN TAPCON... - Page 184 Set the minimum and maximum values of the sensor, e.g. with a 4...20 mA signal, the corresponding measured value for 4 mA and the corresponding value for 20 mA. Table 53: Configuration of the analog inputs and outputs ® TAPCON 4077638/07 EN Maschinenfabrik Reinhausen GmbH 2019...
-
Page 185: Configuring Digital Inputs And Outputs
Upon delivery, the configurable digital inputs and outputs of the device are configured as follows: ▪ Input: High active ▪ Output: Normally open contact (NO) You can change this configuration if necessary. ® Maschinenfabrik Reinhausen GmbH 2019 4077638/07 EN TAPCON... - Page 186 Parameter Configurator or Administrator role. When in delivery status, you can log in as the administrator as follows: ▪ User name: admin ▪ Password: admin ® TAPCON 4077638/07 EN Maschinenfabrik Reinhausen GmbH 2019...
-
Page 187: Event Management
8.19.1 Displaying and acknowledging events To display the events currently active, proceed as follows: ► Go to Events. ð A list of events currently active appears. Figure 120: Overview of events currently active ® Maschinenfabrik Reinhausen GmbH 2019 4077638/07 EN TAPCON... -
Page 188: Configuring Events
Storage If you activate this option, the event is stored in the event memory. Table 55: Properties of events ® TAPCON 4077638/07 EN Maschinenfabrik Reinhausen GmbH 2019... -
Page 189: Displaying Event Memory
Event text Time Date and time of event (DD.MM.YYYY, HH:MM:SS/ms) Event coming/going: Event coming Event going Table 56: Event memory To call up the event memory, proceed as follows: 1. Go to Events. ® Maschinenfabrik Reinhausen GmbH 2019 4077638/07 EN TAPCON... -
Page 190: Scada
The following section describes how you can configure the device to connect to a control system (SCADA). You can download the data points with the help of the export manager [►Section 8.25, Page 238]. ® TAPCON 4077638/07 EN Maschinenfabrik Reinhausen GmbH 2019... -
Page 191: Configuring Iec 61850 (Optional)
To set the device ID, proceed as follows: 1. Go to Settings > Parameters > IEC 61850 > Device ID. 2. Enter a device ID. 3. Press the Accept button to save the modified parameter. ® Maschinenfabrik Reinhausen GmbH 2019 4077638/07 EN TAPCON... - Page 192 [►Section 8.25, Page 238]. To do this, you have to establish an Ether- net connection between the device and your PC. For a smooth download with Windows Vista/7/8 operating systems, use Windows Explorer. ® TAPCON 4077638/07 EN Maschinenfabrik Reinhausen GmbH 2019...
-
Page 193: Displaying Iec 61850 Log (Optional)
2. Optional: Press the Server or Client button to change the display. 8.20.3 Configuring IEC 60870-5-101 (optional) If you want to use the IEC 60870-5-101 control system protocol, you must set the following parameters. Figure 125: Setting parameters for IEC60870-5-101 ® Maschinenfabrik Reinhausen GmbH 2019 4077638/07 EN TAPCON... - Page 194 2. Select transmission procedure. 3. Press the Accept button to save the modified parameter. Octet number of link address You can use this parameter to set how many octets are provided for the link address. ® TAPCON 4077638/07 EN Maschinenfabrik Reinhausen GmbH 2019...
- Page 195 1. Go to Settings > Parameters > IEC 60870-5-101 > Octet number of in- formation object address. 2. Set octet number of information object address. 3. Press the Accept button to save the modified parameter. ® Maschinenfabrik Reinhausen GmbH 2019 4077638/07 EN TAPCON...
- Page 196 With this parameter, you can set whether a confirmation is to be sent as sin- gle characters instead of as a complete message. Single character confirma- tion is only possible for requesting data of class 2 (Class 2 Request). ® TAPCON 4077638/07 EN Maschinenfabrik Reinhausen GmbH 2019...
- Page 197 (Type 1, 3, 5, 7, 9, 11, 13, 15, 20, 21, 126). Table 58: ASDU sequence optimization To set the ASDU sequence optimization, proceed as follows: 1. Go to Settings > Parameters > IEC 60870-5-101 > ASDU sequence op- timization. ® Maschinenfabrik Reinhausen GmbH 2019 4077638/07 EN TAPCON...
-
Page 198: Configuring Iec 60870-5-103 (Optional)
3. Press the Accept button to save the modified parameter. 8.20.4 Configuring IEC 60870-5-103 (optional) If you want to use the IEC 60870-5-103 control system protocol, you must set the following parameters. Figure 126: Setting parameters for IEC60870-5-103 ® TAPCON 4077638/07 EN Maschinenfabrik Reinhausen GmbH 2019... - Page 199 To set the number of data bits, proceed as follows: 1. Go to Settings > Parameters > IEC 60870-5-103 > Number of data bits. 2. Set number of data bits. 3. Press the Accept button to save the modified parameter. ® Maschinenfabrik Reinhausen GmbH 2019 4077638/07 EN TAPCON...
- Page 200 To set the DFC compatibility, proceed as follows: 1. Go to Settings > Parameters > IEC 60870-5-103 > DFC compatibility. 2. Select the desired option. 3. Press the Accept button to save the modified parameter. ® TAPCON 4077638/07 EN Maschinenfabrik Reinhausen GmbH 2019...
-
Page 201: Configuring Iec 60870-5-104 (Optional)
Also refer to the section Configuring the net- work [►Section 8.3, Page 88]. Figure 127: Setting parameters for IEC60870-5-104 TCP port You can use this parameter to set the TCP port. ® Maschinenfabrik Reinhausen GmbH 2019 4077638/07 EN TAPCON... - Page 202 To set the ASDU sequence optimization, proceed as follows: 1. Go to Settings > Parameters > IEC 60870-5-104 > ASDU sequence op- timization. 2. Select the desired option. 3. Press the Accept button to save the modified parameter. ® TAPCON 4077638/07 EN Maschinenfabrik Reinhausen GmbH 2019...
-
Page 203: Configuring Modbus (Optional)
Modbus type selected. Also refer to the section Configuring the network [►Section 8.3, Page 88] if you want to use Modbus TCP. Figure 128: Setting parameters for Modbus ® Maschinenfabrik Reinhausen GmbH 2019 4077638/07 EN TAPCON... - Page 204 You can use this parameter to activate/deactivate the "TCP Keepalive" func- tion. To activate/deactivate the "TCP Keepalive" function, proceed as follows: 1. Go to Settings > Parameters > Modbus > TCP Keepalive. ® TAPCON 4077638/07 EN Maschinenfabrik Reinhausen GmbH 2019...
- Page 205 3. Press the Accept button to save the modified parameter. Parity (only with Modbus RTU and Modbus ASCII) You can use this parameter to set the parity. You can select the following options: ▪ None ▪ Even ▪ Odd ® Maschinenfabrik Reinhausen GmbH 2019 4077638/07 EN TAPCON...
-
Page 206: Configuring Dnp3 (Optional)
To set the transmission type, proceed as follows: 1. Go to Settings > Parameters > DNP3 > DNP3 transmission type. 2. Select DNP3 transmission type. 3. Press the Accept button to save the modified parameter. ® TAPCON 4077638/07 EN Maschinenfabrik Reinhausen GmbH 2019... - Page 207 You can use this parameter to set the link address of the device. To set the device address, proceed as follows: 1. Go to Settings > Parameters > DNP3 > Device address. 2. Enter the device address. 3. Press the Accept button to save the modified parameter ® Maschinenfabrik Reinhausen GmbH 2019 4077638/07 EN TAPCON...
- Page 208 You can use this parameter to set the timeout for unsolicited messages. To set the timeout for unsolicited messages, proceed as follows: 1. Go to Settings > Parameters > DNP3 > Timeout. ® TAPCON 4077638/07 EN Maschinenfabrik Reinhausen GmbH 2019...
-
Page 209: Configuring Goose (Optional)
You can use the optional GOOSE function to send GOOSE messages (GOOSE publisher) or receive GOOSE messages (GOOSE subscriber) via the IEC 61850 control system protocol with the device. The configuration of GOOSE is described in the following sections. ® Maschinenfabrik Reinhausen GmbH 2019 4077638/07 EN TAPCON... - Page 210 ▪ The maximum number of usable GSEControl elements is defined in TEM- PLATE.icd under Services GOOSE. You cannot adjust this value. ▪ The shortest repeat time is defined in Private Element type="MR- MINTIME-GOOSE". You cannot adjust this value. ®...
- Page 211 2. Select the SCADA configuration option. ð The SCADA configuration is exported as a zip archive. 3. Unzip the zip archive and adapt the TEMPLATE.icd file to the require- ments. 4. Go to Settings > Import. ® Maschinenfabrik Reinhausen GmbH 2019 4077638/07 EN TAPCON...
- Page 212 GOOSE messages from an IED in the network and link them to device func- tions. You can use this function to display all of the device's digital input sig- nals via GOOSE. ® TAPCON 4077638/07 EN Maschinenfabrik Reinhausen GmbH 2019...
- Page 213 DataSet and GSE block. The referenced DataSet may contain data ob- jects (DO) or data attributes (DA). The maximum number of usable data points per GOOSE message is defined in Private Element type="MR-MAX- GOOSE-SUBSCRIBER-FCDA". You cannot adjust this value.
- Page 214 5. Press the Accept button to save the configuration. ð The Restart device dialog appears. 6. Select Cancel if you want to configure other data points or OK to com- plete the modified configuration by restarting the device. ® TAPCON 4077638/07 EN Maschinenfabrik Reinhausen GmbH 2019...
-
Page 215: Configure Data Points (Optional)
▪ 01000: group 4 ▪ 01001: group 1 and group 4 INTG The value indicates whether the data point is to be in- 0, 1 cluded in a general query (1) or not (0). ® Maschinenfabrik Reinhausen GmbH 2019 4077638/07 EN TAPCON... - Page 216 2. Adjust the data points as required. 3. Press the Accept button to adopt the modified list of data points. 4. Restart the device to activate the modified list of data points. ® TAPCON 4077638/07 EN Maschinenfabrik Reinhausen GmbH 2019...
- Page 217 If no device parameter is available for the threshold value, no threshold value is active either. Table 67: Configuring IEC 60870-5-103 data points Figure 136: Configuring IEC 60870-5-103 data points ® Maschinenfabrik Reinhausen GmbH 2019 4077638/07 EN TAPCON...
- Page 218 0, the data point is not transmitted periodically. Notice: You can only enter an interval for data points of type 9, 11 or 13. Table 68: Configuring IEC 60870-5-104 data points ® TAPCON 4077638/07 EN Maschinenfabrik Reinhausen GmbH 2019...
- Page 219 16 bits. Please note that the Index2 address always follows on from the Index1 address exactly. Name Data point designation Table 69: Configuring Modbus data points ® Maschinenfabrik Reinhausen GmbH 2019 4077638/07 EN TAPCON...
- Page 220 Data point address. 0...4,294,967,296 CLASS Data point class. 0...3 ▪ 0: Static ▪ 1...3: Event Notice: You can only set the data point class for data points of object groups AI, BI, and CT. ® TAPCON 4077638/07 EN Maschinenfabrik Reinhausen GmbH 2019...
- Page 221 Notice: The threshold value has the same unit as the data point value. Take note of the list of data points. Table 70: Configuring DNP3 data points Figure 139: Configuring DNP3 data points ® Maschinenfabrik Reinhausen GmbH 2019 4077638/07 EN TAPCON...
-
Page 222: Configuring Syslog
The device supports the transmission of log messages via the syslog proto- col in accordance with the standards RFC 5424 and RFC 3164. In order to use syslog, you must set the following parameters: Figure 140: Configuring syslog ® TAPCON 4077638/07 EN Maschinenfabrik Reinhausen GmbH 2019... - Page 223 (only for TCP or TLS). Set the device designation You can use this parameter to set the device designation that the device will be identified with on the syslog server. ® Maschinenfabrik Reinhausen GmbH 2019 4077638/07 EN TAPCON...
-
Page 224: Time Synchronization
▪ SNTP time server (for the first and second SNTP time servers) ▪ Synchronization interval ▪ Time zone ▪ Automatic daylight saving / standard time ▪ Time (manual setting) Figure 141: Setting time synchronization ® TAPCON 4077638/07 EN Maschinenfabrik Reinhausen GmbH 2019... -
Page 225: Activating Time Synchronization Using Sntp
To enter the time server address of the SNTP server, proceed as follows: 1. Go to Settings > Parameters > System > Time synchronization > SNTP time server. 2. Enter time server address. 3. Press the Accept button to save the modified parameter. ® Maschinenfabrik Reinhausen GmbH 2019 4077638/07 EN TAPCON... -
Page 226: Setting The Time Zone
To set the synchronization interval, proceed as follows: 1. Go to Settings > Parameters > System > Time synchronization > Syn- chronization interval. 2. Enter the synchronization interval. 3. Press the Accept button to save the modified parameter. ® TAPCON 4077638/07 EN Maschinenfabrik Reinhausen GmbH 2019... -
Page 227: Automatic Switchover Between Daylight Saving Time And Standard Time
Note the Setting access rights to parameters and events [►Section 8.23.4, Page 232] section. If you are not logged in on the device, you will assume the "Data display" user role. ® Maschinenfabrik Reinhausen GmbH 2019 4077638/07 EN TAPCON... - Page 228 Restart device Import Export Set date and time Calling up the commissioning wizard Calibrate resistor contact se- ries Actuation of the RAISE, LOWER, REMOTE, AVR AUTO, and AVR MANUAL keys Setting topology ® TAPCON 4077638/07 EN Maschinenfabrik Reinhausen GmbH 2019...
-
Page 229: Changing Password
Calling up the maintenance wizard Changing tap position table Enabling ECOTAP Modbus Adding sensors to the MR sensor bus Table 75: Access rights permanently linked to the roles 8.23.2 Changing password All users can change their passwords provided that the user account is not set up as a group account. -
Page 230: Creating, Editing And Deleting Users
The user data is still stored in the device. ▪ Auto login: You can activate the Auto-login function for a user. This user is automatically logged in when the system is restarted or another user logs out. ® TAPCON 4077638/07 EN Maschinenfabrik Reinhausen GmbH 2019... - Page 231 To edit an existing user, proceed as follows: 1. Go to Settings > Administration > User. 2. Select the desired user in the list. 3. Make the amendments desired. 4. Press the Accept button to save the user. ® Maschinenfabrik Reinhausen GmbH 2019 4077638/07 EN TAPCON...
-
Page 232: Setting Access Rights To Parameters And Events
To set the access rights to parameters and events, proceed as follows: 1. Go to Settings > Administration > Parameters/events. ð A list of all parameters or events appears. 2. Select the desired entry in the list. 3. Select the options you want. ® TAPCON 4077638/07 EN Maschinenfabrik Reinhausen GmbH 2019... -
Page 233: User Authentication Via Radius (Optional)
VENDOR MR 34559 BEGIN-VENDOR MR # Attributes ATTRIBUTE MR-ISM-User-Group 1 integer # Predefined values for attribute 'MR-ISM-User-Group' VALUE MR-ISM-User-Group Administrator 1 VALUE MR-ISM-User-Group Parameter-configurator 2 VALUE MR-ISM-User-Group Operator 3 VALUE MR-ISM-User-Group Diagnostics 4 VALUE MR-ISM-User-Group Data-display 5... - Page 234 RADIUS server You can use this parameter to set the IP address of the RADIUS server. RADIUS server port You can use this parameter to set the port of the RADIUS server. ® TAPCON 4077638/07 EN Maschinenfabrik Reinhausen GmbH 2019...
-
Page 235: Information About Device
Figure 146: Displaying information about the device's hardware To retrieve information on the hardware, proceed as follows: 1. Go to Information > Hardware. 2. Select the Assembly you want in order to display the signal levels of the channels. ® Maschinenfabrik Reinhausen GmbH 2019 4077638/07 EN TAPCON... -
Page 236: Software
Active parallel operation method Current tap position U [V] Voltage I_p [%] Active current I_q [%] Reactive curr. Blocking: ▪ Gray: Parallel operation not blocked ▪ Red: Parallel operation blocked Table 76: Information about parallel operation ® TAPCON 4077638/07 EN Maschinenfabrik Reinhausen GmbH 2019... -
Page 237: Topology
► Go to Information > Parallel operation. 8.24.4 Topology In the Topology menu you can display which transformers are in parallel op- eration and which parallel operation group the transformers belong to. Figure 149: Topology ® Maschinenfabrik Reinhausen GmbH 2019 4077638/07 EN TAPCON... -
Page 238: Import/Export Manager
Transformer is in parallel operation and belongs to parallel operation group 2. Transformer is in simplex mode. The CAN bus connection to the TAPCON® of this trans- former is faulty. Table 77: Forms of depiction (examples) To retrieve information on the topology, proceed as follows: ►... - Page 239 Configuration of parameters and events. Data point con- Data point configuration of the control system. figuration Sensor bus de- Sensor description of the sensors for MR sensor bus that have vice descrip- been created with the sensor editor. tion Service data...
-
Page 240: Importing Data (Software Version 3.44 And Later)
► During the import, do not remove the USB stick or disconnect the network connection. To import data, proceed as follows: 1. Go to Settings > Import. 2. Select the desired option for data transmission (PC or USB). ® TAPCON 4077638/07 EN Maschinenfabrik Reinhausen GmbH 2019... -
Page 241: Configuring Media Converter With Managed Switch
1. Establish connection with a computer via an Ethernet connection. 2. Configure the computer so that it is in the same subnet as the Ethernet switch. 3. Access the IP address 192.168.1.1 using a browser. ® Maschinenfabrik Reinhausen GmbH 2019 4077638/07 EN TAPCON... - Page 242 7. If necessary, establish a connection to the new IP address to continue changing settings. Click on the Help button to find out more information. 8. Attach the cable for connecting to your network. ® TAPCON 4077638/07 EN Maschinenfabrik Reinhausen GmbH 2019...
-
Page 243: Configuration
1. Go to Basic settings > Load/Save and click on the Reset to factory de- faults… button. 2. Reestablish the connection to the IP address of 192.168.1.1 if necessary. 3. Set the MR factory settings in accordance with the following table. Menu Parameter... -
Page 244: Linking Signals And Events
If the assigned event is active, the device activates the follower parallel operation method. Automatic tap synchronization parallel If the assigned event is active, the device operation method activates the automatic tap synchroniza- tion parallel operation method. ® TAPCON 4077638/07 EN Maschinenfabrik Reinhausen GmbH 2019... - Page 245 If the assigned event is active, the device prompts an increase in the desired value. Decrease desired value If the assigned event is active, the device prompts a decrease in the desired value. Table 83: Functions available Figure 152: Link functions ® Maschinenfabrik Reinhausen GmbH 2019 4077638/07 EN TAPCON...
-
Page 246: Linking Digital Outputs And Control System Messages
When you link a digital output to an event, the device issues a signal to that output if the event occurs. The signal persists until the event stops. A param- eter is available for each available digital output. Figure 153: Linking digital outputs ® TAPCON 4077638/07 EN Maschinenfabrik Reinhausen GmbH 2019... - Page 247 If you enter event number 500, the link is disabled. To link the SCADA message, proceed as follows: ü The desired event number is known [►Section 8.19, Page 187]. 1. Go to Settings > Parameters > Link messages. ® Maschinenfabrik Reinhausen GmbH 2019 4077638/07 EN TAPCON...
-
Page 248: Setting Screensaver
▪ Dimming: Activate or deactivate dimming of the display brightness. ▪ Dimming waiting time: Set waiting time. ▪ Dimming brightness: Brightness setting for a dimmed display. 100% corre- sponds to full brightness, 10% to the lowest brightness. ® TAPCON 4077638/07 EN Maschinenfabrik Reinhausen GmbH 2019... -
Page 249: Tapcon® Personal Logic Editor (Tple)
4. Press the Accept button to save the modified parameter. 8.29 TAPCON® Personal Logic Editor (TPLE) You can use the TAPCON® Personal Logic Editor (TPLE) function to pro- gram simple logical links via the web-based visualization. You can also link the inputs and outputs available on the device using function modules. - Page 250 If no input is configured, the module is not run so it re- mains in its initial state. Table 84: AND function module 8.29.1.3.2 NAND Description NAND, logical NOT-AND link Inputs Input 1…4 (BOOL) ® TAPCON 4077638/07 EN Maschinenfabrik Reinhausen GmbH 2019...
- Page 251 If no input is configured, the output remains in the initial state of FALSE anyway. Table 87: NOR function module 8.29.1.3.5 XOR Description XOR, logical EXCLUSIVE-OR link Inputs Input 1…2 (BOOL) Outputs Output (BOOL) ® Maschinenfabrik Reinhausen GmbH 2019 4077638/07 EN TAPCON...
- Page 252 Initial state All inputs and outputs are FALSE. Non-configured inputs are assumed to be FALSE so that they have no impact on the output. Table 90: Current impulse relay function module ® TAPCON 4077638/07 EN Maschinenfabrik Reinhausen GmbH 2019...
- Page 253 All inputs and outputs are FALSE. Table 91: Switch-on delay function module 8.29.1.3.9 Switch-off delay Description TOFF, switch-off delay Inputs Trigger (BOOL) Reset (BOOL) Outputs Output (BOOL) Parameter Time ms (UINT32), 1...1,000,000, default = 1,000 ® Maschinenfabrik Reinhausen GmbH 2019 4077638/07 EN TAPCON...
- Page 254 All inputs and outputs are FALSE. Table 93: Pulse function module 8.29.1.3.11 Symmetrical pulse generator Description CLCK, symmetrical pulse generator Inputs Enable (BOOL) Outputs Output (BOOL) Parameter Time ms (UINT32), 1...1,000,000, default = 1,000 ® TAPCON 4077638/07 EN Maschinenfabrik Reinhausen GmbH 2019...
- Page 255 When Direction input = TRUE, the output value is decremented by one with every rising edge at the Trig- ger input. Initial state All inputs and outputs are zero or FALSE. Table 95: Counter (forwards/backwards) function module ® Maschinenfabrik Reinhausen GmbH 2019 4077638/07 EN TAPCON...
- Page 256 Off Limit, Output becomes TRUE. Otherwise, the Output is FALSE. Initial state All inputs and outputs are zero or FALSE. Table 96: Analog threshold value switch with hysteresis function module ® TAPCON 4077638/07 EN Maschinenfabrik Reinhausen GmbH 2019...
- Page 257 Result = Value * Multiplier * Constant multiplier If the REAL32 range of numbers is exceeded, the Overflow output becomes TRUE. Initial state All inputs and outputs are zero or FALSE. Table 97: Analog multiplication function module ® Maschinenfabrik Reinhausen GmbH 2019 4077638/07 EN TAPCON...
- Page 258 All inputs and outputs are zero or FALSE. Table 99: Analog addition function module 8.29.1.3.17 Analog subtraction Description SUB, analog subtraction Inputs Input 1 (REAL32) Input 2 (REAL32) Outputs Result (REAL32) Overflow (BOOL) Parameter Offset (REAL32), -1,000,000...+1,000,000; default = 0 ® TAPCON 4077638/07 EN Maschinenfabrik Reinhausen GmbH 2019...
- Page 259 All inputs and outputs are FALSE. Table 102: Falling edge function module 8.29.1.3.20 Average value Description AVRG, average value Inputs Input (REAL32) Enable (BOOL) Reset (BOOL) Autorepeat (BOOL) Outputs Average (REAL32) Done (BOOL) Started (BOOL) SampleCount (UINT32) ® Maschinenfabrik Reinhausen GmbH 2019 4077638/07 EN TAPCON...
- Page 260 Initial state All inputs and outputs are FALSE. Table 103: Average value function module ® TAPCON 4077638/07 EN Maschinenfabrik Reinhausen GmbH 2019...
- Page 261 Output (REAL32) Error (BOOL) Parameter Min In (REAL32): -10,000,000...+10,000,000, default = -10,000,000 Max In (REAL32): -10,000,000...+10,000,000, default = +10,000,000 Min Out (REAL32): -10,000,000...+10,000,000, default = -10,000,000 Max Out (REAL32): -10,000,000...+10,000,000, default = +10,000,000 ® Maschinenfabrik Reinhausen GmbH 2019 4077638/07 EN TAPCON...
- Page 262 REAL32 to SINT32. Initial state All inputs and outputs are zero. Table 106: RTOI function module 8.29.1.3.24 ITOR Description ITOR, Integer-to-real conversion Inputs UINT32 (UINT32) SINT32 (SINT32) Outputs Output U (REAL32) Output S (REAL32) ® TAPCON 4077638/07 EN Maschinenfabrik Reinhausen GmbH 2019...
-
Page 263: Configuring Tple
Note the Event management [►Section 8.19, Page 187] section. The permissible number of characters is limited: ▪ Name: Maximum of 20 characters ▪ Description: Maximum of 80 characters ® Maschinenfabrik Reinhausen GmbH 2019 4077638/07 EN TAPCON... - Page 264 To create, edit or delete a function, you have to call up the function group you want. To do so, proceed as follows: 1. Go to Settings > TPLE > Function group. 2. Select the function group you want. Figure 162: Function group ® TAPCON 4077638/07 EN Maschinenfabrik Reinhausen GmbH 2019...
- Page 265 If necessary, you can rename the function group in order to better assign it. To rename a function group, proceed as follows: 1. Go to Settings > TPLE > Function group. 2. Select the function group you want. ® Maschinenfabrik Reinhausen GmbH 2019 4077638/07 EN TAPCON...
- Page 266 1. Go to Settings > TPLE > Function group. 2. Select the function group you want. 3. Press the Inactive button. ð Red X: Function group is inactive; gray X: Function group is active. ® TAPCON 4077638/07 EN Maschinenfabrik Reinhausen GmbH 2019...
-
Page 267: Maintenance And Care
9 Maintenance and care 9 Maintenance and care The device is maintenance-free. You can clean the device's housing with a dry cloth. ® Maschinenfabrik Reinhausen GmbH 2019 4077638/07 EN TAPCON... -
Page 268: Fault Elimination
Automatic voltage regulation is Voltage measurement incorrect Check voltage measurement. blocked. ▪ Measured voltage too low (< 30 V) Bandwidth set too high Determine the recommended bandwidth. ® TAPCON 4077638/07 EN Maschinenfabrik Reinhausen GmbH 2019... -
Page 269: Unwanted On-Load Tap-Change Operation
Connection cable between front Check connection cable panel and CPU (ETH 2.1) defec- tive. Display Display has crashed. Press for longer than 2 s to re- ▪ No reaction to input set the display. ® Maschinenfabrik Reinhausen GmbH 2019 4077638/07 EN TAPCON... -
Page 270: Incorrect Measured Values
▪ Measured value too low. Measured voltage Possible sources of fault: Check measured voltage. ▪ Measured value fluctuates. ▪ Leads laid in parallel. Increase distance from source of interference. ▪ Tap-change operations. Install filter if necessary. ® TAPCON 4077638/07 EN Maschinenfabrik Reinhausen GmbH 2019... -
Page 271: Parallel Operation Faults
▪ Manually correct the master's tap position. ▪ Restart master. ▪ Set master/follower switching characteristics to "sequential". ▪ Change master device to follower and define a different device as the master. Table 113: Parallel operation faults ® Maschinenfabrik Reinhausen GmbH 2019 4077638/07 EN TAPCON... -
Page 272: Tap Position Capture Incorrect
No power supply Check the power supply not light up DIO 42-20 ERR LED (red) lights up An error was detected in the as- Contact Maschinenfabrik Rein- DIO 42-20 HL sembly. hausen GmbH. ® TAPCON 4077638/07 EN Maschinenfabrik Reinhausen GmbH 2019... -
Page 273: Other Faults
▪ Has the software been updated? ▪ Has there previously been a problem with this device? ▪ Have you previously contacted Maschinenfabrik Reinhausen about this is- sue? If yes, then who was the contact? ® Maschinenfabrik Reinhausen GmbH 2019 4077638/07 EN TAPCON... -
Page 274: Event Messages
Z compensation. Check the set parameters. No master present No master is present in the parallel op- Specify a TAPCON® as the master for eration group. parallel operation and check whether the master is ready for operation. Masters on CAN bus > 1 Several masters are present in the par- Ensure that just one TAPCON®... - Page 275 The CAN bus address is already being Make sure that different CAN bus ad- used for another TAPCON®. dresses are configured for each TAPCON®. Use a different CAN bus ad- dress. Invalid tap position: Fol- The tap position of a follower in parallel...
- Page 276 Invalid tap position The captured tap position is invalid. Check the function and wiring of tap po- sition capture of the corresponding TAPCON®. Connect as shown in con- nection diagram. Motor protective switch Motor protective switch triggered. Follow the operating instructions for the motor-drive unit.
- Page 277 P<< parame- ters. W2: Limit value P<< Value has fallen below the limit value Check the current operating conditions of for active power P<<. the transformer and the set P<< parame- ters. ® Maschinenfabrik Reinhausen GmbH 2019 4077638/07 EN TAPCON...
- Page 278 W2: Limit value cosφ << Value has fallen below the limit value Check the current operating conditions of for power factor cos φ<<. the transformer and the set parameters cosφ<<. ® TAPCON 4077638/07 EN Maschinenfabrik Reinhausen GmbH 2019...
- Page 279 TAPCON®. W1: Invalid measured volt- The measured voltage value is invalid. The TAPCON® voltage measurement is age value not working correctly. Check the mea- surement transformer and the wiring of the corresponding TAPCON®. W2: Invalid measured volt- The measured voltage value is invalid.
- Page 280 1175 Auto mode active The device is in auto mode. 1176 Remote mode active The device is in remote mode. 1202 Motor running "Motor running" signal present. Table 116: Event messages ® TAPCON 4077638/07 EN Maschinenfabrik Reinhausen GmbH 2019...
-
Page 281: Disposal
12 Disposal 12 Disposal Observe the national requirements applicable in the country of use. ® Maschinenfabrik Reinhausen GmbH 2019 4077638/07 EN TAPCON... -
Page 282: Overview Of Parameters
TDSC Umin (optional) 49.0...140.0 V 95.0 V TDSC U0 (optional) 49.0...140.0 V 100.0 V TDSC Pmax (optional) 0.1...1,000.0 MW 10.0 MW TDSC Pmin (optional) -1,000.0...-0.1 MW -10.0 MW Bandwidth 0.50...9.00 % 1.00 % ® TAPCON 4077638/07 EN Maschinenfabrik Reinhausen GmbH 2019... - Page 283 Off, R&X compensation, Z com- pensation R&X compensation: Ohmic re- 0.000...30.000 mΩ/m 0.000 mΩ/m sistance load R&X compensation: Inductive 0.000...30.000 mΩ/m 0.000 mΩ/m resistance load R&X compensation: Length of 0...1,000.0 km 0.0 km line ® Maschinenfabrik Reinhausen GmbH 2019 4077638/07 EN TAPCON...
- Page 284 Independent regulation present blocking, cosφ interpolation Delay time par. op. error mes- 1...30 s 5 s sage Settings > Parameter > Retrofit TAPCON® 2xx Retrofit TAPCON® 2xx Off, On Settings > Voltage monitoring (W1 and W2) U< [V] 40.0...160.0 V 90.0 V U<...
- Page 285 10.00 A I>> [%] 50.0...250.0 % 110.0 % I>> relative/absolute Relative, absolute Relative I>> hysteresis 0.00...12.50 A 0.00 A I>> delay time 0.0...60.0 s 0.0 s I>> behavior Off, auto-blocking, auto/manual blocking ® Maschinenfabrik Reinhausen GmbH 2019 4077638/07 EN TAPCON...
- Page 286 5.0 s Q> [kVar] -100,000...100,000 kVar 10,000 kVar Q> hysteresis 0...10,000 kVar 1,000 kVar Q> delay time 0.0...60.0 s 5.0 s Q>> [kVar] -100,000...100,000 kVar 10,000 kVar Q>> hysteresis 0...10,000 kVar 1,000 kVar ® TAPCON 4077638/07 EN Maschinenfabrik Reinhausen GmbH 2019...
- Page 287 0.0 s Settings > Parameter > Total switching interval monitoring (W1 and W2) Maximum number 1...100 Time period 1...1,440 min 5 min Message duration 1...60 min 15 min Behavior Off, Auto blocking, Switch to manual ® Maschinenfabrik Reinhausen GmbH 2019 4077638/07 EN TAPCON...
- Page 288 Settings > Parameter > IEC 61850 (optional) IP address 0.0.0.0...255255255255 192.168.10.254 Subnet mask 0.0.0.0...255255255255 255.255.255.0 Gateway address 0.0.0.0...255255255255 0.0.0.0 IED name TAPCON Device ID TAPCON Settings > Parameter > IEC 60870-5-101 (optional) Serial interface RS232, RS485 RS232 Baud rate 9.6...115.2 kilobaud 9.6 kilobaud Transmission procedure...
- Page 289 In accordance with order Baud rate 9.6...115.2 kilobaud 9.6 kilobaud Number of databits 5...8 In accordance with order Parity None, even, odd In accordance with order Number of stop bits 1...2 In accordance with order ® Maschinenfabrik Reinhausen GmbH 2019 4077638/07 EN TAPCON...
- Page 290 Timeout for unsolicited mes- 1...60 s 5 s sages Timeout for application confirm 1...60 s 5 s User ID code TAPCON Settings > Parameter > Time synchronization Time synchronization via SNTP Off, On SNTP time server 0.0.0.0...255255255255 0.0.0.0 Time zone UTC-11 h...UTC+12 h...
- Page 291 Follower parallel operation method Automatic tap synchronization parallel operation method Deactivate parallel operation Blocking Activate remote mode High-speed return Target-tap-position operation Activate desired value 1 Activate desired value 2 Activate desired value 3 ® Maschinenfabrik Reinhausen GmbH 2019 4077638/07 EN TAPCON...
- Page 292 Pos. at max. analog signal -128...128 In accordance with order Pos. at min. analog signal -128...128 In accordance with order Table 117: Overview of parameters *) Availability of the parameter depends on device configuration ® TAPCON 4077638/07 EN Maschinenfabrik Reinhausen GmbH 2019...
-
Page 293: Technical Data
5.7" LCD, Backlight LED VGA (640 x 480 pixels) 262,000 colors (18-bit) LEDs 8 LEDs for operation display and messages 14.2 Voltage supply OT1205 (MR/N) Permissible voltage range 85 to 265 V AC / V DC : 100 to 240 V AC : 100 to 220 V DC Permissible frequency range 50/60 Hz... -
Page 294: Voltage Measurement And Current Measurement
<± 0.5°; U <± 0.3° Frequency measurement : 50 / 60 Hz Measuring range: 45...65 Hz Measuring accuracy (-25...+70 °C): <± 0.03% Table 120: Technical data for the UI 1 and UI 3 assemblies ® TAPCON 4077638/07 EN Maschinenfabrik Reinhausen GmbH 2019... -
Page 295: Digital Inputs And Outputs
Max. AC: 230 V AC; 5 A Max. DC: See diagram Simultaneity factor up to 60 °C: 100%, > 60 °C: -5%/K Table 123: Technical data for the DIO 28-15 and DIO 42-20 assemblies ® Maschinenfabrik Reinhausen GmbH 2019 4077638/07 EN TAPCON... - Page 296 ► Use the same voltage ranges within a plug. ► Use the same phase within a plug. Interface Description Input Input Input Input Input Input Input Common Table 124: Digital inputs ® TAPCON 4077638/07 EN Maschinenfabrik Reinhausen GmbH 2019...
-
Page 297: Analog Inputs And Outputs
4...20 mA Load resistance max. 500 Ω (0/4...20 mA) Resistor contact series Maximum resistance of 100 Ω...10 kΩ, max. 35 tap positions Table 126: Technical data for the AIO 2 and AIO 4 assemblies ® Maschinenfabrik Reinhausen GmbH 2019 4077638/07 EN TAPCON... -
Page 298: Cpu (Central Processing Unit) I
Application memory 1 GB Power supply +24 VDC (18...36 VDC) Table 128: Technical data for the CPU I assembly Interfaces Interface Description RXD (RS232) TXD (RS232) GND (RS232, RS485) RXD+/TXD+ (RS485) RXD-/TXD- (RS485) Table 129: COM2 (RS232, RS485) ® TAPCON 4077638/07 EN Maschinenfabrik Reinhausen GmbH 2019... - Page 299 14 Technical data Interface Description Table 130: USB 2.0 Interface Description TxD+ TxD- RxD+ RxD- Table 131: ETH1, ETH 2.1, ETH 2.2 (RJ45) Interface Description CAN-L CAN-GND CAN-H Table 132: CAN1, CAN2 ® Maschinenfabrik Reinhausen GmbH 2019 4077638/07 EN TAPCON...
-
Page 300: System Networking
Table 134: Technical data for the MC 2-2 assembly SW 3-3 Description Managed Fast Ethernet Switch in accordance with IEEE 802.3, store-and-forward-switching Interfaces 2x RJ45 2x duplex LC (SFP) Redundancy protocols , RSTP Time synchronization PTPv2 (IEEE 1588-2008) ® TAPCON 4077638/07 EN Maschinenfabrik Reinhausen GmbH 2019... -
Page 301: Dimensions And Weight
19 inch plug-in housing in accordance with DIN 41494 Part 5 W x H x D 483 mm x 133 mm x 178 mm (19 in x 5.2 in x 7 in) Weight Max. 6.7 kg ® Maschinenfabrik Reinhausen GmbH 2019 4077638/07 EN TAPCON... -
Page 302: Ambient Conditions
14 Technical data Figure 168: Dimensions 14.9 Ambient conditions Operating temperature -25...+70 °C Storage temperature -40...+85 °C Relative humidity 10...95% non-condensing ® TAPCON 4077638/07 EN Maschinenfabrik Reinhausen GmbH 2019... -
Page 303: Standards And Directives
▪ Power supply: 4 kV ▪ Measurement (UI1/3): 4 kV ▪ Digital I/O: 4 kV ▪ Analog I/O, shielding on both sides: 4 kV ▪ Communication interfaces, shielding on both sides: 4 ® Maschinenfabrik Reinhausen GmbH 2019 4077638/07 EN TAPCON... - Page 304 IEC 60068-2-1 Dry cold - 25°C / 96 hours IEC 60068-2-2 Dry heat +70 °C / 96 hours IEC 60068-2-78 Constant moist heat + 40 °C / 93% / 4 days, no dew ® TAPCON 4077638/07 EN Maschinenfabrik Reinhausen GmbH 2019...
- Page 305 1 octave/min) IEC 60255-21-2 Class Shocks (11 ms, 5 g, 15 g, 3 axes) IEC 60255-21-3 Class Earthquakes (1...35 Hz; 3.5 mm/1 g horizontal; 1.5 mm/0.5 g vertical; 1 octave/min, 10 min/axis) Table 142: Environmental durability tests ® Maschinenfabrik Reinhausen GmbH 2019 4077638/07 EN TAPCON...
-
Page 306: Glossary
NTP. IEEE TDSC Worldwide association of engineers, mainly from TAPCON® Dynamic Set Point Control the fields of electrical engineering and IT (Insti- tute of Electrical and Electronics Engineers) TPLE TAPCON® Personal Logic Editor... -
Page 307: List Of Key Words
Baud rate 194, 199, 205, 207 143 Behavior if no communication Event memory 189 present 143 Events 187 Acknowledge 187 Configure 188 Display 187 Exporting 190 Filtering 190 Expert mode 43 Export 238 ® Maschinenfabrik Reinhausen GmbH 2019 4077638/07 EN TAPCON... - Page 308 238 Power flow Inductive resistance load 134 Negative 152 Information 235 Power flow monitoring 152 Inputs Power monitoring 151 Analog 183 Digital 185 IO mapping 244 IP address 89 Quick search 42 ® TAPCON 4077638/07 EN Maschinenfabrik Reinhausen GmbH 2019...
- Page 309 Tap-change operation statistics User role 227 definitely 208 171 RES bit test 197 TAPCON® 2xx retrofit 144 Reversal of power flow 152 TAPCON® Dynamic Setpoint Con- Visualization RFC 3164 222 trol 95, 98 Connection 84 RFC 5424 222 Target tap position 161 Voltage monitoring 145...
- Page 312 Maschinenfabrik Reinhausen GmbH Falkensteinstrasse 8 93059 Regensburg +49 (0)941 4090-0 +49(0)941 4090-7001 sales@reinhausen.com www.reinhausen.com ® 4077638/07 EN - TAPCON - 07/19 - Maschinenfabrik Reinhausen GmbH 2019 THE POWER BEHIND POWER.
Need help?
Do you have a question about the TAPCON and is the answer not in the manual?
Questions and answers