
Related Manuals for ROBBE harbour tug FAIRPLAY


Summary of Contents for ROBBE harbour tug FAIRPLAY
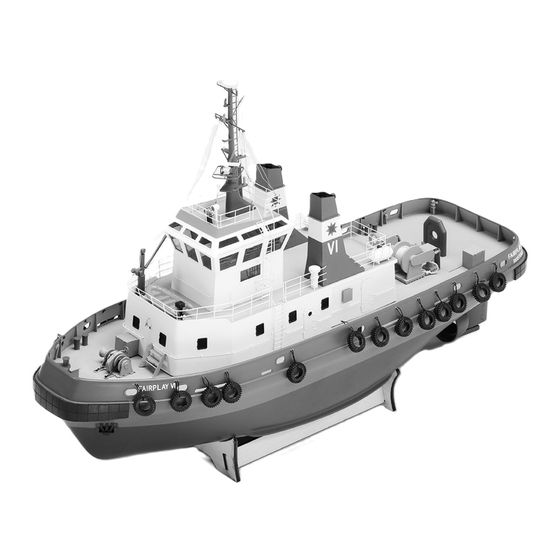
- Page 1 Installation manual harbour tug FAIRPLAY Detailed scale model of a harbour tug with high prefabrication and elaborate painting in scale 1/50 No. 1199 1199_Fairplay.indd 1 08.07.16 22:39...
-
Page 2: Table Of Contents
Assembly instructions harbour tug FAIRPLAY No. 1199 General notes on the installation instructions subject matter The installation instructions are divided into logically consecutive construction stages. Get an overview of the respective stage of construction using the illustrations and the Declaration of Conformity instruction texts during construction. -
Page 3: Guarantee
Therefore, we accept no liability whatsoever for losses, damages or costs arising from or in any way connected with incorrect use and operation. To the extent permitted by law, the obligation to pay damages, for whatever legal reasons, is limited to the invoice value of the robbe products directly involved in the event causing the damage. This does not apply if liability must be unlimited due to intent or gross negligence in accordance with mandatory statutory provisions. -
Page 4: The Original
Assembly instructions harbour tug FAIRPLAY No. 1199 The original: scope of supply: Technische Daten: The Fairplay VI is an extremely powerful and manoeuvrable • Nearly finished model including fitting and drive set Length: approx. 650mm • Multicoloured lacquered ABS fuselage... -
Page 5: Safety Notices
Do not use wet devices, even if they are dry again! Either have it checked in the robbe service or replace it. Hidden Check your insurance policy and take out insurance if necessary. -
Page 6: De-Rimming
Assembly instructions harbour tug FAIRPLAY No. 1199 performance check de-rimming Notes on driving - Place the model in the boat stand. Set truncheons and - Before initial operation, read the sections "Routine checks - Place the ready to drive model in a bathtub. -
Page 7: Boat Stand
Assembly instructions harbour tug FAIRPLAY No. 1199 The boat stand Attaching the abutment CLW = water level Glue on foam rubber, foam rubber or felt Mounting the boat stand Important: Before starting the assembly you should mount the enclosed boat stand to give the model a safe stand during the work. -
Page 8: Model Overview
For attaching the small parts to the superstructure and ship deck, please observe the mounting locations shown in the technical drawings. Bond with a suitable adhesive. For example robbe speed type 1 (5062) or speed type 2 (5063). Use adhesives sparingly to avoid running or blooming. Hint:... - Page 9 For attaching the small parts to the superstructure and ship deck, please observe the mounting locations shown in the technical drawings. Bond with a suitable adhesive. For example robbe speed type 1 (5062) or speed type 2 (5063). Use adhesives sparingly to avoid running or blooming. Hint:...
- Page 10 Assembly instructions harbour tug FAIRPLAY No. 1199 RC connection diagram harbour tug FAIRPLAY sender receiver Prepare V-cable for battery connection or charging: TAM Gold bushings TAM Gold connector Highly flexible. stranded wire 1,5mm² battery 6V battery 6V load 1199_Fairplay.indd 10...
-
Page 11: Rc Installation
Assembly instructions harbour tug FAIRPLAY No. 1199 RC installation Motor and battery connection (see connection diagram p. 10) 1. Connect the speed controller to the motors. 2. provide the battery cables with one socket each. 3. Make a V-cable from the strand to connect the batteries to each other. Connect a plug to the battery connection cable of the speed controller. - Page 12 Assembly instructions harbour tug FAIRPLAY No. 1199 1199_Fairplay.indd 12 08.07.16 22:39...
- Page 13 Assembly instructions harbour tug FAIRPLAY No. 1199 1199_Fairplay.indd 13 08.07.16 22:39...
-
Page 14: Service Address
Modellbau Lindinger GmbH, Industriestraße 10, 4565 Inzersdorf im Kremstal, Austria Telefon: +43(0)7582/81313-0 , info@robbe.com "robbe Modellsport" ist eingetragenes Markenzeichen der Modellbau Lindinger GmbH Irrtum, Druckfehler und technische Änderungen vorbehalten. Copyright Modellbau Lindinger 2018 Kopie und Nachdruck, auch auszugsweise, nur mit schriftlicher Genehmigung.
Need help?
Do you have a question about the harbour tug FAIRPLAY and is the answer not in the manual?
Questions and answers