Table of Contents
Advertisement
Advertisement
Table of Contents

Related Manuals for HIKVISION NK44W1H-1T


Summary of Contents for HIKVISION NK44W1H-1T
- Page 1 Wi-Fi Kit Quick Start Guide...
- Page 2 Any and all information, including, among others, wordings, pictures, graphs are the properties of Hangzhou Hikvision Digital Technology Co., Ltd. or its subsidiaries (hereinafter referred to be "Hikvision"). This user manual (hereinafter referred to be "the Manual") cannot be reproduced, changed, translated, or distributed, partially or wholly, by any means, without the prior written permission of Hikvision.
- Page 3 BUSINESS PROFITS, BUSINESS INTERRUPTION, OR LOSS OF DATA OR DOCUMENTATION, IN CONNECTION WITH THE USE OF THIS PRODUCT, EVEN IF HIKVISION HAS BEEN ADVISED OF THE POSSIBILITY OF SUCH DAMAGES. REGARDING TO THE PRODUCT WITH INTERNET ACCESS, THE USE OF PRODUCT SHALL BE WHOLLY AT YOUR OWN RISKS.
- Page 4 Wi-Fi Kit·Quick Start Guide IN THE EVENT OF ANY CONFLICTS BETWEEN THIS MANUAL AND THE APPLICABLE LAW, THE LATER PREVAILS. Regulatory Information FCC Information Please take attention that changes or modification not expressly approved by the party responsible for compliance could void the user's authority to operate the equipment.
- Page 5 Wi-Fi Kit·Quick Start Guide FCC Conditions This device complies with part 15 of the FCC Rules. Operation is subject to the following two conditions: 1. This device may not cause harmful interference. 2. This device must accept any interference received, including interference that may cause undesired operation EU Conformity Statement This product and - if applicable - the supplied...
- Page 6 Wi-Fi Kit·Quick Start Guide or to a designated collection point. For more information see: www.recyclethis.info Industry Canada ICES-003 Compliance This device meets the CAN ICES-3 (B)/NMB-3(B) standards requirements. This device complies with Industry Canada licence-exempt RSS standard(s). Operation is subject to the following two conditions: (1) this device may not cause interference, and (2) this device must accept any interference, including interference that may cause undesired operation of the device.
- Page 7 Wi-Fi Kit·Quick Start Guide fonctionner avec une antenne d'un type et d'un gain maximal (ou inférieur) approuvé pour l'émetteur par Industrie Canada. Dans le but de réduire les risques de brouillage radioélectrique à l'intention des autres utilisateurs, il faut choisir le type d'antenne et son gain de sorte que la puissance isotrope rayonnée équivalente (p.i.r.e.) ne dépasse pas l'intensité...
- Page 8 Wi-Fi Kit·Quick Start Guide potential injury or material damage. Warnings For Network Camera: ● Proper configuration of all passwords and other security settings is the responsibility of the installer and/or end-user. ● In the use of the product, you must be in strict compliance with the electrical safety regulations of the nation and region.
- Page 9 Wi-Fi Kit·Quick Start Guide ● Proper configuration of all passwords and other security settings is the responsibility of the installer and/or end-user. ● In the use of the product, you must be in strict compliance with the electrical safety regulations of the nation and region. Please refer to technical specifications for detailed information.
- Page 10 Wi-Fi Kit·Quick Start Guide ● Make sure the power supply voltage is correct before using the camera. ● Do not drop the camera or subject it to physical shock. ● Do not touch sensor modules with fingers. If cleaning is necessary, use clean cloth with a bit of ethanol and wipe it gently.
- Page 11 Wi-Fi Kit·Quick Start Guide and using history, so regular checking is recommended for all the users. Please contact with your dealer for more details. ● Improper use or replacement of the battery may result in hazard of explosion. Replace with the same or equivalent type only. Dispose of used batteries according to the instructions provided by the battery manufacturer.
- Page 12 Wi-Fi Kit·Quick Start Guide ● Improper use or replacement of the battery may result in hazard of explosion. Replace with the same or equivalent type only. Dispose of used batteries according to the instructions provided by the battery manufacturer. Power Supply Instructions for NVR Device: Use only power supplies listed in the user instructions.
-
Page 13: Table Of Contents
Wi-Fi Kit·Quick Start Guide Table of Contents 1 Introduction ................13 1.1 Application ................. 13 1.2 NVR Appearance ..............14 1.2.1 Front Panel.............. 14 1.2.2 Rear Panel ............... 15 1.3 Camera Appearance ............16 2 NVR Installation ................ 19 2.1 Precautions ................ 19 2.2 Hard Disk Installation ............ -
Page 14: Introduction
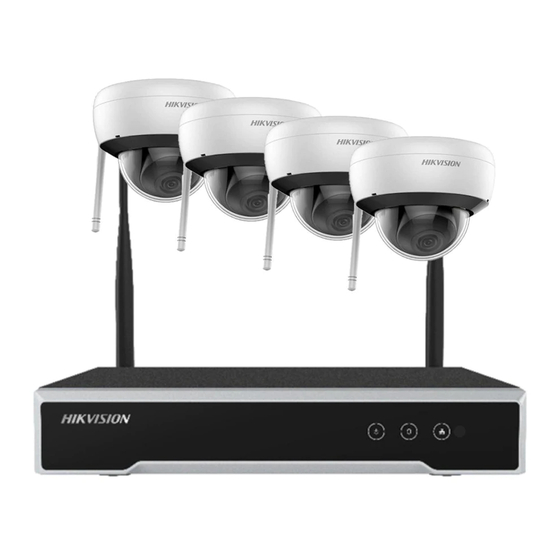
Wi-Fi Kit·Quick Start Guide 1 Introduction 1.1 Application The Wi-Fi kit includes four network cameras and a NVR device. The NVR works as a wireless network router, and the camera connects to the NVR's Wi-Fi automatically after the camera is powered on. Monitor Wi-Fi Camera VGA/HDMI... -
Page 15: Nvr Appearance
Wi-Fi Kit·Quick Start Guide 1.2 NVR Appearance 1.2.1 Front Panel Front Panel Description Icon Description Indicator turns red when NVR is powered up. Indicator lights in red when there is data transmission. Indicator blinks blue when network connection is functioning properly. -
Page 16: Rear Panel
Wi-Fi Kit·Quick Start Guide 1.2.2 Rear Panel Rear Panel Description Icon Description Wi-Fi Antenna Wi-Fi antenna interface. Power supply 12 VDC power supply. Audio out One audio output. VGA interface HDMI HDMI video output connector. One RJ-45 10M/100M self- adaptive Ethernet interface Wi-Fi Antenna Wi-Fi antenna interface. -
Page 17: Camera Appearance
Wi-Fi Kit·Quick Start Guide Icon Description Ground Ground (needs to be connected when device starts up). 1.3 Camera Appearance Overview Description Description Bubble Lens... - Page 18 Wi-Fi Kit·Quick Start Guide Description IR LED Wi-Fi Antenna Black Liner Safety Rope Adjusting Bracket WPS(Wi-Fi Protected Setup)/Reset Button Memory Card Slot Bottom Base Power Interface Network Interface Adapter Plate Note: ● Hold RESET about 10s when the camera is powering on or rebooting to restore the default settings, including the user name, password, IP address, port No., etc.
- Page 19 Wi-Fi Kit·Quick Start Guide Press the WPS button (about 2s) on the camera within 120s you enable the WPS of the router to join in the wireless network. Note: The WPS button works as a reset button only when you press it when the camera is powering on.
-
Page 20: Nvr Installation
Wi-Fi Kit·Quick Start Guide 2 NVR Installation 2.1 Precautions During installation of the NVR: Use brackets for rack mounting. Ensure ample room for audio and video cables. When routing cables, ensure that the bend radius of the cables is no less than five times than its diameter. - Page 21 Wi-Fi Kit·Quick Start Guide Steps: 1. Remove the cover from device by unfastening the screws on panels. Remove Cover 2. Connect the data cable and power cable. Connect one end of data cable to the device motherboard. Connect the other end of data cable to HDD. Connect one end of power cable to HDD.
- Page 22 Wi-Fi Kit·Quick Start Guide Connect Cables 3. Set the device up, match HDD screw threads with the reserved holes on the device bottom, and fix HDD with screws. Fix HDD to Device Bottom 4. (Optional) Repeat the steps above to install other HDDs. 5.
-
Page 23: Camera Installation
Wi-Fi Kit·Quick Start Guide 3 Camera Installation Before you start: ● Make sure the device in the package is in good condition and all the assembly parts are included. ● The standard power supply is 12 VDC. Make sure your power supply matches with your camera. - Page 24 Wi-Fi Kit·Quick Start Guide Remove the Bubble 2. Insert the memory card into the slot. Install the Memory Card...
-
Page 25: Antenna Installation
Wi-Fi Kit·Quick Start Guide 3.2 Antenna Installation Steps: Tighten the screw nut to install the antenna to the camera. Install the Antenna 3.3 Ceiling Mounting Steps: 1. Fix the adapter plate to the mounting surface with the screws. - Page 26 Wi-Fi Kit·Quick Start Guide Install the Adapter Plate 2. Install the camera to the adapter plate. Install the Camera 3. Rotate the camera clockwise according to the direction on the adapter plate to buckle it into the adapter plate.
- Page 27 Wi-Fi Kit·Quick Start Guide Install the Camera 4. Adjust the view angle of the camera. 2-axis (pan/tilt) adjusting allows adjustment for optimum camera rotation and placement. Rotate the adjusting bracket to adjust the pan angle. Loosen the tilting adjusting screw to adjust the tilt angle. Tighten the screw.
-
Page 28: Optional) Installation Of Network Cable Waterproof Jacket
Wi-Fi Kit·Quick Start Guide 3.4 (Optional) Installation of Network Cable Waterproof Jacket Purpose: If the camera is installed outdoor, you can use the waterproof accessory for the network cable after the camera is secured on the installation surface. Figure 3-8 Waterproof Accessory Components Components Components Camera's Network Interface Socket... - Page 29 Wi-Fi Kit·Quick Start Guide Steps: Feed the plugless network cable ⑦ through the lock nut ⑥, waterproof rubber gasket ⑤ (the rubber gasket inset ridge must face the waterproof endcap), and the waterproof endcap ④ in order. Crimp an RJ-45 network plug ③onto the end of the cable, taking care to insert the twisted pairs of wires in correct order.
- Page 30 Wi-Fi Kit·Quick Start Guide Align the snap and notch. i. Insert into ⑤ ④ ii. Secure with ⑥ ④ Camera Switch/Router Figure 3-9 Waterproof Accessory Installation...
-
Page 31: Menu Operation
Wi-Fi Kit·Quick Start Guide 4 Menu Operation 4.1 Startup and Shutdown To start your NVR: Steps: 1. Check the power supply is plugged into an electrical outlet. It is HIGHLY recommended that an Uninterruptible Power Supply (UPS) be used in conjunction with the device. The Power button on the front panel should be red, indicating the device is receiving the power. -
Page 32: Use The Setup Wizard
Wi-Fi Kit·Quick Start Guide For the first-time access, you need to activate the NVR by setting an admin password. No operation is allowed before activation. You can also activate the NVR via Web Browser, SADP or client software. 1. Input the same password in the text field of Create New Password and Confirm New Password. -
Page 33: Add Ip Cameras
Wi-Fi Kit·Quick Start Guide 4.4 Add IP Cameras 4.4.1 Wi-Fi Kit Cameras The supplied Wi-Fi kit cameras can connect to the NVR automatically after it is powered on. 4.4.2 Other Cameras For the other cameras, follow the steps below to add the camera and configure the Wi-Fi parameters. - Page 34 Wi-Fi Kit·Quick Start Guide Steps: 1. Download and install the Hik-Connect app by searching "Hik- Connect" in App Store or Google Play 2. Launch the app and register for a Hik-Connect user account. 3. Log in Hik-Connect app after registration. 4.
- Page 35 UD11329B...
Need help?
Do you have a question about the NK44W1H-1T and is the answer not in the manual?
Questions and answers