Table of Contents
Advertisement
Advertisement
Table of Contents

Related Manuals for Epson DS-870


Summary of Contents for Epson DS-870
- Page 1 User's Guide NPD6053-00 EN...
- Page 2 Neither Seiko Epson Corporation nor its affiliates shall be liable to the purchaser of this product or third parties for damages, losses, costs, or expenses incurred by the purchaser or third parties as a result of accident, misuse, or abuse of this product or unauthorized modifications, repairs, or alterations to this product, or (excluding the U.S.)
- Page 3 Trademarks ❏ EPSON ® is a registered trademark, and EPSON EXCEED YOUR VISION or EXCEED YOUR VISION is a trademark of the Seiko Epson Corporation. ❏ Microsoft, Windows, Windows Server, and Windows Vista are either registered trademarks or trademarks of Microsoft Corporation in the United States and/or other countries.
-
Page 4: Table Of Contents
Safety Instructions......9 Epson Scan 2......71 Restrictions on Copying. - Page 5 Checking Messages on the Control Panel..116 Contacting Epson Support....133 The Scanner Does Not Turn On... . 116 Before Contacting Epson.
- Page 6 User's Guide Contents Help for Users in Hong Kong....137 Help for Users in Malaysia....138 Help for Users in India.
-
Page 7: About This Manual
Provides you with information on setting up the product and installing the application. ❏ User's Guide (digital manual) Provides instructions on using the product, maintenance, and solving problems. As well as the manuals above, see the help included in the various Epson applications. Marks and Symbols Caution: Instructions that must be followed carefully to avoid bodily injury. -
Page 8: Operating System References
User's Guide About This Manual Operating System References Windows In this manual, terms such as "Windows 10", "Windows 8.1", "Windows 8", "Windows 7", "Windows Vista", "Windows XP", "Windows Server 2016", "Windows Server 2012 R2", "Windows Server 2012", "Windows Server 2008 R2", "Windows Server 2008", "Windows Server 2003 R2", and "Windows Server 2003"... -
Page 9: Important Instructions
❏ Some of the symbols used on your product and options are to ensure safety and proper use of the product. Visit the following Web site to learn the meaning of the symbols. http://support.epson.net/symbols ❏ Place the product and options on a flat, stable surface that extends beyond the base of the product and options in all directions. -
Page 10: Restrictions On Copying
User's Guide Important Instructions ❏ Unplug the product, options, and the AC adapter, and refer servicing to qualified service personnel under the following conditions: The AC adapter or plug is damaged; liquid has entered the product, options, or the AC adapter;... -
Page 11: Scanner Basics
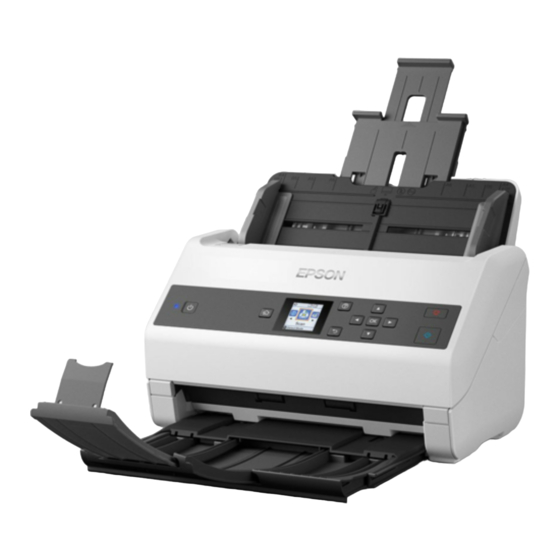
User's Guide Scanner Basics Scanner Basics Part Names and Functions Front Control panel Indicates the scanner’s status and allows you to make scanning settings. Edge guides Feeds originals straight into the scanner. Slide to the edges of the originals. Input tray Loads originals. - Page 12 User's Guide Scanner Basics Back Security slot Inserts a security lock for theft prevention. USB port Connects a USB cable. DC inlet Connects the AC adapter. Inside Scanner cover Pull the lever and open the scanner cover when cleaning inside the scanner and removing jammed paper.
-
Page 13: Control Panel
User's Guide Scanner Basics Control Panel Buttons and Light Turns the scanner on or off. Do not turn off the scanner while the light is flashing because the scanner is operating or processing a job. Displays the home screen. Displays menus and messages. Displays the help screen. - Page 14 User's Guide Scanner Basics Guide to the Home Screen The following icons and menus are displayed on the home screen. This icon indicates that you are on the home screen. This icon indicates whether or not the DFDS Function feature is enabled. When enabled, the icon changes to This feature skips double feed detection once and continues scanning.
- Page 15 User's Guide Scanner Basics Related Information “Scanning Using the Control Panel” on page 54 & “Menu Options on the Control Panel” on page 86 & “Replacing the Roller Assembly Kit” on page 107 & Viewing Guidance Animations You can watch animated guides that explain how to maintain the scanner, replace the rollers, place various kind of originals, and so on.
- Page 16 User's Guide Scanner Basics 3. Select Restrict User Access using the button, and then press the OK button. 4. Select On using the button, and then press the OK button. 5. When the message To enable Restrict User Access, see your documentation. is displayed, hold down the buttons simultaneously for more than one second.
-
Page 17: Information On Applications
Epson Web site. Epson Scan 2 Epson Scan 2 is a driver for controlling your scanner, enabling a variety of scan settings. This also allows you to start either as a standalone application or by using TWAIN-compliant application software. -
Page 18: Document Capture Pro Server
The optional Network Interface Unit is required to use this application. EPSON Software Updater EPSON Software Updater is an application that checks for new or updated applications on the internet and installs them. You can also update the scanner’s digital manual. -
Page 19: Network Interface Unit Codes
User's Guide Scanner Basics Windows only Network Interface Unit Codes You can scan through a network by using Document Capture Pro (Windows only). By registering frequently used scan process settings such as save, sort, transfer, and so on, with a name such as "job", you can reduce the workload and increase efficiency by simply selecting “job”... -
Page 20: Roller Assembly Kit Codes
Parts (the pickup roller and separation roller) should be replaced when the number of scans exceeds the service number. You can check the latest number of scans on the control panel or in the Epson Scan 2 Utility. A: pickup roller, B: separation roller... -
Page 21: Specifications Of Originals And Placing Originals
User's Guide Specifications of Originals and Placing Originals Specifications of Originals and Placing Originals Specifications of Originals This section explains the specifications and conditions of originals that can be loaded in the ADF. General Specifications for Originals being Scanned Type of Original Thickness Size Plain paper... - Page 22 User's Guide Specifications of Originals and Placing Originals Specifications of Standard Size Originals The list of the standard size originals you can load on the scanner. Size Measurement Thickness Paper Type Loading Capacity Legal 215.9×355.6 mm 27 to 413 g/m2 Plain paper Thickness of the originals stack: under 12 mm (0.47 in.)
- Page 23 User's Guide Specifications of Originals and Placing Originals Size Thickness Paper Type Loading Capacity Width: 50.8 to 215.9 mm 50 to 130 g/m2 Plain paper 1 sheet (2.0 to 8.5 in.) Fine paper Length: 393.8 to 6,096.0 mm Recycled paper (15.5 to 240.0 in.) Specifications of Plastic Cards The specification of plastic card you can load into the scanner.
-
Page 24: Types Of Originals That Require Attention
User's Guide Specifications of Originals and Placing Originals Type Size Thickness Loading Capacity of the Carrier Sheet Originals that cannot be 0.3 mm (0.012 in.) or less 10 sheets loaded directly into the (excluding the thickness of scanner the Carrier Sheet) Letter Legal Custom size:... -
Page 25: Types Of Originals That Must Not Be Scanned
❏ To scan originals that are incorrectly detected as double feeds, set the DFDS Function to On on the control panel before you resume scanning, or select Off in Detect Double Feed on the Main Settings tab in the Epson Scan 2 window. When you are using Document Capture Pro, you can open the window by pressing the Detailed Settings button on the Scan Settings screen. -
Page 26: Placing Originals
User's Guide Specifications of Originals and Placing Originals Note: ❏ Do not feed photos, valuable original artwork, or important documents which you do not want to damage or deface into the scanner directly. Misfeeding may wrinkle or damage the original. When scanning such originals, make sure you use the Carrier Sheet (sold separately). - Page 27 User's Guide Specifications of Originals and Placing Originals Size Measurement Thickness Paper Type Loading Capacity Legal 215.9×355.6 mm 27 to 413 g/m2 Plain paper Thickness of the originals stack: under 12 mm (0.47 in.) (8.5×14 in.) Fine paper 80 g/m2: 80 sheets Recycled paper 90 g/m2: 69 sheets 104 g/m2: 59 sheets...
- Page 28 User's Guide Specifications of Originals and Placing Originals Placing Standard Size Originals 1. Extend the input tray extension. Slide out the output tray, extend the output tray extension, and then raise the stopper. Note: ❏ For A4 size or larger originals, make sure you pull out and extend the input tray extension. ❏...
- Page 29 User's Guide Specifications of Originals and Placing Originals 3. Fan the originals. Hold both ends of the originals and fan them a few times. 4. Align the edges of the originals with the printed side facing down and slide the leading edge into a wedge shape.
- Page 30 User's Guide Specifications of Originals and Placing Originals 6. Slide the edge guides to fit the edge of the originals making sure there are no gaps between the originals and the edge guides. Otherwise, the originals may be fed skewed. Note: ❏...
-
Page 31: Long Paper
User's Guide Specifications of Originals and Placing Originals Long Paper Specifications of Long Paper The specification of long paper you can load into the scanner. Size Thickness Paper Type Loading Capacity Width: 50.8 to 215.9 mm 50 to 130 g/m2 Plain paper 1 sheet (2.0 to 8.5 in.) - Page 32 User's Guide Specifications of Originals and Placing Originals 3. Load the original straight into the input tray, facing down with the top edge facing into the ADF. Slide the original into the ADF until it meets resistance. 4. Adjust the edge guides to fit the edge of the long paper making sure there are no gaps between the edge of the paper and the edge guides.
-
Page 33: Plastic Cards
· 5,461.1 to 6,096.0 mm (215 to 240 in.) in length: 200 dpi or less ❏ You need to specify the paper size in the Epson Scan 2 window. When you are using Document Capture Pro, you can open the window by pressing the Detailed Settings button on the Scan Settings screen. - Page 34 User's Guide Specifications of Originals and Placing Originals Size Card Type Thickness Loading Capacity Loading Direction ISO7810 ID-1 Type With embossing 1.24 mm (0.05 in.) or 1 card Horizontal (Landscape) less 54.0×85.6 mm Without embossing 1.1 mm (0.04 in.) or 5 cards (2.1×3.3 in.) less...
- Page 35 User's Guide Specifications of Originals and Placing Originals 3. Load the plastic cards into the input tray facing down with the top edge facing into the ADF. Slide the plastic cards into the ADF until they meet resistance. Important: Do not load plastic cards vertically.
-
Page 36: Laminated Cards
Select Plastic Card (Landscape) in Document Size or select Off in Detect Double Feed on the Main Settings tab in Epson Scan 2. See the Epson Scan 2 help for details. If Detect Double Feed in the Epson Scan 2 window is enabled and a double feed error occurs, remove the card from the ADF, reload it, press the button, and then select DFDS Function (Double Feed Detection Skip function) on the control panel to set it to On. - Page 37 User's Guide Specifications of Originals and Placing Originals Placing Laminated Cards 1. Slide out the output tray and raise the stopper. 2. Slide the edge guides on the input tray all the way out.
- Page 38 ❏ Select the Main Settings tab > Detect Double Feed > Off. See the Epson Scan 2 help for details. If Detect Double Feed is enabled in the Epson Scan 2 window and a double feed error occurs, remove the card from...
-
Page 39: Large Size Originals
User's Guide Specifications of Originals and Placing Originals Related Information “Required Settings for Special Originals in Epson Scan 2” on page 71 & Large Size Originals Specifications of Large Size Originals By using the Carrier Sheet sold separately and folding the originals in half, you can scan originals larger than A4 size, such as A3 or B4 sizes. - Page 40 User's Guide Specifications of Originals and Placing Originals 2. Slide the edge guides on the input tray all the way out. 3. Place the Carrier Sheet with the illustration on the front edge facing up and place the original in the carrier sheet by folding it in half so that the side to be scanned is facing out, with the right side at the front.
- Page 41 297 mm long. Otherwise, the length of the scanned image may be longer than intended as the scanner scans to the end of the Carrier Sheet when you select Auto Detect as the Document Size setting in the Epson Scan 2 window.
-
Page 42: Irregular Shaped Originals
User's Guide Specifications of Originals and Placing Originals Irregular Shaped Originals Specifications of Irregular Shaped Originals By using the Carrier Sheet sold separately, you can scan originals that are wrinkled, curled, very thin, or irregularly shaped. Size Thickness Loading Capacity of the Carrier Sheet Up to A4 0.3 mm (0.012 in.) or less... - Page 43 User's Guide Specifications of Originals and Placing Originals 3. Place the Carrier Sheet with the illustration on the front edge facing up and place the original in the center of the Carrier Sheet with the side to be scanned facing down. 4.
-
Page 44: Photographs
❏ If you cannot find an appropriate size for the original you want to scan in the Document Size list, select Auto Detect. When using Epson Scan 2, you can also select Customize to create a custom document size. ❏ When scanning a Carrier Sheet by selecting Auto Detect as the Document Size setting, the image is automatically scanned by applying Paper Skew in the Correct Document Skew setting. - Page 45 User's Guide Specifications of Originals and Placing Originals Placing Photographs 1. Extend the input tray extension. Slide out the output tray, extend the output tray extension, and then raise the stopper. 2. Slide the edge guides on the input tray all the way out. 3.
- Page 46 User's Guide Specifications of Originals and Placing Originals 4. Load the Carrier Sheet into the input tray with the top edge facing into the ADF. Slide the Carrier Sheet into the ADF until it meets resistance. 5. Slide the edge guides to fit the edge of the Carrier Sheet making sure there are no gaps between the Carrier Sheet and the edge guides.
-
Page 47: Envelopes
❏ If you cannot find an appropriate size for the original you want to scan in the Document Size list, select Auto Detect. When using Epson Scan 2, you can also select Customize to create a custom document size. ❏ When scanning a Carrier Sheet by selecting Auto Detect as the Document Size setting, the image is automatically scanned by applying Paper Skew in the Correct Document Skew setting. - Page 48 User's Guide Specifications of Originals and Placing Originals Placing Envelopes 1. Extend the input tray extension. Slide out the output tray, extend the output tray extension, and then raise the stopper. 2. Slide the edge guides on the input tray all the way out.
- Page 49 User's Guide Specifications of Originals and Placing Originals 3. Load the envelopes into the input tray facing down making sure that the opened edge (flap side) of the envelope is facing to the side. For envelopes with the opened edge (flap side) on the shorter side, you can load the envelope with the opened edge (flap side) facing up.
-
Page 50: Mixture Of Originals
Select Main Settings tab > Detect Double Feed > Off. See the Epson Scan 2 help for details. If Detect Double Feed is enabled in the Epson Scan 2 window and a double feed error occurs, remove the envelope from the ADF, reload it, press the button, and then select DFDS Function (Double Feed Detection Skip function) on the control panel to set it to On. - Page 51 User's Guide Specifications of Originals and Placing Originals Placing a Mixture of Originals at Different Sizes 1. Extend the input tray extension. Slide out the output tray, extend the output tray extension, and then raise the stopper. Note: If there are any thick originals, to stop them from bumping into the output tray and falling out, store the output tray and do not use it to stack the ejected originals.
- Page 52 User's Guide Specifications of Originals and Placing Originals 3. Load the originals at the center of the input tray in descending order of paper size with the widest at the back and the narrowest at the front. Important: Check the following points when setting different sizes of originals. ❏...
- Page 53 User's Guide Specifications of Originals and Placing Originals Related Information “Scanning Different Sizes or Types of Originals One by One (Automatic Feeding Mode)” on page 75 &...
-
Page 54: Basic Scanning
User's Guide Basic Scanning Basic Scanning Scanning Using the Control Panel You can scan originals from the control panel by using jobs created in Document Capture Pro (Windows)/ Document Capture (Mac OS). Note: ❏ Before scanning, install Document Capture Pro/Document Capture on your computer and create the job. There is a preset job that saves scanned images as PDFs. - Page 55 User's Guide Basic Scanning Note: ❏ You can start scanning immediately on the Select Job screen by pressing the button. ❏ Press the button to make Scanner Settings. · Slow: Slows down the scanning speed. Use this to scan originals that are likely to jam, for example thin paper. ·...
-
Page 56: Scanning Using Document Capture Pro (Windows)
User's Guide Basic Scanning If you want to edit the scan settings, press the OK button. Select the item using the button, and then edit the setting using button. When you have finished editing the job, press the OK button. Note: If you set Disable job setting changes on control panel in Document Capture Pro/Document Capture, you cannot change the settings. - Page 57 Enter the application name in the search charm, and then select the displayed icon. ❏ Windows 7 Click the start button, and then select All Programs > Epson Software > Document Capture Pro. Note: You may need to select the scanner you want to use from the scanners list.
- Page 58 User's Guide Basic Scanning 3. Click New Job. The Job Settings screen is displayed. 4. Set the Job Name.
- Page 59 ❏ Correct Document Skew: Select to correct the slant of the original. ❏ Skip Blank Page: Select to skip blank pages if there are any in the originals. ❏ Detailed Settings button: Select to use Epson Scan 2 features to adjust scanned images.
- Page 60 User's Guide Basic Scanning 6. Click 2. Save, and then make the save settings. ❏ File Name: Set the file name you want to use when saving the scanned image. Click Details to change the settings for component items for the file name, and then click File Name Components to add the items. ❏...
- Page 61 User's Guide Basic Scanning Note: ❏ If you want to upload to a cloud service, you need to set up your account with the cloud service in advance. ❏ If you want to use Evernote as the destination, download the Evernote application from the Evernote Corporation Website and install it before using this feature.
-
Page 62: Scanning Using Document Capture (Mac Os)
Do not use the Fast User Switching function while using your scanner. 1. Start Document Capture. Select Finder > Go > Applications > Epson Software > Document Capture. Note: You may need to select the scanner you want to use from the scanners list. - Page 63 User's Guide Basic Scanning 2. Click The Job List screen is displayed. Note: A preset job is available that allows you to save scanned images as a PDF. When using this job, skip this procedure and go to procedure 10. 3.
- Page 64 User's Guide Basic Scanning 4. Set the Job Name. 5. Make scanning settings on the Scan tab. ❏ Source: Select the source where the original is placed. Select double-sided to scan both sides of the originals. ❏ Document Size: Select the size of the original you placed. ❏...
- Page 65 User's Guide Basic Scanning Note: You can also adjust the image using following items. ❏ Text Enhancement: Select to make blurred letters in the original clear and sharp. ❏ Correct Document Skew: Select to correct the slant of the original. ❏...
- Page 66 User's Guide Basic Scanning 7. Click Destination, and then select the Destination. Destination setting items are displayed according to the destination you selected. Make detailed settings as necessary. Click the ? (Help) icon for details on each item. Note: ❏ If you want to upload to a cloud service, you need to set up your account with the cloud service in advance. ❏...
-
Page 67: Scanning Using Epson Scan 2
2. Start Epson Scan 2. ❏ Windows 10/Windows Server 2016 Click the start button, and then select EPSON > Epson Scan 2. ❏ Windows 8.1/Windows 8/Windows Server 2012 R2/Windows Server 2012 Enter the application name in the search charm, and then select the displayed icon. - Page 68 ❏ Windows 7/Windows Vista/Windows XP/Windows Server 2008 R2/Windows Server 2008/Windows Server 2003 R2/Windows Server 2003 Click the start button, and then select All Programs or Programs > EPSON > Epson Scan 2 > Epson Scan ❏ Mac OS Select Go > Applications > Epson Software > Epson Scan 2.
- Page 69 User's Guide Basic Scanning Note: ❏ ADF is set as the Document Source automatically. ❏ On the Main Settings tab, you can also make the following settings. ❏ Stitch Images: Select to stitch the images on the front and rear when scanning both sides of the original.
- Page 70 ❏ To scan originals that are likely to jam, for example thin paper, enable Slow on the control panel to slow down the scanning speed. Press the button, and then select Scanner Settings > Slow. The scanned image is saved to the folder you specified. Related Information “Placing Originals” on page 26 & “Epson Scan 2” on page 17 &...
-
Page 71: Required Settings For Special Originals In Epson Scan 2
“Setting a Resolution That Suits the Scanning Purpose” on page 71 & Required Settings for Special Originals in Epson Scan 2 You need to set certain items on the Main Settings tab in Epson Scan 2 when scanning special originals. Type of Original Required Settings Envelopes Select Off in Detect Double Feed. - Page 72 User's Guide Basic Scanning List of Recommended Resolutions to Suit Your Purpose See the table and set the appropriate resolution for the purpose of your scanned image. Purpose Resolution (Reference) Displaying on a screen Up to 200 dpi Sending by email Using Optical Character Recognition (OCR) 200 to 300 dpi Creating a text searchable PDF...
-
Page 73: Advanced Scanning
User's Guide Advanced Scanning Advanced Scanning Setting a Job (Scan, Save, and Send) When performed in order, the following operations are known as a job: 1. Scan > 2. Save > 3. Send. By registering a series of operations in advance as a job using Document Capture Pro (Windows), Document Capture (Mac OS) or Document Capture Pro Server (Windows Server), you can perform all of the operations by simply selecting the job. -
Page 74: Creating And Registering A Job (Mac Os)
User's Guide Advanced Scanning Creating and Registering a Job (Mac OS) Explains how to set a job in Document Capture. See the Document Capture help for details on the features. 1. Start Document Capture. 2. Click the icon on the main window. The Job List window is displayed. -
Page 75: Assigning A Job To The Control Panel (Mac Os)
User's Guide Advanced Scanning 2. Click Job Settings on the top screen The Job List is displayed. 3. Click Button Assignment. The Button Assignment screen is displayed. 4. Select the job you want to run on the control panel from the pull-down menu. 5. - Page 76 1. Start Epson Scan 2. Note: When you are using Document Capture Pro, you can open the Epson Scan 2 window by pressing the Detailed Settings button on the Scan Settings screen. 2. Select Automatic Feeding Mode on the Main Settings tab.
-
Page 77: Separation Feature (For Windows Only)
User's Guide Advanced Scanning 5. Adjust the edge guides, and then place the original in the ADF. Scanning starts automatically. 6. After scanning stops, place the next original in the ADF. Repeat this procedure until you have scanned all originals. Note: Press the button to make Scanner Settings. - Page 78 User's Guide Advanced Scanning When scanning multiple documents and using separator information or a specified number of pages to separate the document into multiple files, each separated file can be saved to a specific folder. For example, you can make separation settings such as the following. Note: Document Capture Pro does not support Windows Vista, Windows XP, and Windows Server.
-
Page 79: Sorting And Saving Scanned Images Into A Separate Folder
User's Guide Advanced Scanning Sorting and Saving Scanned Images into a Separate Folder You can sort scanned images automatically and save them to a separate folder using Document Capture Pro. To sort scanned images, you can use a variety of detection methods such as blank pages inserted between the originals or barcodes on the originals. - Page 80 User's Guide Advanced Scanning 5. Set the Job Name. 6. Make scanning settings on the 1. Scan tab.
- Page 81 User's Guide Advanced Scanning 7. Click 2. Save, make the save settings, and then select Apply job separation. 8. Click Separation Settings.
- Page 82 User's Guide Advanced Scanning 9. Select Separator on the Job Separation Settings screen. ❏ Fixed Page: Select to separate by each specified page and split into files. ❏ Blank Page: Select to separate by detecting blank pages. ❏ Barcode: Select to separate by detecting barcodes. ❏...
- Page 83 User's Guide Advanced Scanning 11. Click 3. Send, and then select the Destination. Destination setting items are displayed according to the destination you selected. Make detailed settings as necessary. Click Help for details on each item. 12. Click OK to close the Job Settings screen. 13.
-
Page 84: Saving As An Office Format File (For Windows Only)
❏ Microsoft® PowerPoint® (.pptx) Note: ❏ Document Capture Pro does not support Windows Vista, Windows XP, and Windows Server. ❏ This feature is only available when the EPSON Scan OCR component is installed. 1. Place the original. 2. Start Document Capture Pro. - Page 85 User's Guide Advanced Scanning 4. Click Scan Settings to display the Scan Settings screen. 5. Make the scanning settings, and then click OK. 6. Click one of the destination icons. Scanning starts. After scanning, the Save Settings window or Transfer Settings window is displayed. 7.
-
Page 86: Menu Options On The Control Panel
User's Guide Menu Options on the Control Panel Menu Options on the Control Panel You can start scanning, perform maintenance, make scanner settings, and view scanner information from the control panel. Scan You can start jobs on your computer that were created in Document Capture Pro (Windows)/Document Capture (Mac OS). -
Page 87: Edit Job
User's Guide Menu Options on the Control Panel Level Examples of Protectable Paper Detection Sensitivity for Feeding Skew On-Highest Thin paper(Vertical), such as High application forms Important: ❏ This feature does not reduce damage to all jammed originals. ❏ Depending on the condition of the originals being fed, you cannot detect feeding errors. Note: Depending on the original, the condition of the originals being fed, and the level you set, this feature may not work correctly. -
Page 88: Scanner Maintenance
User's Guide Menu Options on the Control Panel Original Size Select the size of the original you placed on the scanner. Source Select the side of the original you want to scan. ❏ 2-Sided: Scans both sides of the original. ❏... -
Page 89: Lcd Brightness
User's Guide Menu Options on the Control Panel Paper Protection Reduces damage to the originals by stopping scanning immediately when the following status is detected. ❏ A feeding error for the originals occurs ❏ Originals are fed askew Select the detection level to enable this feature. See the table below for details on each level. Level Examples of Protectable Paper Detection Sensitivity for Feeding... -
Page 90: Sleep Timer
User's Guide Menu Options on the Control Panel Sleep Timer Adjust the time period for entering sleep mode (energy saving mode) when the scanner has not performed any operations. The LCD screen turns black when the set time has passed. Related Information “Energy Saving”... -
Page 91: Device Information
User's Guide Menu Options on the Control Panel Device Information Status This menu is only available when the icon is displayed on the home screen. Indicates the following status. Press the OK button to see more detailed information. ❏ Roller Replacement Soon: The number of scans is close to the life cycle of the rollers. Prepare replacement rollers. -
Page 92: Using The Flatbed Scanner Dock
User's Guide Using the Flatbed Scanner Dock Using the Flatbed Scanner Dock The optional Flatbed Scanner Dock allows you to scan from the scanner glass. Note: ❏ You need the applicable flatbed scanner to use the Flatbed Scanner Dock. ❏ You cannot use the Flatbed Scanner Dock and the Network Interface Unit at the same time. Part Names and Functions of the Flatbed Scanner Dock Front... -
Page 93: Scanning From The Scanner Glass
User's Guide Using the Flatbed Scanner Dock Back USB port 1 Connects a USB cable to connect to a computer. USB port 2 Connects a USB cable to connect to the sheet feed scanner. DC inlet Connects the AC adapter. Scanning from the Scanner Glass 1. - Page 94 User's Guide Using the Flatbed Scanner Dock 2. Open the document cover. 3. Place your document or photo face down on the scanner glass making sure the upper corner of the side you want to scan is against the corner of the scanner next to the arrow mark.
-
Page 95: Notes On Using The Flatbed Scanner Dock
❏ Do not leave originals on the scanner glass for an extended period of time as they may stick. 5. Start Document Capture Pro (Windows), Document Capture (Mac OS), or Epson Scan 2. 6. Select Scanner Glass from the Document Source list on the scan setting screen. - Page 96 User's Guide Using the Flatbed Scanner Dock Note: ❏ Make sure you pull out and extend the output tray extensions so that they are a little bit longer than the length of the original, and raise the stopper so that the ejected originals can be stacked comfortably on the output tray. ❏...
- Page 97 User's Guide Using the Flatbed Scanner Dock Originals longer than A4 (297 mm) to Legal (355.6 mm) Extend the input tray, slide out the output tray extension of the Flatbed Scanner Dock, and then raise the stopper. Note: ❏ Make sure you pull out and extend the output tray extensions so that they are a little bit longer than the length of the original, and raise the stopper so that the ejected originals can be stacked comfortably on the output tray.
-
Page 98: Maintenance
User's Guide Using the Flatbed Scanner Dock Related Information “Placing Originals” on page 26 & Maintenance Cleaning the Flatbed Scanner Dock To keep your Flatbed Scanner Dock in optimum condition, follow the steps below to clean it periodically. Important: ❏ Never use alcohol, thinner, or corrosive solvent to clean the Flatbed Scanner Dock. These chemicals can damage the Flatbed Scanner Dock components and the case. -
Page 99: Transferring And Transporting The Flatbed Scanner Dock
User's Guide Using the Flatbed Scanner Dock Transferring and Transporting the Flatbed Scanner Dock Caution: When lifting the Flatbed Scanner Dock, place your hands in the positions shown below. If you lift the Flatbed Scanner Dock by holding it in other positions, the Flatbed Scanner Dock may fall or you may trap your fingers when placing the Flatbed Scanner Dock. -
Page 100: Troubleshooting For The Flatbed Scanner Dock
User's Guide Using the Flatbed Scanner Dock 2. Unplug the AC adapter, and then disconnect the USB cable that is connected to the computer from the Flatbed Scanner Dock. 3. Do not subject the Flatbed Scanner Dock to vibrations and keep it level while carrying. Transporting the Flatbed Scanner Dock Make sure you have the Setup guide with you before you begin the following procedure. -
Page 101: Cannot Scan The Correct Area On The Scanner Glass
Epson Scan 2: Click the Advanced Settings tab > Text Enhancement. Depending on the condition of your scanned image, click Settings in the Epson Scan 2 window and try setting a lower level for Edge Enhancement or a higher level for Noise Reduction Level. -
Page 102: Maintenance
Epson Scan 2 Utility. If a surface is stained with a hard-to-remove material, use a genuine Epson cleaning kit to remove the stains. Use a small amount of cleaner on the cleaning cloth to remove the stains. - Page 103 3. Pull the lever and open the scanner cover. 4. Wipe off any stains on the plastic roller and glass surface at the bottom inside of the scanner cover using a soft cloth or a genuine Epson cleaning kit. Important: ❏...
- Page 104 6. Open the cover, and then remove the separation roller. See “Replacing the Roller Assembly Kit” for more details. 7. Wipe off any dust or dirt on the separation roller using a genuine Epson cleaning kit or a soft, moist cloth. Important: Use only a genuine Epson cleaning kit or a soft, moist cloth to clean the roller.
- Page 105 8. Open the cover, and then remove the pickup roller. See “Replacing the Roller Assembly Kit” for more details. 9. Wipe off any dust or dirt on the pickup roller using a genuine Epson cleaning kit or a soft, moist cloth. Important: Use only a genuine Epson cleaning kit or a soft, moist cloth to clean the roller.
- Page 106 15. Slowly rotate the rollers at the bottom by pressing button. Wipe the surface of the rollers using a genuine Epson cleaning kit or a soft cloth dampened with water. Repeat this until the rollers are clean. Caution: Be careful not to get your hands or hair caught in the mechanism when operating the roller. This could cause an injury.
-
Page 107: Replacing The Roller Assembly Kit
User's Guide Maintenance Replacing the Roller Assembly Kit The roller assembly kit (the pickup roller and the separation roller) needs to be replaced when the number of scans exceeds the life cycle of the rollers. When a replacement message is displayed on the control panel or your computer screen, follow the steps below to replace it. - Page 108 User's Guide Maintenance 4. Open the cover of the pickup roller, and then slide and remove it. 5. Pull down the fixture of the roller axis, and then slide and remove the installed pickup rollers. Important: Do not pull out the pickup roller forcibly. This could damage the inside of the scanner.
- Page 109 User's Guide Maintenance 6. While holding down the fixture, slide the new pickup roller to the left and insert it into the hole in the scanner. Press the fixture to secure it. 7. Put the edge of the cover of the pickup roller into the groove and slide it. Close the cover firmly.
- Page 110 User's Guide Maintenance Important: ❏ Make sure the pick up cover is closed correctly. ❏ Make sure the pickup rollers are installed correctly if the cover is hard to close. ❏ Do not install the cover while it is raised. 8.
-
Page 111: Resetting The Number Of Scans
Dispose of the pickup roller and the separation roller following the rules and regulations of your local authority. Do not disassemble them. Related Information “Roller Assembly Kit Codes” on page 20 & Resetting the Number of Scans Reset the number of scans using the control panel or Epson Scan 2 Utility after replacing the Roller Assembly Kit. -
Page 112: Resetting The Number Of Scans On The Control Panel
❏ Windows 7/Windows Vista/Windows XP/Windows Server 2008 R2/Windows Server 2008/Windows Server 2003 R2/Windows Server 2003 Click the start button, and then select All Programs (or Programs) > EPSON > Epson Scan 2 > Epson Scan 2 Utility. ❏ Mac OS Select Go >... -
Page 113: Energy Saving
User's Guide Maintenance 4. Click Reset for the roller assembly kit. Energy Saving You can save energy by using sleep mode or auto power off mode when no operations are performed by the scanner. You can set the time period before the scanner enters sleep mode and turns off automatically. Any increase will affect the product’s energy efficiency. -
Page 114: Updating Applications And Firmware
User's Guide Maintenance 3. Remove the cables and the devices. 4. Close the input tray extension and output tray. Important: Make sure you close the output tray securely; otherwise it may be damaged during transport. 5. Remove the input tray. 6. - Page 115 Select Go > Applications > Epson Software > EPSON Software Updater. Note: If you cannot find the application you want to update in the list, you cannot update using the EPSON Software Updater. Check for the latest versions of the applications on your local Epson website.
-
Page 116: Solving Problems
Follow the steps below to try to update the firmware again. 1. Connect the computer and the scanner with a USB cable. 2. Visit your local Epson website for further instructions. Related Information “Updating Applications and Firmware” on page 114 &... -
Page 117: Problems Starting Scanning
❏ Epson Event Manager If the applications are not installed, install them again. ❏ Document Capture Pro does not support Windows Vista, Windows XP, and Windows Server. Use Epson Scan 2 instead. ❏ Check the correct setting is assigned to the scanner button in Document Capture Pro (Windows) or Document Capture (Mac OS). -
Page 118: Paper Feeding Problems
❏ Use Automatic Feeding Mode in Epson Scan 2, and scan originals one by one. When you are using Document Capture Pro, you can open the Epson Scan 2 window by pressing the Detailed Settings button on the Scan Settings screen. -
Page 119: The Original Jams In The Scanner Frequently
User's Guide Solving Problems 3. Carefully remove any originals remaining inside the scanner. 4. If you cannot pull originals straight up, carefully pull out any jammed originals from the output tray in the direction of the arrow. Important: Make sure there is no paper inside the scanner. 5. -
Page 120: Paper Protection Does Not Work Correctly
User's Guide Solving Problems ❏ If the ejected originals get stuck in the output tray, store the output tray and do not use it. Related Information “Cleaning Inside the Scanner” on page 102 & Paper Protection Does not Work Correctly Depending on the original and the level you set, this feature may not work correctly. -
Page 121: Scanned Image Problems
Select Settings on the home screen > Scanner Settings > Detect Glass Dirt, and then select On-Low or On- High. When an alert is displayed, clean the glass surfaces inside your scanner using a genuine Epson cleaning kit or a soft cloth. -
Page 122: Expanding Or Contracting The Scanned Image
❏ Windows 7/Windows Vista/Windows XP/Windows Server 2008 R2/Windows Server 2008/Windows Server 2003 R2/Windows Server 2003 Click the start button, and then select All Programs or Programs > EPSON > Epson Scan 2 > Epson Scan 2 Utility. 2. Select the Adjustments tab. -
Page 123: Scanned Image Or Text Is Blurred
If the original is a printed document, moiré patterns (web-like shadows) may appear in the scanned image. ❏ Check that Descreening is selected in the Epson Scan 2 window. When you are using Document Capture Pro, you can open the window by pressing the Detailed Settings button on the Scan Settings screen. -
Page 124: The Edge Of The Original Is Not Scanned When Automatically Detecting The Size Of The Original
Note: If the size of the original you want to scan is not on the list, create the size manually in the Epson Scan 2 window. When you are using Document Capture Pro, you can open the window by pressing the Detailed Settings button on the Scan Settings screen. -
Page 125: Uninstalling And Installing Applications
❏ Windows 7/Windows Vista/Windows XP/Windows Server 2008 R2/Windows Server 2008/Windows Server 2003 R2/Windows Server 2003 Click the start button, and then select All Programs or Programs > EPSON > Epson Scan 2 > Epson Scan 2 Utility. ❏ Mac OS Select Go >... - Page 126 6. Select the application you want to uninstall, and then click Uninstall. Important: The Uninstaller removes all drivers for Epson scanners on the computer. If you use multiple Epson scanners and you only want to delete some of the drivers, delete all of them first, and then install the necessary scanner...
-
Page 127: Installing Your Applications
If you cannot find the application you want to uninstall in the application list, you cannot uninstall using the Uninstaller. In this situation, select Go > Applications > Epson Software, select the application you want to uninstall, and then drag it to the trash icon. -
Page 128: Technical Specifications
User's Guide Technical Specifications Technical Specifications General Scanner Specifications Note: Specifications are subject to change without notice. Scanner type Sheet Feed, one pass duplex color scanner Photoelectric device Effective pixels 5,100×9,300 at 600 dpi 2,550×64,500 at 300 dpi Light source RGB LED Scanning resolution 600 dpi (main scan) -
Page 129: Dimensions And Weight Specifications
Scanner Electrical Specifications Rated DC Input Power Supply Voltage DC 24 V Rated DC Input Current Power Consumption DS-870: ❏ Operating: Approx. 18 W ❏ Ready mode: Approx. 8.5 W ❏ Sleep mode: Approx. 1.4 W ❏ Power off: Approx. 0.1 W DS-970: ❏... -
Page 130: Environmental Specifications
User's Guide Technical Specifications Rated Output Current Environmental Specifications Temperature When operating 5 to 35 °C (41 to 95 °F) When stored –25 to 60 °C (–13 to 140 °F) Humidity When operating 15 to 80% (without condensation) When stored 15 to 85% (without condensation) Operating conditions Ordinary office or home conditions. - Page 131 User's Guide Technical Specifications Fast User Switching on Mac OS or later is not supported. The UNIX File System (UFS) for Mac OS is not supported.
-
Page 132: Standards And Approvals
The following models are CE marked and in compliance with all the applicable EU Directives. For further details, visit the following website to access the full declaration of conformities containing reference to the Directives and harmonized standards used to declare conformity. http://www.epson.eu/conformity J381D A471H, A472E Flatbed Scanner Dock option The following model is CE marked and in compliance with all the applicable EU Directives. -
Page 133: Where To Get Help
Depending on the product, the dial list data for fax and/or network settings may be stored in the product’s memory. Due to breakdown or repair of a product, data and/or settings may be lost. Epson shall not be responsible for the loss of any data, for backing up or recovering data and/or settings even during a warranty period. -
Page 134: Help For Users In Taiwan
Epson Helpdesk Phone: 1300-361-054 Epson Helpdesk is provided as a final backup to make sure our clients have access to advice. Operators on the Helpdesk can aid you in installing, configuring and operating your Epson product. Our Pre-sales Helpdesk staff can provide literature on new Epson products and advise where the nearest dealer or service agent is located. -
Page 135: Help For Users In Singapore
User's Guide Where to Get Help Help for Users in Singapore Sources of information, support, and services available from Epson Singapore are: World Wide Web http://www.epson.com.sg Information on product specifications, drivers for download, Frequently Asked Questions (FAQ), Sales Enquiries, and Technical Support via e-mail are available. -
Page 136: Help For Users In Indonesia
Epson Hotline Phone: +62-1500-766 Fax: +62-21-808-66-799 Our Hotline team can help you with the following over the phone or fax: ❏ Sales enquiries and product information ❏ Technical support Epson Service Center Province Company Name Address Phone E-mail DKI JAKARTA ESS JAKARTA Ruko Mall Mangga Dua No. -
Page 137: Help For Users In Hong Kong
To obtain technical support as well as other after-sales services, users are welcome to contact Epson Hong Kong Limited. Internet Home Page http://www.epson.com.hk Epson Hong Kong has established a local home page in both Chinese and English on the Internet to provide users with the following information: ❏ Product information ❏ Answers to Frequently Asked Questions (FAQs) -
Page 138: Help For Users In Malaysia
World Wide Web http://www.epson.com.my ❏ Information on product specifications, drivers for download ❏ Frequently Asked Questions (FAQ), Sales Enquiries, questions through e-mail Epson Call Centre Phone: +60 1800-8-17349 ❏ Sales enquiries and product information ❏ Product usage questions or problems ❏... -
Page 139: Help For Users In The Philippines
Where to Get Help Help for Users in the Philippines To obtain technical support as well as other after sales services, users are welcome to contact the Epson Philippines Corporation at the telephone, fax numbers and e-mail address below: World Wide Web http://www.epson.com.ph...
Need help?
Do you have a question about the DS-870 and is the answer not in the manual?
Questions and answers