Advertisement
SMD Rework Station
Instruction Manual
Thank you for purchasing the HAKKO FR-810B SMD Rework Station.
This unit features digital control and display of hot air temperature.
Please read this manual before operating the HAKKO FR-810B.
Keep this manual readily accessible for reference.
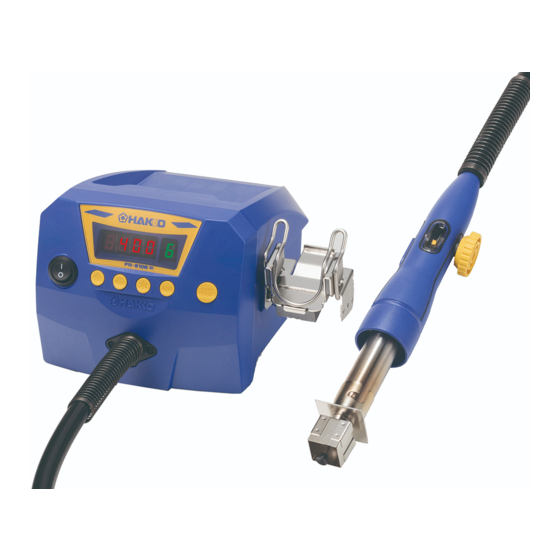
1. PACKING LIST AND PART NAMES
HAKKO FR-810B station
Power cord
1
Handpiece holder
Vacuum pipe control knob (L) (with Tapping screw)
1
Pads (ø3 mm (0.12 in.), ø5 mm (0.20 in.), ø7.6 mm (0.3 in.))
Nozzle N51-02 (ø4)
2 each
Heat resistant pad
Instruction manual
1
Temperature distribution chart
HAKKO
handpiece holder
attachment plate
FR-810B
station
Handpiece holder
2 for each pad
Temp/Time indicator
Air indicator
Handpiece
● Handpiece
S (START/STOP)
V (VACUUM)
button
button
③Sensor (internal)
①Pad
This sensor detects the
The pad absorbs parts.
temperature of the hot air.
②Vacuum pipe
④Vacuum pipe control knob
The pad is mounted on the
Nozzle
This knob controls the length
tip of the vacuum pipe.
(not included)
of the vacuum pipe.
⑤Pick-up indicator
The movement of the vacuum pipe can be checked here.
2. SPECIFICATIONS
● Station
Power consumption
100V-700W 110V-840W 120V-820W
Power consumption
220V-1100W 230V-1200W 240V-1300W
Capacity (Airflow)
● Handpiece
Control temperature
Power consumption
100V-670W 110V-810W 120V-790W
Outer dimensions
220V-1070W 230V-1170W 240V-1270W
250 mm (9.8 in.)
Total length (w/o cord)
Weight
180 g (0.40 lb.)
Weight (w/o cord)
* Airflow capacity is rated as free flowing. Restrictions
* This product is protected against electrostatic discharge.
created by various nozzles may reduce the maximum
airflow capacity.
* Specifications and design are subject to change without
notice.
CAUTION
This product includes such features as electrically conductive plastic parts and grounding of the handpiece and
station as measures to protect the device to be soldered from the effects of static electricity. Be sure to observe
the following instructions:
1. The handle and other plastic parts are not insulators, they are conductors. When replacing parts or repairing,
take sufficient care not to expose live electrical parts or damage insulation materials.
2. Be sure to ground the unit during use.
3. WARNINGS, CAUTIONS AND NOTES
Warnings, cautions and notes are placed at critical points in this manual to direct the operator's
attention to significant items. They are defined as follows:
WARNING: Failure to comply with a WARNING may result in serious injury or death.
CAUTION : Failure to comply with a CAUTION may result in injury to the operator, or damage to the
items involved.
NOTE : A NOTE indicates a procedure or point that is important to the process being described.
To avoid damage to the unit, do not turn the power switch OFF until the pump stops automatically by
cooling down after use and
When powered, the temperature of the hot air and the nozzle will become extremely hot, reaching
a maximum temperature of 600℃ (1120℉). Be sure of the following to avoid possible burns / fires :
Do not direct the hot air toward personnel or touch the metal parts near the nozzle.
Do not allow the nozzle to come close to, or touch, flammable materials.
Inform others in the area that the unit is hot and should not be touched.
Please check to make sure that all items
Turn the power off and allow the unit to cool when changing parts or storing the HAKKO FR-810B.
listed below are included in the package.
The unit is for a counter or workbench use only.
This appliance can be used by children aged from 8 years and
1
1
above and persons with reduced physical, sensory or mental
1
capabilities or lack of experience and knowledge if they have
1
1
been given supervision or instruction concerning use of the
appliance in safe way and understand the hazards involved.
Heat resistant pad
Children shall not play with the appliance.
Cleaning and user maintenance shall not be made by
Nozzle
children without supervision.
To prevent accidents or damage to the HAKKO FR-810B, be sure to observe the following:
Power cord
● Turn the power off when not in use, or left unattended.
Tapping
● Do not strike the handpiece against hard surfaces or otherwise subject it to physical shock.
screw
● Be sure the unit is grounded. Always connect power to a grounded receptacle.
● Do not modify the unit.
● Use only genuine HAKKO replacement parts.
Vacuum pipe
● Do not allow the HAKKO FR-810B to become wet, or use it when hands are wet.
● Remove the power cord by holding the plug - not the cord.
control knob (L)
● Be sure the work area is well ventilated.
4. INITIAL SETUP
● Controls and displays
30 W
1 - 9 (5 - 115L/min*)
50 - 600℃ (120 - 1120℉)
160(W) × 145(H) × 220(D) mm
A. Station assembly
(6.3 × 5.7 × 8.7 in.)
● Attach the handpiece holder.
1.5 kg (3.3 lb.)
1. Turn and loosen the knob that locks the handpiece holder.
2. Slide the handpiece holder along the groove on the station in the direction of
the arrow. Turn the knob to lock the handpiece holder in place.
B. Handpiece
The nozzle and pad will be heated at high temperature. Cool them before replacement.
NOTE:
The handpiece can be used with the provided vacuum
pipe control knob (L).
WARNING
appears on the display.
CAUTION
The front panel of HAKKO FR-810B includes five operation buttons.
- Used to start or stop the station.
•Pressing this button when the forced cool down bypass is
enabled will turn the airflow off and stop the cooling process.
- Used for changing values.
•Pressing this button when using Preset Mode will cause the
preset selection screen to appear.
- Used for changing values.
•Hold this button for at least two seconds to enter the Offset
Mode.
- Used for finalizing entered values and checking settings.
•Hold this button for at least two seconds to display the
temp/timer screen.
- Used to set air flow.
•When setting the airflow, you may press or to
finalize your airflow setting value.
* The handpiece holder can be attached to either side of
the station by removing the handpiece holder attachment
plate and attaching it to the opposite side of the handpiece
holder.
CAUTION
4. INITIAL SETUP
● Using vacuum function operative nozzle
1. Attach the nozzle.
a. Extend the vacuum pipe using the vacuum pipe control knob.
b. Pass the vacuum pipe through the nozzle hole and attach the nozzle.
CAUTION
● Vacuum pipe
Do not use excessive force. When not using a nozzle,
retract the vacuum pipe to the shortest length.
2. Attach the pad.
a. Attach the pad.
b. Adjust the pad to an appropriate position.
Adjust the vacuum pipe so that the pipe and pad protrude as little as possible.
CAUTION
● Pad
The pad does not last indefinitely. When it becomes deteriorated, replace it. Since exposure to
high temperatures causes it to deteriorate faster, Hakko recommends it be cooled after use.
● Using vacuum function inoperative nozzle {N51-01(G), N51-05(G)}
a. Retract the vacuum pipe to the shortest length using the vacuum pipe
control knob.
←A
CAUTION
The new N51-01/N51-05 nozzle has a pipe
guard inside. These nozzles could not be
attached to HAKKO FR-810B when the vacuum
pipe is extended. Do not use excessive force.
Pipe guard
b. Tighten the nozzle mounting screw.
CAUTION
When "G" is not marked on the nozzle, these nozzles do not
have space to blow hot air. using them with the HAKKO FR-810B
may result in danger.
● How to Use a old nozzle
Align the
, attach the old nozzle to the heater pipe.
projection part
Screwing position
Projection part
Projection part
→
Projection part(high)
Projection part
There are two projection with
different heights. Align the
nozzle
screwing position
with
the higher projection part of
the pipe.
CAUTION
Projection part(low)
When attached in the wrong direction,
※When using the QFP nozzle, remove the
the nozzle could not be fully inserted
inside screw (M3 × 5) of the nozzle.
and can cause air leakage.
M3×5
Make sure to attach the nozzle in the
correct direction.
QFP nozzle
CAUTION
● Vacuum function inoperative nozzles. (Old nozzle)
A1124B, A1130, A1131, A1132, A1133, A1134, A1142B, A1183, A1190, A1191, A1192, A1325
These nozzles could not be attached to HAKKO FR-810B when the vacuum pipe is extended.
Do not use excessive force.
A1124, A1142
Do not use these nozzles with HAKKO FR-810B. These nozzles do not have space to blow hot air,
using them with the HAKKO FR-810B may result in danger.
The rim of the
C. Electrical connection and power ON
handpiece must
rest on the area
1. Insert the power cord into the receptacle on
circled in the
the rear panel of the station.
illustration.
2. Place the handpiece on the holder.
CAUTION
3. Plug the other end of the power cord into
When not in use, place the handpiece on the holder.
a grounded wall socket.
CAUTION
4. Turn the power switch ON.
This product is protected against electrostatic
discharge. Be sure the unit is grounded.
5. OPERATION
● Air Blow
1. Start
Press the "S" button on the handpiece or
(START/STOP) button on the station to start blowing air. Hot
air blows out of the tip of the nozzle. Hot air temperature is controlled according to the temperature setting.
2. Stop
Press the "S" or
button again. Power to the heater is shut off and cooling begins. When the
temperature falls to 100°C (200°F), or after 1.5 minutes of cooling, air blow is automatically stopped. The
display will show
indicating that the station is ready to start again.
A
NOTE:
Letter G is marked on the
nozzle with the pipe guard.
Advertisement
Table of Contents

Related Manuals for Hakko Electronics FR-810B


Summary of Contents for Hakko Electronics FR-810B
- Page 1 Please check to make sure that all items Turn the power off and allow the unit to cool when changing parts or storing the HAKKO FR-810B. The pad does not last indefinitely. When it becomes deteriorated, replace it. Since exposure to listed below are included in the package.
- Page 2 The document on the portal will contain Pressing the START/STOP (HOT AIR) button in this state will not turn on the station. If the handpiece is In addition to the procedure described remove above, HAKKO FR-810B includes a preset mode allowing the information on troubleshooting and placed in the holder while it is blowing hot air, start of automatic cooling is forced before the stop of operation.
Need help?
Do you have a question about the FR-810B and is the answer not in the manual?
Questions and answers