
Subscribe to Our Youtube Channel
Related Manuals for Edwards XDD 1 115/230 V


Summary of Contents for Edwards XDD 1 115/230 V
- Page 1 A746-02-885 Issue A Original Instruction Manual XDD 1 MKII/115/230 V and 24 V DC Diaphragm Pumps Description Item Number XDD 1 115/230 V A746-02-983 XDD 1 24 V A746-02-991...
- Page 2 Declaration of Conformity Edwards, Innovation Drive, Burgess Hill, West Sussex, RH15 9TW, UK declare under our sole responsibility, as manufacturer and person within the EU authorised to assemble the technical file, that the product(s) XDD1 AC Diaphragm Pump A746-02-983 * ...
-
Page 3: Table Of Contents
Spares and accessories ................. 33 List of spare parts ......................33 For return of equipment, complete the HS Forms at the end of this manual. © Edwards Limited 2010. All rights reserved. Page i Edwards and the Edwards logo are trademarks of Edwards Limited. - Page 4 Logic interface connector pins ..................12 Troubleshooting ......................29 Spare parts ....................... 33 Trademark credits ® Viton is trademark of DuPont Dow Elastomers L.L.C. Page ii © Edwards Limited 2010. All rights reserved. Edwards and the Edwards logo are trademarks of Edwards Limited.
-
Page 5: Introduction
Make sure that the individual components are only connected, combined and operated according to their design and as indicated in the instructions for use. © Edwards Limited 2010. All rights reserved. Page 1 Edwards and the Edwards logo are trademarks of Edwards Limited. - Page 6 Obey applicable regulations when disposing of chemicals. Take into consideration that chemicals may be polluted. Page 2 © Edwards Limited 2010. All rights reserved. Edwards and the Edwards logo are trademarks of Edwards Limited.
- Page 7 Use only genuine spare parts and accessories. Otherwise safety and performance of the equipment as well as the electromagnetic compatibility of the equipment might be reduced. © Edwards Limited 2010. All rights reserved. Page 3 Edwards and the Edwards logo are trademarks of Edwards Limited.
-
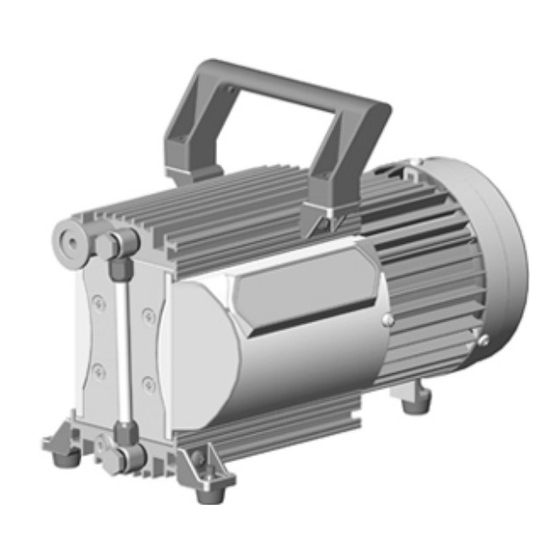
Page 8: General View Of Xdd 1 With Dual-Voltage Motor
6. Mains switch 2. Inlet (small flange) NW16 7. Mains input 3. Pump feet (adjustable) 8. Outlet (silencer) 4. Voltage selector switch Page 4 © Edwards Limited 2010. All rights reserved. Edwards and the Edwards logo are trademarks of Edwards Limited. -
Page 9: General View Of Xdd 1 24 V Dc
2. Inlet (small flange) NW 16 3. Male 15 pin D-connector 4. Outlet (silencer) at lower side 5. Screw to secure cover © Edwards Limited 2010. All rights reserved. Page 5 Edwards and the Edwards logo are trademarks of Edwards Limited. - Page 10 A746-02-885 Issue A This page has been intentionally left blank. Page 6 © Edwards Limited 2010. All rights reserved. Edwards and the Edwards logo are trademarks of Edwards Limited.
-
Page 11: Technical Data
30 to 85 operation (no condensation) Maximum operating altitude 2000 IEC rated pollution degree Sound level Area of use Indoor use only © Edwards Limited 2010. All rights reserved. Page 7 Edwards and the Edwards logo are trademarks of Edwards Limited. -
Page 12: Diaphragm Clamping Disc
PTFE -FPM (e.g. Viton ) sandwich Inlet (small flange) Stainless steel Outlet (silencer) Aluminium / silicon caoutchouc Hose Fitting Aluminium anodized Page 8 © Edwards Limited 2010. All rights reserved. Edwards and the Edwards logo are trademarks of Edwards Limited. -
Page 13: Dimensional Drawing Xdd 1 (Dual-Voltage Motor)
A746-02-885 Issue A Figure 3 - Dimensional drawing XDD 1 (dual-voltage motor) © Edwards Limited 2010. All rights reserved. Page 9 Edwards and the Edwards logo are trademarks of Edwards Limited. -
Page 14: Dimensional Drawing Xdd 1 24 V Dc
A746-02-885 Issue A Figure 4 - Dimensional drawing XDD 1 24 V DC Page 10 © Edwards Limited 2010. All rights reserved. Edwards and the Edwards logo are trademarks of Edwards Limited. -
Page 15: Installation
It must be connected to a suitably fused and protected electrical supply and suitable earth point. For electrical data refer to Table © Edwards Limited 2010. All rights reserved. Page 11 Edwards and the Edwards logo are trademarks of Edwards Limited. -
Page 16: Xdd1 24 V Dc
Electrical supply: 0 V Use all pins for connection! 1, 6, 11 Electrical supply 24 V Use all pins for connection! Page 12 © Edwards Limited 2010. All rights reserved. Edwards and the Edwards logo are trademarks of Edwards Limited. -
Page 17: Configure The Xdd1 24V Dc Internal Speed Setting
0.5 V to 10 V : Linear increase of the motor speed (~100 rpm to 2200 rpm) Note: Pump runs smoothly only at speeds > 200 rpm ( > ~0.9 V). © Edwards Limited 2010. All rights reserved. Page 13 Edwards and the Edwards logo are trademarks of Edwards Limited. -
Page 18: Notes Regarding The Motor Speed
Operating the pump at low motor speeds increases the ultimate vacuum performance, this will also increase the lifetime of the diaphragm and valves. Page 14 © Edwards Limited 2010. All rights reserved. Edwards and the Edwards logo are trademarks of Edwards Limited. -
Page 19: Use And Operation
The motor is protected by a temperature sensor at the circuit board (current limitation if the temperature at the circuit board is higher than 70°C). © Edwards Limited 2010. All rights reserved. Page 15 Edwards and the Edwards logo are trademarks of Edwards Limited. -
Page 20: Shutdown
Separate pump from the apparatus. Close inlet and outlet port (e. g. with transport caps). Store the pump in dry conditions. Page 16 © Edwards Limited 2010. All rights reserved. Edwards and the Edwards logo are trademarks of Edwards Limited. -
Page 21: Maintenance
In order to comply with law (occupational, health and safety regulations, safety at work law and regulations for environmental protection) vacuum pumps, components and measuring instruments returned to the manufacturer can be repaired only when certain procedures (see section Return of Edwards Equipment - Procedure (Forms HS 1 and HS 2) are followed. - Page 22 For cleaning or removing deposits of the valves and diaphragms, use a suitable solvent. The use of any solvents must be used in accordance with your local health and safety regulations. Page 18 © Edwards Limited 2010. All rights reserved. Edwards and the Edwards logo are trademarks of Edwards Limited.
-
Page 23: View Of The Disassembled Pump Head Parts
8. Diaphragm clamping disc with connecting screw 3. Bearing flange 9. Head cover 4. Housing 10. Valve 5. Rod 11. VS seal 6. Diaphragm support disc © Edwards Limited 2010. All rights reserved. Page 19 Edwards and the Edwards logo are trademarks of Edwards Limited. -
Page 24: Cleaning And Inspecting The Pump Heads
Use open-ended wrench to remove fitting at the pump head and remove together with connecting hose. Note: Do not remove bearing flange (1). Figure 10 - Remove the fitting at the pump head 1. Bearing flange Page 20 © Edwards Limited 2010. All rights reserved. Edwards and the Edwards logo are trademarks of Edwards Limited. -
Page 25: Remove The Handle
Use hex key to remove six socket head screws from pump head and remove upper housing (housing cover and head cover). Figure 12 - Remove the housing cover and head cover © Edwards Limited 2010. All rights reserved. Page 21 Edwards and the Edwards logo are trademarks of Edwards Limited. -
Page 26: Replacing The Diaphragm
5. If the old diaphragm is difficult to separate from the support disc, immerse the assembly in a suitable solvent in order to aid separation of the two parts. Page 22 © Edwards Limited 2010. All rights reserved. Edwards and the Edwards logo are trademarks of Edwards Limited. -
Page 27: Lift The Diaphragm
8. Smaller number of washers: The pump will not attain final vacuum. More washers: Clamping disc will hit head cover; noise or even blockage of the pump. © Edwards Limited 2010. All rights reserved. Page 23 Edwards and the Edwards logo are trademarks of Edwards Limited. -
Page 28: Assembling Pump Heads
Figure 17 - Assemble the diaphragm assembly to the connecting rod 4. Bring diaphragm into a position in which diaphragm is in contact with housing and centred with respect to bore. Page 24 © Edwards Limited 2010. All rights reserved. Edwards and the Edwards logo are trademarks of Edwards Limited. -
Page 29: Position The Diaphragm
Figure 19 - Assemble the head cover and valves CAUTION Obey position and orientation of the head covers and the valves definitely. © Edwards Limited 2010. All rights reserved. Page 25 Edwards and the Edwards logo are trademarks of Edwards Limited. -
Page 30: Scheme Pump Head With Head Covers
8. Screw in six socket head screws fixing housing cover crosswise first slightly, then tighten. Note: Do not tighten until head cover is in contact with housing, max. torque 6 Nm. Page 26 © Edwards Limited 2010. All rights reserved. Edwards and the Edwards logo are trademarks of Edwards Limited. -
Page 31: Position The Housing Cover
Figure 23 - Assemble the handle © Edwards Limited 2010. All rights reserved. Page 27 Edwards and the Edwards logo are trademarks of Edwards Limited. -
Page 32: Assembling Fittings
If pump does not achieve the ultimate total pressure: Check hose connectors between pump heads and manifolds for leaks. If necessary recheck pump chamber. Page 28 © Edwards Limited 2010. All rights reserved. Edwards and the Edwards logo are trademarks of Edwards Limited. -
Page 33: Troubleshooting
Diaphragm clamping disc Perform maintenance. loose? None of above mentioned Contact your supplier. causes? Pump seized. Contact your supplier. © Edwards Limited 2010. All rights reserved. Page 29 Edwards and the Edwards logo are trademarks of Edwards Limited. - Page 34 A746-02-885 Issue A This page has been intentionally left blank. Page 30 © Edwards Limited 2010. All rights reserved. Edwards and the Edwards logo are trademarks of Edwards Limited.
-
Page 35: Storage And Disposal
Particular care must be taken with components which have been contaminated with dangerous process substances. Do not incinerate fluoroelastomer seals and O-rings. © Edwards Limited 2010. All rights reserved. Page 31 Edwards and the Edwards logo are trademarks of Edwards Limited. - Page 36 A746-02-885 Issue A This page has been intentionally left blank. Page 32 © Edwards Limited 2010. All rights reserved. Edwards and the Edwards logo are trademarks of Edwards Limited.
-
Page 37: Spares And Accessories
Fan cover white, XDD 1, 115/230 V, 50/60 Hz A746-01-704 Motor cover white, XDD 1, 24 V DC A746-01-705 Anti-vibration mount © Edwards Limited 2010. All rights reserved. Page 33 Edwards and the Edwards logo are trademarks of Edwards Limited. - Page 38 A746-02-885 Issue A This page has been intentionally left blank. Page 34 © Edwards Limited 2010. All rights reserved. Edwards and the Edwards logo are trademarks of Edwards Limited.
Need help?
Do you have a question about the XDD 1 115/230 V and is the answer not in the manual?
Questions and answers